
-
Loadrunner Licese 支持6.5万用户 global类型 AEACFSJI-YJKJKJJKEJIJD-BCLBR
2012-09-24 16:26:38
Loadrunner Licese 支持6.5万用户 global类型
AEACFSJI-YJKJKJJKEJIJD-BCLBR
http://www.51testing.com/?uid-116228-action-viewspace-itemid-238362
-
Loadrunner Response time in controller and analysis 不一致
2011-12-01 18:46:48
在分析性能测试结果时,有时会发现controller 中的average response time 和 analysis transaction summary中的 response time不一致。
可能原因有2:
1. 在controller中运行场景时,选择了replay thinking time.在analysis transaction summary中默认是ignore thinking time的。
Solution: controller->run time setting->think time-> ignore think time.
2. controller 中的采样时间间隔和analysis中的采样时间间隔不一致。
查看controller的采样时间间隔:right click graphc->configure->refresh rate (sec)
查看analysis的采样时间间隔:analysis->view->set granularity
solution: 将analysis的采样时间设置为controller一致
over!!
转自:
http://blog.sina.com.cn/s/blog_43ac2b030100vx16.html
你会发现还不一样,见讨论帖:
http://bbs.51testing.com/viewthread.php?tid=75250&extra=&page=1
关键词:
1. 图表刷新频率或者说数据展现/采样频率:
controller:默认5s,analysis:默认4s。
2. 待选集合,总体:不详
3. 被采集到的样本,即被用来计算数值的
controller, analysis :是否全部? ; Diagnostics:只选取部分Vuser
4.计算方法
-
web_url/ web_submit_data / web_submit_form / web_custom_request 几个函数区别
2011-11-10 15:10:21
web_submit_data
/
web_submit_form
/
web_custom_request
三个函数的差别;
web_url
The web_url function is an action function that loads the Web page (GET request) specified by the URL argument. The web_url function does not require a context.
web_url is recorded only when VuGen is in either URL–based recording mode, or in HTML–based recording mode with the A script. containing explicit URLs only option checked (see VuGen's Recording Options).
You can use web_url to simulate the download of a file from an FTP server. The web_url function causes the server to perform. the same tasks as if a file were actually being downloaded. The download is done in binary mode, unless "FtpAscii=1" is specified.
Examples of non–HTML–generated resources are .gif and .jpg images. The List of Resource Attributes is only inserted when the recording option for these resources is set at Record within the current script. step. This is the default setting. Refer to the Creating Vuser Scripts guide.
The HTTP header can be modified to pass additional information about the request to the server. Using HTTP headers you can, for example, allow other content types in the response such as compressed files, or you can request a Web page only on certain conditions. To modify the HTTP header in the request, see web_add_header. To modify all subsequent requests, see web_add_auto_header.
This function is supported for all Web scripts, and for WAP scripts running in HTTP mode or Wireless Session Protocol (WSP) replay mode.
Example: web_url
Example 1 – Send an HTTP GET request to ABC's home page
web_url("www.abc.com",
"URL=http://www.abc.com/",
"TargetFrame=",
"TargetBrowser=Mercury Technologies",
"Resource=0",
"RecContentType=text/html",
"Snapshot=t1.inf",
"Mode=HTML",
LAST);
Example 2 – Send a HTTP request with a referrer page
web_url("Hit the Slopes and Save",
"URL=http://www.saleserver.com/American?BV_EngineID=
..fm_ski_sale_fall00guest.html",
"TargetFrame=Main",
"Resource=0",
"RecContentType=text/html",
"Referer=http://www.saleserver.com/American?BV_Operation=
Dyn_Frame&..main–guest.tmpl",
"Snapshot=t3.inf",
"Mode=HTML",
LAST);
Example 3– Download a game
web_url("Games",
"URL=ftp://joe:secret@mygames.com/games/archive/loderunner.exe",
"FtpAscii=1",
LAST);
Example 4– Login to Secure Site
web_url("Login",
"URL=https://secure.computing.com/scripts/login.asp?
user=(username)&session={ssid}",
"RecContentType=text/html", //Expected content–type
========================================================================================================================================================================================
web_submit_data
Performs an "unconditional" or "contextless" form. submission.
The web_submit_data function is an action function that performs an "unconditional" or "contextless" form. submission. It allows you to generate GET and POST requests as made by the HTML forms. You don't need to have a form. context to execute this request.
web_submit_data is recorded only when VuGen is in either the URL–based recording mode, or in the HTML–based recording mode with the A script. containing explicit URLs only option checked (see VuGen's Recording Options).
The method indicates how the data of the form. is sent to the server, whether as a query within the URL (GET), or as a request body (POST).
This function is generated when VuGen is set to record a Web session in HTTP (all requests from the server) recording mode. VuGen also records a web_submit_data statement whenever a form. is submitted and it is unable to generate a web_submit_form. statement.
Examples of non–HTML–generated resources are .gif and .jpg images. The List of Resource Attributes is only inserted when the recording option for these resources is set at Record within the current script. step. This is the default setting. Refer to the Creating Vuser Scripts guide.
In Java calls to lrapi.web.submit_data the list of attributes, including hidden fields, is part of the options array. The list of data and the list of resources are part of the data array.
The HTTP header can be modified to pass additional information about the request to the server. Using HTTP headers you can, for example, allow other content types in the response such as compressed files, or you can request a Web page only on certain conditions. To modify the HTTP header in the request see web_add_header, or to modify all subsequent requests see web_add_auto_header.
Example: web_submit_data
In the following example, the web_submit_data function submits a form. using the POST method:
web_submit_data("default.aspx",
"Action=http://lazarus/flightnet/default.aspx",
"Method=POST",
"TargetFrame=",
"RecContentType=text/html",
"Referer=http://lazarus/flightnet/",
"Snapshot=t7.inf",
"Mode=HTML",
ITEMDATA,
"Name=grpType", "Value=radRoundtrip", ENDITEM,
"Name=lstDepartingCity", "Value=DEN", ENDITEM,
"Name=lstDestinationCity", "Value=LAX", ENDITEM,
"Name=txtDepartureDate", "Value=8/19/2003", ENDITEM,
"Name=txtReturnDate", "Value=8/19/2003", ENDITEM,
"Name=txtQuantity", "Value=1", ENDITEM,
"Name=radClass", "Value=1", ENDITEM,
"Name=radSeat", "Value=1", ENDITEM,
"Name=btnAvailableFlights", "Value=Next >", ENDITEM,
LAST);
In the following example, the web_submit_data function submits two files using the POST method:
web_submit_data("Attachments",
"Action=http://barton.cottage@.Devonshire.uk/Attachments?YY=45434",
"Method=POST",
"EncType=multipart/form–data",
"TargetFrame=",
"RecContentType=text/html",
"Referer=http:///barton.cottage@.Devonshire.uk/Compose?YY=20435",
"Snapshot=t5.inf",
"Mode=HTML",
ITEMDATA,
"Name=userFile0",
"Value=E:\\sense_sensibility\\Elinor.txt",
"File=yes",
"ContentType=text/html", // Override default "text/plain" for .txt files
ENDITEM,
"Name=userFile1",
"Value=E:\\sense_sensibility\\Marianne.jpg",
"File=yes",
ENDITEM,
LAST);
========================================================================================================================================================================================
web_submit_form
Submits a form.
The web_submit_form. function is an action function that submits a form. The web_submit_form. function may be executed only in the context of a previous operation.
web_submit_form. is recorded only when VuGen is in HTML–based recording mode (see VuGen's Recording Options).
Examples of non–HTML–generated resources are .gif and .jpg images. The List of Resource Attributes is only inserted when the recording option for these resources is set at "Record within the current script. step". This is the default setting. Refer to the Creating Vuser Scripts guide.
When web_submit_form. is recorded, "name" and "value" are generally recorded for items in the ITEMDATA section. If you do not wish the recorded value to appear in the script, you can encrypt it. Change the word "Value" to "EncryptedValue", and substitute the encrypted value for the recorded value. For example:
Example 1
In the following example, the name of the web_submit_form. function is "employee.exe". The function submits a request for information about the employee John Green. The function has no attributes because the form. is uniquely identified by the item data.
web_submit_form("employee.exe",
ITEMDATA,
"name=persons", "value=John Green – John", ENDITEM,
"name=go_page", "value=Go to Page", ENDITEM,
LAST);
Example 2
In the following example, a user submitted a search in a company's library, for the book "Practical UNIX Security" by Garfinkel.
web_url("dogbert", "URL=http://dogbert/", LAST);
web_link("Departments:", "Text=Departments:", LAST);
web_url("index.html", "URL=http://dogbert/groups/library/index.html", LAST);
web_link("Book Search:", "Text= Book Search:", LAST);
web_submit_form("db2net.exe",
ITEMDATA,
"name=library.TITLE", "value=Practical UNIX Security", ENDITEM,
"name=library.AUTHOR_S_", "value=Garfinkel", ENDITEM,
"name=library.SUBJECTS", "value=", ENDITEM,
LAST);
========================================================================================================================================================================================
web_custom_request
Allows you to create a custom HTTP request with any method supported by HTTP.
The web_custom_request function is an action function that allows you to create a custom HTTP request using any method or body. By default, VuGen generates this function only for requests that could not be interpreted with other web functions.
To insert this function manually, use the Add Step dialog box. To specify an HTTP header to be sent before the custom request, add a web_add_header or web_add_auto_header function.
Attributes
URL – the URL (Uniform. Resource Locator) of the Web page to load.
Method – the form. submission method: POST or GET.
Body – the body of the request. See the Body Attribute section for a complete list of available options.
Raw Body – the body of the request is passed as a pointer to the data. See the Raw Body Attribute section.
BodyFilePath – The path to a file to be passed as the body of the request. BodyFilePath can not be used together with Body, or any Body Attribute or Raw Body Attribute: BodyBinary, BodyUnicode, RAW_BODY_START , or Binary=1.
Mode – the Recording Level: HTML or HTTP. Click here for more information.
Example: web_custom_request
In the following recorded script, the user began recording from http://lazarus/html/forms/file.html.
When the user submitted his request, VuGen inserted a web_add_header function, followed by a web_custom_request function.
web_url("file.html", "URL=http://lazarus/html/forms/file.html",
"TargetFrame=_TOP", LAST);
web_add_header("Content–Type",
"multipart/form–data; boundary=–––––––––––––––––––––––––––292742461228954");
web_custom_request("post_query.exe", "Method=POST",
"URL=http://lazarus/cgi–bin/post_query.exe",
"Body=–––––––––––––––––––––––––––––292742461228954\r\nContent–Disp"
"osition: form–data; name=\"entry\"\r\n\r\nText\r\n––––––––––"
"–––––––––––––––––––292742461228954\r\nContent–Disposition: f"
"–––––––––––292742461228954––\r\n",
"TargetFrame=",
LAST);
web_submit_data
Performs an "unconditional" or "contextless" form. submission.
The web_submit_data function is an action function that performs an "unconditional" or "contextless" form. submission.
It allows you to generate GET and POST requests as made by the HTML forms. You don't need to have a form. context to execute this request.
web_submit_data is recorded only when VuGen is in either the URL–based recording mode, or in the HTML–based recording mode with the A script. containing explicit URLs only option checked (see VuGen's Recording Options).
The method indicates how the data of the form. is sent to the server, whether as a query within the URL (GET), or as a request body (POST).
This function is generated when VuGen is set to record a Web session in HTTP (all requests from the server) recording mode. VuGen also records a web_submit_data statement whenever a form. is submitted and it is unable to generate a web_submit_form. statement.
Examples of non–HTML–generated resources are .gif and .jpg images. The List of Resource Attributes is only inserted when the recording option for these resources is set at Record within the current script. step. This is the default setting. Refer to the Creating Vuser Scripts guide.
In Java calls to lrapi.web.submit_data the list of attributes, including hidden fields, is part of the options array. The list of data and the list of resources are part of the data array.
The HTTP header can be modified to pass additional information about the request to the server. Using HTTP headers you can, for example, allow other content types in the response such as compressed files, or you can request a Web page only on certain conditions. To modify the HTTP header in the request see web_add_header, or to modify all subsequent requests see web_add_auto_header.
web_submit_form
Submits a form.
The web_submit_form. function is an action function that submits a form. The web_submit_form. function may be executed only in the context of a previous operation.
web_submit_form. is recorded only when VuGen is in HTML–based recording mode (see VuGen's Recording Options).
web_custom_request
Allows you to create a custom HTTP request with any method supported by HTTP.
============================================================================
web_get_int_property
Returns specific information about the previous HTTP request.
The web_get_int_property function returns specific information about the previous HTTP request.
The meaning of the return value depends on the HttpInfoType argument. HttpInfoType can be any of the following options. The first constant in each pair (HTTP_*) is for C, the second (object.HTTP_*) is for object oriented languages.
HTTP_INFO_RETURN_CODE or object.HTTP_INFO_RETURN_CODE
The return code in HTTP response header.
HTTP_INFO_DOWNLOAD_SIZE or object.HTTP_INFO_DOWNLOAD_SIZE
The size (in bytes) of the last download, including the header, body, and communications overhead (for example, NTLM negotiation).
HTTP_INFO_DOWNLOAD_TIME or object.HTTP_INFO_DOWNLOAD_TIME
The time in (milliseconds) of the last download.
HTTP_INFO_TOTAL_REQUEST_STAT or object.HTTP_INFO_TOTAL_REQUEST_STAT
Returns the accumulated size of all headers and bodies since the first time web_get_int_property was issued with HTTP_INFO_TOTAL_REQUEST_STAT.
HTTP_INFO_TOTAL_RESPONSE_STAT or object.HTTP_INFO_TOTAL_RESPONSE_STAT
Returns the accumulated size, including header and body, of all responses since the first time web_get_int_property was issued with HTTP_INFO_TOTAL_RESPONSE_STAT
This function is supported for all Web scripts, and for WAP scripts running in HTTP mode only. It is not supported for WAP scripts running in Wireless Session Protocol (WSP) replay mode.
Example: web_get_int_property
The following example uses the web_get_int_property function to check if the script. successfully accessed the my_home home page.
{
int HttpRetCode;
web_url("my_home",
"URL=http://my_home",
"TargetFrame=_TOP",
LAST);
HttpRetCode = web_get_int_property(HTTP_INFO_RETURN_CODE);
if (HttpRetCode == 200)
lr_log_message("The script. successfully accessed the My_home home page");
else
lr_log_message("The script. failed to access the My_home home page ");
}
Output:
HTTP_INFO_RETURN_CODE = 200
HTTP_INFO_DOWNLOAD_SIZE = 53685
HTTP_INFO_DOWNLOAD_TIME = 2204
The following example uses the web_get_int_property function to calculate the traffic in an action, and for a single step.
Action()
{
int initial_byte_request_ct, before_submit_request_ct, after_submit_request_ct, submit_byte_request_ct, final_request_ct;
int initial_byte_response_ct, before_submit_response_ct, after_submit_response_ct, submit_byte_response_ct, final_response_ct;
initial_byte_request_ct = web_get_int_property(HTTP_INFO_TOTAL_REQUEST_STAT);
initial_byte_response_ct = web_get_int_property(HTTP_INFO_TOTAL_RESPONSE_STAT);
web_submit_data("com.mercurytours.servlet.ReservationServlet",
"Action=http://newtours.mercuryinteractive.com/servlets/com.mercurytours.servlet.ReservationServlet?procSub=1&pg=1",
"Method=POST",
"RecContentType=text/html",
"Referer=http://newtours.mercuryinteractive.com/servlets/com.mercurytours.servlet.ReservationServlet",
"Snapshot=t7.inf",
"Mode=HTML",
ITEMDATA,
"Name=tripType", "Value=roundtrip", ENDITEM,
"Name=passCount", "Value=2", ENDITEM,
"Name=fromPort", "Value=San Francisco", ENDITEM,
"Name=fromMonth", "Value=12", ENDITEM,
"Name=fromDay", "Value=10", ENDITEM,
"Name=toPort", "Value=Acapulco", ENDITEM,
"Name=toMonth", "Value=12", ENDITEM,
"Name=toDay", "Value=14", ENDITEM,
"Name=servClass", "Value=Business", ENDITEM,
"Name=airline", "Value=Pangea Airlines", ENDITEM,
"Name=findFlights.x", "Value=63", ENDITEM,
"Name=findFlights.y", "Value=10", ENDITEM,
LAST);
before_submit_request_ct = web_get_int_property(HTTP_INFO_TOTAL_REQUEST_STAT);
before_submit_response_ct = web_get_int_property(HTTP_INFO_TOTAL_RESPONSE_STAT);
lr_message("Before Submit:Request = %d, Response = %d",
before_submit_request_ct,before_submit_response_ct);
/* Before Submit:Request = 1182, Response = 14177 */
web_submit_data("com.mercurytours.servlet.PurchaseServlet",
"Action=http://newtours.mercuryinteractive.com/servlets/com.mercurytours.servlet.PurchaseServlet",
"Method=POST",
"RecContentType=text/html",
"Referer=http://newtours.mercuryinteractive.com/servlets/com.mercurytours.servlet.ReservationServlet?procSub=1&pg=1",
"Snapshot=t9.inf",
"Mode=HTML",
ITEMDATA,
"Name=outFlight", "Value=Pangea Airlines$612$356$9:23$", ENDITEM,
"Name=inFlight", "Value=Pangea Airlines$162$364$16:43$", ENDITEM,
"Name=reserveFlights.x", "Value=61", ENDITEM,
"Name=reserveFlights.y", "Value=9", ENDITEM,
LAST);
after_submit_request_ct = web_get_int_property(HTTP_INFO_TOTAL_REQUEST_STAT);
submit_byte_request_ct = after_submit_request_ct - before_submit_request_ct ;
after_submit_response_ct = web_get_int_property(HTTP_INFO_TOTAL_RESPONSE_STAT);
submit_byte_response_ct = after_submit_response_ct - before_submit_response_ct ;
lr_message("After Submit:Request = %d, Response = %d",
after_submit_request_ct,after_submit_response_ct);
/* After Submit:Request = 2695, Response = 58681*/
lr_message("Submit Net traffic:Request = %d, Response = %d",
submit_byte_request_ct,submit_byte_response_ct);
/*Submit Net traffic:Request = 1513, Response = 44504 */
web_url("search_5",
"URL=http://toolbarqueries.google.com/search?client=navclient-auto&googleip=O;66.102.11.99;240&ie=UTF-8&oe=UTF-8&features=Rank:&q=info:http%3A%2F%2Fnewtours%2Emercuryinteractive%2Ecom%2Fservlets%2Fcom%2Emercurytours%2Eservlet%2EPurchaseServlet&ch=762475275111",
"Resource=0",
"RecContentType=text/html",
"Referer=",
"Snapshot=t10.inf",
"Mode=HTML",
LAST);
web_submit_data("com.mercurytours.servlet.PurchaseServlet_2",
"Action=http://newtours.mercuryinteractive.com/servlets/com.mercurytours.servlet.PurchaseServlet?procSub=1&pg=1",
"Method=POST",
"RecContentType=text/html",
"Referer=http://newtours.mercuryinteractive.com/servlets/com.mercurytours.servlet.PurchaseServlet",
"Snapshot=t22.inf",
"Mode=HTML",
ITEMDATA,
"Name=passFirst0", "Value=Fitzwilliam", ENDITEM,
"Name=passLast0", "Value=Darcy", ENDITEM,
"Name=pass.1.meal", "Value=VGML", ENDITEM,
"Name=passFirst1", "Value=Elizabeth", ENDITEM,
"Name=passLast1", "Value=Darcy", ENDITEM,
"Name=pass.1.meal", "Value=LCML", ENDITEM,
"Name=creditCard", "Value=CB", ENDITEM,
"Name=creditnumber", "Value=123456789", ENDITEM,
"Name=cc_exp_dt_mn", "Value=01", ENDITEM,
"Name=cc_exp_dt_yr", "Value=2008", ENDITEM,
"Name=cc_frst_name", "Value=Catherine", ENDITEM,
"Name=cc_mid_name", "Value=", ENDITEM,
"Name=cc_last_name", "Value=DeBourgh", ENDITEM,
"Name=ticketLess", "Value=checkbox", ENDITEM,
"Name=billAddress1", "Value=Rosings Park", ENDITEM,
"Name=billAddress2", "Value=", ENDITEM,
"Name=billCity", "Value=Lambton", ENDITEM,
"Name=billState", "Value=Derbyshire", ENDITEM,
"Name=billZip", "Value=94089", ENDITEM,
"Name=billCountry", "Value=214", ENDITEM,
"Name=ticketLess", "Value=checkbox", ENDITEM,
"Name=delAddress1", "Value=1325 Borregas Ave.", ENDITEM,
"Name=delAddress2", "Value=", ENDITEM,
"Name=delCity", "Value=Sunnyvale", ENDITEM,
"Name=delState", "Value=CA", ENDITEM,
"Name=delZip", "Value=94089", ENDITEM,
"Name=delCountry", "Value=215", ENDITEM,
"Name=buyFlights.x", "Value=51", ENDITEM,
"Name=buyFlights.y", "Value=15", ENDITEM,
LAST);
web_url("com.mercurytours.servlet.SignonServlet_2",
"URL=http://newtours.mercuryinteractive.com/servlets/com.mercurytours.servlet.SignonServlet",
"Resource=0",
"RecContentType=text/html",
"Referer=http://newtours.mercuryinteractive.com/servlets/com.mercurytours.servlet.PurchaseServlet?procSub=1&pg=1",
"Snapshot=t24.inf",
"Mode=HTML",
LAST);
web_url("search_6",
"URL=http://toolbarqueries.google.com/search?client=navclient-auto&googleip=O;216.239.59.99;701&ie=UTF-8&oe=UTF-8&features=Rank:&q=info:http%3A%2F%2Fnewtours%2Emercuryinteractive%2Ecom%2Fservlets%2Fcom%2Emercurytours%2Eservlet%2ESignonServlet&ch=722304523644",
"Resource=0",
"RecContentType=text/html",
"Referer=",
"Snapshot=t25.inf",
"Mode=HTML",
LAST);
final_request_ct = web_get_int_property(HTTP_INFO_TOTAL_REQUEST_STAT);
lr_message("REQUEST: Initial = %d, before submit = %d, after_submit = %d, submit size = %d, total = %d",
initial_byte_request_ct, before_submit_request_ct, after_submit_request_ct, submit_byte_request_ct, final_request_ct);
/*REQUEST: Initial = 0, before submit = 1182, after_submit = 2695, submit size = 1513, total = 7911 */
final_response_ct = web_get_int_property(HTTP_INFO_TOTAL_RESPONSE_STAT);
lr_message("RESPONSE: Initial = %d, before submit = %d, after_submit = %d, submit size = %d, total = %d",
initial_byte_response_ct, before_submit_response_ct, after_submit_response_ct, submit_byte_response_ct, final_response_ct);
/* RESPONSE: Initial = 0, before submit = 14177, after_submit = 58681, submit size = 44504, total = 86444 */
return 0;
}
-
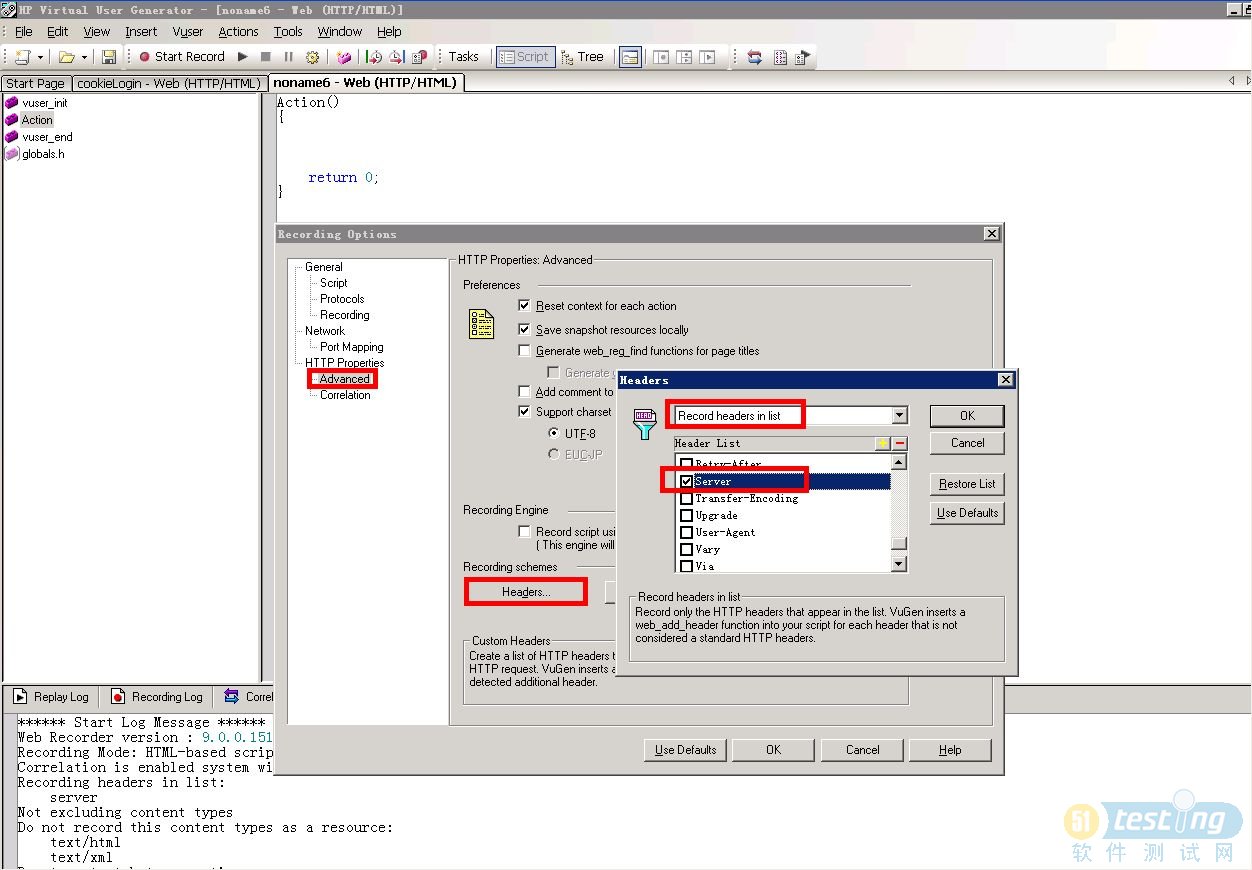
loadrunner 录制 cookie
2011-11-09 18:20:59
loadrunner 录制设置:
作用:cookie登录
-
LoadRunner/C/java 二进制转换
2011-10-28 10:46:11
LoadRunner/C 二进制转换
LoadRunner输出二进制流,同理处理8进制、16进制:
void Main()
{
char buff[20];
change(100,2,buff);
lr_output_message("%s\n",buff);
change(100,8,buff);
lr_output_message("%s\n",buff);
change(100,10,buff);
lr_output_message("%s\n",buff);
change(100,16,buff);
lr_output_message("%s\n",buff);
}
char *change(int val, int base, char *retbuf )
{
static char *str = "0123456789ABCDEF";
char *p;
char buf[15];
p = buf+14;
*p = 0;
do { *--p = str[val % base]; } while( val /= base );
strcpy(retbuf,p);
return retbuf;
}
输出就不打印了,运行一下就知了。
另外还有一种简单的方法,直接用itoa或strtol转换:void Main()
{
char dnum[40]="测试";
char cnum[32];
itoa(dnum,cnum,2);
lr_output_message("the binary number is:%s",cnum);
return 0;
}
http://blog.csdn.net/gzh0222/article/details/6644371
JAVA中实现十进制与其它自定义进制进行相互转换。我们通常用到的数字都是十进制的,日常使用的也是这样,但是在程序中,我们可能还会经常用到二进制、八进制、十六进制的数字。既然程序中会使用到,那么就会有它存在的道理。有些时候,将数字用字符串保存到文件或者数据库中,你会发现,十进制的64在二进制中表示为1000000,在八进制中表示为100,在十六进制中表示为40。于是,需要将64存储到文件或者数据库中,用二进制表示的话占用了7个字符长度,八进制占了3个字符长度,而十进制、十六进制都只用了2个字符长度,可以看出,如果要使用最想的空间来存储一个普通的十进制数字,只要使用更高的进制表示就可以节省更多的空间。现在,我们完全可以自定义属于自己的进制表示,可以是N进制,当然N会有一定的限制。
下面的源代码给出了自定义进制转换的方法:/**
* 在进制表示中的字符集合。
*/
final static char[] digits = {
'0' , '1' , '2' , '3' , '4' ,'5' ,
'6' , '7' , '8' , '9' , 'a' ,'b' ,
'c' , 'd' , 'e' , 'f' , 'g' ,'h' ,
'i' , 'j' , 'k' , 'l' , 'm' ,'n' ,
'o' , 'p' , 'q' , 'r' , 's' ,'t' ,
'u' , 'v' , 'w' , 'x' , 'y' ,'z'
};/**
* 将十进制的数字转换为指定进制的字符串。
* @param i 十进制的数字。
* @param system 指定的进制,常见的2/8/16。
* @return 转换后的字符串。
*/
public String toCustomNumericString(int i, intsystem) {
long num = 0;
if (i < 0) {
num =((long)2 * 0x7fffffff) + i + 2;
} else {
num =i;
}
char[] buf = newchar[32];
int charPos = 32;
while ((num / system) > 0){
buf[--charPos]= digits[(int)(num % system)];
num /=system;
}
buf[--charPos] =digits[(int)(num % system)];
return new String(buf, charPos,(32 - charPos));
}
/**
*将其它进制的数字(字符串形式)转换为十进制的数字。
* @param s 其它进制的数字(字符串形式)
* @param system 指定的进制,常见的2/8/16。
* @return 转换后的数字。
*/
public int toCustomNumeric(String s, int system){
char[] buf = newchar[s.length()];
s.getChars(0, s.length(), buf,0);
long num = 0;
for (inti=0;i<buf.length;i++) {
for (intj=0;j<digits.length;j++) {
if(digits[j] == buf[i]) {
num+= j * Math.pow(system, buf.length - i -1);
break;
}
}
}
return (int)num;
}从上面的代码中可以看出,由于受到digits字符数量的限制,现在能够实现的最大自定义进制只有36进制,如果想要构造更大的进制表示,我们可以扩充digits中的字符。当然不能自己构造一个一进制、零进制的数字。下面的一个方法是JDK中的标准类库提供的方法,它在性能上有很大的提高,毕竟用到了位运算,而不是简单的比较。private static String toUnsignedString(int i, int shift){
char[] buf = newchar[32];
int charPos = 32;
int radix = 1 <<shift;
int mask = radix - 1;
do {
buf[--charPos] = digits[i & mask];
i >>>= shift;
} while (i != 0);return new String(buf,charPos, (32 - charPos));
}
由于用到了位移操作,所以它的进制表示只是局限于2/4/8/16/32,其它的就不能实现了。当shift为1时,表示二进制;当shift为2时,表示四进制;依次类推。http://yz124.blog.163.com/blog/static/36663682006112102813233/ -
loadrunner sprintf格式化输出百分号
2011-08-16 19:19:02
sprintf————Writes formatted output to a string.
sprintf(mingText,"00%s%s##%##",uniqeNum,sysTime) ;
之前是这样写的,最后做MD5摘要好,数据总是不一致
先排除了算法本身的问题然后比对加密前的明文,发现少了一个不起眼的百分号%
于是问百度就知道了
因为C语言中如果要打印百分号,需要这样写 printf("%%");遂,改为sprintf(mingText,"00%s%s##%%##",uniqeNum,sysTime) ;
结果正确,ok.
-
loadrunner 使用自定义c函数
2011-07-29 16:17:56
loadrunner 使用自定义c函数:
1. 在 C:\Program Files\Mercury\LoadRunner\include 放入 test.h
2. 脚本中 globals.h 增加 #include "test.h"
或者:修改 C:\Program Files\Mercury\LoadRunner\include\globals.h 也可(未验证)
3. 在脚本中可以直接使用 test.h 中的c函数。
其他:
1. 将函数的定义直接写在脚本中,然后调用也可以
2. 使用DLL方法,然后加载动态库也可以 -
LoadRunner_GUID,关联长度问题,中文乱码,用Eclipse编写脚本,执行Linux命令,Memcached
2011-07-28 18:26:14
以下均转自:http://hi.baidu.com/higkoo/blog/category/Loadrunner/index/0
5. LoadRunner实现:模拟生成UUID/GUID
GUID: 即Globally Unique Identifier(全球唯一标识符) 也称作 UUID(Universally Unique IDentifier) 。 GUID是一个通过特定算法产生的二进制长度为128位的数字标识符,用于指示产品的唯一性。GUID 主要用于在拥有多个节点、多台计算机的网络或系统中,分配必须具有唯一性的标识符。
LUID就是指locally unique identifier,GUID/UUID大家是比较熟悉的,和GUID/UUID的要求保证全局唯一不同,LUID只要保证局部唯一,就是指在系统的每一次运行期间保证是唯一的就可以了。
在 Windows 平台上,GUID 广泛应用于微软的产品中,用于标识如如注册表项、类及接口标识、数据库、系统目录等对象。
灵感来自:LoadRunner生成唯一数 + LoadRunner实现:计算字符串Md5 。
原理非常简单,先生成唯一字符串,然后算Md5。以下代码就是在Md5的基础上稍稍加工一下:
void Md5toLUID(char* inStr,char *outStr)
{
int i;
strncpy(outStr,inStr,8);
strcat(outStr,"-");
for (i=9;i<13;i++)
outStr[i]=inStr[i-1];
strcat(outStr,"-");
for (i=14;i<18;i++)
outStr[i]=inStr[i-2];
strcat(outStr,"-");
for (i=19;i<23;i++)
outStr[i]=inStr[i-3];
strcat(outStr,"-");
for (i=24;i<37;i++)
outStr[i]=inStr[i-4];
strcat(outStr,"\0");
}
调用方法:void main()
{
char uStr[33],lStr[37];
int i;
for (i=0;i<10;i++) {
lr_save_int(i,"iValue");
GetUniqueString(lr_eval_string("{iValue}"),uStr);
GetMd5FromString(uStr,uStr);
Md5toLUID(uStr,lStr);
lr_output_message(lStr);
}
}
输出:main.c(18): b7f163a8-f89c-59e3-6705-a3823a358c0d
main.c(18): 20fcb7ab-0879-9572-fb5b-5c9848b37930
main.c(18): 869b718d-126c-eaeb-b099-b1ec15d3c9db
main.c(18): fd12c050-0975-3641-1de9-3685431d4a01
main.c(18): 604bbc51-e787-1955-d721-ee5032640629
main.c(18): 4fffdc48-0c44-66c9-34d7-697e473d20da
main.c(18): a5d0d30c-5053-03e8-6e1a-1f112ef49007
main.c(18): 4babb152-de2f-1136-d4a6-8aa78a90f2c7
main.c(18): 833f6f33-da3d-efeb-7ec8-95f5491bf1a1
main.c(18): 89148aad-8040-e70c-b406-69d56f570293测试的时候这个LUID,就可以当成GUID/UUID使用了。除非同时使用了多个Contorller而且脚本组名也相同,而且即使是如此,取到重复值的机率也非常小!
函数就是在拼接“-”到指定位置,平常用得更多的是字符串替换:C语言实现:替换字符串中指定字符。
6. LoadRunner/C语言 实现:生成GUID
在LoadRunner里使用GUID有以下三种方法:
1、使用LoadRunner自带的函数:已实现。
2、使用C++封装DLL供LoadRunner调用。
3、直接调用Windows系统API,方式和第2种类似。
下面是使用第3种方式的实现示例:vuser_init(){
lr_load_dll("ole32.dll");
}
char* lr_guid_gen(char* paramName){
typedef struct _GUID {
unsigned long Data1;
unsigned short Data2;
unsigned short Data3;
unsigned char Data4[8];
} GUID;GUID m_guid;
char buf[50];
char pNameStr[50];CoCreateGuid(&m_guid);
// 定义输出格式
//sprintf (buf, "{%08lX-%04X-%04X-%02X%02X-%02X%02X%02X%02X%02X%02X}", // 大写
// sprintf (buf, "{%08lx-%04x-%04x-%02x%02x-%02x%02x%02x%02x%02x%02x}",// 小写
sprintf (buf, "%08lX%04X%04X%02X%02X%02X%02X%02X%02X%02X%02X",// 小写
m_guid.Data1, m_guid.Data2, m_guid.Data3,
m_guid.Data4[0], m_guid.Data4[1], m_guid.Data4[2], m_guid.Data4[3],
m_guid.Data4[4], m_guid.Data4[5], m_guid.Data4[6], m_guid.Data4[7]);lr_save_string(buf, paramName);
sprintf(pNameStr,"{%s}",paramName);return lr_eval_string(pNameStr);
}
Action(){
lr_output_message(lr_guid_gen("GUID"));
}vuser_end(){
return 0;
}相对自己编写DLL而言,调用系统API更安全更稳定。
而且C++要求测试人员有一定的编码能力,编写的代码要稳定且安全。
每次修改GUID的输出方式,需要重新修改并编译DLL或编写多个导出。
直接调用系统API,安全稳定。且输出格式随手掌控。
7. LoadRunner 函数 web_reg_save_param 的长度问题
发现web_reg_save_param在查找字符串时有问题,找不到指定字符串。
使用 web_reg_save_param("Wholebody","LB=", "RB=","Notfound=warning","Search=Body", LAST); 可以把整个服务器返回的Body内容都拿出来。
譬如内容如下:
{"content":"0zIUKjQevu6ygxCSsggU+g30XZL1rEAGOWsjRPQ9CHz1Np28wP4HZ26scc\/sHX9Yq\/hEhB+Au4OwRnIdTUFCP1sDvGb+MY8e2C6aP2ZsBxgpMdiPSkZZ30N9OE+fjTdugiXfAdQMgjzkuluTqbpI6Dhbcyv2k\/ymM9f+zTBOS2wfKOSbVMEnVrBla31XCkvFLJXb60YUrLlVuhUioTcIKXe3800iYQ6ipL3FF9sg6QBkFZ7vri3\/y06le7LMxMS9BrSJs03SLtqHlA2frbaTnFuaLmeDzIvWWDeie4o9r6QWrYtO3MfQ37aK9xn1hh\/A"}
但是如果你只想要content值的时候,使用 web_reg_save_param("Content","LB=content\":\"", "RB=\"}","Notfound=warning","Search=Body", LAST); 结果是找不到!
如果把右匹配改为"RB=cc",就可以取到值。起初以为转义字符串导致web_reg_save_param出错从而没有取到值。
后来作了静态页面专门试验发现和转义字符没有关系,怀疑和长度有关系。但整个Body都取出来了,Body会更长呀。而且如果RB设为空,也能取到值。又让人不去怀疑长度问题。
长话短说,就是长度问题!添加 web_set_max_html_param_len("1024"); 即可
为什么会这样呢?分析一下,如果RB留空的话,LoadRunner应该直接给变量赋值为一个指针,所以结束就可以到末尾。如果RB不为空,那么需要经过赋值。而默认长度是256,超长就导致内容错误,所以添加长度设定后就能正常取到值了。
8. LoadRunner无法显示XML的问题
最近测试一个升级程序遇到以下问题:
要求测试一个XML文件的下载性能。然后发现以下情况:
直接访问URL,无法显示网页:
脚本的目录下,还有“t6_a.xml”;快照不可用,导致无法查看源文件,也不能进行其它操作。请教了小荷老师:
1、不是所有服务器返回的内容都能看到快照的。
2、 如果非要看快照,你可以试试 url-based () web/http property。
3、 这个快照不可用,不会导致你无法看源文件。
4、 如果你现在确实再无法切换回源文件,这可能因为有语法错误,你在切换的界面的时候,录制脚本的内容已经被改变了。
所以你可以先不着急看快照,先看源文件,检查你的脚本,有没有格式很奇怪的,或者没有结束的,或者xml的语法被当作你的给处理的情况。
顿时云开雾散,使用URL模式录制问题解决!相比较HTML模式和URL模式的录制日志、脚本、回放日志,都完全相同的。
小荷老师的四点说得很到位:并不是所有返回内容都是可以在LR里用快照查看的;第2点我没有想到会解决问题;是否有录制到源文件,和快照不能查看不是必然的关系;第4点我倒是有遇到过,是XML树,不过可以正常显示,但源码里有个标记和HTML里不一样。
问题解决了,在此特别感谢小荷老师!
9. LoadRunner中文出现乱码的解决办法录制选项,高级,支持字符集,UTF-8。
一般情况下不需要开启此选项,否则在Submit里会出现有乱码。
如果未开启此功能还出现乱码,可尝试开启此选项。如果开启此选项还是有乱码,且乱码处的内容你需要进行参数化,可使用lr_convert_string_encoding函数将字符转化为你需要的模式。
函数原型:int lr_convert_string_encoding ( const char *sourceString, const char *fromEncoding, const char *toEncoding, const char *paramName);
sourceString The string to convert
fromEncoding The encoding of the sourceString
toEncoding The encoding to convert of the string saved in parameter paramName
paramName The name of the parameter in which the destination string will be savedConstant Value
LR_ENC_SYSTEM_LOCALE NULL
LR_ENC_UTF8 "utf-8"
LR_ENC_UNICODE "ucs-2"//中文乱码互相转换:
lr_convert_string_encoding("乱码内容",LR_ENC_UTF8,LR_ENC_SYSTEM_LOCALE,"mt") ;
lr_output_message(" 2 ---\n%s",lr_eval_string("{mt}")) ;
lr_convert_string_encoding("未通过审核应用",LR_ENC_SYSTEM_LOCALE,LR_ENC_UTF8,"dt") ;
lr_output_message(" 3 ---\n%s",lr_eval_string("{dt}")) ;
浏览器也有转码功能:菜单“查看”-->编码-->Unicode(UTF-8)为什么要启用UTF-8,某些请求中会出现:
web_custom_request("CALL-H001I",
"EncType=text/xml; charset=UTF-8",
……);这时候,此函数你就派得上用场了!
lr_convert_string_encoding函数的使用,直接查看帮助即可。
说明:
1. 在树视图里的源码(server Response)的乱码是没法解决的;
2. 在树视图的页面显示可以是正常,源码视图也可以显示正常;
3. 虽然在server Response显示乱码,但查找中文字符串还是正常的。10. 使用Eclipse编写LoadRunner测试脚本
真是后知后觉,今天才开始尝试用Eclipse编写LoadRunner脚本。
过去多数都用LoadRunner自带的IDE编写,也有用过Visual Stdio插件。复杂一点的使用DLL或JAR扩展。虽然调试起来比较麻烦,但把常用函数和方法包装起来,一劳永逸还算值得。
最近项目时间紧,希望能快速开发测试脚本。
过去遇到的xml、json都不算复杂,用LoadRunner自带函数和C函数一起处理一下就好了。最痛苦的一次是使用LoadRunner实现 Web/Http协议 + Windows Sockets协议 + Mysql + Memcached 脚本的编写,懂LoadRunner的同学应该能明白。虽然内置C编译器,能使用C++扩展,但用法并不完全一样,陷阱多多。使用Java Vuser也没有不像Java开发那样自如。
今天,我已无法忍受用C语句的char解析服务端返回的大堆Json串了! 忍无可忍,不可再忍
解析Json串还是用Java最方便,若能使用Eclipse编写LoadRunner脚本是件多么美好的事情呀,就像LoadRunner的VS插件一样。
方法很简单:1、使用Eclipse新建一个Java工程
2、将“%LoadRunner_Home%\classes\lrapi”目录导入到工程中
3、将工程导出为Jar包,譬如:命名为lrapi.jar
4、再新建Java工程时,将lrapi.jar引入扩展库中
5、"import lrapi.lr;"即可使用LoadRunner函数了
6、 “import lrapi.web;”则可使用LoadRunner的WEB函数
11. 在LoadRunner向远程Linux/Unix执行命令行并收集性能数据
前面介绍过在LoadRunner的Java协议实现“使用SSH连接Linux”,当然连接之后的故事由你主导。
今天要讲的,是一个非Java版本。是对“在LoadRunner中执行命令行程序之:popen()取代system()”的一个升华。
下面的脚本,是在LoadRunner里连接Linux/Unix远程服务器,收集其磁盘IO的负载到测试结果中。
涉及到三个知识点:
1、LoadRunner自带“PuTTY Link”的使用,路径为“%LR_PATH%\bin\plink.exe”;
2、Linux/Unix的磁盘监控指令,读者也可以扩展为其它任何实用指令;
3、LoadRunner自带函数lr_user_data_point的使用,保存自定义数据到测试结果。
脚本贴出如下:
#define BUFFER_SIZE 20480 // 初始给它 20 KB
extern char* strtok(char *token, const char *delimiter); // 显示申明
Action(){
long fp; // 数据流
int count; // 用于保存流长度
char buffer[BUFFER_SIZE]; // 给数据流分配内存空间
char * row_token; // 记录每一行的地址
char field_name[100]; // 第一列的名称
int field_value; // 保存系列的值
char lrudp_name[100]; // 保存LR自定义指标值
int rc; // 保存返回值lr_start_transaction("DiskIO");// Linux采样方式: plink -ssh -l username -pw password hostname command
lr_save_string("higkoo", "UserName");
lr_save_string("123456", "Password");
lr_save_string("192.168.10.31", "Server");
lr_save_string("iostat -xc | awk 'NR >2 {print $1, $10}'", "Command"); // 使用iostat拿到磁盘IO的状态信息
lr_save_string(lr_eval_string("\"%LR_PATH%\\bin\\plink\" -ssh -l {UserName} -pw {Password} {Server} \"{Command}\" 2>&1 "), "Result"); // 使用plink连接远程Linux服务器并拿到执行结果
fp = popen(lr_eval_string("{Result}"), "r");
if (fp == NULL) {
lr_error_message("执行命令失败");
return -1;
}count = fread(buffer, sizeof(char), BUFFER_SIZE, fp); // 读取结果
if (feof(fp) == 0) {
lr_error_message("返回结果太大,请给数据流分配更大内存空间,谢谢!");
return -1;
}
if (ferror(fp)) {
lr_error_message ("监控指令返回错误");
return -1;
}
if (count == 0) {
lr_error_message("监控指令返回结果为熔");
return -1;
}
buffer[count] = NULL;row_token = (char*) strtok(buffer, "\n"); // 按换行符分割
if (row_token == NULL) {
lr_error_message ("未发现有效数据");
return -1;
}
while (row_token != NULL) { // 开始读取数据
rc = sscanf(row_token, "%s %d", field_name, &field_value); //分割名称与值
if (rc != 2) {
lr_error_message("Incorrect number of items read from the row.");
return -1;
}sprintf(lrudp_name, "disk_busy_%s", field_name);// 自定义数据的名称
lr_user_data_point(lrudp_name, field_value);// 保存到LR自定义数据row_token = (char*) strtok(NULL, "\n");
}pclose(fp);
lr_end_transaction("DiskIO", LR_AUTO);
}
功能实现了,后面的故事你来讲~~在LoadRunner中执行命令行程序之:popen()取代system()
http://hi.baidu.com/higkoo/blog/item/3f6e6a467e02a0076b63e5b5.html
在LoadRunner向远程Linux/Unix执行命令行并收集性能数据
http://hi.baidu.com/higkoo/blog/item/5ab2ea82f36b559ef703a67a.html12. LoadRunner使用Libmemcached与Memcached通讯
在一包含业务的大数据量测试过程中,需要使用快速、大容量的数据库。
可考虑的有关系型数据库或键值缓存数据库,建立集群。 LoadRunner操作Mysql实例:C语言篇已完成。
今日来尝试在LoadRunner里操作Memcached,使用Libmemcached。
首先下载源码:?http://svn.coderepos.org/share/lang/c/libmemcached-win32
然后按照说明进行编译,源码里还有测试代码和示例代码。编译方法有三种:
一、使用?mingw32进行编译,打开? Visual Studio Command Prompt:
? ? cd libmemcached-latest\libmemcached
? ? mingw32-make -f Makefile.w32? ? cd ..\cilents
? ? mingw32-make -f Makefile.w32? ? cd ..\..\example
? ? mingw32-make -f Makefile.w32二、使用Visual Studio 2005或更高版本执行编译:
? ? libmemcached-latest\visualc\libmemcached.sln
三、使用nmake进行编译,?打开? Visual Studio Command Prompt:
? ? cd libmemcached-latest\libmemcached
? ? nmake -f Makefile.msc?? ? cd ..\cilents
? ? nmake -f Makefile.msc? ? cd ..\..\example
?? ? nmake -f Makefile.msc编译过程将生成memcached.dll,供LoadRunner扩展调用。如下图:
?源码:
#define SERVER_NAME "192.168.223.106"
#define SERVER_PORT 11211
Action(){ //先加载libmemcached.dll
int memc;
int rc;
int value_length=0;
intf lags=0;
int result;
long int num;
char* key="name";
char* value="higkoo";
char* discription="Performance";memc=memcached_create(NULL);
rc=memcached_server_add(memc,SERVER_NAME,SERVER_PORT);
lr_output_message("server add: %s\n",memcached_strerror(memc,rc));rc=memcached_set(memc,key,strlen(key),value,strlen(value),0,0);
lr_output_message("set '%s' to '%s': %s\n",key,value,memcached_strerror(memc,rc));result=memcached_get(memc,key,strlen(key),&value_length,&flags,&rc);
lr_output_message("get '%s': %s\n",key,memcached_strerror(memc,rc));
lr_output_message("%s = %s\n",key,result);rc=memcached_behavior_set(memc,0,1);
lr_output_message("behavior. set to non-block: %s\n",memcached_strerror(memc,rc));result=memcached_get(memc,key,strlen(key),&value_length,&flags,&rc);
lr_output_message("get '%s': %s\n",key,memcached_strerror(memc,rc));
lr_output_message("%s = %s\n",key,value);rc=memcached_set(memc,key,strlen(key),discription,strlen(discription),0,0);
lr_output_message("set '%s' to '%s': %s\n",key,discription,memcached_strerror(memc,rc));rc=memcached_increment(memc,key,strlen(key),1,&num);
lr_output_message("incr '%s': %s\n",key,memcached_strerror(memc,rc));
rc=memcached_increment(memc,key,strlen(key),1,&num);
lr_output_message("incr '%s': %s\n",key,memcached_strerror(memc,rc));
rc=memcached_increment(memc,key,strlen(key),1,&num);
lr_output_message("incr '%s': %s\n",key,memcached_strerror(memc,rc));
rc=memcached_decrement(memc,key,strlen(key),1,&num);
lr_output_message("decr '%s': %s\n",key,memcached_strerror(memc,rc));result=memcached_get(memc,key,strlen(key),&value_length,&flags,&rc);
lr_output_message("get '%s': %s\n",key,memcached_strerror(memc,rc));
lr_output_message("test = %s\n",value);rc=memcached_delete(memc,key,strlen(key),0);
lr_output_message("delete '%s': %s\n",key,memcached_strerror(memc,rc));result=memcached_get(memc,key,strlen(key),&value_length,&flags,&rc);
lr_output_message("get(was deleted) '%s': %s\n",key,memcached_strerror(memc,rc));memcached_free(memc);
}
... -
LoadRunner_c语言扩展_Base64,Md5,替换字符串中指定字符,生成唯一数(上)
2011-07-28 18:02:32
以下均转自:http://hi.baidu.com/higkoo/home
http://hi.baidu.com/higkoo/blog/category/Loadrunner/index/0
1. LoadRunner/C语言 实现:Base64加解码
之前分享过一个LoadRunner执行Base64编码的函数,由于当时没有提供解码。如今又在网上重新收集了一套编解码的函数。在LoadRunner脚本里包含头文件即可使用,示例如下:
#include "base64.h"Action(){int res;
// ENCODE
lr_save_string("testddd_001@dddd.cn:ttttt","plain");
b64_encode_string( lr_eval_string("{plain}"), "b64str" );
lr_output_message("Encoded: %s", lr_eval_string("{b64str}") );// DECODE
b64_decode_string( lr_eval_string("{b64str}"), "plain2" );
lr_output_message("Decoded: %s", lr_eval_string("{plain2}") );// Verify decoded matches original plain text
res = strcmp( lr_eval_string("{plain}"), lr_eval_string("{plain2}") );
if (res==0) lr_output_message("Decoded matches original plain text");
return 0 ;
}文件base64.h源码如下:
//为LoadRunner提供Base64的编码和解码函数,//有直接编码和解决的函数和输出LoadRunner参数的函数。/*
Base 64 Encode and Decode functions for LoadRunner
==================================================
This include file provides functions to Encode and Decode
LoadRunner variables. It's based on source codes found on the
internet and has been modified to work in LoadRunner.
Created by Kim Sandell / Celarius - www.celarius.com
*/// Encoding lookup table
char base64encode_lut[] = {
'A','B','C','D','E','F','G','H','I','J','K','L','M','N','O','P','Q',
'R','S','T','U','V','W','X','Y','Z','a','b','c','d','e','f','g','h',
'i','j','k','l','m','n','o','p','q','r','s','t','u','v','w','x','y',
'z','0','1','2','3','4','5','6','7','8','9','+','/','='};
// Decode lookup table
char base64decode_lut[] = {
0, 0, 0, 0, 0, 0, 0, 0, 0, 0, 0, 0, 0, 0, 0, 0, 0, 0, 0, 0,
0, 0, 0, 0, 0, 0, 0, 0, 0, 0, 0, 0, 0, 0, 0, 0, 0, 0, 0, 0,
0, 0, 0,62, 0, 0, 0,63,52,53,54,55,56,57,58,59,60,61, 0, 0,
0, 0, 0, 0, 0, 0, 1, 2, 3, 4, 5, 6, 7, 8, 9,10,11,12,13,14,
15,16,17,18,19,20,21,22,23,24,25, 0, 0, 0, 0, 0, 0,26,27,28,
29,30,31,32,33,34,35,36,37,38,39,40,41,42,43,44,45,46,47,48,
49,50,51, 0, 0, 0, 0, 0, 0, 0, 0, 0, 0, 0, 0, 0, 0, 0, 0, 0, };
void base64encode(char *src, char *dest, int len)
// Encodes a buffer to base64
{
int i=0, slen=strlen(src);
for(i=0;i<slen && i<len;i+=3,src+=3)
{ // Enc next 4 characters
*(dest++)=base64encode_lut[(*src&0xFC)>>0x2];
*(dest++)=base64encode_lut[(*src&0x3)<<0x4|(*(src+1)&0xF0)>>0x4];
*(dest++)=((i+1)<slen)?base64encode_lut[(*(src+1)&0xF)<<0x2|(*(src+2)&0xC0)>>0x6]:'=';
*(dest++)=((i+2)<slen)?base64encode_lut[*(src+2)&0x3F]:'=';
}
*dest='\0'; // Append terminator
}void base64decode(char *src, char *dest, int len)
// Encodes a buffer to base64
{
int i=0, slen=strlen(src);
for(i=0;i<slen&&i<len;i+=4,src+=4)
{ // Store next 4 chars in vars for faster access
char c1=base64decode_lut[*src], c2=base64decode_lut[*(src+1)], c3=base64decode_lut[*(src+2)], c4=base64decode_lut[*(src+3)];
// Decode to 3 chars
*(dest++)=(c1&0x3F)<<0x2|(c2&0x30)>>0x4;
*(dest++)=(c3!=64)?((c2&0xF)<<0x4|(c3&0x3C)>>0x2):'\0';
*(dest++)=(c4!=64)?((c3&0x3)<<0x6|c4&0x3F):'\0';
}
*dest='\0'; // Append terminator
}
int b64_encode_string( char *source, char *lrvar )
// ----------------------------------------------------------------------------
// Encodes a string to base64 format ----- Method 1
//
// Parameters:
// source Pointer to source string to encode
// lrvar LR variable where base64 encoded string is stored
//
// Example:
//
// b64_encode_string( "Encode Me!", "b64" )
// ----------------------------------------------------------------------------
{
int dest_size;
int res;
char *dest;
// Allocate dest buffer
dest_size = 1 + ((strlen(source)+2)/3*4);
dest = (char *)malloc(dest_size);
memset(dest,0,dest_size);
// Encode & Save
base64encode(source, dest, dest_size);
lr_save_string( dest, lrvar );
// Free dest buffer
res = strlen(dest);
free(dest);
// Return length of dest string
return res;
}int b64_decode_string( char *source, char *lrvar )
// ----------------------------------------------------------------------------
// Decodes a base64 string to plaintext ----- Method 2
//
// Parameters:
// source Pointer to source base64 encoded string
// lrvar LR variable where decoded string is stored
//
// Example:
//
// b64_decode_string( lr_eval_string("{b64}"), "Plain" )
// ----------------------------------------------------------------------------
{
int dest_size;
int res;
char *dest;
// Allocate dest buffer
dest_size = strlen(source);
dest = (char *)malloc(dest_size);
memset(dest,0,dest_size);
// Encode & Save
base64decode(source, dest, dest_size);
lr_save_string( dest, lrvar );
// Free dest buffer
res = strlen(dest);
free(dest);
// Return length of dest string
return res;
}
2.LoadRunner实现:计算字符串Md5
尝试在LR里实现字符串的MD5计算。
在LR里添加头文件md5.h,在globals.h里添加引用#include "md5.h";md5.h代码如下:#ifndef MD5_H
#define MD5_H
#ifdef __alpha
typedef unsigned int uint32;
#else
typedef unsigned long uint32;
#endif
struct MD5Context {
uint32 buf[4];
uint32 bits[2];
unsigned char in[64];
};
extern void MD5Init();
extern void MD5Update();
extern void MD5Final();
extern void MD5Transform();
typedef struct MD5Context MD5_CTX;
#endif
#ifdef sgi
#define HIGHFIRST
#endif
#ifdef sun
#define HIGHFIRST
#endif
#ifndef HIGHFIRST
#define byteReverse(buf, len) /* Nothing */
#else
void byteReverse(buf, longs)unsigned char *buf; unsigned longs;
{
uint32 t;
do {
t = (uint32) ((unsigned) buf[3] << 8 | buf[2]) << 16 |((unsigned) buf[1] << 8 | buf[0]);*(uint32 *) buf = t;
buf += 4;
} while (--longs);
}
#endif
void MD5Init(ctx)struct MD5Context *ctx;
{
ctx->buf[0] = 0x67452301;
ctx->buf[1] = 0xefcdab89;
ctx->buf[2] = 0x98badcfe;
ctx->buf[3] = 0x10325476;
ctx->bits[0] = 0;
ctx->bits[1] = 0;
}
void MD5Update(ctx, buf, len) struct MD5Context *ctx; unsigned char *buf; unsigned len;
{
uint32 t;
t = ctx->bits[0];
if ((ctx->bits[0] = t + ((uint32) len << 3)) < t)
ctx->bits[1]++;
ctx->bits[1] += len >> 29;
t = (t >> 3) & 0x3f;
if (t) {
unsigned char *p = (unsigned char *) ctx->in + t;
t = 64 - t;
if (len < t) {
memcpy(p, buf, len);
return;
}
memcpy(p, buf, t);
byteReverse(ctx->in, 16);
MD5Transform(ctx->buf, (uint32 *) ctx->in);
buf += t;
len -= t;
}
while (len >= 64) {
memcpy(ctx->in, buf, 64);
byteReverse(ctx->in, 16);
MD5Transform(ctx->buf, (uint32 *) ctx->in);
buf += 64;
len -= 64;
}
memcpy(ctx->in, buf, len);
}
void MD5Final(digest, ctx)
unsigned char digest[16]; struct MD5Context *ctx;
{
unsigned count;
unsigned char *p;
count = (ctx->bits[0] >> 3) & 0x3F;
p = ctx->in + count;
*p++ = 0x80;
count = 64 - 1 - count;
if (count < 8) {
memset(p, 0, count);
byteReverse(ctx->in, 16);
MD5Transform(ctx->buf, (uint32 *) ctx->in);
memset(ctx->in, 0, 56);
} else {
memset(p, 0, count - 8);
}
byteReverse(ctx->in, 14);
((uint32 *) ctx->in)[14] = ctx->bits[0];
((uint32 *) ctx->in)[15] = ctx->bits[1];
MD5Transform(ctx->buf, (uint32 *) ctx->in);
byteReverse((unsigned char *) ctx->buf, 4);
memcpy(digest, ctx->buf, 16);
memset(ctx, 0, sizeof(ctx));
}
#define F1(x, y, z) (z ^ (x & (y ^ z)))
#define F2(x, y, z) F1(z, x, y)
#define F3(x, y, z) (x ^ y ^ z)
#define F4(x, y, z) (y ^ (x | ~z))
#define MD5STEP(f, w, x, y, z, data, s) ( w += f(x, y, z) + data, w = w<<s | w>>(32-s), w += x )
void MD5Transform(buf, in)
uint32 buf[4]; uint32 in[16];
{
register uint32 a, b, c, d;
a = buf[0];
b = buf[1];
c = buf[2];
d = buf[3];
MD5STEP(F1, a, b, c, d, in[0] + 0xd76aa478, 7);
MD5STEP(F1, d, a, b, c, in[1] + 0xe8c7b756, 12);
MD5STEP(F1, c, d, a, b, in[2] + 0x242070db, 17);
MD5STEP(F1, b, c, d, a, in[3] + 0xc1bdceee, 22);
MD5STEP(F1, a, b, c, d, in[4] + 0xf57c0faf, 7);
MD5STEP(F1, d, a, b, c, in[5] + 0x4787c62a, 12);
MD5STEP(F1, c, d, a, b, in[6] + 0xa8304613, 17);
MD5STEP(F1, b, c, d, a, in[7] + 0xfd469501, 22);
MD5STEP(F1, a, b, c, d, in[8] + 0x698098d8, 7);
MD5STEP(F1, d, a, b, c, in[9] + 0x8b44f7af, 12);
MD5STEP(F1, c, d, a, b, in[10] + 0xffff5bb1, 17);
MD5STEP(F1, b, c, d, a, in[11] + 0x895cd7be, 22);
MD5STEP(F1, a, b, c, d, in[12] + 0x6b901122, 7);
MD5STEP(F1, d, a, b, c, in[13] + 0xfd987193, 12);
MD5STEP(F1, c, d, a, b, in[14] + 0xa679438e, 17);
MD5STEP(F1, b, c, d, a, in[15] + 0x49b40821, 22);
MD5STEP(F2, a, b, c, d, in[1] + 0xf61e2562, 5);
MD5STEP(F2, d, a, b, c, in[6] + 0xc040b340, 9);
MD5STEP(F2, c, d, a, b, in[11] + 0x265e5a51, 14);
MD5STEP(F2, b, c, d, a, in[0] + 0xe9b6c7aa, 20);
MD5STEP(F2, a, b, c, d, in[5] + 0xd62f105d, 5);
MD5STEP(F2, d, a, b, c, in[10] + 0x02441453, 9);
MD5STEP(F2, c, d, a, b, in[15] + 0xd8a1e681, 14);
MD5STEP(F2, b, c, d, a, in[4] + 0xe7d3fbc8, 20);
MD5STEP(F2, a, b, c, d, in[9] + 0x21e1cde6, 5);
MD5STEP(F2, d, a, b, c, in[14] + 0xc33707d6, 9);
MD5STEP(F2, c, d, a, b, in[3] + 0xf4d50d87, 14);
MD5STEP(F2, b, c, d, a, in[8] + 0x455a14ed, 20);
MD5STEP(F2, a, b, c, d, in[13] + 0xa9e3e905, 5);
MD5STEP(F2, d, a, b, c, in[2] + 0xfcefa3f8, 9);
MD5STEP(F2, c, d, a, b, in[7] + 0x676f02d9, 14);
MD5STEP(F2, b, c, d, a, in[12] + 0x8d2a4c8a, 20);
MD5STEP(F3, a, b, c, d, in[5] + 0xfffa3942, 4);
MD5STEP(F3, d, a, b, c, in[8] + 0x8771f681, 11);
MD5STEP(F3, c, d, a, b, in[11] + 0x6d9d6122, 16);
MD5STEP(F3, b, c, d, a, in[14] + 0xfde5380c, 23);
MD5STEP(F3, a, b, c, d, in[1] + 0xa4beea44, 4);
MD5STEP(F3, d, a, b, c, in[4] + 0x4bdecfa9, 11);
MD5STEP(F3, c, d, a, b, in[7] + 0xf6bb4b60, 16);
MD5STEP(F3, b, c, d, a, in[10] + 0xbebfbc70, 23);
MD5STEP(F3, a, b, c, d, in[13] + 0x289b7ec6, 4);
MD5STEP(F3, d, a, b, c, in[0] + 0xeaa127fa, 11);
MD5STEP(F3, c, d, a, b, in[3] + 0xd4ef3085, 16);
MD5STEP(F3, b, c, d, a, in[6] + 0x04881d05, 23);
MD5STEP(F3, a, b, c, d, in[9] + 0xd9d4d039, 4);
MD5STEP(F3, d, a, b, c, in[12] + 0xe6db99e5, 11);
MD5STEP(F3, c, d, a, b, in[15] + 0x1fa27cf8, 16);
MD5STEP(F3, b, c, d, a, in[2] + 0xc4ac5665, 23);
MD5STEP(F4, a, b, c, d, in[0] + 0xf4292244, 6);
MD5STEP(F4, d, a, b, c, in[7] + 0x432aff97, 10);
MD5STEP(F4, c, d, a, b, in[14] + 0xab9423a7, 15);
MD5STEP(F4, b, c, d, a, in[5] + 0xfc93a039, 21);
MD5STEP(F4, a, b, c, d, in[12] + 0x655b59c3, 6);
MD5STEP(F4, d, a, b, c, in[3] + 0x8f0ccc92, 10);
MD5STEP(F4, c, d, a, b, in[10] + 0xffeff47d, 15);
MD5STEP(F4, b, c, d, a, in[1] + 0x85845dd1, 21);
MD5STEP(F4, a, b, c, d, in[8] + 0x6fa87e4f, 6);
MD5STEP(F4, d, a, b, c, in[15] + 0xfe2ce6e0, 10);
MD5STEP(F4, c, d, a, b, in[6] + 0xa3014314, 15);
MD5STEP(F4, b, c, d, a, in[13] + 0x4e0811a1, 21);
MD5STEP(F4, a, b, c, d, in[4] + 0xf7537e82, 6);
MD5STEP(F4, d, a, b, c, in[11] + 0xbd3af235, 10);
MD5STEP(F4, c, d, a, b, in[2] + 0x2ad7d2bb, 15);
MD5STEP(F4, b, c, d, a, in[9] + 0xeb86d391, 21);
buf[0] += a;
buf[1] += b;
buf[2] += c;
buf[3] += d;
}
void GetMd5FromString(const char* s,char* resStr)
{
struct MD5Context md5c;
unsigned char ss[16];
char subStr[3];
int i;
MD5Init( &md5c );
MD5Update( &md5c, s, strlen(s) );
MD5Final( ss, &md5c );
strcpy(resStr,"");
for( i=0; i<16; i++ )
{
sprintf(subStr, "%02x", ss[i] );
itoa(ss[i],subStr,16);
if (strlen(subStr)==1) {
strcat(resStr,"0");
}
strcat(resStr,subStr);
}
strcat(resStr,"\0");
}
源码都是网上共享的,仅CMd5()函数稍作了改动,要验证可以上http://www.cmd5.com/。在LR里调用就非常简单:void main()
{
char Md5[33];
GetMd5FromString("a",Md5);
lr_output_message(Md5);
}
输出结果:
Running Vuser...
Starting iteration 1.
Starting action main.
main.c(5): 0cc175b9c0f1b6a831c399e269772661
Ending action main.3. C语言实现:替换字符串中指定字符
不用多介绍了,可以在LoadRunner里直接使用,挺好的!
int ReplaceStr(char* sSrc, char* sMatchStr, char* sReplaceStr)
{
int StringLen;
char caNewString[64];
char* FindPos;
FindPos =(char *)strstr(sSrc, sMatchStr);
if( (!FindPos) || (!sMatchStr) )
return -1;
while( FindPos )
{
memset(caNewString, 0, sizeof(caNewString));
StringLen = FindPos - sSrc;
strncpy(caNewString, sSrc, StringLen);
strcat(caNewString, sReplaceStr);
strcat(caNewString, FindPos + strlen(sMatchStr));
strcpy(sSrc, caNewString);
FindPos =(char *)strstr(sSrc, sMatchStr);
}
free(FindPos);
return 0;
}
譬如:ReplaceStr("abcd-efgh-ijklm-nopq","-","");//把字符串中的“-”删除掉!4. LoadRunner生成唯一数
void Main()
{
int i;
char uStr[64];
srand( (unsigned)time( NULL ) );// 最好放在vuser_init里
for (i=0;i<10;i++) {
GetUniqueString(i,uStr);
lr_output_message(uStr);
}
}
void GetUniqueString(int inValue,char *outStr)
{
int id, scid;
char *vuser_group;
lr_whoami(&id, &vuser_group, &scid);
web_save_timestamp_param("tStamp", LAST);
sprintf(outStr,"%s%05d%010d%04d",lr_eval_string("{tStamp}"),id,rand(),inValue);
free(vuser_group);
}
建议把随机种子(srand( (unsigned)time( NULL ) );)放在脚本初始化函数里,只需要初始化一次。若放在子函数里,每次调用都初始化一下的话,产生的随机数可能是一样的。是不安全的代码!
这个唯一数,有四关:毫秒级的时间+虚拟用户ID+随机数+传入的参数;基本上在同一个Controller里不会出现重复了!再稍微处理一下就可以得到想法的东西了,譬如:LoadRunner实现:计算字符串Md5 加密成md5串,再改装一下就成GUID了!
这里有一个安全问题值得说明,随机种子最好只初始化一次,随机数的算法是和时间有一定关系的。若把随机种子放在子函数里,你会发现生成出来的随机数都是一样的。
不要惊讶,为什么说是个安全问题,说严重一点,随机数是一种算法,有可能被别人劫获并计算出下一个随机值,故不安全! -
loadrunner_http长连接设置
2011-07-22 17:54:50
最近协助同事解决了几个问题,也对loadrunner的一些设置加深了理解,关键是更加知其所以然。
1. loadrunner_internet运行时设置 总览:

2. 中文乱码_设置自动字符集转换
3.loadrunner_连接下载超时_tcp是否使用长连接设置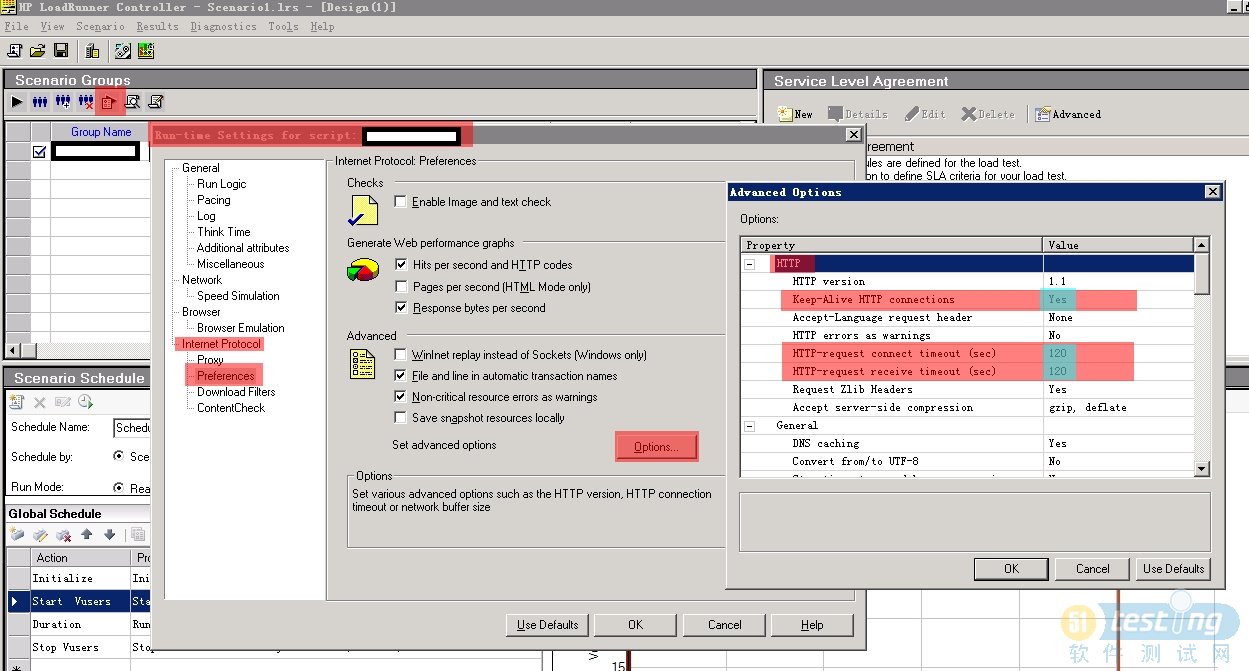
帮助文档中的说明:
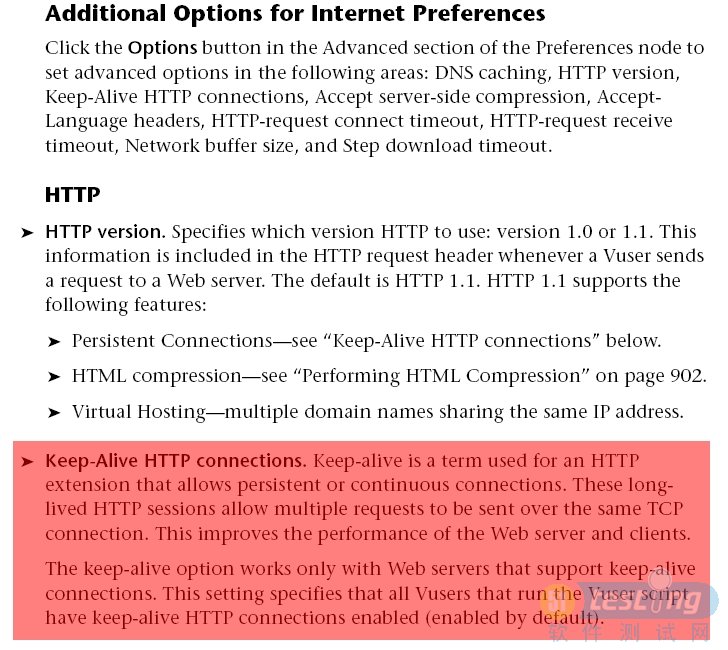
随后在脚本中进行了不同的设置,进行了结果验证:3.1 默认值:设置 Keep-Alive HTTP connections ---> Yes
在此设置情况下访问baidu首页,请求头如下图: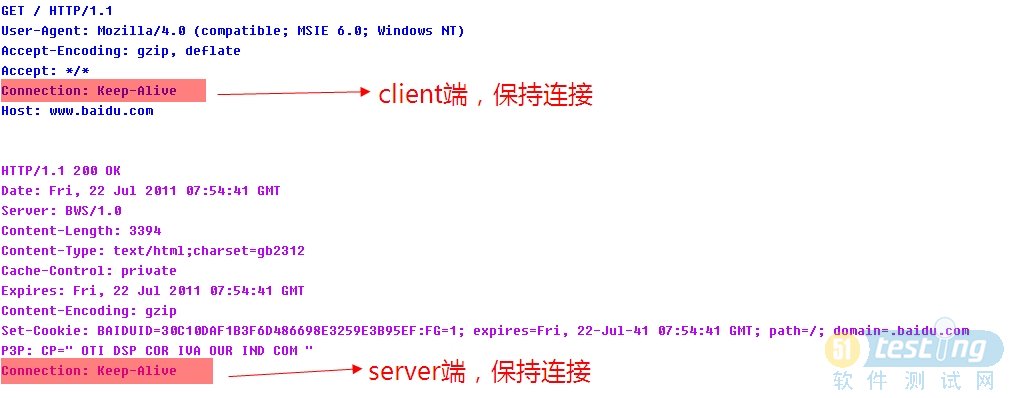
3.2 随后,修改 设置 Keep-Alive HTTP connections ---> No
在此设置情况下访问baidu首页,请求头如下图:
3.3通过对比,可以发现:
此设置生效了,而且是通过设置HTTP请求头中的参数实现的,和下述的文章所说相符。4.至于tcp连接建立连接3次握手,关闭连接4次握手。有兴趣的可以验证下。
附TCP状态变化图:
下面列一些参考文章,感觉还是蛮有收获的。
HTTP长连接定义:
What is HTTP Persistent Connections?
HTTP persistent connections, also called HTTP keep-alive, or HTTP connection reuse, is the idea of using the same TCP connection to send and receive multiple HTTP requests/responses, as opposed to opening a new one for every single request/response pair. Using persistent connections is very important for improving HTTP performance.什么是HTTP长连接?
HTTP长连接,与一般每次发起http请求或响应都要建立一个tcp连接不同,http长连接利用同一个tcp连接处理多个http请求和响应,也叫HTTP keep-alive,或者http连接重用。使用http长连接可以提高http请求/响应的性能。
5.HTTP无状态协议和Connection:Keep-Alive容易犯的误区
http://liuzhigong.blog.163.com/blog/static/178272375201141344312315/名词解释:HTTP无状态:无状态是指协议对于事务处理没有记忆能力,服务器不知道客户端是什么状态。从另一方面讲,打开一个服务器上的网页和你之前打开这个服务器上的网页之间没有任何联系当你登录到一个网站时,你的登录状态也是由Cookie或Session来“记忆”的,因为服务器并不知道你是否登录优点:服务器不用为每个客户端连接分配内存来记忆大量状态,也不用在客户端失去连接时去清理内存,以更高效地去处理WEB业务缺点:客户端的每次请求都需要携带相应参数,服务器需要处理这些参数Keep-Alive:参考另外一篇文章HTTP Keep-Alive 详解容易犯的误区:1、HTTP是一个无状态的面向连接的协议,无状态不代表HTTP不能保持TCP连接,更不能代表HTTP使用的是UDP协议(无连接)2、从HTTP/1.1起,默认都开启了Keep-Alive,保持连接特性,简单地说,当一个网页打开完成后,客户端和服务器之间用于传输HTTP数据的TCP连接不会关闭,如果客户端再次访问这个服务器上的网页,会继续使用这一条已经建立的连接3、Keep-Alive不会永久保持连接,它有一个保持时间,可以在不同的服务器软件(如Apache)中设定这个时间6. http长连接与短连接
http://www.cnblogs.com/Roberts/archive/2010/12/05/1986550.html
可以了解下常见的通信场景:一、长连接与短连接:
长连接:client方与server方先建立连接,连接建立后不断开,然后再进行报文发送和接收。这种方式下由于通讯连接一直存在。此种方式常用于P2P通信。
短连接:Client方与server每进行一次报文收发交易时才进行通讯连接,交易完毕后立即断开连接。此方式常用于一点对多点通讯。C/S通信。二、长连接与短连接的操作过程:
短连接的操作步骤是:建立连接——数据传输——关闭连接...建立连接——数据传输——关闭连接长连接的操作步骤是:建立连接——数据传输...(保持连接)...数据传输——关闭连接三、长连接与短连接的使用时机:
长连接:短连接多用于操作频繁,点对点的通讯,而且连接数不能太多的情况。每个TCP连接的建立都需要三次握手,每个TCP连接的断开要四次握手。如果每次操作都要建立连接然后再操作的话处理速度会降低,所以每次操作下次操作时直接发送数据就可以了,不用再建立TCP连接。例如:数据库的连接用长连接,如果用短连接频繁的通信会造成socket错误,频繁的socket创建也是对资源的浪费。短连接:web网站的http服务一般都用短连接。因为长连接对于服务器来说要耗费一定的资源。像web网站这么频繁的成千上万甚至上亿客户端的连接用短连接更省一些资源。试想如果都用长连接,而且同时用成千上万的用户,每个用户都占有一个连接的话,可想而知服务器的压力有多大。所以并发量大,但是每个用户又不需频繁操作的情况下需要短连接。总之:长连接和短连接的选择要视需求而定。四、发送接收方式:
1、异步:报文发送和接收是分开的,相互独立,互不影响的。这种方式又分两种情况:
异步双工:接收和发送在同一个程序中,有两个不同的子进程分别负责发送和接送。异步单工:接送和发送使用两个不同的程序来完成。2、同步:报文发送和接收是同步进行,即报文发送后等待接送返回报文。同步方式一般需要考虑超时问题,试想我们发送报文以后也不能无限等待啊,所以我们要设定一个等待时候。超过等待时间发送方不再等待读返回报文。直接通知超时返回。
五、报文格式:
通信报文格式多样性更多,相应地就必须设计对应的读写报文的接
收和发送报文函数。
阻塞与非阻塞方式
1、非阻塞方式:读函数不停的进行读动作,如果没有报文接收到,等待一段时间后超时返回,这种情况一般需要指定超时时间。2、阻塞方式:如果没有接收到报文,则读函数一直处于等待状态,知道报文到达。循环读写方式
1、一次直接读写报文:在一次接收或发送报文动作中一次性不加分别地全部读取或全部发送报文字节。2、不指定长度循环读写:这一版发生在短连接进程中,受网络路由等限制,一次较长的报文可能在网络传输过程中被分解成很多个包,一次读取可能不能全部读完一次报文,这就需要循环读取报文,知道读完为止。3、带长度报文头循环读写:这种情况一般在长连接中,由于在长连接中没有条件能够判断循环读写什么时候结束。必须要加长度报文头。读函数先是读取报文头的长度,再根据这个长度去读报文,实际情况中,报头码制格式还经常不一样,如果是非ASCII的报文头,还必须转换成ASCII常见的报文头编制有:1、n个字节的ASCII码。2、n个字节的BCD码。3、n个字节的网络整型码。以上是几种比较典型的读写报文方式,可以与通信方式模板一起 预先提供一些典型的API读写函数。
当然在实际问题中,可能还必须编写与对方报文格式配套的读写API. 在实际情况中,往往需要
把我们自己的系统与别人的系统进行连接, 有了以上模板与API,可以说连接任何方式的通信程序
都不存在问题。
7. http长连接技术文章翻译——关于http长连接有很多重要的概念
http://www.blogjava.net/xjacker/articles/334709.html尝试翻译片技术文章。
What is HTTP Persistent Connections?
HTTP persistent connections, also called HTTP keep-alive, or HTTP connection reuse, is the idea of using the same TCP connection to send and receive multiple HTTP requests/responses, as opposed to opening a new one for every single request/response pair. Using persistent connections is very important for improving HTTP performance.
什么是HTTP长连接?
HTTP长连接,与一般每次发起http请求或响应都要建立一个tcp连接不同,http长连接利用同一个tcp连接处理多个http请求和响应,也叫HTTP keep-alive,或者http连接重用。使用http长连接可以提高http请求/响应的性能。There are several advantages of using persistent connections, including:
Network friendly. Less network traffic due to fewer setting up and tearing down of TCP connections.
Reduced latency on subsequent request. Due to avoidance of initial TCP handshake
Long lasting connections allowing TCP sufficient time to determine the congestion state of the network, thus to react appropriately.
使用http长连接有很多好处,包括:
更少的建立和关闭tcp连接,可以减少网络流量。
因为已建立的tcp握手,减少后续请求的延时。
长时间的连接让tcp有充足的时间判断网络的拥塞情况,方便做出下步操作。
The advantages are even more obvious with HTTPS or HTTP over SSL/TLS. There, persistent connections may reduce the number of costly SSL/TLS handshake to establish security associations, in addition to the initial TCP connection set up.
In HTTP/1.1, persistent connections are the default behavior. of any connection. That is, unless otherwise indicated, the client SHOULD assume that the server will maintain a persistent connection, even after error responses from the server. However, the protocol provides means for a client and a server to signal the closing of a TCP connection.
这些优点在使用https连接时更显著。可以减少多次建立高消耗的SSL/TLS握手。
在HTTP/1.1中,默认使用的是长连接方式。客户端默认服务端会保持长连接,即便返回错误响应;除非明确指示不使用长连接。同时,协议中也指定了客户端可以发送关闭信号到服务端来关闭TCP连接。
What makes a connection reusable?
Since TCP by its nature is a stream based protocol, in order to reuse an existing connection, the HTTP protocol has to have a way to indicate the end of the previous response and the beginning of the next one. Thus, it is required that all messages on the connection MUST have a self-defined message length (i.e., one not defined by closure of the connection). Self demarcation is achieved by either setting the Content-Length header, or in the case of chunked transfer encoded entity body, each chunk starts with a size, and the response body ends with a special last chunk.
怎样是连接可以重用?
因为TCP是基于流的协议,所以HTTP协议需要有一种方式来指示前一个响应的结束和后一个响应的开始来重用已建立的连接。所以,它要求连接中传输的信息必须有自定义的消息长度。自定义消息长度可以通过设置 Content-Length 消息头,若传输编码的实体内容块,则每个数据块的标明数据块的大小,而且响应体也是以一个特殊的数据块结束。
What happens if there are proxy servers in between?
Since persistent connections applies to only one transport link, it is important that proxy servers correctly signal persistent/or-non-persistent connections separately with its clients and the origin servers (or to other proxy servers). From a HTTP client or server's perspective, as far as persistence connection is concerned, the presence or absence of proxy servers is transparent.
若中间存在代理服务器将会如何?
因为长连接仅占用一条传输链路,所以代理服务器能否正确得与客户端和服务器端(或者其他代理服务器)发送长连接或非长连接的信号尤为重要。但是HTTP的客户端或服务器端来看,代理服务器对他们来说是透明的,即便长连接是需要关注的。What does the current JDK do for Keep-Alive?
The JDK supports both HTTP/1.1 and HTTP/1.0 persistent connections.When the application finishes reading the response body or when the application calls close() on the InputStream returned by URLConnection.getInputStream(), the JDK's HTTP protocol handler will try to clean up the connection and if successful, put the connection into a connection cache for reuse by future HTTP requests.
The support for HTTP keep-Alive is done transparently. However, it can be controlled by system properties http.keepAlive, and http.maxConnections, as well as by HTTP/1.1 specified request and response headers.
当前的JDK如何处理Keep-Alive?
JDK同时支持HTTP/1.1 和 HTTP/1.0。
当应用程序读取完响应体内容后或者调用 close() 关闭了URLConnection.getInputStream()返回的流,JDK中的HTTP协议句柄将关闭连接,并将连接放到连接缓存中,以便后面的HTTP请求使用。
对HTTP keep-Alive 的支持是透明的。但是,你也可以通过系统属性http.keepAlive和http.maxConnections以及HTTP/1.1协议中的特定的请求响应头来控制。The system properties that control the behavior. of Keep-Alive are:
http.keepAlive=<boolean>
default: trueIndicates if keep alive (persistent) connections should be supported.
http.maxConnections=<int>
default: 5Indicates the maximum number of connections per destination to be kept alive at any given time
HTTP header that influences connection persistence is:
Connection: closeIf the "Connection" header is specified with the value "close" in either the request or the response header fields, it indicates that the connection should not be considered 'persistent' after the current request/response is complete.
控制Keep-Alive表现的系统属性有:
http.keepAlive=<布尔值>
默认: true
指定长连接是否支持
http.maxConnections=<整数>
默认: 5
指定对同一个服务器保持的长连接的最大个数。
影响长连接的HTTP header是:
Connection: close
如果请求或响应中的Connection header被指定为close,表示在当前请求或响应完成后将关闭TCP连接。
The current implementation doesn't buffer the response body. Which means that the application has to finish reading the response body or call close() to abandon the rest of the response body, in order for that connection to be reused. Furthermore, current implementation will not try block-reading when cleaning up the connection, meaning if the whole response body is not available, the connection will not be reused.
JDK中的当前实现不支持缓存响应体,所以应用程序必须读取完响应体内容或者调用close()关闭流并丢弃未读内容来重用连接。此外,当前实现在清理连接时并未使用阻塞读,这就意味这如果响应体不可用,连接将不能被重用。What's new in Tiger?
When the application encounters a HTTP 400 or 500 response, it may ignore the IOException and then may issue another HTTP request. In this case, the underlying TCP connection won't be Kept-Alive because the response body is still there to be consumed, so the socket connection is not cleared, therefore not available for reuse. What the application needs to do is call HttpURLConnection.getErrorStream() after catching the IOException , read the response body, then close the stream. However, some existing applications are not doing this. As a result, they do not benefit from persistent connections. To address this problem, we have introduced a workaround.The workaround involves buffering the response body if the response is >=400, up to a certain amount and within a time limit, thus freeing up the underlying socket connection for reuse. The rationale behind this is that when the server responds with a >=400 error (client error or server error. One example is "404: File Not Found" error), the server usually sends a small response body to explain whom to contact and what to do to recover.
JDK1.5中的新特性
当应用接收到400或500的HTTP响应时,它将忽略IOException 而另发一个HTTP 请求。这种情况下,底层的TCP连接将不会再保持,因为响应内容还在等待被读取,socket 连接未清理,不能被重用。应用可以在捕获IOException 以后调用HttpURLConnection.getErrorStream() ,读取响应内容然后关闭流。但是现存的应用没有这么做,不能体现出长连接的优势。为了解决这个问题,介绍下workaround。
当响应体的状态码大于或等于400的时候,workaround 将在一定时间内缓存一定数量的响应内容,释放底层的socket连接来重用。基本原理是当响应状态码大于或等于400时,服务器端会发送一个简短的响应体来指明连接谁以及如何恢复连接。Several new Sun implementation specific properties are introduced to help clean up the connections after error response from the server.
The major one is:
sun.net.http.errorstream.enableBuffering=<boolean>
default: falseWith the above system property set to true (default is false), when the response code is >=400, the HTTP handler will try to buffer the response body. Thus freeing up the underlying socket connection for reuse. Thus, even if the application doesn't call getErrorStream(), read the response body, and then call close(), the underlying socket connection may still be kept-alive and reused.
The following two system properties provide further control to the error stream buffering behavior.:
sun.net.http.errorstream.timeout=<int> in millisecond
default: 300 millisecondsun.net.http.errorstream.bufferSize=<int> in bytes
default: 4096 bytes下面介绍一些SUN实现中的特定属性来帮助接收到错误响应体后清理连接:
主要的一个是:
sun.net.http.errorstream.enableBuffering=<布尔值>
默认: false当上面属性设置为true后,在接收到响应码大于或等于400是,HTTP 句柄将尝试缓存响应内容。释放底层的socket连接来重用。所以,即便应用不调用getErrorStream()来读取响应内容,或者调用 close()关闭流,底层的socket连接也将保持连接状态。
下面的两个系统属性是为了更进一步控制错误流的缓存行为:
sun.net.http.errorstream.timeout=<int> in 毫秒
默认: 300 毫秒sun.net.http.errorstream.bufferSize=<int> in bytes
默认: 4096 bytes
What can you do to help with Keep-Alive?
Do not abandon a connection by ignoring the response body. Doing so may results in idle TCP connections. That needs to be garbage collected when they are no longer referenced.If getInputStream() successfully returns, read the entire response body.
When calling getInputStream() from HttpURLConnection, if an IOException occurs, catch the exception and call getErrorStream() to get the response body (if there is any).
Reading the response body cleans up the connection even if you are not interested in the response content itself. But if the response body is long and you are not interested in the rest of it after seeing the beginning, you can close the InputStream. But you need to be aware that more data could be on its way. Thus the connection may not be cleared for reuse.
Here's a code example that complies to the above recommendation:
你如何做可以保持连接为连接状态呢?
不要忽略响应体而丢弃连接。这样会是TCP连接闲置,当不再被引用后将会被垃圾回收器回收。
如果getInputStream()返回成功,读取全部响应内容。如果抛出IOException ,捕获异常并调用getErrorStream() 读取响应内容(如果存在响应内容)。
即便你对响应内容不感兴趣,也要读取它,以便清理连接。但是,如果响应内容很长,你读取到开始部分后就不感兴趣了,可以调用close()来关闭流。值得注意的是,其他部分的数据已在读取中,所以连接将不能被清理进而被重用。
下面是一个基于上面建议的代码样例:1
 try
try  {
{
2 URL a = new URL(args[0]);
3 URLConnection urlc = a.openConnection();
4 is = conn.getInputStream();
5 int ret = 0;
6
 while ((ret = is.read(buf)) > 0) {
7 processBuf(buf);
8 }
}
9 // close the inputstream
10 is.close();
11} catch (IOException e) {
12 try {
13 respCode = ((HttpURLConnection)conn).getResponseCode();
14 es = ((HttpURLConnection)conn).getErrorStream();
15 int ret = 0;
16 // read the response body
17 while ((ret = es.read(buf)) > 0) {
18 processBuf(buf);
19 }
20 // close the errorstream
21 es.close();
22 } catch(IOException ex) {
23 // deal with the exception
24 }
25 }
}
If you know ahead of time that you won't be interested in the response body, you should issue a HEAD request instead of a GET request. For example when you are only interested in the meta. info of the web resource or when testing for its validity, accessibility and recent modification. Here's a code snippet:
如果你预先就对响应内容不感兴趣,你可以使用HEAD 请求来代替GET 请求。例如,获取web资源的meta信息或者测试它的有效性,可访问性以及最近的修改。下面是代码片段:1 URL a = new URL(args[0]);
2URLConnection urlc = a.openConnection();
3HttpURLConnection httpc = (HttpURLConnection)urlc;
4// only interested in the length of the resource
5httpc.setRequestMethod("HEAD");
6int len = httpc.getContentLength();
根据前面的图可以知道,Keep Alive 属性有服务端和客户端两头都可以设置,
那么服务器端如何设置才可以获得更好的性能呢?8.Apache 中 Keep Alive 配置的合理使用——里面的公式和计算方法,没看懂,不要迷信还是要实证
http://blog.163.com/hai_zone/blog/static/264611372010718103838356/?fromdm&fromSearch&isFromSearchEngine=yes在 Apache 服务器中,KeepAlive 是一个布尔值,On 代表打开,Off 代表关闭,这个指令在其他众多的 HTTPD 服务器中都是存在的。
KeepAlive 配置指令决定当处理完用户发起的 HTTP 请求后是否立即关闭 TCP 连接,如果 KeepAlive 设置为On,那么用户完成一次访问后,不会立即断开连接,如果还有请求,那么会继续在这一次 TCP 连接中完成,而不用重复建立新的 TCP 连接和关闭TCP 连接,可以提高用户访问速度。
那么我们考虑3种情况:
1。用户浏览一个网页时,除了网页本身外,还引用了多个 javascript. 文件,多个 css 文件,多个图片文件,并且这些文件都在同一个 HTTP 服务器上。
2。用户浏览一个网页时,除了网页本身外,还引用一个 javascript. 文件,一个图片文件。
3。用户浏览的是一个动态网页,由程序即时生成内容,并且不引用其他内容。对于上面3中情况,我认为:1 最适合打开 KeepAlive ,2 随意,3 最适合关闭 KeepAlive
下面我来分析一下原因。
在 Apache 中,打开和关闭 KeepAlive 功能,服务器端会有什么异同呢?
先看看理论分析。
打开 KeepAlive 后,意味着每次用户完成全部访问后,都要保持一定时间后才关闭会关闭 TCP 连接,那么在关闭连接之前,必然会有一个Apache 进程对应于该用户而不能处理其他用户,假设 KeepAlive 的超时时间为 10 秒种,服务器每秒处理 50个独立用户访问,那么系统中 Apache 的总进程数就是 10 * 50 = 500 个,如果一个进程占用 4M 内存,那么总共会消耗 2G内存,所以可以看出,在这种配置中,相当消耗内存,但好处是系统只处理了 50次 TCP 的握手和关闭操作。
如果关闭 KeepAlive,如果还是每秒50个用户访问,如果用户每次连续的请求数为3个,那么 Apache 的总进程数就是 50 * 3= 150 个,如果还是每个进程占用 4M 内存,那么总的内存消耗为 600M,这种配置能节省大量内存,但是,系统处理了 150 次 TCP的握手和关闭的操作,因此又会多消耗一些 CPU 资源。
在看看实践的观察。
我在一组大量处理动态网页内容的服务器中,起初打开 KeepAlive功能,经常观察到用户访问量大时Apache进程数也非常多,系统频繁使用交换内存,系统不稳定,有时负载会出现较大波动。关闭了 KeepAlive功能后,看到明显的变化是: Apache 的进程数减少了,空闲内存增加了,用于文件系统Cache的内存也增加了,CPU的开销增加了,但是服务更稳定了,系统负载也比较稳定,很少有负载大范围波动的情况,负载有一定程度的降低;变化不明显的是:访问量较少的时候,系统平均负载没有明显变化。
总结一下:
在内存非常充足的服务器上,不管是否关闭 KeepAlive 功能,服务器性能不会有明显变化;
如果服务器内存较少,或者服务器有非常大量的文件系统访问时,或者主要处理动态网页服务,关闭 KeepAlive 后可以节省很多内存,而节省出来的内存用于文件系统Cache,可以提高文件系统访问的性能,并且系统会更加稳定。
补充1:
关于是否应该关闭 KeepAlive 选项,我觉得可以基于下面的一个公式来判断。在理想的网络连接状况下,系统的 Apache 进程数和内存使用可以用如下公式表达:
HttpdProcessNumber = KeepAliveTimeout * TotalRequestPerSecond / Average(KeepAliveRequests)
HttpdUsedMemory = HttpdProcessNumber * MemoryPerHttpdProcess换成中文:
总Apache进程数 = KeepAliveTimeout * 每秒种HTTP请求数 / 平均KeepAlive请求
Apache占用内存 = 总Apache进程数 * 平均每进程占用内存数需要特别说明的是:
[平均KeepAlive请求] 数,是指每个用户连接上服务器后,持续发出的 HTTP 请求数。当 KeepAliveTimeout 等 0或者 KeepAlive 关闭时,KeepAliveTimeout 不参与乘的运算从上面的公式看,如果 [每秒用户请求]多,[KeepAliveTimeout] 的值大,[平均KeepAlive请求] 的值小,都会造成 [Apache进程数] 多和 [内存]多,但是当 [平均KeepAlive请求] 的值越大时,[Apache进程数] 和 [内存] 都是趋向于减少的。基于上面的公式,我们就可以推算出当 平均KeepAlive请求 <= KeepAliveTimeout 时,关闭 KeepAlive 选项是划算的,否则就可以考虑打开。
补充2: KeepAlive 该参数控制Apache是否允许在一个连接中有多个请求,默认打开。但对于大多数论坛类型站点来说,通常设置为off以关闭该支持。
补充3: 如果服务器前跑有应用squid服务,或者其它七层设备,KeepAlive On 设定要开启持续长连接
实际在 前端有 squid 的情况下, KeepAlive 很关键。记得 On
9.不可忽略的KeepAlive —— Apache 中 Keep Alive 配置
http://tomyz0223.iteye.com/blog/603187在网页开发过程中,Keep-Alive是HTTP协议中非常重要的一个属性。大家知道HTTP构建在TCP之上。在HTTP早期实现中,每个HTTP请求都要打开一个socket连接。这种做效率很低,因为一个Web 页面中的很多HTTP请求都指向同一个服务器。例如,很多为Web页面中的图片发起的请求都指向一个通用的图片服务器。持久连接的引入解决了多对已请求服务器导致的socket连接低效性的问题。它使浏览器可以再一个单独的连接上进行多个请求。浏览器和服务器使用Connection头ilai指出对 Keep-Alive的支持。
笔者在去年遇到一个跟Keep-Alive的问题:
问题现象: 一个JSP页面,居然要耗时40多秒。网页中有大量的图片的CSS
问题解决: 原因也找了半天,原来Apache配置里面,把Keep-Alive的开关关闭了。这个是个大问题,工程师为什么要关闭它,原来他考虑的太简单了,我们知道Apache适合处于短连接的请求,处理时间越短,并发数才能上去,原来他是这么考虑,但是没有办法,只能这样了,还是打开Keep-Alive开关吧。
当然,不是所有的情况都设置KeepAlive为On,下面的文字总结比较好:
【在使用apache 的过程中,KeepAlive 属性我一直保持为默认值On,其实,该属性设置为On还是Off还是要具体问题具体分析的,在生产环境中的影响还是蛮大的。
KeepAlive 选项到底有什么用处?如果你用过Mysql ,应该知道Mysql的连接属性中有一个与KeepAlive 类似的Persistent Connection,即:长连接(PConnect)。该属性打开的话,可以使一次TCP连接为同一用户的多次请求服务,提高了响应速度。
比如很多网页中图片、CSS、JS、Html都在一台Server上,当用户访问其中的Html网页时,网页中的图片、Css、Js都构成了访问请求,打开KeepAlive 属性可以有效地降低TCP握手的次数(当然浏览器对同一域下同时请求的图片数有限制,一般是2),减少httpd进程数,从而降低内存的使用(假定prefork模式)。MaxKeepAliveRequests 和KeepAliveTimeOut 两个属性在KeepAlive =On时起作用,可以控制持久连接的生存时间和最大服务请求数。
不过,上面说的只是一种情形,那就是静态网页居多的情况下,并且网页中的其他请求与网页在同一台Server上。当你的应用动态程序(比如:php )居多,用户访问时由动态程序即时生成html内容,html内容中图片素材和Css、Js等比较少或者散列在其他Server上时,KeepAlive =On反而会降低Apache 的性能。为什么呢?
前面提到过,KeepAlive =On时,每次用户访问,打开一个TCP连接,Apache 都会保持该连接一段时间,以便该连接能连续为同一client服务,在KeepAliveTimeOut还没到期并且MaxKeepAliveRequests还没到阈值之前,Apache 必然要有一个httpd进程来维持该连接,httpd进程不是廉价的,他要消耗内存和CPU时间片的。假如当前Apache 每秒响应100个用户访问,KeepAliveTimeOut=5,此时httpd进程数就是100*5=500个(prefork 模式),一个httpd进程消耗5M内存的话,就是500*5M=2500M=2.5G,夸张吧?当然,Apache 与Client只进行了100次TCP连接。如果你的内存够大,系统负载不会太高,如果你的内存小于2.5G,就会用到Swap,频繁的Swap切换会加重CPU的Load。
现在我们关掉KeepAlive ,Apache 仍然每秒响应100个用户访问,因为我们将图片、js、css等分离出去了,每次访问只有1个request,此时httpd的进程数是100*1=100个,使用内存100*5M=500M,此时Apache 与Client也是进行了100次TCP连接。性能却提升了太多。
总结:
1、当你的Server内存充足时,KeepAlive =On还是Off对系统性能影响不大。
2、当你的Server上静态网页(Html、图片、Css、Js)居多时,建议打开KeepAlive 。
3、当你的Server多为动态请求(因为连接数据库,对文件系统访问较多),KeepAlive 关掉,会节省一定的内存,节省的内存正好可以作为文件系统的Cache(vmstat命令中cache一列),降低I/O压力。
PS:当KeepAlive =On时,KeepAliveTimeOut的设置其实也是一个问题,设置的过短,会导致Apache 频繁建立连接,给Cpu造成压力,设置的过长,系统中就会堆积无用的Http连接,消耗掉大量内存,具体设置多少,可以进行不断的调节,因你的网站浏览和服务器配置 而异。
10. HTTP协议中的持久连接connection:keep-alive,的一些问题和思考,参考。
http://www.51sea.com/cache/water/587.html关于keep-alive这个东西,是否要开放,对性能究竟有何影响,目前大家估计也都是从经验方面来设置的,没有从理论层面的讨论,今天我来挖个坑,希望大家踊跃往里跳。
简单整理一下问题要点:
1,keep-alive的工作原理是什么,能解决什么问题?
2,web server设置了keep-alive,是否需要下级协议盏的支持才起作用?例如是否要启用tcp/ip的keep alive机制?
3,web server设置了keep-alive,是否要客户端浏览器有相应支持?是否要客户端协议盏的支持?如果要得话,我们通常使用的各种系统以及各种浏览器支持的情况怎样?
4,keep-alive会带来性能提升吗?具体体现在什么方面?例如可承载高并发访问?或者是可提升传输性能?再或者可减轻服务器压力?在低访问量和高访问量情况下有何区别?
就我个人的理解来看,keep-alive是利用了tcp的双向全双工连接特性,在web-server端可以不断开连接,来接受客户端更多的请求,应该是能够改善连接时间,不过似乎在连接非常多的情况下会大大加重服务器负担,需要tcp/ip协议盏支持,并且不同客户端之间有不同的设定,具体细节还不详。
楼上的文章受教了,简单说就是从http协议的情况来看,默认1.0是关闭的,需要在http头加入Connection: Keep-Alive才能发起keep-alive的连接,而http1.1协议默认启用keep-alive,如果加入Connection: close 则就强制关闭。
目前大部分浏览器都是用http1.1协议,也就是说默认都会发起keep-alive的连接请求了,所以是否能完成一个完整的keep-alive连接就看服务器设置情况。我推测服务器返回的http头应该包含关于keep-alive的信息,回去抓包正是一下。
楼上的文章说我在网上找到的,事实上服务器确实会返回关于keep-alive的消息。最简单的方法,不需要任何额外的软件,你可以打开迅雷,随便下载一个文件,然后查看任务详情里面,他就有http请求和回应的header信息,从这个里面可以清楚的看到客户端在header设置了keep- alive,而服务器返回时也有这个header字段。
不过我刚开始还在担心一个问题,他是怎么保持连接的呢?既然说到http是无状态的,那server根本就不知道这个连接建立多久了,如果数据已经传送完毕,那客户端应该不会继续想server请求了吧?既然没有数据交互,也没有状态信息,那怎么保持甚至是结束这个连接呢?至少我在网上看到的答案是这个连接是不能保持很久的,一般最多空闲两分钟而已。这么来看还是可以接受的。
另外一个问题是,网上关于这方面的资料好像很少,至少中文的是这样,百度googlge不到。但是实际上《计算机网络--自顶向下方法与internet 特色》这本书是讲得很清楚的。在中译本P60或原版P89就有十分详细生动的解释,这里没有时间把他写上来了。当然,书中的一个不足是没有在那里提到这个持久连接是在header中设置connection字段来实现的,当然了,这也是因为那个时候书上还没有讲到http header的结构。
11. FireFox下的HTTP请求构造调试工具Tamper
Tamper是firefox下的HTTP请求监听和调试工具,功能和Fiddler差不多,但用起来比Fiddler更加方便,毕竟是firefox下的扩展。同样的,
可以对请求进行拦截,修改请求头和请求参数等信息,方便进行程序调试和问题监控。可以从这里下载:https://addons.mozilla.org/zh-CN/firefox/addon/966/
直接在"附加插件"里搜索Tamper吧:
参考文章汇总:1.HTTP无状态协议和Connection:Keep-Alive容易犯的误区
http://liuzhigong.blog.163.com/blog/static/178272375201141344312315/2. http长连接与短连接——可以了解下常见的通信场景
http://www.cnblogs.com/Roberts/archive/2010/12/05/1986550.html3. http长连接技术文章翻译——关于http长连接有很多重要的概念
http://www.blogjava.net/xjacker/articles/334709.html4.Apache 中 Keep Alive 配置的合理使用——里面的公式和计算方法,没看懂,不要迷信还是要实证
http://blog.163.com/hai_zone/blog/static/264611372010718103838356/?fromdm&fromSearch&isFromSearchEngine=yes5.不可忽略的KeepAlive —— Apache 中 Keep Alive 配置
http://tomyz0223.iteye.com/blog/6031876.HTTP协议中的持久连接connection:keep-alive,的一些问题和思考,参考。
http://www.51sea.com/cache/water/587.html图片和文章附件:
 loadrunner_http长连接设置.rar(1.39 MB)
 -
LR9的Base64编码,LR11中已经内置了该函数
2011-05-13 10:37:51
LR9的Base64编码,LR11中已经内置了该函数,但需要在runtime setting中勾选启用
缘由:crul命令中的 -u "user:password"
是将"user:password"进行了base64编码后在http的header中进行传递的。LR9的Base64编码,是同事的代码,贴下来记下:
在vuser_init中Copy以下代码:/*Base 64 Encode and Decode functions for LoadRunner==================================================This include file provides functions to Encode and DecodeLoadRunner variables. It's based on source codes found on theinternet and has been modified to work in LoadRunner.Created by Kim Sandell / Celarius - www.celarius.com*/// Encoding lookup tablechar base64encode_lut[] = {'A','B','C','D','E','F','G','H','I','J','K','L','M','N','O','P','Q','R','S','T','U','V','W','X','Y','Z','a','b','c','d','e','f','g','h','i','j','k','l','m','n','o','p','q','r','s','t','u','v','w','x','y','z','0','1','2','3','4','5','6','7','8','9','+','/','='};// Decode lookup tablechar base64decode_lut[] = {0, 0, 0, 0, 0, 0, 0, 0, 0, 0, 0, 0, 0, 0, 0, 0, 0, 0, 0, 0,0, 0, 0, 0, 0, 0, 0, 0, 0, 0, 0, 0, 0, 0, 0, 0, 0, 0, 0, 0,0, 0, 0,62, 0, 0, 0,63,52,53,54,55,56,57,58,59,60,61, 0, 0,0, 0, 0, 0, 0, 0, 1, 2, 3, 4, 5, 6, 7, 8, 9,10,11,12,13,14,15,16,17,18,19,20,21,22,23,24,25, 0, 0, 0, 0, 0, 0,26,27,28,29,30,31,32,33,34,35,36,37,38,39,40,41,42,43,44,45,46,47,48,49,50,51, 0, 0, 0, 0, 0, 0, 0, 0, 0, 0, 0, 0, 0, 0, 0, 0, 0, };void base64encode(char *src, char *dest, int len)// Encodes a buffer to base64{int i=0, slen=strlen(src);for(i=0;i<slen && i<len;i+=3,src+=3){ // Enc next 4 characters*(dest++)=base64encode_lut[(*src&0xFC)>>0x2];*(dest++)=base64encode_lut[(*src&0x3)<<0x4|(*(src+1)&0xF0)>>0x4];*(dest++)=((i+1)<slen)?base64encode_lut[(*(src+1)&0xF)<<0x2|(*(src+2)&0xC0)>>0x6]:'=';*(dest++)=((i+2)<slen)?base64encode_lut[*(src+2)&0x3F]:'=';}*dest='\0'; // Append terminator}void base64decode(char *src, char *dest, int len)// Encodes a buffer to base64{int i=0, slen=strlen(src);for(i=0;i<slen&&i<len;i+=4,src+=4){ // Store next 4 chars in vars for faster accesschar c1=base64decode_lut[*src], c2=base64decode_lut[*(src+1)], c3=base64decode_lut[*(src+2)], c4=base64decode_lut[*(src+3)];// Decode to 3 chars*(dest++)=(c1&0x3F)<<0x2|(c2&0x30)>>0x4;*(dest++)=(c3!=64)?((c2&0xF)<<0x4|(c3&0x3C)>>0x2):'\0';*(dest++)=(c4!=64)?((c3&0x3)<<0x6|c4&0x3F):'\0';}*dest='\0'; // Append terminator}int b64_encode_string( char *source, char *lrvar )// ----------------------------------------------------------------------------// Encodes a string to base64 format//// Parameters:// source Pointer to source string to encode// lrvar LR variable where base64 encoded string is stored//// Example://// b64_encode_string( "Encode Me!", "b64" )// ----------------------------------------------------------------------------{int dest_size;int res;char *dest;// Allocate dest bufferdest_size = 1 + ((strlen(source)+2)/3*4);dest = (char *)malloc(dest_size);memset(dest,0,dest_size);// Encode & Savebase64encode(source, dest, dest_size);lr_save_string( dest, lrvar );// Free dest bufferres = strlen(dest);free(dest);// Return length of dest stringreturn res;}int b64_decode_string( char *source, char *lrvar )// ----------------------------------------------------------------------------// Decodes a base64 string to plaintext//// Parameters:// source Pointer to source base64 encoded string// lrvar LR variable where decoded string is stored//// Example://// b64_decode_string( lr_eval_string("{b64}"), "Plain" )// ----------------------------------------------------------------------------{int dest_size;int res;char *dest;// Allocate dest bufferdest_size = strlen(source);dest = (char *)malloc(dest_size);memset(dest,0,dest_size);// Encode & Savebase64decode(source, dest, dest_size);lr_save_string( dest, lrvar );// Free dest bufferres = strlen(dest);free(dest);// Return length of dest stringreturn res;}vuser_init(){// int res;// // ENCODE// lr_save_string("testzb_001@sina.cn:111111","plain");// b64_encode_string( lr_eval_string("{plain}"), "b64str" );// lr_output_message("Encoded: %s", lr_eval_string("{b64str}") );//// // DECODE// b64_decode_string( lr_eval_string("{b64str}"), "plain2" );// lr_output_message("Decoded: %s", lr_eval_string("{plain2}") );//// // Verify decoded matches original plain text// res = strcmp( lr_eval_string("{plain}"), lr_eval_string("{plain2}") );// if (res==0) lr_output_message("Decoded matches original plain text");return 0;}在Action中可以如下使用:Action(){lr_save_string("testzb_001@sina.cn:111111","plain");b64_encode_string( lr_eval_string("{plain}"), "b64str" );lr_output_message("Encoded: %s", lr_eval_string("{b64str}"));return 0;} -
loadrunner —— 使用Web Page Diagnostics Graphs进行分析
2011-05-04 18:55:50
About Web Page Diagnostics Graphs
一、analysis中查看相关文档:
Analysis Graphs > Web Page Diagnostics Graphs > About Web Page Diagnostics Graphs
二、controller设置,使其有数据,具体操作参考三、中的附件,有详细说明。
To enable the Web Page Diagnostics feature in the Controller:From the Controller menu, choose Diagnostics > Configuration.
Select the Enable the following diagnostics check box.
Next to Web Page Diagnostics (Max. Vuser Sampling: 10%) click Enable.
Click OK.
Note: It is recommended that, in VuGen, you select HTML-based script in the Recording tab of the Recording Options dialog box.一开始我理解错了,以为只有web_url函数可以,web_submit_data不可以,后来证实是都可以的。文档里建议的是录制的时候选择 HTML-based script。不过如果注意的话,你会发现函数体里面都有
"RecContentType=text/html",
"Mode=HTML",
这样两个参数设置,我认为这会起作用,不过还没有实际验证。For more information on recording Web Vuser scripts, refer to the HP Virtual User Generator User's Guide.
三、loadrunner 使用Web Page Diagnostics Graphs进行分析 Loadrunner 使用Web Page Diagnostics Graphs进行分析.rar(77.7 KB)四、Web Page Diagnostics Graphs 图表分析:
loadrunner anslysis ---> page 239:
Time to First Buffer Breakdown GraphThe Time to First Buffer Breakdown graph displays each Web page
component’s relative server/network time (in seconds) for the period of time
until the first buffer is successfully received back from the Web server. If the
download time for a component is high, you can use this graph to
determine whether the problem is server- or network-related.
The x-axis specifies the name of the component. The y-axis shows the
average network/server time (in seconds) for each component.Note: Each measurement displayed on the page level is the sum of that
measurement recorded for each page component. For example, the network
time for www.cnn.com is the sum of the network time for each of the page’s
components.Network time is defined as the average amount of time that passes from the
moment the first HTTP request is sent until receipt of ACK.Server time is defined as the average amount of time that passes from the
receipt of ACK of the initial HTTP request (usually GET) until the first buffer
is successfully received back from the Web server.In the above graph, it is apparent that network time is greater than server
time.Note: Because server time is being measured from the client, network time
may influence this measurement if there is a change in network
performance from the time the initial HTTP request is sent until the time
the first buffer is sent. The server time displayed, therefore, is estimated
server time and may be slightly inaccurate.稍后继续完善
我的想法是这的时间细分要结合http协议的具体实现细节(比如三次握手啊什么的)来进行理解,有没有兴趣哈。
参考:
1. loadrunner help
2. http://syang0517.blog.163.com/blog/static/133340263201011111569425/
3. http://bbs.51testing.com/thread-148303-1-1.html -
loadrunner 添加压力机
2011-04-15 14:57:40
安装Controller的机子如果要联合别的机子一起跑脚本
第一,保证要联合的机子上装了LR agent,并启用了(状态栏那里会有一个小卫星)
第二,RPC服务开启
第三,请从你的Controller的机子上登陆下要联合的机子。(运行里面输入 \\机器名)个人觉得,性能测试不是单单用LR做个脚本,找台机器压一下就好了。
你现在需要
1 是了解LR的运行原理和机制。
2 了解你测试中间件的一些基本知识
3 制定你要测试系统预期要达到的目标
4 根据实际的业务需求合理的制定测试场景和测试脚本
5 在是考虑如何施压。是否需要多机器
6 分析测试结果,决定下一步 -
loadrunner_LR中错误代号为27796的一个解决方法(转载)
2011-04-13 19:56:02
原文见:http://blog.csdn.net/zeeslo
问题:
曾经遇到过一个问题,在一次性能测试过程中,使用http协议的多用户向服务器发送请求。设置了持续时间,出现错误为:27796, Failed to connect to server 'hostname';port_ld': 'reason'.10048.(凭记忆写的,不知道写错了没有)
分析:
因为负载生成器的性能太好,发数据包特别快,服务器也响应特别快,从而导致负载生成器的机器的端口在没有timeout之前就全部占满了。在全部占满后,就会出现上面的错误。执行netstat –na命令,可以看到打开了很多端口。所以就调整TCP的time out。即在最后一个端口还没有用到时,前面已经有端口在释放了。
官方的troubleshooting:
查看工具的troubleshooting,如下:复制代码- Message Code 27796
- Failed to connect to server 'hostname';port_ld': 'reason'.
- Unable to connect to the specified server and port.
- Troubleshooting
- o Try to address the reason provided for the connection failure.
- o Try to access the application with a browser from the injector machine and from another machine (such as the recording machine).
- o Check that you accurately specified the correct host name and port.
- o Ping the host/port.
- o Check if the server application you are trying to access is running.
- o If you used a hostname, check if it was resolved to the correct address.
- o Check if the server application is listening to the right port.
均不是解决之道。
成功的解决方法:
在注册表HKEY_LOCAL_MACHINE\SYSTEM\CurrentControlSet\Services\Tcpip\Parameters里,有如下两个键值:
TcpTimedWaitDelay
MaxUserPort
1,这里的TcpTimedWaitDelay默认值应该中是30s,所以这里,把这个值调小为5s(按需要调整)。
2,也可以把MaxUserPort调大 --> 65534 (如果这个值不是最大值的话)。
反复验证,问题解决。看图片:

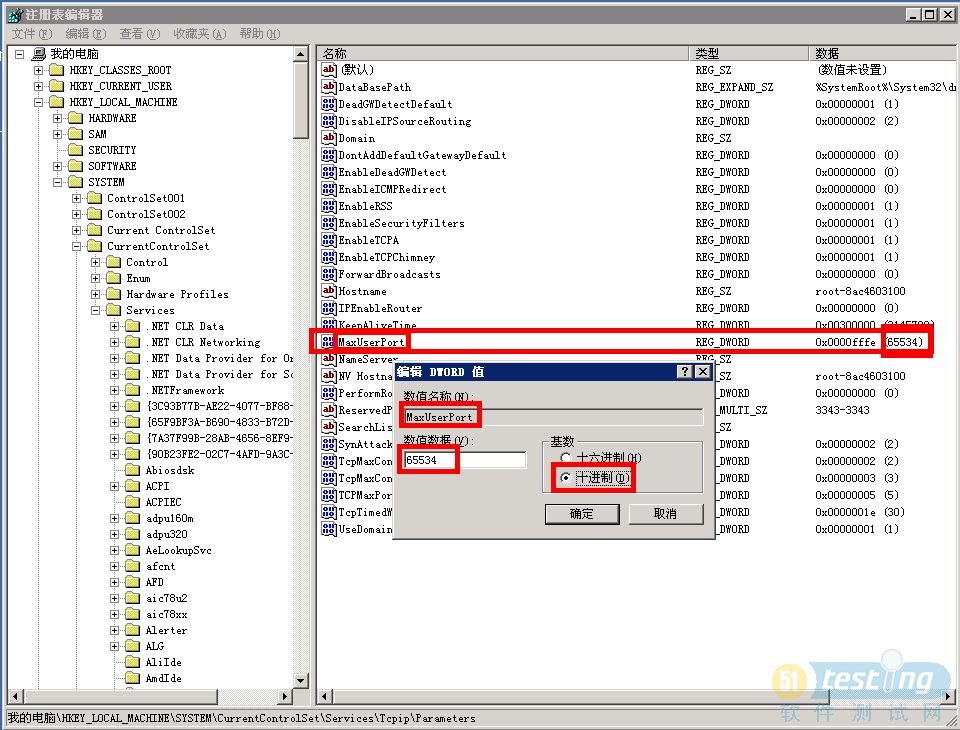
真实太谢谢zee了,这种无私贴最喜欢了
我在网上又查了点信息,大家一起提高下 
TcpTimedWaitDelay 值決定了 TCP/IP 必須經過多久,才能釋出已關閉的連線及重複使用它的資源。這個關閉和釋出的間隔稱為 TIME_WAIT 狀態,或是區段生命期限上限 (2MSL) 狀態的兩倍。在這段時間內,通往用戶端和伺服器的連線重新開啟的成本,比建立新的連線低。藉由縮減這個項目的值,TCP/IP 可以更快釋出已關閉的連線,提供更多資源給新的連線。如果執行中的應用程式需要快速釋出、建立新連線,或多個連線在 TIME_WAIT 狀態中造成通訊量太低,因而需要進行調整的話,請調整這個參數。
預設值是 0xF0,它會將等待時間設為 240 秒(4 分鐘)。
最小的建議值是 0x1E,它會將等待時間設為 30 秒。請利用這個程序來檢視或自訂您的值。
啟動 regedit 指令,瀏覽至 HKEY_LOCAL_MACHINE\SYSTEM\CurrentControlSet\Services\TCPIP\Parameters 登錄次機碼,建立名稱為 TcpTimedWaitDelay 的新 REG_DWORD 值。
將值設為十進位 30,也就是十六進位的 0x0000001e。這個值會將等待時間設為 30 秒。
關閉登錄編輯器。
停止並重新啟動系統。
MaxUserPort
MaxUserPort 值決定了當應用程式向系統要求可用的使用者埠時,TCP/IP 所能指派的最高埠號。如果您的系統報告建立 Socket 時,發生錯誤異常狀況,可能是匿名(短期)埠的數量不當所造成,當系統開啟大量的埠來建立 Web 服務、資料庫或其他遠端資源的連線時,尤其如此。===============================================================================
loadrunner error 27792 27796 转2010-07-09 10:01xp系统问题
error -27792,-27796等问题,都是和xp系统的tcp连接数有限制导致,默认是10,修改下这个默认值为150或者250,基本上就可以解决了。
修改tcp连接数,网上有很多方法,我用的是最偷懒的方法,就是装一个bit精灵,里面有“tcp连接数破解补丁”,设置下就好了=====================================================================================
TcpTimedWaitDelay和MaxUserPort设置
描述:确定 TCP/IP 可释放已关闭连接并重用其资源前,必须经过的时间。关闭和释放之间的此时间间隔通称 TIME_WAIT 状态或两倍最大段生命周期(2MSL)状态。此时间期间,重新打开到客户机和服务器的连接的成本少于建立新连接。减少此条目的值允许 TCP/IP 更快地释放已关闭的连接,为新连接提供更多资源。如果运行的应用程序需要快速释放和创建新连接,而且由于 TIME_WAIT 中存在很多连接,导致低吞吐量,则调整此参数。 如何查看或设置: 使用 regedit 命令访问 HKEY_LOCAL_MACHINE\SYSTEM\CurrentControlSet\ Services\TCPIP\Parameters 注册表子键并创建名为 TcpTimedWaitDelay 的新 REG_DWORD 值。 将此值设置为十进制 30,其为十六进制 0x0000001e。该值将等待时间设置为 30 秒。 停止并重新启动系统。 缺省值:0xF0,它将等待时间设置为 240 秒(4 分钟)。 建议值:最小值为 0x1E,它将等待时间设置为 30 秒。 MaxUserPort 描述:确定在应用程序从系统请求可用用户端口时,TCP/IP 可指定的最高端口号。 如何查看或设置: 使用 regedit 命令访问 HKEY_LOCAL_MACHINE\SYSTEM\CurrentControlSet\ Services\TCPIP\Parameters 注册表子键并创建名为 MaxUserPort 的新 REG_DWORD 值。 停止并重新启动系统。 缺省值:无 建议值:至少十进制 32768。 注:当在 Windows NT 或 Windows 2000 操作系统上
调整 WebSphere Application Server 时,同时使用这两个参数。希望本站的知识能给您的工作、学习和生活带来方便和乐趣!本文来自CSDN博客,转载请标明出处:http://blog.csdn.net/tuwen/archive/2008/03/17/2191742.aspx
其他相关文章:关于Windows频繁打开关闭端口时出现的问题最近事情很多,人也懒,东西看了不少,也想到过一些东西,但就是懒得写。现在记录一下前两个星期做一个压力测试时出现的现象,希望重开一个好头。简单地说,这是个从Windows Server连接Linux下的MongoDB服务时出现的问题。MongoDB使用的是自定义的二进制协议,客户端使用普通的TCP连接进行连接后再读写数据。在以前的测试中,我使用的都是建立少量连接,每个连接进行多次操作,而这次则是对“应用程序”进行压力测试,因此需要不断地开启及关闭连接——频率大约是每秒4、500次吧。
我使用的环境是Windows Web Server 2008 R2,MongoDB部署在Cent OS上,双方都是64位操作系统。压力测试刚开启时一切顺利,性能也比较令人满意,但是不久后便会抛出这样的异常:
由于系统缓冲区空间不足或队列已满,不能执行套接字上的操作。
一开始我以为是程序里有哪个地方没有释放连接,于是检查了程序代码,觉得没有问题;后来又直接使用mongodb-csharp进行频繁连接关闭,结果还是出现了同样的错误,于是我又怀疑是驱动本身的问题,但是看了看讨论组中似乎又没有人汇报过这个问题;于是我又换了个思路,使用了Java平台上的驱动写了个简单的测试程序,居然还是得到了这个错误。由此我确定了两点:
- 这很可能不是mongodb-csharp这个驱动程序的问题。当然,要确定这一点还需要更多测试,例如在mono上使用这个驱动。
- 这是操作系统方面的问题,因为.NET和Java都给出了同样的错误信息,甚至和当前程序的语言文化设置无关。
还有一个细节:在直接使用驱动进行插入操作的时候,发现无论使用多少线程同时进行,最终永远是在插入了16370-16380条记录之后停止,这意味着每次都是打开关闭了确定次数之后出现的错误,这很有可能是一个操作系统限制所致的结果。因此,我使用这段错误信息在网上寻找解决方案,原因有很多,大都不是我需要的。顺便一提,只有中文的错误信息真是很难找到合适的结果,因此我不得不通过几个关键字,再连蒙带猜地得到了错误的标准英文翻译:
An operation on a socket could not be performed because the system lacked sufficient buffer space or because a queue was full.
有了这段信息,找起答案来就简单多了,例如KB上找到了这样一条记录,说是在Windows Vista及2008中,Tcp/IP动态端口的范围调整到49152至65535,做一个简单的减法可以发现我们可以使用16384个接口,和我们之前看到的记录数量大致相同,基本可以确定是频繁地打开关闭操作造成客户端的动态端口用尽的问题。KB上也给出了解决方法,只要使用netsh命令便可以进行设置。
不过有意思的是,我在此之前还找到了另一条记录,说是在HKLM\SYSTEM\CurrentControlSet\Services\Tcpip\Parameters下面可以增加一个MaxUserPort参数,指定程序可以使用的端口范围,它的默认值是5000,也就是端口范围是1025至5000,这也是上一条记录中说Windows之前的端口策略,它的“适用范围”已经不包括2008系统,但我鬼使神差地将MaxUserPort设置为65534(十进制)之后,原本只能插入16000多条记录的程序已经能够插入数万条,这意味着修改的确生效了。
当然,这么做还是没有解决问题,总不见得插入这么多条记录之后还是失败吧。其实第二条记录里还写到,有一个TcpTimedWaitDelay参数,表示一个关闭后的端口等待多久之后可以重新使用,顺着这个信息我找到了《TCP/IP Registry Values for Windows Server 2008》这样一篇文章,描述Vista与2008系统中各种TCP/IP相关的参数,其中自然包括了TcpTimedWaitDelay,它的默认值为120,表示端口关闭后120秒才能重新使用。
于是我们来算一下,假设有60000个端口可用,如果在120秒内消耗完毕,则每秒最多使用500个端口,这远远低于MongoDB的性能瓶颈,甚至接近了一个Web应用程序的需求——根据压力测试,我们单台Web服务器每秒可以处理接近200个动态请求,这意味着平均每个请求只能使用2.5个连接。根据文档,我将TcpTimedWaitDelay设成最短的30秒,这意味着我们可以每秒开启关闭2000个端口,平均每个请求使用10个连接。够了。
这个问题就这样解决了,说实话很简单,也就是个“知道就能解决”的配置问题。当然现在这个方式并不算太理想,更好的方式应该是利用连接池,这样便不会开启/关闭大量的TCP/IP连接,默认的端口数量也已经足够了,更重要的是这也可以省下很大的开销——因为经过测试,即使是最复杂的ASP.NET页面,只要不涉及MongoDB,每秒也能处理6500多个请求,而目前每秒200个动态请求,从数字上看也远低于MongoDB的能力,我们有理由相信目前的性能似乎是卡在连接的打开/关闭上了。
只可惜目前mongodb-csharp的连接池实现有bug,用于清理连接的维护进程居然会让造成明显的中断,甚至在频繁使用十几分钟后还抛出了异常。有机会的话我再看看吧,但我总觉得它目前的实现过于复杂了,我估计都可以说是面向对象的“经典”使用案例了。
最后再来一提,话说我目前使用的是64位的Windows Web Server 2008 R2系统,功能强大,价格便宜,授权宽松,最多允许使用到32GB内存,作为Web服务器我很满意。
- Message Code 27796
-
apache ab压力测试
2011-04-13 19:42:23
apache ab压力测试
相同并发下,用ab测试与用loadrunner测试结果有出入,tps偏小
以前安装好APACHE总是不知道该如何测试APACHE的性能,现在总算找到一个测试工具了。就是APACHE自带的测试工具AB(apache benchmark).在APACHE的bin目录下。
格式: ./ab [options] [http://]hostname[:port]/path
参数:
-n requests Number of requests to perform
//在测试会话中所执行的请求个数。默认时,仅执行一个请求
-c concurrency Number of multiple requests to make
//一次产生的请求个数。默认是一次一个。
-t timelimit Seconds to max. wait for responses
//测试所进行的最大秒数。其内部隐含值是-n 50000。它可以使对服务器的测试限制在一个固定的总时间以内。默认时,没有时间限制。
-p postfile File containing data to POST
//包含了需要POST的数据的文件.
-T content-type Content-type header for POSTing
//POST数据所使用的Content-type头信息。
-v verbosity How much troubleshooting info to print
//设置显示信息的详细程度 - 4或更大值会显示头信息, 3或更大值可以显示响应代码(404, 200等), 2或更大值可以显示警告和其他信息。 -V 显示版本号并退出。
-w Print out results in HTML tables
//以HTML表的格式输出结果。默认时,它是白色背景的两列宽度的一张表。
-i Use HEAD instead of GET
// 执行HEAD请求,而不是GET。
-x attributes String to insert as table attributes
//
-y attributes String to insert as tr attributes
//
-z attributes String to insert as td or th attributes
//
-C attribute Add cookie, eg. 'Apache=1234. (repeatable)
//-C cookie-name=value 对请求附加一个Cookie:行。 其典型形式是name=value的一个参数对。此参数可以重复。
-H attribute Add Arbitrary header line, eg. 'Accept-Encoding: gzip'
Inserted after all normal header lines. (repeatable)
-A attribute Add Basic WWW Authentication, the attributes
are a colon separated username and password.
-P attribute Add Basic Proxy Authentication, the attributes
are a colon separated username and password.
//-P proxy-auth-username:password 对一个中转代理提供BASIC认证信任。用户名和密码由一个:隔开,并以base64编码形式发送。无论服务器是否需要(即, 是否发送了401认证需求代码),此字符串都会被发送。
-X proxy:port Proxyserver and port number to use
-V Print version number and exit
-k Use HTTP KeepAlive feature
-d Do not show percentiles served table.
-S Do not show confidence estimators and warnings.
-g filename Output collected data to gnuplot format file.
-e filename Output CSV file with percentages served
-h Display usage information (this message)
//-attributes 设置 属性的字符串. 缺陷程序中有各种静态声明的固定长度的缓冲区。另外,对命令行参数、服务器的响应头和其他外部输入的解析也很简单,这可能会有不良后果。它没有完整地实现HTTP/1.x; 仅接受某些'预想'的响应格式。 strstr(3)的频繁使用可能会带来性能问题,即, 你可能是在测试ab而不是服务器的性能。参数很多,一般我们用 -c 和 -n 参数就可以了. 例如:
./ab -c 1000 -n 1000 http://127.0.0.1/index.php
这个表示同时处理1000个请求并运行1000次index.php文件.
#/usr/local/xiaobai/apache2054/bin/ab -c 1000 -n 1000 http://127.0.0.1/index.html.zh-cn.gb2312
This is ApacheBench, Version 2.0.41-dev <$Revision: 1.121.2.12 $> apache-2.0
Copyright (c) 1996 Adam Twiss, Zeus Technology Ltd, http://www.zeustech.net/
Copyright (c) 1998-2002 The Apache Software Foundation, http://www.apache.org/Benchmarking 127.0.0.1 (be patient)
Completed 100 requests
Completed 200 requests
Completed 300 requests
Completed 400 requests
Completed 500 requests
Completed 600 requests
Completed 700 requests
Completed 800 requests
Completed 900 requests
Finished 1000 requests
Server Software: Apache/2.0.54
//平台apache 版本2.0.54
Server Hostname: 127.0.0.1
//服务器主机名
Server Port: 80
//服务器端口Document Path: /index.html.zh-cn.gb2312
//测试的页面文档
Document Length: 1018 bytes
//文档大小Concurrency Level: 1000
//并发数
Time taken for tests: 8.188731 seconds
//整个测试持续的时间
Complete requests: 1000
//完成的请求数量
Failed requests: 0
//失败的请求数量
Write errors: 0Total transferred: 1361581 bytes
//整个场景中的网络传输量
HTML transferred: 1055666 bytes
//整个场景中的HTML内容传输量
Requests per second: 122.12 [#/sec] (mean)
//大家最关心的指标之一,相当于 LR 中的 每秒事务数 ,后面括号中的 mean 表示这是一个平均值
Time per request: 8188.731 [ms] (mean)
//大家最关心的指标之二,相当于 LR 中的 平均事务响应时间 ,后面括号中的 mean 表示这是一个平均值
Time per request: 8.189 [ms] (mean, across all concurrent requests)
//每个请求实际运行时间的平均值
Transfer rate: 162.30 [Kbytes/sec] received
//平均每秒网络上的流量,可以帮助排除是否存在网络流量过大导致响应时间延长的问题Connection Times (ms)
min mean[+/-sd] median max
Connect: 4 646 1078.7 89 3291
Processing: 165 992 493.1 938 4712
Waiting: 118 934 480.6 882 4554
Total: 813 1638 1338.9 1093 7785
//网络上消耗的时间的分解,各项数据的具体算法还不是很清楚Percentage of the requests served within a certain time (ms)
50% 1093
66% 1247
75% 1373
80% 1493
90% 4061
95% 4398
98% 5608
99% 7368
100% 7785 (longest request)
//整个场景中所有请求的响应情况。在场景中每个请求都有一个响应时间,其中50%的用户响应时间小于1093 毫秒,60% 的用户响应时间小于1247 毫秒,最大的响应时间小于7785 毫秒由于对于并发请求,cpu实际上并不是同时处理的,而是按照每个请求获得的时间片逐个轮转处理的,所以基本上第一个Time per request时间约等于第二个Time per request时间乘以并发请求数
更多信息
ab 不像 LR 那么强大,但是它足够轻便,如果只是在开发过程中想检查一下某个模块的响应情况,或者做一些场景比较简单的测试,ab 还是一个不错的选择——至少不用花费很多时间去学习 LR 那些复杂的功能,就更别说那 License 的价格了。
下面是 ab 的详细参数解释,大家有兴趣的可以研究一下,最近没有足够多的时间研究,如果哪位朋友有兴趣希望可以帮忙翻译一下每个参数的含义,有问题讨论也欢迎在这里回帖 ^_^
ab [ -A auth-username:password ] [ -c concurrency ] [ -C cookie-name=value ] [ -d ] [ -e csv-file ] [ -g gnuplot-file ] [ -h ] [ -H custom-header ] [ -i ] [ -k ] [ -n requests ] [ -p POST-file ] [ -P proxy-auth-username:password ] [ -q ] [ -s ] [ -S ] [ -t timelimit ] [ -T content-type ] [ -v verbosity] [ -V ] [ -w ] [ -x <table>-attributes ] [ -X proxy[:port] ] [ -y <tr>-attributes ] [ -z <td>-attributes ] [http://]hostname[:port]/path
-A auth-username:password
Supply BASIC Authentication credentials to the server. The username and password are separated by a single : and sent on the wire base64 encoded. The string is sent regardless of whether the server needs it (i.e., has sent an 401 authentication needed).
-c concurrency
Number of multiple requests to perform. at a time. Default is one request at a time.
-C cookie-name=value
Add a Cookie: line to the request. The argument is typically in the form. of a name=value pair. This field is repeatable.
-d
Do not display the "percentage served within XX [ms] table". (legacy support).
-e csv-file
Write a Comma separated value (CSV) file which contains for each percentage (from 1% to 100%) the time (in milliseconds) it took to serve that percentage of the requests. This is usually more useful than the 'gnuplot' file; as the results are already 'binned'.
-g gnuplot-file
Write all measured values out as a 'gnuplot' or TSV (Tab separate values) file. This file can easily be imported into packages like Gnuplot, IDL, Mathematica, Igor or even Excel. The labels are on the first line of the file.
-h
Display usage information.
-H custom-header
Append extra headers to the request. The argument is typically in the form. of a valid header line, containing a colon-separated field-value pair (i.e., "Accept-Encoding: zip/zop;8bit").
-i
Do HEAD requests instead of GET.
-k
Enable the HTTP KeepAlive feature, i.e., perform. multiple requests within one HTTP session. Default is no KeepAlive.
-n requests
Number of requests to perform. for the benchmarking session. The default is to just perform. a single request which usually leads to non-representative benchmarking results.
-p POST-file
File containing data to POST.
-P proxy-auth-username:password
Supply BASIC Authentication credentials to a proxy en-route. The username and password are separated by a single : and sent on the wire base64 encoded. The string is sent regardless of whether the proxy needs it (i.e., has sent an 407 proxy authentication needed).
-q
When processing more than 150 requests, ab outputs a progress count on stderr every 10% or 100 requests or so. The -q flag will suppress these messages.
-s
When compiled in (ab -h will show you) use the SSL protected https rather than the http protocol. This feature is experimental and very rudimentary. You probably do not want to use it.
-S
Do not display the median and standard deviation values, nor display the warning/error messages when the average and median are more than one or two times the standard deviation apart. And default to the min/avg/max values. (legacy support).
-t timelimit
Maximum number of seconds to spend for benchmarking. This implies a -n 50000 internally. Use this to benchmark the server within a fixed total amount of time. Per default there is no timelimit.
-T content-type
Content-type header to use for POST data.
-v verbosity
Set verbosity level - 4 and above prints information on headers, 3 and above prints response codes (404, 200, etc.), 2 and above prints warnings and info.
-V
Display version number and exit.
-w
Print out results in HTML tables. Default table is two columns wide, with a white background.
-x <table>-attributes
String to use as attributes for <table>. Attributes are inserted <table here >.
-X proxy[:port]
Use a proxy server for the requests.
-y <tr>-attributes
String to use as attributes for <tr>.
-z <td>-attributes
String to use as attributes for <td>.
相关链接
ab 是 Apache 的一个安装组件,所以需要下载 Apache 安装后才能使用,可以访问 Apache 的项目主页来下载 http://httpd.apache.org/download.cgi
ab 的更多信息可以参加 Apache 主页上的描述
http://httpd.apache.org/docs/2.0/programs/ab.html
本文来自CSDN博客,转载请标明出处:http://blog.csdn.net/jollyant/archive/2010/11/14/6008212.aspx -
转-Loadrunner测试MySql数据库性能,测试SQL语句性能的脚本例子
2011-03-01 14:09:31
此代码为Loadrunner 8 通过C API类型的Vuser测试MySQL性能,或者测试sql语句性能的脚本。
view plaincopy to clipboardprint?
/*需要的表结构如下
CREATE TABLE `test_data` (
`order_id` BIGINT UNSIGNED NOT NULL COMMENT 'Order numbers. Must be unique.',
`status` BOOL NOT NULL DEFAULT '0' COMMENT 'Whether data has been used or not. A value of 0 means FALSE.',
`date_used` DATETIME NULL COMMENT 'Date/time that the data was used.',
UNIQUE (
`order_id`
)
) ENGINE = innodb COMMENT = 'LoadRunner test data';
*/
Action()
{
int rc;
int db_connection; // 数据库连接
int query_result; // 查询结果集 MYSQL_RES
char** result_row; // 查询的数据衕
char *server = "localhost";
char *user = "root";
char *password = "123456";
char *database = "test";
int port = 3306;
int unix_socket = NULL;
int flags = 0;
// 找到libmysql.dll的所在位置.
rc = lr_load_dll("C:\\Program Files\\MySQL\\MySQL Server 5.1\\bin\\libmysql.dll");
if (rc != 0) {
lr_error_message("Could not load libmysql.dll");
lr_abort();
}
// 创建MySQL对象
db_connection = mysql_init(NULL);
if (db_connection == NULL) {
lr_error_message("Insufficient memory");
lr_abort();
}
// 连接到MySQL数据库
rc = mysql_real_connect(db_connection, server, user, password, database, port, unix_socket, flags);
if (rc == NULL) {
lr_error_message("%s", mysql_error(db_connection));
mysql_close(db_connection);
lr_abort();
}
// 向数据库插入数据
// 此处的 {ORDER_ID} 是一个参数,简单测试时可以用一个常数代替
lr_save_string (lr_eval_string("INSERT INTO test_data (order_id) VALUES ({ORDER_ID})"),"paramInsertQuery");
rc = mysql_query(db_connection, lr_eval_string("{paramInsertQuery}"));
if (rc != 0) {
lr_error_message("%s", mysql_error(db_connection));
mysql_close(db_connection);
lr_abort();
}
// 从数据库读取一个数据并显示
rc = mysql_query(db_connection, "SELECT order_id FROM test_data WHERE status IS FALSE LIMIT 1");
if (rc != 0) {
lr_error_message("%s", mysql_error(db_connection));
mysql_close(db_connection);
lr_abort();
}
query_result = mysql_use_result(db_connection);
if (query_result == NULL) {
lr_error_message("%s", mysql_error(db_connection));
mysql_free_result(query_result);
mysql_close(db_connection);
lr_abort();
}
// 如果结果集包含多行数据,需要多次调用 mysql_fetch_row 直到返回NULL
result_row = (char **)mysql_fetch_row(query_result);
if (result_row == NULL) {
lr_error_message("Did not expect the result set to be empty");
mysql_free_result(query_result);
mysql_close(db_connection);
lr_abort();
}
// 保存参数,用于删除这行数据
lr_save_string(result_row[0], "paramOrderID");
lr_output_message("Order ID is: %s", lr_eval_string("{paramOrderID}"));
mysql_free_result(query_result);
// 在事务里更新一行数据,需要用InnoDB引擎
rc = mysql_query(db_connection, "BEGIN"); //启动事务
if (rc != 0) {
lr_error_message("%s", mysql_error(db_connection));
mysql_close(db_connection);
lr_abort();
}
// 使用 "FOR UPDATE" 锁住要更新的数据行
rc = mysql_query(db_connection, "SELECT order_id FROM test_data WHERE status IS FALSE LIMIT 1 FOR UPDATE");
if (rc != 0) {
lr_error_message("%s", mysql_error(db_connection));
mysql_close(db_connection);
lr_abort();
}
query_result = mysql_use_result(db_connection);
if (query_result == NULL) {
lr_error_message("%s", mysql_error(db_connection));
mysql_free_result(query_result);
mysql_close(db_connection);
lr_abort();
}
result_row = (char **)mysql_fetch_row(query_result);
if (result_row == NULL) {
lr_error_message("没有查询到结果");
mysql_free_result(query_result);
mysql_close(db_connection);
lr_abort();
}
lr_save_string(result_row[0], "paramOrderID");
lr_output_message("Order ID is: %s", lr_eval_string("{paramOrderID}"));
mysql_free_result(query_result);
lr_save_string(lr_eval_string("UPDATE test_data SET status=TRUE, date_used=NOW() WHERE order_id='{paramOrderID}'"),"paramUpdateQuery");
rc = mysql_query(db_connection, lr_eval_string("{paramUpdateQuery}"));
if (rc != 0) {
lr_error_message("%s", mysql_error(db_connection));
mysql_close(db_connection);
lr_abort();
}
rc = mysql_query(db_connection, "COMMIT"); // 提交事务
if (rc != 0) {
lr_error_message("%s", mysql_error(db_connection));
mysql_close(db_connection);
lr_abort();
}
// 再次查找数据,应该为空了,因为前面的事务更新了标志
rc = mysql_query(db_connection, "SELECT order_id FROM test_data WHERE status IS FALSE LIMIT 1");
if (rc != 0) {
lr_error_message("%s", mysql_error(db_connection));
mysql_close(db_connection);
lr_abort();
}
query_result = mysql_use_result(db_connection);
if (query_result == NULL) {
lr_error_message("%s", mysql_error(db_connection));
mysql_free_result(query_result);
mysql_close(db_connection);
lr_abort();
}
result_row = (char **)mysql_fetch_row(query_result);
if (result_row == NULL) {
lr_output_message("Result set is empty as expected");
mysql_free_result(query_result);
} else {
lr_error_message("Did not expect the result set to contain any rows");
mysql_free_result(query_result);
mysql_close(db_connection);
lr_abort();
}
// 删除数据
lr_save_string(lr_eval_string("DELETE FROM test_data WHERE order_id = '{paramOrderID}'"),"paramDeleteQuery");
rc = mysql_query(db_connection, lr_eval_string("{paramDeleteQuery}"));
if (rc != 0) {
lr_error_message("%s", mysql_error(db_connection));
mysql_close(db_connection);
lr_abort();
}
// 释放MySQL资源
mysql_close(db_connection);
return 0;
}
/*需要的表结构如下
CREATE TABLE `test_data` (
`order_id` BIGINT UNSIGNED NOT NULL COMMENT 'Order numbers. Must be unique.',
`status` BOOL NOT NULL DEFAULT '0' COMMENT 'Whether data has been used or not. A value of 0 means FALSE.',
`date_used` DATETIME NULL COMMENT 'Date/time that the data was used.',
UNIQUE (
`order_id`
)
) ENGINE = innodb COMMENT = 'LoadRunner test data';
*/
Action()
{
int rc;
int db_connection; // 数据库连接
int query_result; // 查询结果集 MYSQL_RES
char** result_row; // 查询的数据衕char *server = "localhost";
char *user = "root";
char *password = "123456";
char *database = "test";
int port = 3306;
int unix_socket = NULL;
int flags = 0;// 找到libmysql.dll的所在位置.
rc = lr_load_dll("C:\\Program Files\\MySQL\\MySQL Server 5.1\\bin\\libmysql.dll");
if (rc != 0) {
lr_error_message("Could not load libmysql.dll");
lr_abort();
}// 创建MySQL对象
db_connection = mysql_init(NULL);
if (db_connection == NULL) {
lr_error_message("Insufficient memory");
lr_abort();
}// 连接到MySQL数据库
rc = mysql_real_connect(db_connection, server, user, password, database, port, unix_socket, flags);
if (rc == NULL) {
lr_error_message("%s", mysql_error(db_connection));
mysql_close(db_connection);
lr_abort();
}// 向数据库插入数据
// 此处的 {ORDER_ID} 是一个参数,简单测试时可以用一个常数代替
lr_save_string (lr_eval_string("INSERT INTO test_data (order_id) VALUES ({ORDER_ID})"),"paramInsertQuery");
rc = mysql_query(db_connection, lr_eval_string("{paramInsertQuery}"));
if (rc != 0) {
lr_error_message("%s", mysql_error(db_connection));
mysql_close(db_connection);
lr_abort();
}// 从数据库读取一个数据并显示
rc = mysql_query(db_connection, "SELECT order_id FROM test_data WHERE status IS FALSE LIMIT 1");
if (rc != 0) {
lr_error_message("%s", mysql_error(db_connection));
mysql_close(db_connection);
lr_abort();
}
query_result = mysql_use_result(db_connection);
if (query_result == NULL) {
lr_error_message("%s", mysql_error(db_connection));
mysql_free_result(query_result);
mysql_close(db_connection);
lr_abort();
}
// 如果结果集包含多行数据,需要多次调用 mysql_fetch_row 直到返回NULL
result_row = (char **)mysql_fetch_row(query_result);
if (result_row == NULL) {
lr_error_message("Did not expect the result set to be empty");
mysql_free_result(query_result);
mysql_close(db_connection);
lr_abort();
}
// 保存参数,用于删除这行数据
lr_save_string(result_row[0], "paramOrderID");
lr_output_message("Order ID is: %s", lr_eval_string("{paramOrderID}"));
mysql_free_result(query_result);// 在事务里更新一行数据,需要用InnoDB引擎
rc = mysql_query(db_connection, "BEGIN"); //启动事务
if (rc != 0) {
lr_error_message("%s", mysql_error(db_connection));
mysql_close(db_connection);
lr_abort();
}
// 使用 "FOR UPDATE" 锁住要更新的数据行
rc = mysql_query(db_connection, "SELECT order_id FROM test_data WHERE status IS FALSE LIMIT 1 FOR UPDATE");
if (rc != 0) {
lr_error_message("%s", mysql_error(db_connection));
mysql_close(db_connection);
lr_abort();
}
query_result = mysql_use_result(db_connection);
if (query_result == NULL) {
lr_error_message("%s", mysql_error(db_connection));
mysql_free_result(query_result);
mysql_close(db_connection);
lr_abort();
}
result_row = (char **)mysql_fetch_row(query_result);
if (result_row == NULL) {
lr_error_message("没有查询到结果");
mysql_free_result(query_result);
mysql_close(db_connection);
lr_abort();
}
lr_save_string(result_row[0], "paramOrderID");
lr_output_message("Order ID is: %s", lr_eval_string("{paramOrderID}"));
mysql_free_result(query_result);
lr_save_string(lr_eval_string("UPDATE test_data SET status=TRUE, date_used=NOW() WHERE order_id='{paramOrderID}'"),"paramUpdateQuery");
rc = mysql_query(db_connection, lr_eval_string("{paramUpdateQuery}"));
if (rc != 0) {
lr_error_message("%s", mysql_error(db_connection));
mysql_close(db_connection);
lr_abort();
}
rc = mysql_query(db_connection, "COMMIT"); // 提交事务
if (rc != 0) {
lr_error_message("%s", mysql_error(db_connection));
mysql_close(db_connection);
lr_abort();
}// 再次查找数据,应该为空了,因为前面的事务更新了标志
rc = mysql_query(db_connection, "SELECT order_id FROM test_data WHERE status IS FALSE LIMIT 1");
if (rc != 0) {
lr_error_message("%s", mysql_error(db_connection));
mysql_close(db_connection);
lr_abort();
}
query_result = mysql_use_result(db_connection);
if (query_result == NULL) {
lr_error_message("%s", mysql_error(db_connection));
mysql_free_result(query_result);
mysql_close(db_connection);
lr_abort();
}
result_row = (char **)mysql_fetch_row(query_result);
if (result_row == NULL) {
lr_output_message("Result set is empty as expected");
mysql_free_result(query_result);
} else {
lr_error_message("Did not expect the result set to contain any rows");
mysql_free_result(query_result);
mysql_close(db_connection);
lr_abort();
}// 删除数据
lr_save_string(lr_eval_string("DELETE FROM test_data WHERE order_id = '{paramOrderID}'"),"paramDeleteQuery");
rc = mysql_query(db_connection, lr_eval_string("{paramDeleteQuery}"));
if (rc != 0) {
lr_error_message("%s", mysql_error(db_connection));
mysql_close(db_connection);
lr_abort();
}// 释放MySQL资源
mysql_close(db_connection);
return 0;
}http://www.51testing.com/?uid-128935-action-viewspace-itemid-230798
-
LoadRunner之编写Tuxedo脚本(转载)
2011-01-17 16:00:04
LoadRunner之编写Tuxedo脚本
当我们所测试的项目是Tuxedo通信,并且不能使用工具录制脚本,手头只有一些数据(比如服务器报文等等)的时候,我们只有通过手工编写测试脚本啦。
我暂且把编写Tuxedo脚本的工作分为三个重要部分吧。
一、脚本调研部分
1、了解服务器端Tuxedo版本,本地控制机安装Tuxedo客户端,配置环境变量;
2、了解WSL访问方式(IP:Port);
3、了解研发使用的Tuxedo服务名、数据缓冲类型(如CARRAY、FML32等)、缓冲区长度(如1024*1024*3);
4、了解这个缓冲区类型的缓冲结构(包括哪些字段、这些字段的属性(数据类型、数据长度等),以及这些字段要放置什么数据,是任意数据还是指定的死数据);
5、了解报文(报文长度、内容、详细信息;哪些数据需要做参数化;调研报文的格式,是否可以通过在脚本中组装报文,是否可以通过从报文文件中获取报文[从文件中读取的保温不能做参数化处理]),文章最后有对报文的组装形式简要说明;
6、了解报文发送后服务器返回的数据内容、长度等,用作在脚本中判断事务是否成功。
二、脚本编写部分
1、在脚本开头书写脚本详细描述,也就是脚本的名称、脚本语言、作者、脚本编写时间,当然这些都是注释掉的,也是常识,但也是我们容易忽视的地方。
2、在脚本中设定Tuxedo环境变量。
static char *env_allow_array[] = {
"WSNADDR=//163.192.1.126:90900",
"FLDTBLDIR32=c:\bea\tuxedo8.1\etc",
"FIELDTBLS32=ftpflds",
NULL
};
3、定义脚本中变量类型4、初始化数据
5、lrt_tpalloc分配缓冲区空间
pFml = (FBFR32 *)lrt_tpalloc("FML32",0,4096);
6、lrt_Finitialize32初始化缓冲区
lrt_Finitialize32((FBFR32 *)pFml);
7、组装报文,lrt_Fadd32_fld根据缓冲区结构把字段信息添加到缓冲区
lrt_Fadd32_fld((FBFR32*)pFml,"id=167813666","value=\220\074""3\001\n",LRT_END_OF_PARMS);
8、发送lrt_tpcall请求
lrt_tpcall( "SVCName", (char *)pFml, 0, &MsgRcv, &rcvlen, 0 );
9、判断返回的信息是否正确(看你是不是有这个需求)
10、使用lrt_tpfree释放申请的请求和应答buffer空间(也就是对有lrt_tpalloc获取的缓冲区进行释放)
lrt_tpfree((char *)pFml);
11、对每个变量和每一步执行代码做注释,要养成写完脚本后做注释的习惯
三、脚本调试部分
对与调试部分对脚本来说是十分重要的一块,写完脚本后,必须验证脚本。运行脚本对不同的日志提示进行相应的调试即可,可以通过设置断点(F9),单步执行(F10),增加日志函数等方法调试脚本。由于脚本调试过程中遇到的问题多样化,解决的办法也各不相同,这里不再赘述。
补充:
组装报文的形式(据我知道的):
1、在脚本中直接通过strcat()函数和lr_eval_string()函数组合或使用sprintf()函数和lr_eval_string()函数组合组装报文(在其中可以对报文做参数化操作),然后把报文串赋值给一个字符串。
2、如果本次性能测试不要求对报文做参数化,并且项目组给的报文数据是以二进制格式或其他格式的文件(如****.bin、***文件)存在的话,我们也可以写C代码读取数据文件信息(具体读取文件操作的代码可以参照VuGen帮助文档),把报文发给后端。
手工编写脚本是一项技术性要求很强的工作,更能提高测试工程师的技术水平。尽管通过纯手工编写的脚本也对服务器施加了压力,但是它忽视了用户端的处理逻辑。在尽量模拟真实环境中用户操作的原则下,这样是否更能真实模拟用户的操作,还有待进一步研究。
本文来自CSDN博客,转载请标明出处:http://blog.csdn.net/lissxe850528/archive/2010/08/18/5821862.aspx
-
Loadrunner的Tuxedo脚本分析,基本流程和基本函数介绍
2011-01-17 15:47:06
#include "lrt.h"
#include "replay.vdf"vuser_init()
{
//=================================================================================================================
// 第一个交易
// 1.设置变量组: Sets a list of environment variables.
lrt_set_env_list(env_allow_array);// 2.从配置文件读取环境变量: Adds variables to the environment from a file.
lrt_tuxreadenv("C:\\Program Files\\test\\test8\\etc\\tuxedoenv.ini", "TUXCOMM");//事务开始
lr_start_transaction("01_login");// 3. Modifies an existing environment value or adds a value to the environment.
lrt_tuxputenv("ULOGPFX=c:\\log\\330100-300302");lr_think_time(25);
// 4.分配空间: Allocates a new buffer.
// The lrt_tpalloc function allocates a new buffer and returns a pointer to a buffer of specified type. Since some buffer types
// require initialization before they can be used, lrt_tpalloc initializes a buffer after it is allocated, before it is returned.
data_0 = lrt_tpalloc("FML32", "", 65000);// 5.进行初始化: Initializes an existing FML buffer.
// 注意: data_0 在replay.vdf 中已经被定义,同时在此处被初始化,初始化后,就可以向里面添加field-value对了.
lrt_Finitialize32((FBFR32*)data_0);// 6.向data_0中加field-value对,就是传给后台tuxedo服务的数据:
lrt_Fadd32_fld((FBFR32*)data_0, "id=167772364", "value=330100", LRT_END_OF_PARMS);
lrt_Fadd32_fld((FBFR32*)data_0, "id=167772373", "value=10.253.1.138", LRT_END_OF_PARMS);
lrt_Fadd32_fld((FBFR32*)data_0, "id=167772374", "value=000000000000", LRT_END_OF_PARMS);
lrt_Fadd32_fld((FBFR32*)data_0, "id=167772375", "value=1", LRT_END_OF_PARMS);
lrt_Fadd32_fld((FBFR32*)data_0, "id=167772422", "value=300302", LRT_END_OF_PARMS);
lrt_Fadd32_fld((FBFR32*)data_0, "id=167772423", "value=000000", LRT_END_OF_PARMS);// 7. 分配空间给data_1: Allocates a new buffer.
data_1 = lrt_tpalloc("FML32", "", 65000);
// 8. 使用lrt_tpcall 调用服务,发送的数据是data_0,服务器的返回信息保存在data_1中.
// lrt_tpcall Sends a service request and awaits its reply.
// int lrt_tpcall ( char *svc, char *idata, long ilen, char **odata, long *olen, long flags );// svc Requested service (can be parameterized).
// idata Data portion of the request.
// ilen Length of request data to send.
// odata Reply data.
// olen Length of reply data.
// flags Valid flags: TPNOTRAN- SVC will not be performed on behalf of caller's transaction,
// TPNOCHANGE - buffer type of reply data is not allowed to change, TPNOBLOCK - request not sent if blocking condition exists,
// TPNOTIME - caller immune to blocking timeouts, TPSIGRSTRT - any interrupted system calls are re-issued after lrt_tpcall.tpresult_int = lrt_tpcall("new_css_Login",
data_0,
0,
&data_1,
&olen,
0);
/* Returned FML32 buffer 1 */
// 9.使用lrt_save32_fld_val 从服务器返回信息中获取需要的数据:
// The lrt_save32_fld_val function saves the current value of an FML32 buffer to a parameter specified by paramName.
// lrt_save32_fld_val(fbfr, "id=xxxx", 0, "parameter");
// lrt_save32_fld_val(fbfr, "name=xxxx", 0, "parameter");
lrt_save32_fld_val((FBFR32*)data_1,"id=167772363",0,"returnValue") ;
// print
lr_output_message("返回值:%s",lr_eval_string("{returnValue}") ) ;// 10.如果出错,则停止事务Aborts the current transaction if the previous Tuxedo function resulted in an error.
lrt_abort_on_error();
//11.释放之前的空间和连接:
// The lrt_tpfree function frees a buffer that was previously obtained by either lrt_tpalloc or lrt_tprealloc.
lrt_tpfree(data_0);
lrt_tpfree(data_1);
// The lrt_tpterm function removes a client from a System/T application.
// If the client is in transaction mode, then the transaction is rolled back.
lrt_tpterm();
// 第一个交易已经完成.
//=================================================================================================================// 进行第二个交易:
// 其他的操作和第一轮操作类似:
//分配新的空间
data_0 = lrt_tpalloc("FML32", "", 65535);
// 重新初始化:
lrt_Finitialize32((FBFR32*)data_0);
//设置数据
lrt_Fadd32_fld((FBFR32*)data_0, "id=33554633", "value=5084013", LRT_END_OF_PARMS);
lrt_Fadd32_fld((FBFR32*)data_0, "id=33554637", "value=9901", LRT_END_OF_PARMS);
lrt_Fadd32_fld((FBFR32*)data_0, "id=33554640", "value=1", LRT_END_OF_PARMS);
lrt_Fadd32_fld((FBFR32*)data_0, "id=33554642", "value=920041", LRT_END_OF_PARMS);
lrt_Fadd32_fld((FBFR32*)data_0, "id=42755520", "value=0", LRT_END_OF_PARMS);
lrt_Fadd32_fld((FBFR32*)data_0, "id=67109070", "value=0", LRT_END_OF_PARMS);
lrt_Fadd32_fld((FBFR32*)data_0, "id=67109071", "value=1", LRT_END_OF_PARMS);
lrt_Fadd32_fld((FBFR32*)data_0, "id=67109076", "value=Q", LRT_END_OF_PARMS);
// 为返回值分配空间:
data_1 = lrt_tpalloc("FML32", "", 65535);
// 调用服务:
tpresult_int = lrt_tpcall("csi_01",
data_0,
0,
&data_1,
&olen,
0);
/* Returned FML32 buffer 2 */
lrt_abort_on_error();
// 释放
lrt_tpfree(data_0);
lrt_tpfree(data_1);
lrt_tpterm();
// 第二个交易完成
//=================================================================================================================lr_end_transaction("01_login", LR_AUTO);
lr_start_transaction("05_select");
// 第三个及以后的所有交易,都与之前的交易类似:
//=================================================================================================================lr_think_time(55);
data_0 = lrt_tpalloc("FML32", "", 65535);
lrt_Finitialize32((FBFR32*)data_0);
lrt_Fadd32_fld((FBFR32*)data_0, "id=1101360", "value=1", LRT_END_OF_PARMS);
lrt_Fadd32_fld((FBFR32*)data_0, "id=1101360", "value=0", LRT_END_OF_PARMS);
lrt_Fadd32_fld((FBFR32*)data_0, "id=1101360", "value=0", LRT_END_OF_PARMS);
lrt_Fadd32_fld((FBFR32*)data_0, "id=1101360", "value=0", LRT_END_OF_PARMS);
lrt_Fadd32_fld((FBFR32*)data_0, "id=33554633", "value=5084013", LRT_END_OF_PARMS);
lrt_Fadd32_fld((FBFR32*)data_0, "id=33554637", "value=9901", LRT_END_OF_PARMS);
lrt_Fadd32_fld((FBFR32*)data_0, "id=33554640", "value=1", LRT_END_OF_PARMS);
lrt_Fadd32_fld((FBFR32*)data_0, "id=33554642", "value=110001", LRT_END_OF_PARMS);data_1 = lrt_tpalloc("FML32", "", 65535);
tpresult_int = lrt_tpcall("csi_01",
data_0,
0,
&data_1,
&olen,
0);
/* Returned FML32 buffer 3 */
lrt_abort_on_error();lrt_tpfree(data_0);
lrt_tpfree(data_1);
lrt_tpterm();
//=================================================================================================================data_0 = lrt_tpalloc("FML32", "", 65535);
lrt_Finitialize32((FBFR32*)data_0);
lrt_Fadd32_fld((FBFR32*)data_0, "id=1101225", "value=0", LRT_END_OF_PARMS);
lrt_Fadd32_fld((FBFR32*)data_0, "id=1101307", "value=0", LRT_END_OF_PARMS);
lrt_Fadd32_fld((FBFR32*)data_0, "id=168873390", "value=", LRT_END_OF_PARMS);data_1 = lrt_tpalloc("FML32", "", 65535);
tpresult_int = lrt_tpcall("csi_01",
data_0,
0,
&data_1,
&olen,
0);
/* Returned FML32 buffer 11 */
lrt_abort_on_error();
lrt_tpfree(data_0);
lrt_tpfree(data_1);
lrt_tpterm();
lr_end_transaction("05_select", LR_AUTO);//=================================================================================================================
return 0;
}Action()
{
return 0;
}vuser_end()
{
return 0;
}replay.vdf
#ifndef TUXVDF_H
#define TUXVDF_H
char* data_0;
char* data_1;/* Returned FML32 buffer 1
field: "id=33554633", "occurrence=0", "value=5084013"
field: "id=33554637", "occurrence=0", "value=9901"
Reply buffer */#endif /* TUXVDF_H */
loadrunner wdiff对比返回结果,分析异同,进行关联
也可以监测服务器收到的和返回的信息,分析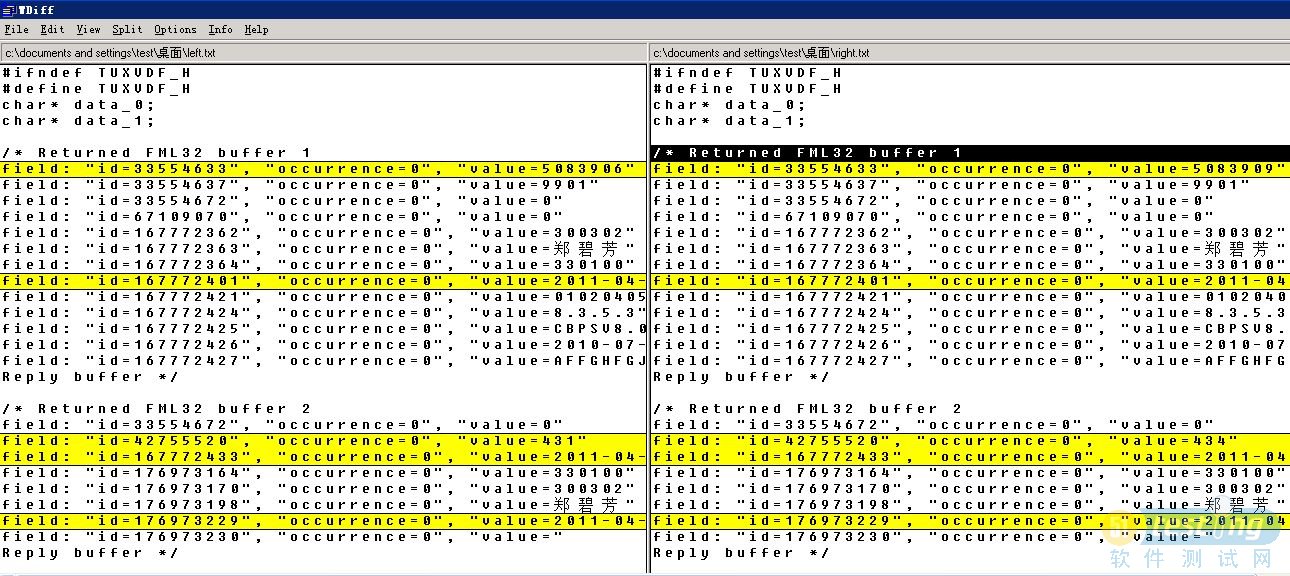
-
LR9系列安装报错解决(a previous installation has not completed.)
2010-12-30 10:14:30
LR9系列安装报错解决(Setup has determined that a previous installation has not completed.)
在一个新的XP系统中装HP LoadRunner 9.10,点击安装后提示“Setup has determined that a previous installation has not completed.
You should restart the system in order to complete this process.”重启电脑后问题还存在,用网上下的deletelicense.exe和优化大师清处注册表信息也不行。 后来从网上找到一种可以解决的方法,那就是:
1. 打开临时文件夹,开始—>运行—>输入%temp%
2. 找到“Prereq_Mgr.HP_LoadRunner_9.10.log”文件,这个文件记录着不能安装的原因。我的这个日志文件记录在一个新的XP系统中装HP LoadRunner 9.10,点击安装后提示“Setup has determined that a previous installation has not completed.
You should restart the system in order to complete this process.”重启电脑后问题还存在,用网上下的deletelicense.exe和优化大师清处注册表信息也不行。 后来从网上找到一种可以解决的方法,那就是:
1. 打开临时文件夹,开始—>运行—>输入%temp%
2. 找到“Prereq_Mgr.HP_LoadRunner_9.10.log”文件,这个文件记录着不能安装的原因。我的这个日志文件记录如下:
[04/23/09 12:58:31] INFO: (IsRebootRequired) The registry value [PendingFileRenameOperations] exists under [HKEY_LOCAL_MACHINE\SYSTEM\CurrentControlSet\Control\Session Manager] and cannot be ignored3、删除注册表项(如果要操作注册表,最好要把注册表备份好,防止误操作)
把注册表HKEY_LOCAL_MACHINE\SYSTEM\CurrentControlSet\Control\Session Manager下的项PendingFileRenameOperations删除。再安装HP LoadRunner 9.10就可以正常安装了!
如下:
[04/23/09 12:58:31] INFO: (IsRebootRequired) The registry value [PendingFileRenameOperations] exists under [HKEY_LOCAL_MACHINE\SYSTEM\CurrentControlSet\Control\Session Manager] and cannot be ignored3、删除注册表项(如果要操作注册表,最好要把注册表备份好,防止误操作)
把注册表HKEY_LOCAL_MACHINE\SYSTEM\CurrentControlSet\Control\Session Manager下的项PendingFileRenameOperations删除。再安装HP LoadRunner 9.10就可以正常安装了!
-
LR9.5 与sqlserver2008不兼容?
2010-10-27 21:31:48
LR9.5 与sqlserver2008不兼容?
今天参数化时,lr死掉,报错如下。
vugen.exe caused an EXCEPTION_ACCESS_VIOLATION in module MFC80.DLL at 001B:7821C0F3, Ordinal3771()+0098 byte(s)
EAX=00000000 EBX=079C9FE0 ECX=77E2B888 EDX=00000030 ESI=016C7340
EDI=00000001 EBP=0012E284 ESP=0012E1D0 EIP=7821C0F3 FLG=00010206
CS=001B DS=0023 SS=0023 ES=0023 FS=003B GS=0000001B:7821C0F3 MFC80.DLL, Ordinal3771()+0098 byte(s)
001B:7820277E MFC80.DLL, Ordinal6275()+0034 byte(s)
001B:78201514 MFC80.DLL, Ordinal1028()+0163 byte(s)
001B:7820172A MFC80.DLL, Ordinal1209()+0053 byte(s)
001B:40A70AAB coparamui.dll, DllUnregisterServer()+36923 byte(s)
001B:77E2B6E3 USER32.dll, LoadCursorW()+19701 byte(s)
。。。。。
经查是与SQL2008不兼容问题
google解决如下:
分析了原因可能是因为调用的MFC80.dll和安装sql2008附带的MFC80.dll不一致。
loadrunner9.5调用下面路径下的mfc80.dll
C:\WINDOWS\WinSxS\x86_Microsoft.VC80.MFC_1fc8b3b9a1e18e3b_8.0.50727.1833_x-ww_2fd6f5db\mfc80.dll ......1,080KB
安装sqlserver 2008后,系统中的mfc80.dll
C:\WINDOWS\WinSxS\x86_Microsoft.VC80.MFC_1fc8b3b9a1e18e3b_8.0.50727.42_x-ww_dec6ddd2\mfc80.dll.........1,068KB
解决方法:
备份C:\WINDOWS\WinSxS\x86_Microsoft.VC80.MFC_1fc8b3b9a1e18e3b_8.0.50727.1833_x-ww_2fd6f5db\mfc80.dll => mfc80.dll.bak
复制C:\WINDOWS\WinSxS\x86_Microsoft.VC80.MFC_1fc8b3b9a1e18e3b_8.0.50727.42_x-ww_dec6ddd2\mfc80.dll到上面的目录。
重启loadrunner9.5,尝试参数化,正常。参考自http://bbs.51testing.com/viewthread.php?tid=155060
"+userLink+""; $('miniAd').show(); } }, onFailure: function(){} }}); } showMiniAd();
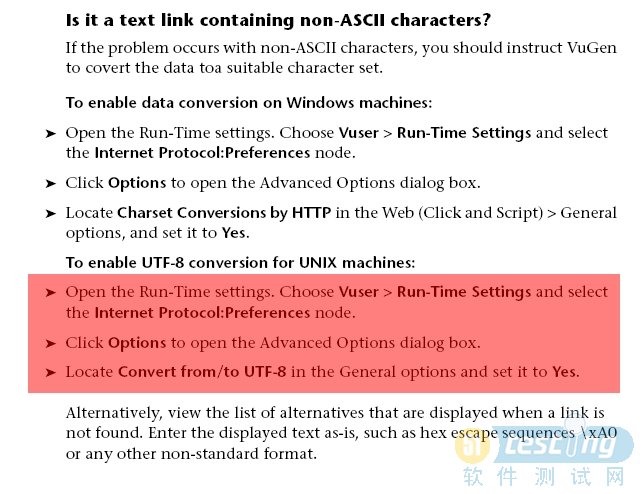
标题搜索
我的存档
数据统计
- 访问量: 714586
- 日志数: 415
- 图片数: 1
- 文件数: 3
- 建立时间: 2008-12-07
- 更新时间: 2015-07-14
