
-
QC10升级到ALM11
2013-12-16 16:15:12

 从QC10升级到ALM11升级前准备:1、数据库服务器还是老的,保险起见,先备份数据库。然后把QC siteadmin中把所有的项目都关闭,并备份Repository下的项目库,最后卸载QC10。2、安装QC11,跟原来QC10服务器配置一致。注意在qcsiteadmin_db,选择‘Upgrade the existing schema’,用户名和密码都与之前配置QC10的一样。3、安装完成后,拷贝备份的项目库到新的Repository路径下,然后进入QC11 siteadmin页面,先升级项目,在激活!OK,升级完成!遇到的问题:1、安装完成ALM11后,发现无法启动“HP Application Lifecycle Management”服务,查看系统应用程序日志,发现“Could not load the Java Virtual Machine’;问题出在这里!可能是之前卸载QC10不干净。解决办法:将C:\Program Files\HP\HP Application Lifecycle Management Platform\java\bin下面的msvcr71.dll拷贝到windows\system32或windows\sysWoW64下面,问题解决!2、安装完成后其中有个项目升级到ALM11过程中有“架构差异,请打开验证报告以查看必须手动修正的问题”!解决办法:先修复项目,一些无法修复的需要我们自己手动修改,我这里就4个表中的ID字段标示规范把“否”改成“是”就好了,再次修复项目,最后在升级项目即可!
 -
QC10.0迁移后无法登录,项目无法使用的解决方案
2012-05-22 16:50:30
公司最近搞服务器虚拟化,在虚拟机中新装了QC10.0,要把原先在用的QC迁移到虚拟机中。下面大致列下本次迁移过程:
1、停止QC Server
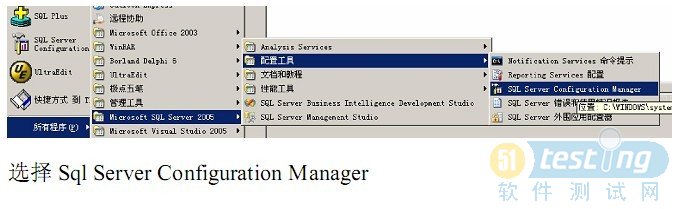
2.备份Domain repository,它囊括每个项目的大量数据(包括自动化测试数据、附件、设置和格式表单等)。要想知道某个项目所使用的数据库的名字,可以在Site Administrator的Projects标签下单击项目列表选择一个项目,右边 Project Directory会显示这个项目Domain库的路径。如果安装QC时,安装路径是默认的,那么Domain库存储在: Windows***作系统:C:\Program Files\Common Files\Mercury Interactive\Quality Center\repository\qc
3.备份数据库服务器,它囊括了其他项目数据(例如手动测试数据、缺陷、自定义数据、组测试和运行测试数据)。要想知道某个项目所使用的数据库的名字,可以在Site Administrator的Projects标签下单击项目列表选择一个项目,右边Database Name就会显示这个项目所使用的数据库名称。数据库备份可以用分离后复制方式。
4、把备份出来的项目库和数据库都还原到新服务器中,项目文件该拷贝的拷贝,数据库该附加的附加。(这个里要注意qcsiteadmin_db库,记得把这个新安装后的qcsiteadmin_db库分离出来备份,以免出现问题可以恢复!)
做完这些,我们打开QC会发现无法登录,如下图所示
 在数据库中查看权限,我们可以看到报(“无法作为数据库主体执行”,因为主体“td”不存在)的错误
 以下错误是在qcsiteadmin_db库恢复后,项目库还没恢复出现的问题:
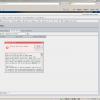 解决方法:2 {9 e; Q" V7 `' k: \* e) T
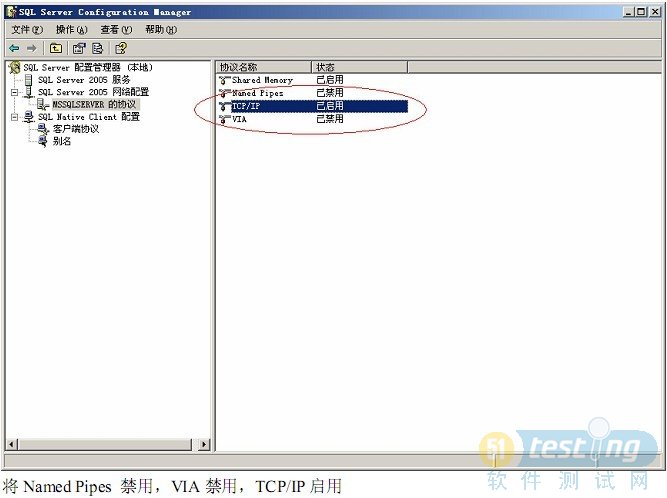
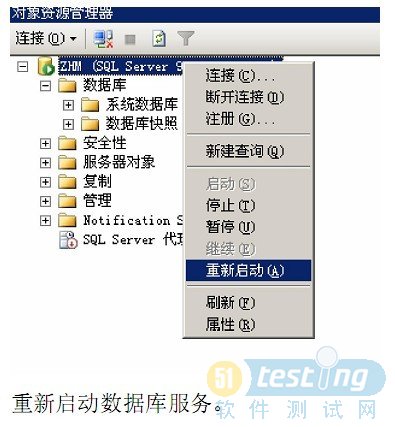
首先暂停QC服务,然后选择QC数据库(项目库和qcsiteadmin_db库),然后在其库对应的SQL查询里运行exec sp_change_users_login 'update_one','TD','TD' 执行完上面的语句后,打开有效权限,可以发现已经可以查看权限了
 就这样把全部的QC相关数据库全部执行一遍后,在启动QC服务,在浏览器中打开QC地址,qcsiteadmin及项目都能正常使用了。
 -
Win 7下破解Loadrunner 11(带中文版下载地址)
2011-05-24 10:46:10
安装好Loadrunner 11后,按以下过程进行破解
1)退出程序,把那两个破解文件lm70.dll和mlr5lprg.dll覆盖掉..\HP\LoadRunner\bin下的这两个文件
2)注意,win7的话一定要以管理员身份运行启动程序,启动后,点击 configuration->loadrunner license,此时会有两个许可证信息存在,退出程序,点击deletelicense.exe(lr删除注册表)文件,来删除刚才得许可证信息,再次打开程序, configuration->loadrunner license->new license,在弹出的输入框中输入license序列号AEABEXFR-YTIEKEKJJMFKEKEKWBRAUNQJU-KBYGB,点击确定,验证通过后,则破解成功!Loadrunner 11下载地址
http://www.genilogix.com/downloads/loadrunner/loadrunner-11.iso中文官方补丁包下载地址
http://h30302.www3.hp.com/prdownloads/Software_HP_LoadRunner_11.00_Sim_Chinese_T7177_15016.iso?downloadid=NTIxMTMxNDg1LDEsSFBfRE9XTkxPQURfQ0VOVEVSLHNvZnR3YXJlLEhQUF9QUk9GSUxFX0lELG5vYm9keUBocC5jb20sSFAtRVNELUFVVEgsMTMwNTcwNzg0NzU2MyxUNzE3N0RTRQ==&merchantId=HP_DOWNLOAD_CENTER复制地址到迅雷直接下载!
如果上面地址不好用的话大家可以自己去HP官方网站下载!
-
[转]Windows 2003 做软RAID详解
2011-02-23 16:05:43
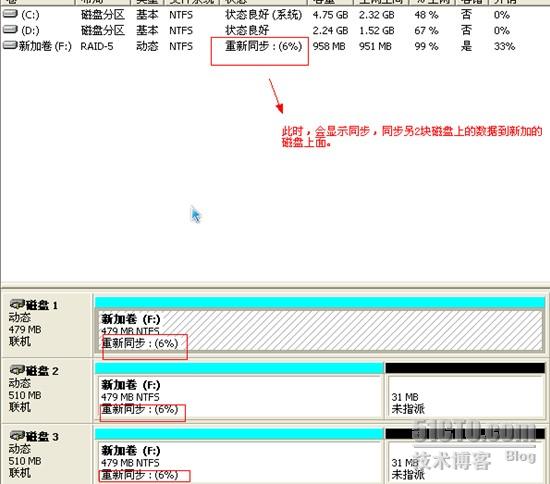
一,软硬RAID的区别:硬件RAID特性:性能好,更稳定,冗余,但价格高,实现相对复杂。软RAID特性:性能稍差,稳定,冗余,win2003内置软件,低廉,实现简单。二,win2003软RAID的一些概念:基本磁盘:新加硬盘的默认类型动态磁盘:要做RAID必须将基本磁盘升级为动态磁盘。卷:windows中的一个分区叫一个卷,删除卷就是删除分区,卷的称呼只适用于动态磁盘。理解,动态磁盘包含的是卷,一个动态磁盘上可以创建几个卷,而且这些卷可以动态扩展空间到非邻接的剩余空间或其它动态磁盘上;这些卷可以指定盘符或挂载点(如已存在盘符的某一文件夹下),卷是磁盘上的一个逻辑部分;win2003将动态磁盘配置信息存储在相关的硬盘上并经常保持更新,并不存储于系统注册表或其它位置。RAID级别如图1: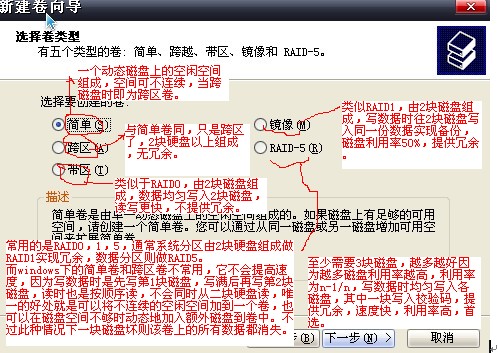 图1三,win2003软RAID的建立以实现RAID5为例,先在虚拟机上添加三块硬盘,大小一样512M,进入系统—计算机管理---磁盘管理,将3块硬盘初始化,然后点右键转化为动态磁盘,此时如图2
 点磁盘1右键---新建卷,弹出向导,点下一步,进入下图
 选择RAID5,下一步
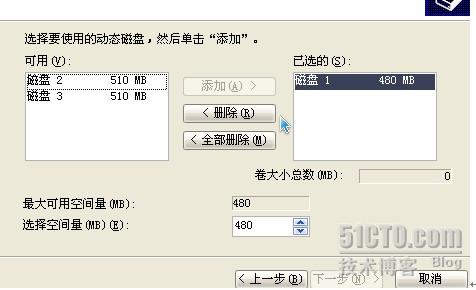 选中左边的磁盘2,磁盘3,添加到右边,注意此处可选择每个磁盘的使用空间
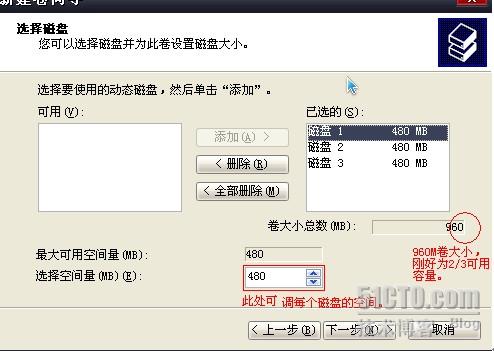
 点击完成如下图
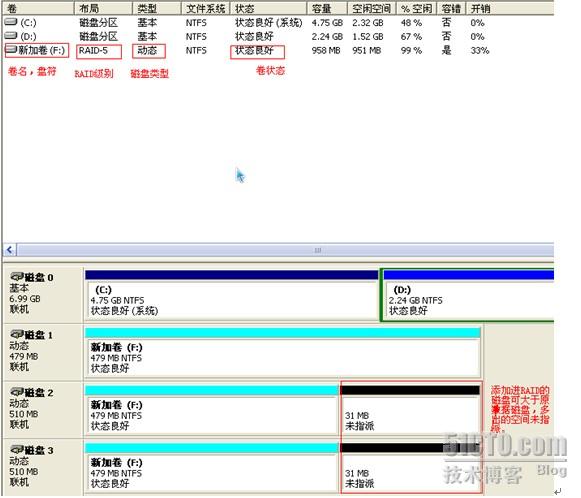 三,RAID的管理模拟其中一块硬盘损坏,在虚拟机中删除一块磁盘再开机,此时如图
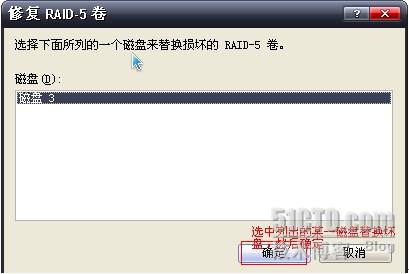
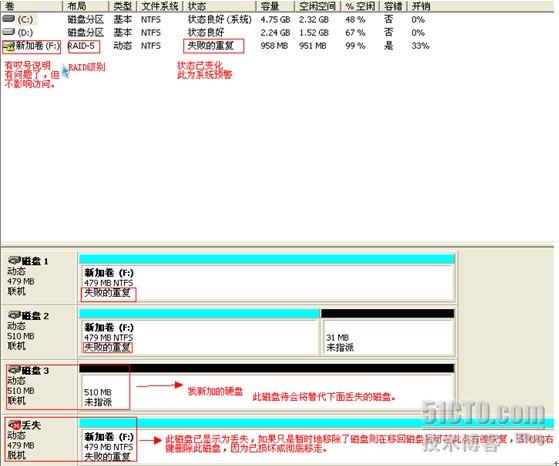 接着,在卷包含的任一磁盘上右击如下
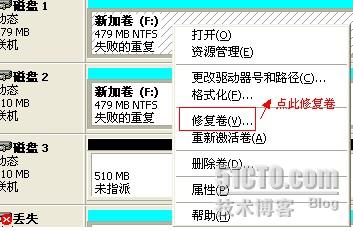
 如果做的是RAID1,道理一样,此时是在原好磁盘上右键---添加镜像,选择新加的磁盘,对于坏磁盘则可以右键---删除镜像,再删除磁盘。举一反三。RAID0意义不大,不存在替换坏磁盘的问题,因为一旦某一磁盘坏则意味着所有数据丢失,替换已无意义。
本文出自 “一路小跑” 博客,请务必保留此出处http://haotian2010.blog.51cto.com/1356518/289260
-
一步步教你安装Quality Center 10
2010-07-22 13:03:49
系统配置:
服务器:Windows Server 2003 SP2
数据库:Microsoft SQL Server 2005 SP2准备工作:
安装QC前保证数据库已经安装成功!然后下载QC10.0客户端和License。 Quality Center 10.0下载地址: http://h30302.www3.hp.com/prdownloads/T7333-15006_1.zip?ordernumber=380460920&itemid=1&downloadid=33646252&merchantId=HP_DOWNLOAD_CENTER&dlm=ON (Quality Center 10.0的下载地址,复制到迅雷里就可下载)
Quality Center 10.0 License:
 QC10.0_license.rar(473 B )
开始安装:
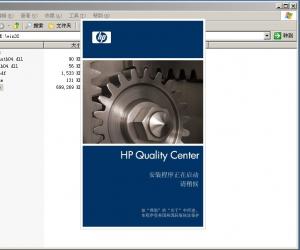
解压Quality Center 10.0安装文件,点击setup.exe开始安装Quality Center。
这里输入licence,

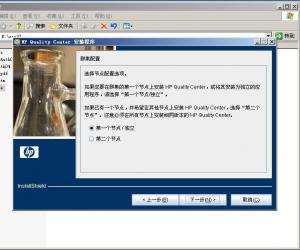
弹出集群配置对话框,如果是第一次安装的话,就选择第一个节点/独立。
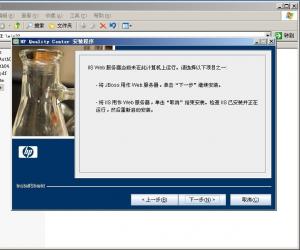
点击下一步。 要求选择应用服务器类型,在默认的情况下,是JBoss应用服务器的(Jboss服务器在QC中都是已经集成了的,不需要单独安装和配置的),也可以选择其他应该服务器,比如IIS,WebLogic服务器等;建议选择Jboss作为应用服务器,本例安装就是选择Jboss应用服务器。Jboss服务器默认占有的端口是8080,如果需要更改访问端口,点击【显示Jboss高级选项】修改端口即可,当然也可以在安装好后,修改相应的配置文件来修改访问端口。

JBoss服务中输入用户名和域名,用户名就是windows系统管理员administrator,也可以不用填,没有任何影响;

Web服务器也选择用Jboss,然后点击【下一步】即可。
选择安装的附带项目。

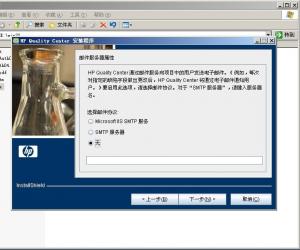
选择邮件服务器,如果系统有邮件服务器,可以选择邮件服务器,本次安装不选择邮件服务器,这并不会影响使用。
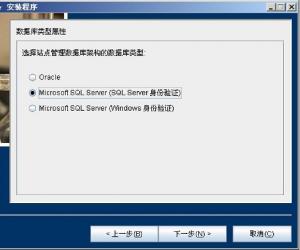
选择SQL Server数据库类型。

开始定义Quality Center 站点管理员的用户名和密码,输入用户名和密码即可;站点管理员就是一个拥有超级权限的用户。

列出本次安装配置的相关信息。

开始进行安装,等待安装完成即可。

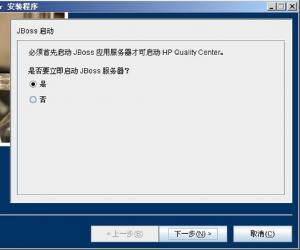
安装完成后,由于使用的是Jboss服务器,需要首先启动Jboss服务器才能正常使用QC。

至此安装完毕,安装过程中如果出现问题,请参考另一篇文章:QC10.0安装问题总结
-
在QC上远程执行QTP问题总结
2010-06-25 16:20:23
根据自己的实际操作,并结合网上给定的一些方法,终于搞定了在QC上远程执行QTP脚本的问题。
出现“RPC服务器不可用”或“The RPC server is unavailable”这种问题,请仔细检查以下各种情况:
1.需要加入域!服务器和客户端都需要加入同个域,但是我这边经过实际操作,发现客户端系统如果是Win7不加入域也能执行,WinXP系统必须加入域!(注:用的是win 7企业版,其它版本有待验证)
2. 启动服务器RPC服务。方法:控制面板-管理工具-服务-“Remote Procedure Call(RPC)”,启动一下(自动),服务状态“启动”;同时要保证执行机中的Server和Workstation服务已启动。
3.服务器端IIS没装。解决:安装IIS。以2000系统为例,控制面板-添加删除程序-添加删除windows组件-“Internet 信息服务(IIS)”打一下勾,下一步……
4.服务器里的QTP,需要设置为允许其他调用。
5.关闭防火墙6.设置QC的代理服务(SystemTest Agent),用户名、密码和域,其中用户名和密码就是服务器的登录帐号和密码。
7.DCOM配置,开启服务器中的“DCOM Server Process Launcher”服务,设置启动类型为“自动”,需要重新启动系统。
(1)运行 -> dcomcnfg.exe -> 组件服务 -> 计算机 -> 我的电脑,右键“属性”,选中“COM 安全”选项卡,将“访问权限”和“启动和激活权限”设置添加Everyone用户,并设置远程启动和远程激活权限为允许。
(2)然后分别右键打开DCOM配置下面的AQTRmtAgent、QuickTest Professional Automation和TlpRmtServer组件属性,将身份验证级别设置为“无”,将“安全”选项卡下面的“访问权限”和“启动和激活权限”自定义,添加Everyone用户,并设置远程启动和远程激活权限为允许。在身份“标识”选项卡下面选择“交互式用户”。8.NT的GUEST用户不能禁用
9.如果执行状态出现“未指定的错误”,这是由于交互式用户,QTP远程桌面登录过服务器引起的,需要重新注销服务器,然后不要用远程桌面登录服务器,需要在服务器本机上登录系统。10.如果执行状态出现“拒绝访问.”,请仔细查看服务器日志事件信息,例如我这边出现过“应用程序-特定 权限设置未将 COM 服务器应用程序(CLSID 为
{6108A56C-6239-41F6-8C0F-94D9CE0D4B61}
)的 远程 激活 权限授予用户 NT AUTHORITY\ANONYMOUS LOGON SID (S-1-5-7)。”这样的错误只要找到DCOM组件下面的{6108A56C-6239-41F6-8C0F-94D9CE0D4B61},将“安全”选项卡下面的“访问权限”和“启动和激活权限”自定义,添加ANONYMOUS LOGON和NETWORK SERVICE用户,并设置远程启动和远程激活权限为允许。如果DCOM组件显示灰色无法编辑,去注册表找到这个CLSID并更改所有者权限。总之一句话,出现问题查看系统日志,根据提示信息去解决问题。
-
【转】QTP插件破解方法
2010-03-11 15:33:21
 -----------方法如下:
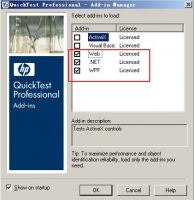
第一步:完成安装.net插件,这是,插件界面会显示出.net和WPF插件,并且有14天的测试license
第二步:正常使用,等14天过完之后,也就是插件的状态变为 no license 之后,将HKEY_LOCAL_MACHINE\SOFTWARE\Mercury Interactive备份
第三步:找到HKEY_LOCAL_MACHINE\SOFTWARE\Mercury Interactive\QuickTest Professional\Add-In Manager\WPF,将名称为“默认”的键值修改为“QTCoreAddin”,再将“ProgID”的键值修改为“Mercury.AddinBaseObj”
第四步:同理,找到HKEY_LOCAL_MACHINE\SOFTWARE\Mercury Interactive\QuickTest Professional\Add-In Manager\WinForms,将将名称为“默认”的键值修改为“QTCoreAddin”,再将“ProgID”的键值修改为“Mercury.AddinBaseObj”
第五步:关闭注册表,重启软件,.net插件和WPF插件的状态都已经变成了licensed状态
可以通过这个方法再尝试破解JAVA等其他插件! 呵呵~大家自由发挥吧!

-
[转]QTP10.0破解方法
2009-02-22 20:33:41

QTP10的破解方法与之前版本类似!
一、从HP官方网上下载QTP10.0并安装。
二、安装成功后,在C:\Program Files\Common Files\Mercury Interactive下创建文件夹:License Manager
三、将破解工具mgn-mqt82.exe复制到C:\Program Files\HP\QuickTest Professional\bin下。
四、运行mgn-mqt82.exe,ok,关闭。
五、用记事本打开License Manager下的lservrc文件,将第一行#前的代码Copy。
六、将代码复制到license向导中的license输入的地方,点击完成就可以了。
恭喜成功了!附:
破解软件: mgn-mqt82.rar(235 KB) -
解决IE8 Session共享问题
2011-06-29 09:53:07

 最近的项目测试中,一个同事机器装的是IE8,当打开2个IE8窗口并以2个不同用户身份分别登录后,之前登录的用户页面会在第二个用户登录以后刷新成第二个用户信息页面。但是在我的本机(IE6)是好的,并未发现类似问题。
我查了整个项目中session设置的地方,并未发现问题。最后分析是session被浏览器共享了,于是网上查了IE8和IE7的区别: IE7中,同一个窗口(IE 进程)共享一个session。
IE8中,所有打开的IE窗口(IE 进程)共享一个session。
这个问题的关键是,cookie在不同的IE进程间是否共享,有些COOKIE是完全共享的,有的作用域只能局限于单个进程。因为cookie中保存着你的sessionid它被服务器用来决定是否应该生成的新的session。
Session默认情况下是以cookie内存储的sessionId作为识别标志,而cookie在浏览器之间独立的。
所以如果是同一个浏览器不管开多少个窗口,都只有一个Session。 解决IE8测试时session共享问题:
1、在IE8的快捷方式的目标栏中添加-nomerge,再打开IE时就不会共享同一个session了。 -
QC10.0安装问题总结
2010-04-10 09:32:52
解压QC安装包,运行setup.exe,安装步骤见《一步步教你安装Quality Center 10》。


倒数几个步骤的时候,系统托盘就会出现一个带红杠的小图标。最后启动jbos服务,完成安装。QC服务启动。就可以使用了。
之后运行你就会发现很多问题
第一,
先解决插件问题,把三个qc插件安装完
第二解决test_type.cab问题,你可以使用QC Explorer,但是不能要求每个开发和测试人员去add这个插件
插件下载http://www.genilogix.com/downloads/qualitycenter/qc-patches/10.0/
这个链接很不错,下载对应操作系统补丁,我使用QC10_Patch13_Windows.zip
第三解决IE访问问题1. 在服务端QC的安装目录下jboss\server\default\deploy目录下找到20qcbin.war这个war包。
2. 用winrar打开这个目录,可以看到start_a.js这个文件。
3. 把start_a.js这个文件copy出来修改添加|| (ua.lastIndexOf(’MSIE 7.0′) != -1)|| (ua.lastIndexOf(’MSIE 8.0′) != -1)后替换 war包中的start_a.js 文件。这里也可以直接在原文件修改。
修改配置成功后,下次重启QC服务也不会有问题。原因是重启服务器的过程中会把20qcbin.war中的内容解压出来到临时目录下的。
这里注意:改完上面的配置需要重启QC服务
还有几个问题如下
1、重新启动后QC服务没有随windows一起启动。需要手动运行C:\Program Files\HP\Quality Center\jboss\bin下面的 run.bat.。运行了 InstallJbossService.bat 之后QC服务器可以随windows启动,不知道这两者有什么关系。。。貌似是把jboss启动作为了windows的服务。
2、重启后系统托盘没有图标。解决方法:运行C:\Program Files\HP\Quality Center\bin目录下面的RunQCTrayIcon.bat 系统托盘图标就会出来了(可以把这个文件放在系统启动项里面)。不能直接运行jboss\bin下面的 QCTrayIcon.exe 会报错的!
3、确保你的 管理工具---->服务中有一个名为HP Quality Center的服务它的可执行文件为C:\Program Files\HP\Quality Center\JBoss\bin\QCJavaService.exe。设置成自动启动。
4、确保你的磁盘有足够的空间。。。我第一次安装的时候虚拟机默认的8g空间,在安装完毕启动jboss服务的时候会解压缩很多包。导致磁盘空间不足。。启动失败。客户端配置:打开IE8,然后选择 工具-Internet选项-高级-安全,找到“启用内存保护帮助减少联机攻击”,把前面的勾去掉,点应用。 就可以用IE8了。
-
[转]loadrunner9.0破解方法
2009-01-15 13:36:31
1、过程和方法:
打开Loadrunner,发现以下几个dll可能和注册有关,mlr5lprg.dll、licensebundles.dll、lm50.dll、lm70.dll。
最后确认mlr5lprg.dll、lm70.dll是关键dll。
破解方法类似与LR8.1
a、用LR8.0中的mlr5lprg.dll、lm70.dll覆盖LR9.0安装目录下“bin”文件夹中的对应文件;
b、然后使用老的注册码就可以使用了;
c、golba-100: AEAMAUIK-YAFEKEKJJKEEA-BCJGI
web-10000: AEABEXFR-YTIEKEKJJMFKEKEKWBRAUNQJU-KBYGB
2、可能会遇到的问题
在破解的过程中我还遇到了个问题,就是通过上述的方法注册时提示“License security violation……”,无法注册。
该问题可通过如下办法解决:
a、手动修改注册表,删除下面内容:
[HKEY_LOCAL_MACHINE\SOFTWARE\Mercury Interactive\LoadRunner\License2]
[HKEY_LOCAL_MACHINE\SOFTWARE\Mercury Interactive\LoadRunner\License2\History]
"AIBGEBFW-JVED-ZKEKEKEKEKEBDNQAF-KBRDN"=""
[HKEY_LOCAL_MACHINE\SOFTWARE\Mercury Interactive\LoadRunner\License2\PermanentLicense]
@="AIBGEBFW-JVED-ZKEKEKEKEKEBDNQAF-KBRDN"
"last"="AIBGEBFW-JVED-ZKEKEKEKEKEBDNQAF-KBRDN"
[HKEY_LOCAL_MACHINE\SOFTWARE\Mercury Interactive\LoadRunner\License2\TemporaryLicense]
@="AEBGEBFS-AKEKEKEKE-KAUCA"
[HKEY_LOCAL_MACHINE\SOFTWARE\Classes\Interface\{87B3ADD4-21EB-11d5-93EF-00105AA0FD2D}]
@="IControl"
b、可使用网上的朋友提供的LR_delete_License.exe文件删除上述的注册表内容。由于这个程序是针对8.1的,可能会报错,但是不影响使用。
现将上述的文件上传,并发几张图,供大家使用和参看。
有问题的朋友请跟帖,我将尽力解决。
3、申明
最后得感谢HP公司的大度,并没有对注册模块做大的修改,这可以让我们取巧使用。最后请大家不要以此用于商业运作,仅供个人学习参考,请大家支持正版软件。
如果转帖,请注明出处。
转自51testing论坛 原作者:大漠飞鹰
原文链接:http://bbs.51testing.com/thread-94444-1-1.html -
软件测试职业发展方向
2011-07-13 16:44:54


-
Linux+XAMPP+BugFree配置小记
2008-12-17 19:56:09
由于公司原先的BUG系统删掉了,总监让我搞个BUG跟踪系统,事先也没装过那东西。说搞就搞吧,BUG跟踪系统有很多,最后选择了免费的BugFree,开源的嘛~而且功能对于咱们小公司来说足够!于是先百度、谷歌搜了下相关的安装说明,但是操作下来感觉有点不完全,在此特将自己的安装笔记记录下来,提供给有需要的朋友!希望此文能帮助到你!
首先下载XAMPP:
XAMPP Linux 1.6.8a:
http://jaist.dl.sourceforge.net/sourceforge/xampp/xampp-linux-1.6.8a.tar.gz相关Linux下安装和配置XAMPP请参考官网:
http://www.apachefriends.org/zh_cn/xampp-linux.html安装之前首先确认你服务器的80端口有没被占用
netstat -an|grep -w 80
如果被占用了请先关闭相关服务,XAMPP启动要用到80端口.安装XAMPP:
[root@localhost ~]#tar xvfz xampp-linux-1.6.8a.tar.gz -C /opt
然后启动(命令参数见XAMPP官网):
opt/lampp/lampp start您应该能在屏幕上看到类似下面的提示信息:
Starting XAMPP 1.6.8a...
LAMPP: Starting Apache...
LAMPP: Starting MySQL...
LAMPP started.
好了。Apache 和 MySQL 正在运行中
只需在您的浏览器中输入下面的链接即可: http://localhost看到一些示例程序的 XAMPP 开始页面就表示XAMPP安装成功了。接下来我们要配置XAMPP的安全性。
配置XAMPP安全性:
[root@localhost ~]# /opt/lampp/lampp security
XAMPP: Quick security check...
XAMPP: Your XAMPP pages are NOT secured by a password.
XAMPP: Do you want to set a password? [yes] XAMPP: Do you want to set a password? [yes] yes
XAMPP: Do you want to set a password? [yes] yes
XAMPP: Password:
XAMPP: Password (again):
XAMPP: Password protection active. Please use 'lampp' as user name!
XAMPP: MySQL is accessable via network.
XAMPP: Normaly that's not recommended. Do you want me to turn it off? [yes] yes
XAMPP: Turned off.
XAMPP: Stopping MySQL...
XAMPP: Starting MySQL...
XAMPP: The MySQL/phpMyAdmin user pma has no password set!!!
XAMPP: Do you want to set a password? [yes] yes
XAMPP: Password:
XAMPP: Password (again):
XAMPP: Setting new MySQL pma password.
XAMPP: Setting phpMyAdmin's pma password to the new one.
XAMPP: MySQL has no root passwort set!!!
XAMPP: Do you want to set a password? [yes] yes
XAMPP: Write the password somewhere down to make sure you won't forget it!!!
XAMPP: Password:
XAMPP: Password (again):
XAMPP: Setting new MySQL root password.
XAMPP: Change phpMyAdmin's authentication method.
XAMPP: The FTP password is still set to 'lampp'.
XAMPP: Do you want to change the password? [yes] yes
XAMPP: Password:
XAMPP: Password (again):
XAMPP: Reload ProFTPD...
XAMPP: Done.并设置 XAMPP 随系统自动启动
[root@localhost ~]# ln -s /opt/lampp/lampp /etc/rc.d/rc3.d/S99lampp
[root@localhost ~]# ln -s /opt/lampp/lampp /etc/rc.d/rc4.d/S99lampp
[root@localhost ~]# ln -s /opt/lampp/lampp /etc/rc.d/rc5.d/S99lampp自此,XAMPP已经配置好了!下面我们来配置BugFree:
下载BugFree2:
[root@localhost ~]# wget -c http://www.bugfree.org.cn/download/bugfree2.tar.gz
解压到Xampp下的htdocs文档下:
[root@localhost ~]#tar xvfz bugfree2.tar.gz -C /opt/lampp/htdocs/
然后复制Include/Config.inc.Sample.php为Include/Config.inc.php,编辑并修改数据库链接地址:
(复制命令CP和修改命令VI,这里就不多介绍了)
/* 3. Define the username and password of the BugFree database. */$_CFG['DB']['User'] = 'root'; // 数据库登录用户名
$_CFG['DB']['Password'] = 'password'; // 数据库登录用户密码
$_CFG['DB']['Host'] = 'localhost'; // 数据库服务器地址
$_CFG['DB']['Database'] = 'bugfree'; // 指定BugFree数据库名称
$_CFG['DB']['TablePrefix'] = 'bf_'; // 数据库表前缀,默认为bf_。除非有冲突,不建议修改或为空
$_CFG['DBCharset'] = 'UTF8'; // 数据库编码设置,保留默认值
然后设置文件目录权限:
[root@localhost ~]# cd /opt/lampp/htdocs/bugfree
[root@localhost bugfree]# chmod 777 Data/TplCompile/
[root@localhost bugfree]# chmod 777 BugFile/
[root@localhost bugfree]# chmod 777 Include/Config.inc.php
全部配置好就可以访问BugFree了:
http://localhost/bugfree/设置新的数据库
phpsql在线:
http://localhost/phpmyadmin/
可用PHPSQL操作Mysql数据或linux终端登录mysql
[root@ASP-WEB root]# /opt/lampp/bin/mysql -u root -p至此,全部安装完成!XAMPP平台真的是个好东西,省去了很多在Linux安装的麻烦!
-
QTP相关问题及解决方法
2014-09-02 14:54:40
1、在QTP中LINK是弹出的新窗口,回放过程中焦点没有显示在新窗口中?解决方法:Tools-Web-Advanced-Run setting,把Replay type类型改为Mouse即可!
2、解决ExcuteFile执行命令时出现“无效字符”的问题解决方法:在QTP中执行类似:ExecuteFile "c:\regress\vbs\data.vbs" 这样的语句时会出现“无效字符”的提示错误,这是因为QTP对字符集的处理能力非常弱,只要把data.vbs这个文件另外存为"ANSI"编码就可以了3、QTP配置ODBC数据库,需要用到mysql驱动,安装"mysql-connector-odbc-5.3.4-win32.msi" 时报错Error 1918. Error installing ODBC driver MySQL ODBC 5.3 ANSI Sriver, ODBC error 13........
解决方法:运行vcredist_x64 或 vcredist_x86,重新安装Mysql驱动即可 -
QC11服务器IP地址变更修改数据库配置文件
2014-08-04 13:06:30
公司IP地址大变更,导致原来的QC11无法访问,修改配置文件和数据库,就可以使用新IP访问了QC了!1、修改配置文件,修改WEB-INF下的siteadmin.xml文件,这里需要特别注意,不是在安装程序C:\Program Files\HP\HP Application Lifecycle Management Platform下面,而是在C:\ProgramData\HP\ALM\jboss\server\default\deploy\20qcbin.war\下面找到WEB-INF下的siteadmin.xml文件,把其中数据库连接字符串:jdbc:mercury:sqlserver://192.168.33.55:1433里的IP地址改为新的IP就可以。2、数据库的修改
打开QC数据库服务器上的 qcsiteadmin_db数据库,修改三张表:
(1)dbo.APPSERVERS
修改TD_SERVERNAME,如果是原来的IP则改为新的IP
(2)dbo.DBSERVERS
修改DBSERVER_NAME和DB_CONNSTR_FORMAT,如果有原来的IP则改为新的IP
(3)dbo.PROJECTS
修改DB_CONNSTR_FORMAT和DBSERVER_NAME,如果有原来的IP则改为新的IP
3、从系统服务中重启一下QC服务,就可以用新IP访问了。
-
QTP已停止工作解决办法
2014-05-07 13:27:20
QTP连接QC操作过程中,突然QTP崩溃了,提示已停止工作, 查看系统应用程序日志,错误如下:
 解决办法:在C:\Windows\SysWOW64下面找到了ykframe.dll,直接删除,提示不能删除,已被ALM-Client应用,关闭QC客户端连接页面,删除并清空回收站。在打开QTP,问题解决!
 -
QTP不同测试环境中要注意的一些事情
2014-04-12 23:25:32
问题1:win7,xp系统不同导致引入excel文件的时候报无端的错误。
错误信息:Data Table.ImportSheet.操作失败 文件无效!
很简单,不同的系统的问题。
解决方法:将对应的你所运行的系统环境下,打开对应的你需要导入的excel文件,另存为以下即可;
问题2:导入的excel在操作datatable.localsheet.getrowcount的时候总是得到很多行数据,而不是预期的excel中的数据行数。
解决方法:
将对应的excel中的数据删除不必要的行,然后再保存即可;
问题3:迁移到win7系统后,运行脚本,提示如图错误,以为是权限问题,折腾了半天,
最后才发现是因为获取系统日期格式错误而导致xls文件没找到!汗~
解决方法:
把系统时间的日期格式,短日期改成yyyy-M-d或你所指定的格式即可!

-
QTP的Debug Viewer调试功能不可用的解决方法
2010-07-22 10:31:54
在QTP操作过程中,突然发现原先可以正常查看的Debug Viewer中的变量值没有显示了,想到可能是装了VS2008的问题,按理说装了VS2008,然后注册下PDM.DLL后能增强调试功能,怎么到我这却连调试变量都没法显示了?于是找原因,设置VS2008的调试功能,发现不起作用...无奈百度谷歌,终于明白了QTP中的调试功能是和Microsoft Script. Debugger结合在一起的,如果QTP产生的脚本也没法调试,可以选择重新安装Script. Debugger,从http://www.microsoft.com/downloads/details.aspx?familyid=2F465BE0-94FD-4569-B3C4-DFFDF19CCD99&displaylang=en 下载Microsoft Script. Debugger并安装,重启QTP后调试信息又回来了,至此问题解决!
-
Using QC with Win 7
2010-06-28 21:02:39
Windows 7.0 includes many new security features to prevent users from accidentally damaging the windows installation. This in turn will prevent QC from being able to install properly. It is important to understand that in Windows 7, a standard user with administrator privileges is not equal to the built in administrator user.
Follow the instructions below to get QCclient to work with win7.
1. Ensure that User control accounts setting is disabled.
- a. in the Windows globe>search for program and files> type UAC
- b. click on the link to bring up the UAC.
- c. Move the slider down to never notify.
- d. Restart the computer.
2. Disable Data Execution prevention (DEP)
- a. In the Windows globe>search for program and files > type CMD
- b. Right click on the link and run as administrator.
- c. In the command prompt type,
Code:
bcdedit /set {current} nx AlwaysOff
- d. Restart the computer.
3. Connect to the QCserver add-ins page
- a. Download and install the QClientSideSetup
4. Launch IE and connect to Quality Center and should be able to work within QC.
5. Change the user control accounts setting back to the original setting and restart. - a. in the Windows globe>search for program and files> type UAC
-
关于"RPC server is unavailable"的解决方案
2010-06-23 16:49:59
Problem Description: Error: "RPC server is unavailable" when doing remote execution of automated scripts after installing Windows XP SP2
The user receives the following error message when executing a automated script. remotely after installing Windows XP SP2:
"The RPC server is unavailable."
Executing the script. locally works correctly.
Diagnosis: Security changes in Windows XP SP2 have blocked the remote agent of the testing tool from being launched. This caused the failure of the automated script. execution.
Note: Windows XP SP2 is supported with TestDirector 8.0 SP2 and TestDirector for Quality Center 8.2 only.
--------------------------------------------------------------------------------
Solution: Change the DCOM permissions on the Windows XP SP2 client to allow for remote execution
Notes:
The security changes suggested below should be applied by your System Administrator. Please contact Microsoft Support if you have questions regarding changes in DCOM securities caused by installing Windows XP SP2.
If you disable the firewall installed with Windows XP SP2, you do not need to apply the steps in Part II below.
The following is the manual process for openning the firewall ports and modifying the DCOM properties for WR, QTP, BPT, System Test, and VAPI-XP.
Part I:
Add both machines into the same domain. For the domain users logged into both machines, add these domain users to the Local Administrators group on the QTP/WR machine. This is required for Windows to authenticate the remote user executing the tests against the DCOM objects.
Part II:
On the Testing Tool client machine configure Windows Firewall to allow Port 135 for DCOM:
1. Select Start -> Control Panel -> Windows Firewall.
2. Navigate to the Exceptions tab.
3. Configure the Remote Agent to be allowed under "Programs and Services." Configuration should be done for each testing tools as given below:
WinRunner Remote Agent (path::\Program Files\Common Files\Mercury Interactive\WR_Remoter\wrrmtsrv.exe)
QuickTest Professional Remote Agent (path::\Program Files\Mercury Interactive\QuickTest Professional\bin\AQTRmtAgent.exe)
Execution Agent for Business Process Testing (path::\Program Files\Common Files\Mercury Interactive\TD2000_80\bp_exec_agent.exe)
4. Click onand add the DCOM TCP port 135 to the Exceptions list.
Note: The WR remote agent is a DCOM object and requires port 135 to work. The list of "Port Assignments for Commonly-Used Services" is provided in the URL below:
http://www.microsoft.com/resources/documentation/Windows/2000/server/reskit/en-us/Default.asp?url=/resources/documentation/windows/2000/server/reskit/en-us/cnet/cnfc_por_SIMW.asp
Part III:
Modify DCOM Security Properties:
1. Select Start -> Run and enter dcomcnfg.
2. Navigate to Console Root -> Component Services -> Computers -> My Computer.
Note: If Windows Security Alert dialog window appears, click onor .
3. Right-click on My Computers and select "Properties."
4. Navigate to the Default Properties tab.
5. Make sure the Default Impersonation Level is "Identify."
6. Click.
7. Navigate to the Defualt COM Security tab.
8. Under Access Permissions, click on. The Access Permission dialog window appears.
9. Click on. The Select Users or Groups dialog windows appear.
10. Click on.
11. Click on.
12. Add the following groups and users from the local machine (below is an example screenshot):
Administrator
Administrators
Authenticated User
Anonymous Logon
Everyone
Interactive
Network
System
13. Click.
14. Add the following groups and users from the domain:
15. Click.
16. Give "Local Access" and "Remote Access" permissions to the groups and users.
17. Click.
18. Under Access Permissions, repeat steps 9-17 for.
19. Under Launch and Activation Permissions, click on. The Launch Permission dialog window appears.
20. Repeat steps 9-15.
21. Enable "Local Launch," "Remote Launch," "Local Activation," and "Remote Activation" permissions to the groups and users.
22. Click.
23. Repeat steps 20-22 for.
Part IV: (for QTP only)
1. While still in the Component Services window, navigate to Console Root -> Component Services -> Computers -> My Computer -> DCOM Config.
2. Look for the following.
AQTRmtAgent
QuickTest Professional Automation
TlpRmtServer
3. For each of these DCOM applications, right click and select.
4. Under the Identity tab, select. This will allow the DCOM application to authenticate the process against the logged in Windows user and run the process in that security context.
5. Next, go to the Security tab.
6. For both theand , select


标题搜索
我的存档
数据统计
- 访问量: 162813
- 日志数: 49
- 图片数: 6
- 文件数: 3
- 建立时间: 2008-02-15
- 更新时间: 2014-09-02
