
-
JProfiler连接Weblogic使用说明
2009-11-11 17:19:41
1. 本地连接
1.1 环境说明
本地安装JProfiler,Weblogic相关工具
1.2 步骤说明
1. 打开工具JProfiler后,在Session菜单下选择New windows,弹出Quickstart窗口界面,在该界面选择第三项An application server,locally or remotely, 然后点击Next.
2. 进入Integration wizard界面,选择应用服务的类型和版本.此处,我们选择BEA Weblogic 9.2, 然后点击Next.
3. 选择连接的类型,是本地还是远程,这里我们选择本地(on this computer), 然后点击Next.
4. 选择第一个,启动weblogic时,试图去连接本次建立的连接,一直会等待到成功连接,而选择第二个,若是发现weblogic没有启动,将不做等待;这里我们选择第一项.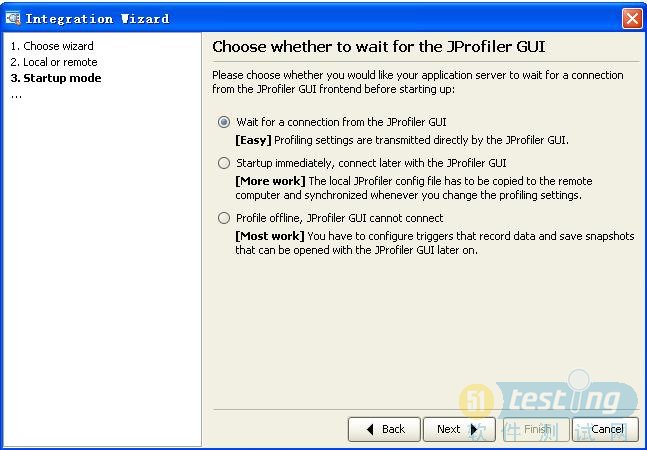
5. 选择Weblogic的启动文件Startweblogic.cmd(如:E:\bea\user_projects\domains\powerbid_test_domain\bin文件夹下), 然后点击Next.
6. 选择JDK的提供厂商和其版本. 这里我们选择了Sun Microsystems 的1.5版, 然后点击Next.
7. 选择两种处理模式,这里选择第一种,符合应用服务(JIT/hotspot complation enabled)
8. 选择JProfiler的使用端口,对于本地连接来说,此处作用不大,用默认即可
9. 对前面设置的内容统一展现,若是检查没有问题,则点击Next,进行下一步操作.
10. 点击Finish, 完成了本次连接的配置,若是选择了马上连接,则下一步开始连接.
11. 这里对配置好的连接进行设置,根据需要可以进行过虑等设置,完成后点击OK.
12. 开始连接本地的weblogic应用,连接成功后,可以得到相关的信息
2. 远程连接
2.1环境说明
本地安装JProfiler
监控机器上安装JProfiler
两台机器能够ping通,且在本地映射监控机器上的Weblogic的安装目录(本文档把监控机器的bea815映射到本地的F盘),该目录必须是可写的.
把远程监控机上的Weblogic启动文件Startweblogic.cmd拷贝到本地2.2步骤说明
1.打开工具JProfiler后,在Session菜单下选择New windows,弹出Quickstart窗口界面,在该界面选择第三项An application server, locally or remotely, 然后点击Next.
2. 进入Integration wizard界面,选择应用服务的类型和版本.此处,我们选择BEA Weblogic 9.2,然后点击Next.
3. 选择连接的类型,是本地还是远程,这里我们选择远程(on a remote computer), 再选择远程计算机的操作系统,然后点击Next.
4. 选择第一个,启动weblogic时,试图去连接本次建立的连接,一直会等待到成功连接,而选择第二个,若是发现weblogic没有启动,将不做等待;这里我们选择第一项.
5. 选择远程监控机器的IP地址或服务器名,如:192.168.0.9
6. 这里的路径为远程监控机器安装JProfiler的路径.如:C:\Program Files\jprofiler5
7. 选择远程监控机器的Weblogic的启动文件,startWeblogic.cmd(先把远程监控机的weblogic的启动文件的路径映射成本地路径),拷贝到本地,然后选择该启动文件。
8. 选择JDK的提供厂商和其版本. 这里我们选择了Sun Microsystems 的1.4版.
9. 选择两种处理模式,这里选择第一种,符合应用服务(JIT/hotspot complation enabled)
10. 选择JProfiler的使用端口,要求本地安装的JProfiler和远程监控机的JProfiler保持一致,才能够保证连接,此处都用默认的8849.
11.对前面设置的内容统一展现,若是检查没有问题,则点击Next,进行下一步操.
12. 点击Finish, 完成了本次连接的配置,若是选择了马上连接,则下一步开始连接,在开始连接之前,要求先启动远程监控机上Weblogic目录下的JProfiler配置连接时产生的startWebLogic_jprofiler.cmd文件.
(该文件和远程监控机中的startWebLogic.cmd文件在同一目录下)
13. 这里对配置好的连接进行设置,根据需要可以进行过虑等设置,完成后点击OK.
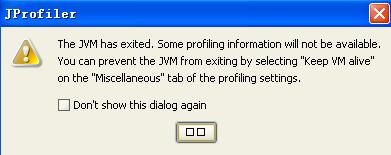
14. 开始连接本地的weblogic应用,连接成功后,可以得到相关的信息.note:在本地监控时总会出现如下图错误提示
1.点击Start Center,对监控时新建的session进行修改
2.点击profiling Settings后,点击Customize profiling Settings按钮,设置,如图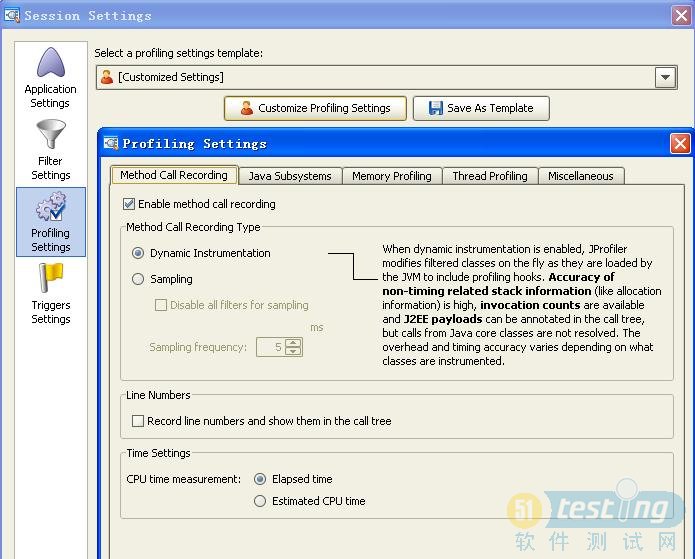
3.点击Miscellaneous标签,勾选keep vm alive -
Jprofiler 安装--远程监控(转)
2009-10-31 16:50:08
WEB服务总是莫名其妙的运行一段时间后JVM直接OutOfMemory错误,这个问题一直困扰着程序的正常运行。大概半个月时间一次,上网查了些资料,也做了不少优化,什么weblogic环境变量Xms,Xmx,MaxPermSize参数调整,可问题依旧,况且这也是治标不治本,问题也许发生在程序中,可能存在内存泄露,或spring和hibernate框架相关的问题。
在网上找到个大家说很好的工具叫Jprofiler,学着弄弄,down下来个最新版本。软件需要注册,注册后有十天的试用期。现在把安装过程记下来。
由于我要监控的程序是在远程的linux系统下的weblogic服务,所以这里记录的是远程监控的配置过程。
先介绍下环境:
系统服务器:
操作系统:linux redhat
web服务器:weblogic 8.1
java虚拟机版本:1.4.2
jprofiler版本:jprofiler_linux_5_1_2.tar.gz(安装包共三个版本 sh,exe,tar.gz)
客户端:
操作系统:Windows Xp SP2
jprofiler5.1.2 for windows(安装包:jprofiler_windows_5_1_2.zip)
安装:
一.客户端安装:
1 windows下直接解压zip包,运行jprofiler5.1.2的exe安装即可。
2 运行jprofiler并进行配置
1)Quick Start:
选择 An application on a remote computer
->Next
2)Local or remote:
The profiled application s located 选择 On a remote computer,
Platform. of the remote computer 下拉菜单选择“Linux X86/AMD64”
->Next
3)Remote address :填写被监控应用程序所在远程计算机的IP
4)Installation directory:解压路径:/var/jprofiler5
5) choose JVM :
JVM Vendor: Sun jvm提供商
Version:1.4.2 版本
Mode:hotspot 系统默认
6)jprofile port :8849
7)startup mode:
Wait for …… 为了在开发环境中获取监控的信息,它将等待远程计算机上的Jprofile GUI 启动,并和本机建立连接,这种方式比较便于修改jprofiler的配置信息。
Don't wait for …… 不必等待远程计算机的Jprofile GUI 先启动和建立连接,立即启动。但在启动远程应用程序前必须校验当前所配置会话的配置文件。虚拟机参数将参考Jprofile 的config 文件的路径。
这里选择Don't wait for ……
->Next
8) Config synchronization:
Directory for config file in the remote computer:/opt (远程config文件的路径)
同步方式:
Manual synchronization;copy to diretory;execute command:
提供三种同步方式,这里我选择的是第一个手工同步。
->Next
9)Perform. modifications:
Integration type: [Generic application]
Selected JVM: Sun 1.4.2 (hotspot)
Startup mode: Don't wait for JProfiler GUI, startup immediatelyImportant: The local config file C:\Documents and Settings\Jan\.jprofiler5\config.xml must be copied manually to /opt on the remote computer when the profiling settings are changed.
(1) Please insert-Xrunjprofiler:port=8849,nowait,id=115,config=/opt/config.xml -Xbootclasspath/a:/var/jprofiler5/bin/agent.jar
into the start command of your remote application right after the java command.
(2) Please add
/var/jprofiler5/bin/linux-x86
to the environment variable LD_LIBRARY_PATH.
A remote session named Remote application on 10.5.31.49 will be created that connects to a running instance of the remote application that is started with the modified start command.
这里的黑体文字部分要保存下来,在服务器端安装时会用到。
->Next
10) Finished:
选No,I will start the session later
因为我们还没有配置服务器端。二.服务器端安装
1 将jprofiler_linux_5_1_2.tar.gz上传到服务器上,/var/下建立jprofiler5目录,并将程序解压到/opt/jprofiler5下即可
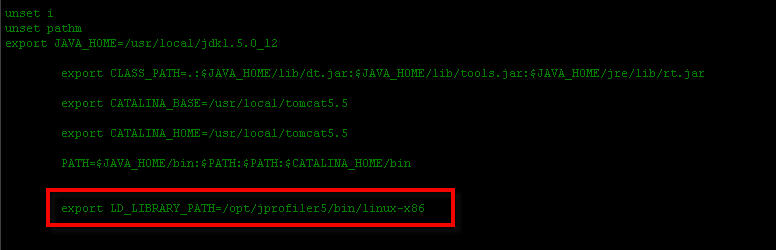
2 修改用户环境变量.bash_profile。
加入export LD_LIBRARY_PATH=/var/jprofiler5/bin/linux-x86。如果是 64 位服务器,则选择linux-x64。
运行source .bash_profile 使环境变量立即生效
3 添加weblogic启动参数
将一.9).(1)中黑体的部分加到weblogic的启动文件startWebLogic.sh的参数中如:
${JAVA_HOME}/bin/java ${JAVA_VM} ${MEM_ARGS} ${JAVA_OPTIONS} -verbosegc
-Xrunjprofiler:port=8849,nowait,id=115,config=/opt/config.xml -Xbootclasspath/a:/var/jprofiler5/bin/agent.jar
-Dweblogic.Name=${SERVER_NAME} -Dweblogic.ProductionModeEnabled=${PRODUCTION_MODE} -Djava.security.policy="${WL_HOME}/server/lib/weblogic.policy" weblogic.Server
尽量让它在一行中。
4 把 C:\Documents and Settings\Jan\.jprofiler5\ 下的config.xml上传到服务器上,路径为一.8)中配置的Directory for config file in the remote computer:/opt
因为这里选择的同步方式是Manual synchronization,所以以后配置发生改变时,需要手工再次上传新的config.xml到这个路径。
三.启动weblogic服务:**************************************************
* To start WebLogic Server, use a username and *
* password assigned to an admin-level user. For *
* server administration, use the WebLogic Server *
* console at http://[hostname]:[port]/console *
***************************************************
JProfiler> Protocol version 25
JProfiler> Using JVMPI
JProfiler> 32-bit library
JProfiler> Don't wait for frontend to connect.
JProfiler> Using config file /opt/config.xml (id: 114)
JProfiler> Listening on port: 8849.
[Full GC 114K->84K(520256K), 0.0063330 secs]
JProfiler> Native library initialized
JProfiler> If output stops here, please remove -Xdebug from the command line
JProfiler> Using dynamic instrumentation
JProfiler> Time measurement: elapsed time
JProfiler> CPU profiling enabled
JProfiler> Hotspot compiler enabled
JProfiler> Starting weblogic/Server ...<Feb 5, 2008 11:41:31 AM CST> <Info> <WebLogicServer> <BEA-000377> <Starting WebLogic Server with Java HotSpot(TM) Client VM Version 1.4.2_09-b05 from Sun Microsystems Inc.>
<Feb 5, 2008 11:41:31 AM CST> <Info> <Configuration Management> <BEA-150016> <This server is being started as the administration server.>启动本机的刚才配置好的Session,开始连接……进入监控界面。
-
搭建jprofiler环境(转自论坛)
2009-10-28 22:39:07
前言:因需要用jprofiler监控内存泄漏问题。我开始着手研究。遇到了问题。先到一个软件测试群中问了两遍。都没有回答。大家却为一些闲事讨论的热闹。哎。难道你们真的认为工作就是闲聊吗。求人不如求己。一切靠自己。而且我自己也有能力搞定。不到半天把windows下和linux下监控都搞定了。现简单记录下:
1:搭建redhat linux as 5 + tomcat 5.5 + jprofiler 5环境
(1)下载jprofiler的windows和linux安装包
(2)安装jprofiler的windows版本
(3)安装linux的rpm包 rpm -ivh jprofiler.rpm 系统默认安装到了/opt目录下
(4)配置tomcat的catalina.sh文件:把代码粘贴到如图的位置:复制内容到剪贴板(5)配置linux系统变量:vi /etc/profile代码:
CATALINA_OPTS="$CATALINA_OPTS -Xms128m -Xmx128m $JPDA_OPTS -agentlib:jprofilerti=port=8849 -Xbootclasspath/a:/opt/jprofiler4/bin/agent.jar"复制内容到剪贴板(6)启动windows下jprofile客户端一步步设置下来就连接成功了。代码:
export LD_LIBRARY_PATH=/opt/jprofiler4/bin/linux-x86
2:搭建了windows下:jdk 1.5+ tomcat 5.0+ jprofiler 5.1环境
(1)分别安装jdk tomcat jprofiler
(2)设置环境变量:JAVA_HOME JAVA_PATH CLASSPATH TOMCAT_HOME CATALIN_HOME CATALINA_BASE
(3)在tomcat的startup.bat文件中添加:复制内容到剪贴板备注:把C:\Documents and Settings\your_name\.jprofiler5\config.xml和D:\Program Files\jprofiler4\bin\agent.jar路径下的config.xml和agent.jar文件分别拷贝到c:\usr目录下。代码:
set JAVA_OPTS=%JAVA_OPTS% -agentlib:jprofilerti=port=8849,nowait,id=102,config=c:\usr\config.xml -Xbootclasspath/a:c:\usr\agent.jar
(4)启动jprofiler,根据提示步骤一步步的设置就可以了。


标题搜索
我的存档
数据统计
- 访问量: 167465
- 日志数: 260
- 书签数: 81
- 建立时间: 2007-08-28
- 更新时间: 2012-06-13
