发布新日志

  • 【Jmeter测Dubbo接口(1)】使用Dubbo sampler取样器进行dubbo接口测试【图解剖析】

    2019-11-01 16:22:00

    Dubbo sampler下载地址:

          该插件支持jmeter 3.2及3.2以上版本。

          现在很多互联网公司开发的系统中,越来越多的接口渐渐从http/https调用,改成了dubbo方式,原有的使用soapui测试webservice接口的方法也不再适用,所以,需要现在需要测试dubbo接口。

          2015年到2017年,网上大部分同学仍是用jmeter来测Dubbo接口,还是使用的是搭建Maven环境才能测Dubbo,虽然有技术含量,但那太繁琐。于是,阿里巴巴在GitHub上提供了专门用于Jmeter来测dubbo接口的插件。

    该插件下载地址具体如下:

          综合介绍:https://www.oschina.net/p/jmeter-plugins-dubbo

          用户指南:https://github.com/dubbo/jmeter-plugins-dubbo/wiki/用户指南

          插件源码:https://github.com/dubbo/jmeter-plugins-dubbo
    ————————————————
    版权声明:本文为CSDN博主「猎摘互联网软件测试业界技术文章专用博客」的原创文章,遵循 CC 4.0 BY-SA 版权协议,转载请附上原文出处链接及本声明。
    原文链接:https://blog.csdn.net/cyjs1988/article/details/84258046
  • jmeter 插件二次开发

    2019-10-17 18:06:16

    版权声明:本文为博主原创文章,遵循 CC 4.0 BY-SA 版权协议,转载请附上原文出处链接和本声明。
    本文链接:https://blog.csdn.net/cyjs1988/article/details/84938497
    ————————————————
    版权声明:本文为CSDN博主「猎摘互联网软件测试业界技术文章专用博客」的原创文章,遵循 CC 4.0 BY-SA 版权协议,转载请附上原文出处链接及本声明。
    原文链接:https://blog.csdn.net/cyjs1988/article/details/84938497

    把需要的jar包 添加到maven依赖中

    jmeter中javasample请求需要的jar包

    <?xml version="1.0" encoding="UTF-8"?>
    <project xmlns="http://maven.apache.org/POM/4.0.0"
             xmlns:xsi="http://www.w3.org/2001/XMLSchema-instance"
             xsi:schemaLocation="http://maven.apache.org/POM/4.0.0 http://maven.apache.org/xsd/maven-4.0.0.xsd">
        <modelVersion>4.0.0</modelVersion>
     
        <groupId>MyJmeter</groupId>
        <artifactId>MyJmeter</artifactId>
        <version>1.0-SNAPSHOT</version>
        <properties>
            <jmeter.version>3.0</jmeter.version>
        </properties>
        <dependencies>
            <!--jmeter-->
            <dependency>
                <groupId>org.apache.jmeter</groupId>
                <artifactId>ApacheJMeter_core</artifactId>
                <version>${jmeter.version}</version>
            </dependency>
     
            <dependency>
                <groupId>org.apache.jmeter</groupId>
                <artifactId>ApacheJMeter_java</artifactId>
                <version>${jmeter.version}</version>
            </dependency>
        </dependencies>
     
        <build>
            <plugins>
                <!--<plugin>-->
                <!--<groupId>org.apache.maven.plugins</groupId>-->
                <!--<artifactId>maven-jar-plugin</artifactId>-->
                <!--<version>2.4</version>-->
                <!--<configuration>-->
                <!--<archive>-->
                <!--<manifest>-->
                <!--<addClasspath>true</addClasspath>-->
                <!--<classpathPrefix>lib/</classpathPrefix>-->
                <!--<mainClass>etms.TestEtms</mainClass>-->
                <!--</manifest>-->
                <!--</archive>-->
                <!--</configuration>-->
                <!--</plugin>-->
                <!--<plugin>-->
                <!--<groupId>org.apache.maven.plugins</groupId>-->
                <!--<artifactId>maven-dependency-plugin</artifactId>-->
                <!--<executions>-->
                <!--<execution>-->
     
                <!--<phase>package</phase>-->
                <!--<goals>-->
                <!--<goal>copy-dependencies</goal>-->
                <!--</goals>-->
                <!--<configuration>-->
                <!--<outputDirectory>-->
                <!--${project.build.directory}/lib-->
                <!--</outputDirectory>-->
                <!--</configuration>-->
                <!--</execution>-->
                <!--</executions>-->
                <!--</plugin>-->
     
            </plugins>
        </build>
     
    </project>

    然后编写代码如下
    package com.niu.MyJmeter;
     
    import javafx.scene.shape.ArcTo;
    import org.apache.jmeter.config.Arguments;
    import org.apache.jmeter.protocol.java.sampler.JavaSamplerClient;
    import org.apache.jmeter.protocol.java.sampler.JavaSamplerContext;
    import org.apache.jmeter.samplers.SampleResult;
    import org.apache.xmlbeans.impl.xb.xsdschema.impl.PublicImpl;
     
    /**
     * Created by Administrator on 2017/8/30 0030.
     */
    public class JmeterTest implements JavaSamplerClient {
        private String interfaceName;
        private String methodName;
     
        @Override
        public void setupTest(JavaSamplerContext javaSamplerContext) {
            //某种连接只连接一次,例如数据库
            System.out.print("测试开始");
     
        }
     
        @Override
        public SampleResult runTest(JavaSamplerContext javaSamplerContext) {
            SampleResult result = new SampleResult();
            //获取页面上interfaceName的方法
            interfaceName = javaSamplerContext.getParameter("interfaceName");
            //获取页面上methodName的方法
            methodName = javaSamplerContext.getParameter("methodName");
            //测试开始的时间戳
            result.sampleStart();
            //设置响应数据的格式
            result.setResponseData(interfaceName+":"+methodName,"UTF-8");
            //测试结束的时间戳
            result.sampleEnd();
            //设置成功的
            result.setSuccessful(true);
            //设置响应code码
            result.setResponseCodeOK();
            //设置数据编码格式
            result.setDataEncoding("UTF-8");
            return result;
        }
     
        @Override
        public void teardownTest(JavaSamplerContext javaSamplerContext) {
            System.out.print("测试结束");
        }
     
        @Override
        public Arguments getDefaultParameters() {
            //添加参数
            Arguments arguments = new Arguments();
            arguments.addArgument("interfaceName","");
            arguments.addArgument("methodName","");
            return arguments;
        }
     
        public static void main(String[] args){
            JmeterTest jmeterTest = new JmeterTest();
            JavaSamplerContext arg0 = new JavaSamplerContext(jmeterTest.getDefaultParameters());
            jmeterTest.runTest(arg0);
            jmeterTest.teardownTest(arg0);
        }
    }

    然后用IDEA中的clean 先清除包,再install打成jar包,放到jmeter中的javasample中,本次代码中的参数是interfaceName, methodName ,然后面填入值,就可以用查看结果树来查看响应结果。

  • 需要关闭的对话框的处理

    2019-04-11 11:04:59

    摘自https://www.jianshu.com/p/3a2049b808fb

    第一次打开应用的时候,可能会出现红包雨对话框、新人专享红包对话框、切换城市对话框,这里需要通过元素 ID 获取到关闭按钮,执行点击操作来关闭这些对话框。
    这里创建一个 新的线程 来单独处理这些对话框。
        
     class ExtraJob(threading.Thread):
      def run(self):
      while self.__running.isSet():
      # 为True时立即返回, 为False时阻塞直到内部的标识位为True后返回
      self.__flag.wait()
      # 1.0 【红包雨】对话框
      red_packet_element = is_element_exist(self.driver, 'com.dangdang.buy2:id/close')
      if red_packet_element:
      red_packet_element.click()
      # 1.1 【新人专享券】对话框
      new_welcome_page_sure_element = is_element_exist(self.driver, 'com.dangdang.buy2:id/dialog_cancel_tv')
      if new_welcome_page_sure_element:
      new_welcome_page_sure_element.click()
      # 1.2 【切换位置】对话框
      change_city_cancle_element = is_element_exist(self.driver, 'com.dangdang.buy2:id/left_bt')
      if change_city_cancle_element:
      change_city_cancle_element.click()
      extra_job = ExtraJob(dangdang.driver)
      extra_job.start()
  • Linux中iptables的用法

    2018-11-12 15:52:46

    http://blog.51cto.com/wn2100/2054541

    1 iptables

    iptables命令用于创建数据过滤与NAT规则,在iptables命令中设置数据过滤或处理数据包的策略叫做规则,将多个规则合成一个链。

    1.1 iptables的控制类型

    ACCEPT:允许通过

    LOG:记录日志信息,然后传给下一条规则继续匹配。

    REJECT:拒绝通过,必要时给出提示。

    DROP:直接丢弃,不给出任何回应。

    1.2 规则链

    规则链依据处理数据包的位置不同而进行分类

    PREROUTING:在进行路由选择前处理数据包。

    INPUT:处理入站的数据包。

    OUTPUT:处理出站的数据包。

    FORWARD:处理转发的数据包。

    POSTROUTING:在进行路由选择后处理数据包。

    规则链的先后顺序:

    入站顺序:PREROUTINGàINPUT

    出站顺序:OUTPUTàPOSTROUTING

    转发顺序:PREROUTINGàFORWARDàPOSTROUTING

    1.3 规则表

    iptables中的规则表是用于容纳规则链,规则表默认是允许状态的,那么规则链就是设置被禁止的规则,而反之如果规则表是禁止状态的,那么规则链就是设置被允许的规则             

    raw表:确定是否对该数据包进行状态跟踪。

    mangle表:为数据包设置标记。

    nat表:修改数据包中的源、目的IP地址或端口。

    filter表:此表是默认规则表,确定是否放行该数据包。

    规则表的先后顺序:rawàmangleànatàfilter

    1.4 注意事项

    1.       没有指定规则表则默认指filter表。

    2.       不指定规则链则指表内所有的规则链。

    3.       在规则链中匹配规则时会依次检查,匹配即停止(LOG规则除外),若没有匹配项则按链的默认状态处理。

    1.5 iptables命令用法

    1.5.1 添加规则

    iptables [-t 表名选项 [链名] [条件] [-j 控制类型]

    1.5.1.1 INPUT规则

    # iptables -L -t filter  #查看filter表,“-t filter”可省略,因为默认就是filter

    # iptables -L -t nat   #查看nat

    #INPUT链的默认策略设置为丢弃。(此时ssh连接也被拒绝了) -P:policy

    # iptables -P INPUT DROP    

    #允许所有的ping操作,-I:insert在规则链头部加入新规则 -p:protocol -j: jump指令

    # iptables -I INPUT -p icmp -j ACCEPT

    INPUT链追加一条规则,允许所有未被其他规则匹配上的数据包通过,“-t filter”可省略,因为默认就是filter

    # iptables -t filter -A INPUT -j ACCEPT

    仅允许来自于10.0.0.0/24网段的用户连接本机的ssh服务

    # iptables -I INPUT -s 10.0.0.0/24 -p tcp --dport 22 -j ACCEPT

    # iptables -A INPUT -p tcp --dport 22 -j REJECT

    不允许任何主机访问本机的12345端口

    # iptables -I INPUT -p tcp --dport 12345 -j REJECT

    # iptables -I INPUT -p udp --dport 12345 -j REJECT 

    拒绝所有主机通过eth0网卡访问本机的http服务

    # iptables -I INPUT -i eth0 -p tcp --dport 80 -j REJECT

    1.5.1.2 FORWARD规则

    FORWARD规则相当于路由功能

    禁止用户访问www.wangning.com

    iptables -I FORWARD -d www.wangning.com -j REJECT

    禁止IP10.0.0.66的用户上网

    # iptables -I FORWARD -s 10.0.0.66 -j REJECT


    1.5.2 删除规则

    #删除filter表中INPUT规则的第一条

    # iptables -D INPUT 1    

    1.6 保存iptables配置

    # /etc/init.d/iptables save

  • 实例!软件缺陷数据度量和分析

    2018-10-18 11:09:54

  • 如何让Fiddler模拟重复发送请求多次

    2018-10-12 17:27:33

  • Jmeter 测试 Dubbo 接口脚本编写

    2018-06-27 18:01:23

    Jmeter 测试 Dubbo 接口脚本编写


    https://testerhome.com/topics/9980


    Dubbo接口测试方法及步骤


    https://jingyan.baidu.com/album/d169e1867ef77c436611d804.html
  • 手把手用Monkey写一个压测脚本

    2018-06-04 15:45:11

    https://segmentfault.com/a/1190000008491332
    手把手用Monkey写一个压测脚本


    https://segmentfault.com/a/1190000008300644
    移动APP测试之Monkey Test 运用
  • 使用python求字符串或文件的MD5

    2018-04-11 13:03:30

    #以下可在python3运行。


    #字符串md5,用你的字符串代替’字符串’中的内容。

    import hashlib

    md5=hashlib.md5(‘字符串’.encode(‘utf-8′)).hexdigest()

    print(md5)


    #求文件md5

    import hashlib

    #文件位置中的路径,请用双反斜杠,

    如’D:\\abc\\www\\b.msi’

    file='D:\\abc\\www\\b.msi’

    md5file=open(file,’rb’)

    md5=hashlib.md5(md5file.read()).hexdigest()

    md5file.close()

    print(md5)

  • Win10下python3和python2同时安装并解决pip共存问题

    2018-04-11 11:35:53

  • 消息推送设置

    2018-04-10 16:38:49

    消息推送设置

    设置开关打开状态下,消息推送是否可正常接收(应用启用中和应用关闭时都应该可以收到)

    默认开关应该是全打开状态

    ●设置开关可以自由打开关闭

    ●确认后台未打开APP客户端时,手机消息栏可以接收到消息提醒。且点击可查看。点击后消息栏中消失

    ●确认APP客户端启动时,可以收到消息提醒,且点击可查看。客户端运行时,消息不会进消息栏。

    ●设置开关关闭时,客户端接收不到消息推送。

  • python coverage--单元测试覆盖图

    2018-04-10 10:28:27

    python coverage--单元测试覆盖图
    https://www.jianshu.com/p/ed7ba052ccab

    介绍

    coverage 在单元测试中可以显示覆盖率,显示更清晰的数据

    • 支持python 2.6-python3.X
    • pip install coverage安装

    测试代码

    def add(a, b):
        return a + b
     
     
    def subtract(a, b):
        return a - b
     
     
    def multiply(a, b):
        return a * b
     
     
    def divide(numerator, denominator):
        return float(numerator) / denominator
    
    • unittest测试
    import mymath
    import unittest
     
    class TestAdd(unittest.TestCase):
        """
        Test the add function from the mymath library
        """
     
        def test_add_integers(self):
            """
            Test that the addition of two integers returns the correct total
            """
            result = mymath.add(1, 2)
            self.assertEqual(result, 3)
     
        def test_add_floats(self):
            """
            Test that the addition of two floats returns the correct result
            """
            result = mymath.add(10.5, 2)
            self.assertEqual(result, 12.5)
     
        def test_add_strings(self):
            """
            Test the addition of two strings returns the two string as one
            concatenated string
            """
            result = mymath.add('abc', 'def')
            self.assertEqual(result, 'abcdef')
     
     
    if __name__ == '__main__':
        unittest.main()
    
    • 命名运行
    coverage run test_mymath.py
    coverage report -m

    作者:望月成三人
    链接:https://www.jianshu.com/p/ed7ba052ccab
    來源:简书


    Coverage简介

    Coverage是一种用于统计Python代码覆盖率的工具,通过它我们可以检测测试代码的有效性,即测试case对被测代码的覆盖率如何。
    Coverage支持分支覆盖率统计,可以生成HTML/XML报告。XML报告可以集成入Jenkins和Sonar。
    官方文档:http://coverage.readthedocs.org/en/latest/

    Coverage安装(Ubuntu)

    sudo pip install coverage

    目前最新的版本是4.0。

    Coverage使用

    Coverage支持2种运行方式,一种是命令行方式,另一种是在代码中调用Coverage的API,可以灵活地控制哪些代码需要测试。
    关于这2种方式,可以看以下文档:
    命令行方式:http://coverage.readthedocs.org/en/latest/cmd.html
    API方式:http://coverage.readthedocs.org/en/latest/api.html

    分析Web项目的代码覆盖率

    关于以Python启动的web项目的代码覆盖率统计,请见:

    关于WSGI项目的覆盖率统计,这方面的文档较少,需要一定地摸索,请见:

  • 彻底解决 Jedis 连接池 获取不到连接,连接放回连接池错误的问题

    2018-02-11 16:17:58

    1. public class CacheKit {  
    2.     private static Logger logger = LoggerFactory.getLogger(CacheKit.class);  
    3.     private List<JSONObject> resultList;  
    4.     private static JedisPool pool;  
    5.   
    6.     /** 
    7.      * 初始化Redis连接池 
    8.      */  
    9.     private static void initializePool() {  
    10.         //redisURL 与 redisPort 的配置文件  
    11.         String configFile = "production.properties";  
    12.         if (PropKit.getBoolean("devMode")) {  
    13.             configFile = "dev.properties";  
    14.         }  
    15.   
    16.         JedisPoolConfig config = new JedisPoolConfig();  
    17.         //设置最大连接数(100个足够用了,没必要设置太大)  
    18.         config.setMaxTotal(100);  
    19.         //最大空闲连接数  
    20.         config.setMaxIdle(10);  
    21.         //获取Jedis连接的最大等待时间(50秒)   
    22.         config.setMaxWaitMillis(50 * 1000);  
    23.         //在获取Jedis连接时,自动检验连接是否可用  
    24.         config.setTestOnBorrow(true);  
    25.         //在将连接放回池中前,自动检验连接是否有效  
    26.         config.setTestOnReturn(true);  
    27.         //自动测试池中的空闲连接是否都是可用连接  
    28.         config.setTestWhileIdle(true);  
    29.         //创建连接池  
    30.         pool = new JedisPool(config, PropKit.use(configFile).get("redisURL"),  
    31.                     PropKit.use(configFile).getInt("redisPort"));  
    32.     }  
    33.   
    34.     /** 
    35.      * 多线程环境同步初始化(保证项目中有且仅有一个连接池) 
    36.      */  
    37.     private static synchronized void poolInit() {  
    38.         if (null == pool) {  
    39.             initializePool();  
    40.         }  
    41.     }  
    42.   
    43.     /** 
    44.      * 获取Jedis实例 
    45.      */  
    46.     private static Jedis getJedis() {  
    47.         if (null == pool) {  
    48.             poolInit();  
    49.         }  
    50.   
    51.         int timeoutCount = 0;  
    52.         while (true) {  
    53.             try {  
    54.                 if (null != pool) {  
    55.                     return pool.getResource();  
    56.                 }  
    57.             } catch (Exception e) {  
    58.                 if (e instanceof JedisConnectionException) {  
    59.                     timeoutCount++;  
    60.                     logger.warn("getJedis timeoutCount={}", timeoutCount);  
    61.                     if (timeoutCount > 3) {  
    62.                         break;  
    63.                     }  
    64.                 } else {  
    65.                     logger.warn("jedisInfo ... NumActive=" + pool.getNumActive()  
    66.                             + ", NumIdle=" + pool.getNumIdle()  
    67.                             + ", NumWaiters=" + pool.getNumWaiters()  
    68.                             + ", isClosed=" + pool.isClosed());  
    69.                     logger.error("GetJedis error,", e);  
    70.                     break;  
    71.                 }  
    72.             }  
    73.             break;  
    74.         }  
    75.         return null;  
    76.     }  
    77.   
    78.     /** 
    79.      * 释放Jedis资源 
    80.      * 
    81.      * @param jedis 
    82.      */  
    83.     public static void returnResource(Jedis jedis) {  
    84.         if (null != jedis) {  
    85.             pool.returnResourceObject(jedis);  
    86.         }  
    87.     }  
    88.   
    89.     /** 
    90.      * 绝对获取方法(保证一定能够使用可用的连接获取到 目标数据) 
    91.      * Jedis连接使用后放回  
    92.      * @param key 
    93.      * @return 
    94.      */  
    95.     private String safeGet(String key) {  
    96.         Jedis jedis = getJedis();  
    97.         while (true) {  
    98.             if (null != jedis) {  
    99.                 break;  
    100.             } else {  
    101.                 jedis = getJedis();  
    102.             }  
    103.         }  
    104.         String value = jedis.get(key);  
    105.         returnResource(jedis);  
    106.         return value;  
    107.     }  
    108.   
    109.     /** 
    110.      * 绝对设置方法(保证一定能够使用可用的链接设置 数据) 
    111.      * Jedis连接使用后返回连接池 
    112.      * @param key 
    113.      * @param time 
    114.      * @param value 
    115.      */  
    116.     private void safeSet(String key, int time, String value) {  
    117.         Jedis jedis = getJedis();  
    118.         while (true) {  
    119.             if (null != jedis) {  
    120.                 break;  
    121.             } else {  
    122.                 jedis = getJedis();  
    123.             }  
    124.         }  
    125.         jedis.setex(key, time, value);  
    126.         returnResource(jedis);  
    127.     }  
    128.   
    129.     /** 
    130.      * 绝对删除方法(保证删除绝对有效) 
    131.      * Jedis连接使用后返回连接池</span> 
    132.      * @param key 
    133.      */  
    134.     private void safeDel(String key) {  
    135.         Jedis jedis = getJedis();  
    136.         while (true) {  
    137.             if (null != jedis) {  
    138.                 break;  
    139.             } else {  
    140.                 jedis = getJedis();  
    141.             }  
    142.         }  
    143.         jedis.del(key);  
    144.         returnResource(jedis);  
    145.     }  
    146.   
    147.     /**自定义的一些 get set del 方法,方便使用**/  
    148.     public JSONObject getByCache(String key) {  
    149.         String result = safeGet(key);  
    150.         if (result != null) {  
    151.             return (JSONObject) JSONObject.parse(result);  
    152.         }  
    153.         return null;  
    154.   
    155.     }  
    156.   
    157.     public String getByCacheToString(String key) {  
    158.         String result = safeGet(key);  
    159.         if (result != null) {  
    160.             return result;  
    161.         }  
    162.         return null;  
    163.   
    164.     }  
    165.   
    166.     public List<JSONObject> getArrayByCache(String key) {  
    167.         String result = safeGet(key);  
    168.         if (result != null) {  
    169.             resultList = JSONArray.parseArray(result, JSONObject.class);  
    170.             return resultList;  
    171.         }  
    172.         return null;  
    173.     }  
    174.   
    175.     public JSONArray getJSONArrayByCache(String key) {  
    176.         String result = safeGet(key);  
    177.         if (result != null) {  
    178.             return JSONArray.parseArray(result);  
    179.         }  
    180.         return null;  
    181.     }  
    182.   
    183.     public void setByCache(String key, String s) {  
    184.         safeSet(key, 86400, s);  
    185.     }  
    186.   
    187.     public void setByCacheOneHour(String key, String s) {  
    188.         safeSet(key, 3600, s);  
    189.     }  
    190.   
    191.     public void setByCacheOneHour(String key, List<JSONObject> json) {  
    192.         safeSet(key, 86400, JSONObject.toJSONString(json));  
    193.         resultList = json;  
    194.     }  
    195.   
    196.     public void setByCache(String key, JSONObject json) {  
    197.         safeSet(key, 86400, JSONObject.toJSONString(json));  
    198.     }  
    199.   
    200.     public void setByCache(String key, List<JSONObject> list) {  
    201.         safeSet(key, 86400, JSONObject.toJSONString(list));  
    202.         resultList = list;  
    203.     }  
    204.   
    205.     public void setByCache(String key, JSONArray array) {  
    206.         safeSet(key, 86400, JSONArray.toJSONString(array));  
    207.     }  
    208.   
    209.     public void setByCacheCusTime(String key, String s, int time) {  
    210.         safeSet(key, time, s);  
    211.     }  
    212.   
    213.   
    214.     public void delByCache(String key) {  
    215.         if (null != safeGet(key)) {  
    216.             safeDel(key);  
    217.         }  
    218.     }  
    219.   
    220.     public JSONObject toJSON(DBObject db) {  
    221.         return (JSONObject) JSONObject.toJSON(db);  
    222.     }  
    223.   
    224.     public List<JSONObject> toJSON(List<DBObject> list) {  
    225.         List<JSONObject> json = new ArrayList<>();  
    226.         for (DBObject aList : list) {  
    227.             json.add((JSONObject) JSONObject.toJSON(aList));  
    228.         }  
    229.         return json;  
    230.     }  
    231.   
    232.     public boolean notNull() {  
    233.         return resultList != null && resultList.size() > 0;  
    234.     }  
    235.   
    236.     public List<JSONObject> getResult() {  
    237.         return resultList;  
    238.     }  
    239.   
    240. }
  • jedispool 连 redis 高并发卡死

    2018-02-11 16:12:06

    https://www.2cto.com/kf/201504/395403.html


    java端在使用jedispool 连接redis的时候,在高并发的时候经常卡死,或报连接异常,JedisConnectionException,或者getResource 异常等各种问题

    在使用jedispool 的时候一定要注意两点

    1。 在获取 jedisPool和jedis的时候加上线程同步,保证不要创建过多的jedispool 和 jedis

    2。 用完Jedis实例后需要返还给JedisPool

    整理了一下redis工具类,通过大量测试和高并发测试的

    package com.caspar.util;
     
    import org.apache.log4j.Logger;
     
    import redis.clients.jedis.Jedis;
    import redis.clients.jedis.JedisPool;
    import redis.clients.jedis.JedisPoolConfig;
     
    /**
     * Redis 工具类
     * @author caspar
     */
    public class RedisUtil {
         
        protected static Logger logger = Logger.getLogger(RedisUtil.class);
         
        //Redis服务器IP
        private static String ADDR_ARRAY = FileUtil.getPropertyValue("/properties/redis.properties", "server");
         
        //Redis的端口号
        private static int PORT = FileUtil.getPropertyValueInt("/properties/redis.properties", "port");
         
        //访问密码
    //    private static String AUTH = FileUtil.getPropertyValue("/properties/redis.properties", "auth");
         
        //可用连接实例的最大数目,默认值为8;
        //如果赋值为-1,则表示不限制;如果pool已经分配了maxActive个jedis实例,则此时pool的状态为exhausted(耗尽)。
        private static int MAX_ACTIVE = FileUtil.getPropertyValueInt("/properties/redis.properties", "max_active");;
         
        //控制一个pool最多有多少个状态为idle(空闲的)的jedis实例,默认值也是8。
        private static int MAX_IDLE = FileUtil.getPropertyValueInt("/properties/redis.properties", "max_idle");;
         
        //等待可用连接的最大时间,单位毫秒,默认值为-1,表示永不超时。如果超过等待时间,则直接抛出JedisConnectionException;
        private static int MAX_WAIT = FileUtil.getPropertyValueInt("/properties/redis.properties", "max_wait");;
     
        //超时时间
        private static int TIMEOUT = FileUtil.getPropertyValueInt("/properties/redis.properties", "timeout");;
         
        //在borrow一个jedis实例时,是否提前进行validate操作;如果为true,则得到的jedis实例均是可用的;
        private static boolean TEST_ON_BORROW = FileUtil.getPropertyValueBoolean("/properties/redis.properties", "test_on_borrow");;
         
        private static JedisPool jedisPool = null;
         
        /**
         * redis过期时间,以秒为单位
         */
        public final static int EXRP_HOUR = 60*60;          //一小时
        public final static int EXRP_DAY = 60*60*24;        //一天
        public final static int EXRP_MONTH = 60*60*24*30;   //一个月
         
        /**
         * 初始化Redis连接池
         */
        private static void initialPool(){
            try {
                JedisPoolConfig config = new JedisPoolConfig();
                config.setMaxTotal(MAX_ACTIVE);
                config.setMaxIdle(MAX_IDLE);
                config.setMaxWaitMillis(MAX_WAIT);
                config.setTestOnBorrow(TEST_ON_BORROW);
                jedisPool = new JedisPool(config, ADDR_ARRAY.split(",")[0], PORT, TIMEOUT);
            } catch (Exception e) {
                logger.error("First create JedisPool error : "+e);
                try{
                    //如果第一个IP异常,则访问第二个IP
                    JedisPoolConfig config = new JedisPoolConfig();
                    config.setMaxTotal(MAX_ACTIVE);
                    config.setMaxIdle(MAX_IDLE);
                    config.setMaxWaitMillis(MAX_WAIT);
                    config.setTestOnBorrow(TEST_ON_BORROW);
                    jedisPool = new JedisPool(config, ADDR_ARRAY.split(",")[1], PORT, TIMEOUT);
                }catch(Exception e2){
                    logger.error("Second create JedisPool error : "+e2);
                }
            }
        }
         
         
        /**
         * 在多线程环境同步初始化
         */
        private static synchronized void poolInit() {
            if (jedisPool == null) { 
                initialPool();
            }
        }
     
         
        /**
         * 同步获取Jedis实例
         * @return Jedis
         */
        public synchronized static Jedis getJedis() { 
            if (jedisPool == null) { 
                poolInit();
            }
            Jedis jedis = null;
            try
                if (jedisPool != null) { 
                    jedis = jedisPool.getResource();
                }
            } catch (Exception e) { 
                logger.error("Get jedis error : "+e);
            }finally{
                returnResource(jedis);
            }
            return jedis;


        /**
         * 释放jedis资源
         * @param jedis
         */
        public static void returnResource(final Jedis jedis) {
            if (jedis != null && jedisPool !=null) {
                jedisPool.returnResource(jedis);
            }
        }
         
         
        /**
         * 设置 String
         * @param key
         * @param value
         */
        public static void setString(String key ,String value){
            try {
                value = StringUtil.isEmpty(value) ? "" : value;
                getJedis().set(key,value);
            } catch (Exception e) {
                logger.error("Set key error : "+e);
            }
        }
         
        /**
         * 设置 过期时间
         * @param key
         * @param seconds 以秒为单位
         * @param value
         */
        public static void setString(String key ,int seconds,String value){
            try {
                value = StringUtil.isEmpty(value) ? "" : value;
                getJedis().setex(key, seconds, value);
            } catch (Exception e) {
                logger.error("Set keyex error : "+e);
            }
        }
         
        /**
         * 获取String值
         * @param key
         * @return value
         */
        public static String getString(String key){
            if(getJedis() == null || !getJedis().exists(key)){
                return null;
            }
            return getJedis().get(key);
        }
         
    }


  • Ant将Jmeter的jtl文件转为html文件报“前言中不允许有内容”

    2018-02-07 09:58:49

    1. 在JMeter的bin目录中找到jmeter.properties;
    2. 将文件中#jmeter.save.saveservice.output_format=csv改为jmeter.save.saveservice.output_format=xml
      注意:去掉前面的#号,后面的xml要小写
  • Jmeter Random Variable配置项可以为每个线程生成随机变量

    2018-02-05 11:35:44

    配置元件Random Variable可以配置生成随机数,自定义输出格式,最大最小值,以及是否为每个线程单独生成:

    复制代码
    Variable Name:     uuid
    Output Format:     12345678-1234-4444-a123-000000000000
    Minimum Value:     111111111111
    Maximum Value:     999999999999
    Seed for Random function:${__Random(1,10,)} //如果指定为一个固定值,则每次迭代,各个线程得到的随机值都会相同
    Per Thread (User): True  //每个线程生成一个随机数
    复制代码
    复制代码
    iteration: 1
        thread: 1
            sampler 1: VALUE_1-1
            sampler 2: VALUE_1-1
            ...
        thread: 2
            sampler 1: VALUE_2-1
            sampler 2: VALUE_2-1
            ...
        ...
    iteration: 2
        thread: 1
            sampler 1: VALUE_1-2
            sampler 2: VALUE_1-2
            ...
        thread: 2
            sampler 1: VALUE_2-2
            sampler 2: VALUE_2-2
            ...
        ...
    复制代码
  • (JMeter/Ant/Jenkins)自动化接口测试的部署 及 部署过程中的坑

    2018-02-01 10:43:07

  • python3发送邮件(yagmail)

    2018-01-30 17:58:15

    python3发送邮件(yagmail)

    # coding:utf-8

    import yagmail

    # 链接邮箱服务器
    yag = yagmail.SMTP(user="xxx@xx.com", password="xxx!!", host='smtp.xxx.com')

    # 邮箱正文
    contents = ['This is the body, and here is just text http://somedomain/image.png',
    'You can find an audio file attached.', '/local/path/song.mp3','测试邮件']

    # 发送邮件
    yag.send(['xxx@xx.com', 'xxxxxx@xx.com'], '发送附件', contents, ['test.html', 'logo.jpg', 'yagmal_test.txt'])

    #抄送
    # 邮箱正文  文本及附件
    contents = ['This is the body, and here is just text http://somedomain/image.png',
    'You can find an audio file attached.', '/local/path/song.mp3', '测试邮件', 'test.html', 'logo.jpg',
    'yagmal_test.txt']

    # 发送邮件
    yag.send(to='xx@xx.com', cc='xxx@xxx.com', subject='发送附件', contents=contents)
  • Jmeter如何更好的组织脚本结构进行接口测试

    2018-01-17 23:18:04

  • jmeter ---json几种读取方式,ArrayList循环读取

    2018-01-14 17:39:06

    https://www.cnblogs.com/nzg-noway/p/7490412.html


    在之前写过提取json数据格式的文章,这次对jmeter读取json数据格式进行整理。

      举例一个接口的response 格式如下:

    复制代码
    {
       "data" : {
          "device_vec" : [
             {
                "agent_version" : "9.7.0.2225",
                "android_id" : "e3d699cf01620531",
                "asset_number" : "",
                "description" : "89vUwdwfVydEjqNAANxM11c72ujdmn",
                "device_name" : "357568061882002",
                "email" : "1504487508089@tt.com",
                "encryption_log_count" : 0,
                "encryption_version" : "",
                "engine_version" : "9.715-1024",
                "firewall_log_count" : 0,
                "firewall_version" : "",
                "group_id" : "aa000000-0000-0000-0000-000000000000",
                "group_name" : "Default",
                "id" : "35756806-1882-0020-0000-000000000000",
                "imei" : "357568061882002",
                "inactive_reason" : 0,
                "install_time" : 1503642124,
                "last_connected_time" : 1504742375,
                "last_scan_time" : 1503642674,
                "meid" : "",
                "noncomp_reason" : "",
                "os_version" : "4.3",
                "pattern_version" : "2.437.00",
                "phone_number" : "",
                "platform_type" : 512,
                "policy_id" : 32,
                "policy_name" : "",
                "security_status" : 3,
                "status" : 3,
                "user_name" : "test1504487508089",
                "virus_log_count" : 26,
                "wtp_log_count" : 0
             },
             {
                "agent_version" : "2.0.0.1518",
                "android_id" : "",
                "asset_number" : "",
                "description" : "3dLAbTlj7UQoOiodnAjDrfX1iI0PCx",
                "device_name" : "Michael’s iPhone",
                "email" : "1504487508089@tt.com",
                "encryption_log_count" : 0,
                "encryption_version" : "",
                "engine_version" : "",
                "firewall_log_count" : 0,
                "firewall_version" : "",
                "group_id" : "aa000000-0000-0000-0000-000000000000",
                "group_name" : "Default",
                "id" : "6954500b4f14e50bd20634481ee2c6d9f17b4ee3",
                "imei" : "35 445006 267069 9",
                "inactive_reason" : 0,
                "install_time" : 1503641446,
                "last_connected_time" : 1503652862,
                "last_scan_time" : 1503641477,
                "meid" : "35445006267069",
                "noncomp_reason" : "",
                "os_version" : "10.3.2",
                "pattern_version" : "",
                "phone_number" : "",
                "platform_type" : 1024,
                "policy_id" : 6,
                "policy_name" : "",
                "security_status" : 1,
                "status" : 3,
                "user_name" : "test1504487508089",
                "virus_log_count" : 0,
                "wtp_log_count" : 0
             }
          ],
          "total_count" : 2
       },
       "error_code" : 1,
       "message" : "Success",
       "timestamp" : 1504765848
    }
    复制代码


    下面就对device_vec取角标2的agent_version 参数进行提取。


    方法一:Jmter Json插件,JSON Path Extractor 提取器。

    处理Json数据的方法是使用JMeter的插件,该插件可以使用JSONPath来获取JSON数据中特定位置的数据。类似于XML文件中的XPath,JSONPath可以使用简单的表达式来操作Json对象。JSON Path Extractor是一个开源的增加了post处理器的插件,可以将该插件的Lib文件拷贝到JMeter的lib目录下或者通过Jmeter UI界面的Options-->Plugins Manager下载json插件即可。

    可以使用如下的JSONPath进行描述:

    $.data.device_vec[1].agent_version

    在JMeter中,只需要从PostProcessor菜单中打开JSON Path Extractor然后输入变量名与默认值即可,如下所示:

    JSONPath表达式较短并且易于阅读,能够有效提高测试脚本的易维护性,该插件并不随着标准的JMeter一起安装。


    方法二:Jmter 正则表达式插件正则表达式提取

    JMeter安装了正则表达式插件之后,可以按照固定的格式从字符串中提取数据,而本例中正则表达式如下所示:

    "agent_version":"(.+?)"

    使用了该表达式之后会返回所有服从表达式的字符串,但是只有一个表达式是我们所关注的。可以使用1个组作为模板($1$),而2则会返回第二个数据。


     方法三:Jmter BeanShell提取器, BeanShell提取器

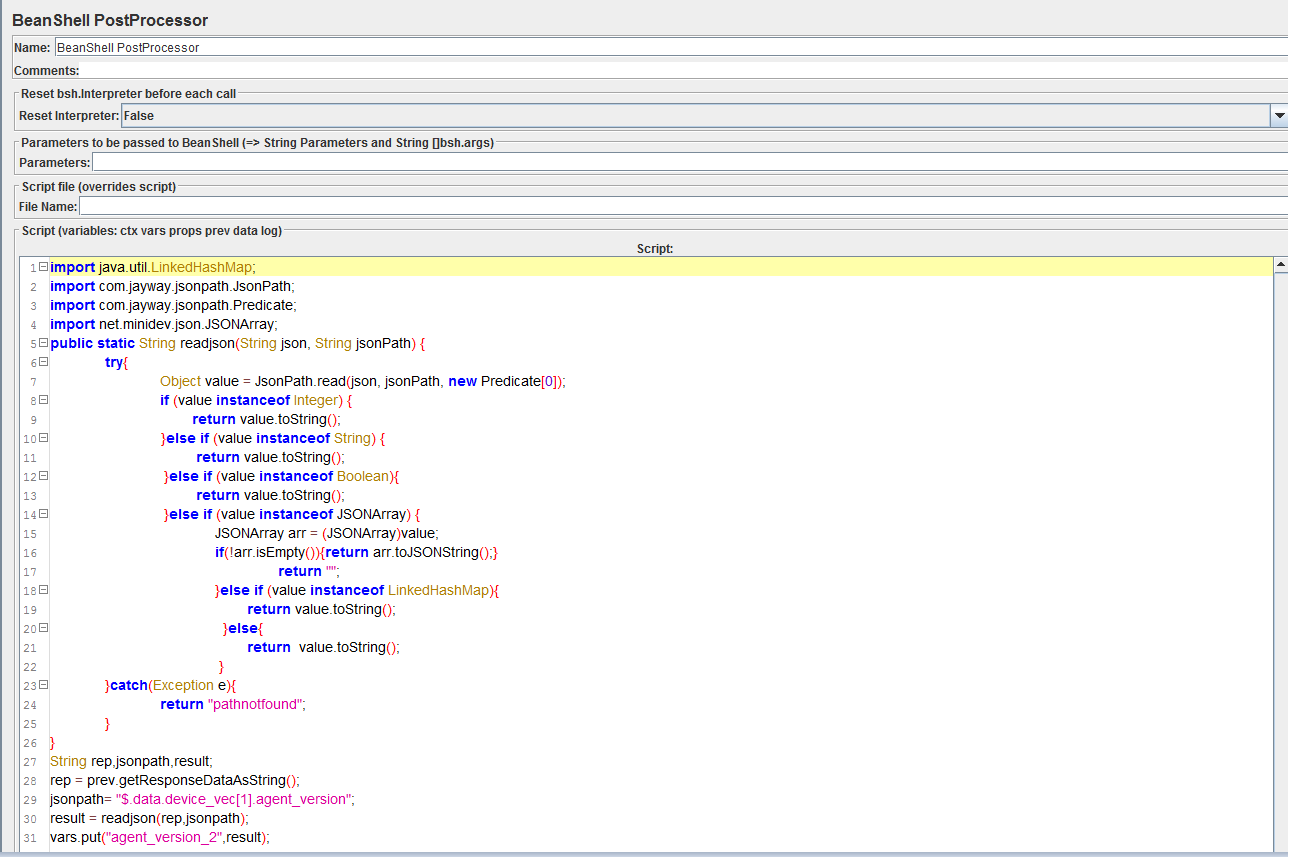
    借用了JMeter的对于BeanShell支持的特性,BeanShell是一个轻量级的面向Java的脚本语言。BeanShell Post Processor允许使用标准的Java语法来处理Json数据,使用方法如下图所示:

       1.写一个jsonpath读取代码如下:

    复制代码
    import java.util.LinkedHashMap;
    import com.jayway.jsonpath.JsonPath;
    import com.jayway.jsonpath.Predicate;
    import net.minidev.json.JSONArray;
    public static String readjson(String json, String jsonPath) {
        try{
            Object value = JsonPath.read(json, jsonPath, new Predicate[0]);
            if (value instanceof Integer) {
                    return value.toString();
                      }else if (value instanceof String) {
                     return value.toString();
             }else if (value instanceof Boolean){
                     return value.toString();
             }else if (value instanceof JSONArray) {
                JSONArray arr = (JSONArray)value;
                if(!arr.isEmpty()){return arr.toJSONString();}
                      return "";
                }else if (value instanceof LinkedHashMap){
                        return value.toString();
                  }else{
                        return  value.toString();
                      }
        }catch(Exception e){
            return "pathnotfound";
        }
    }
    复制代码

    然后使用此方法来读取json数据格式


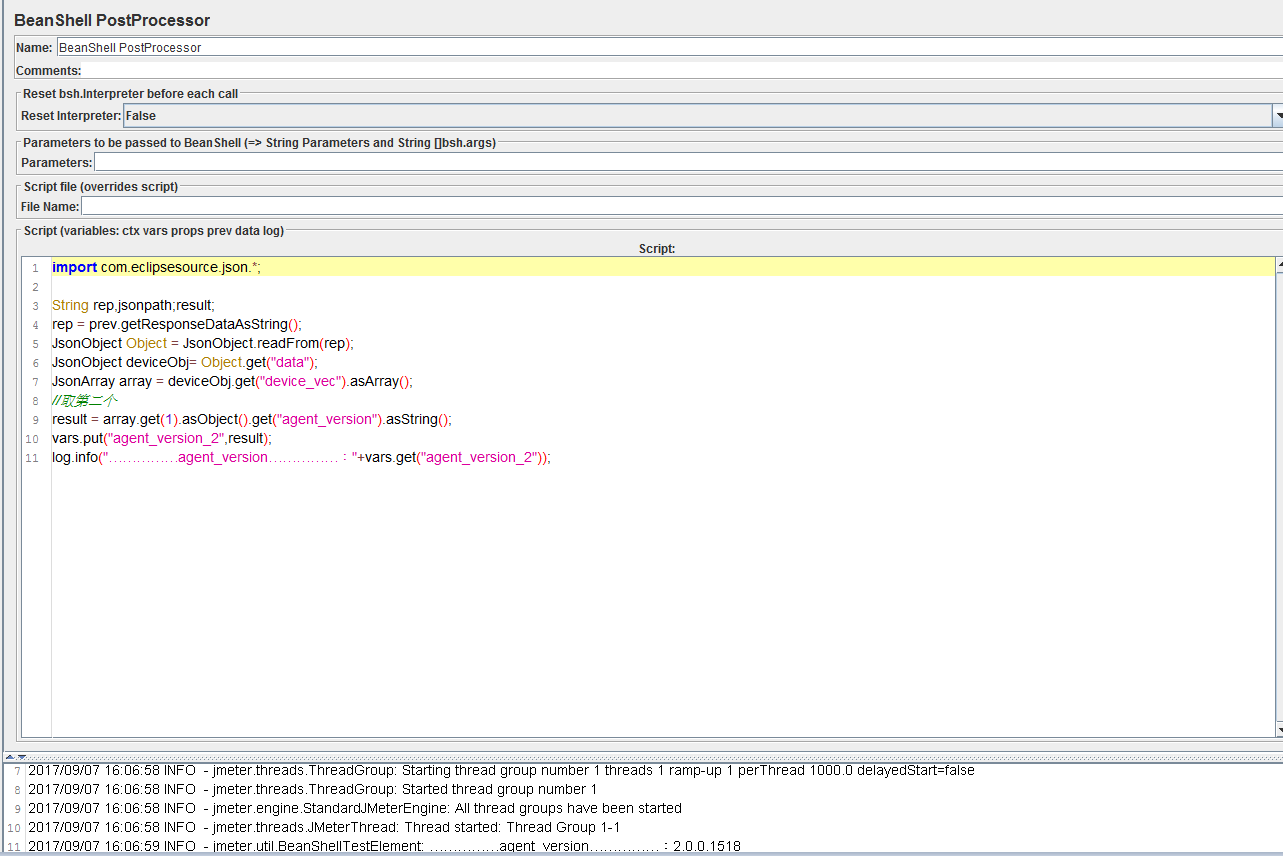
    2.导入com.eclipsesource.json 方法直接读取json

    com.eclipsesource.json,源码下载路径如下 https://github.com/ralfstx/minimal-json,只需将源码打成jar包放到jmeter的lib/ext目录下即可

    com.eclipsesource.json 适用方法:http://static.javadoc.io/com.eclipsesource.minimal-json/minimal-json/0.9.3/com/eclipsesource/json/JsonObject.html


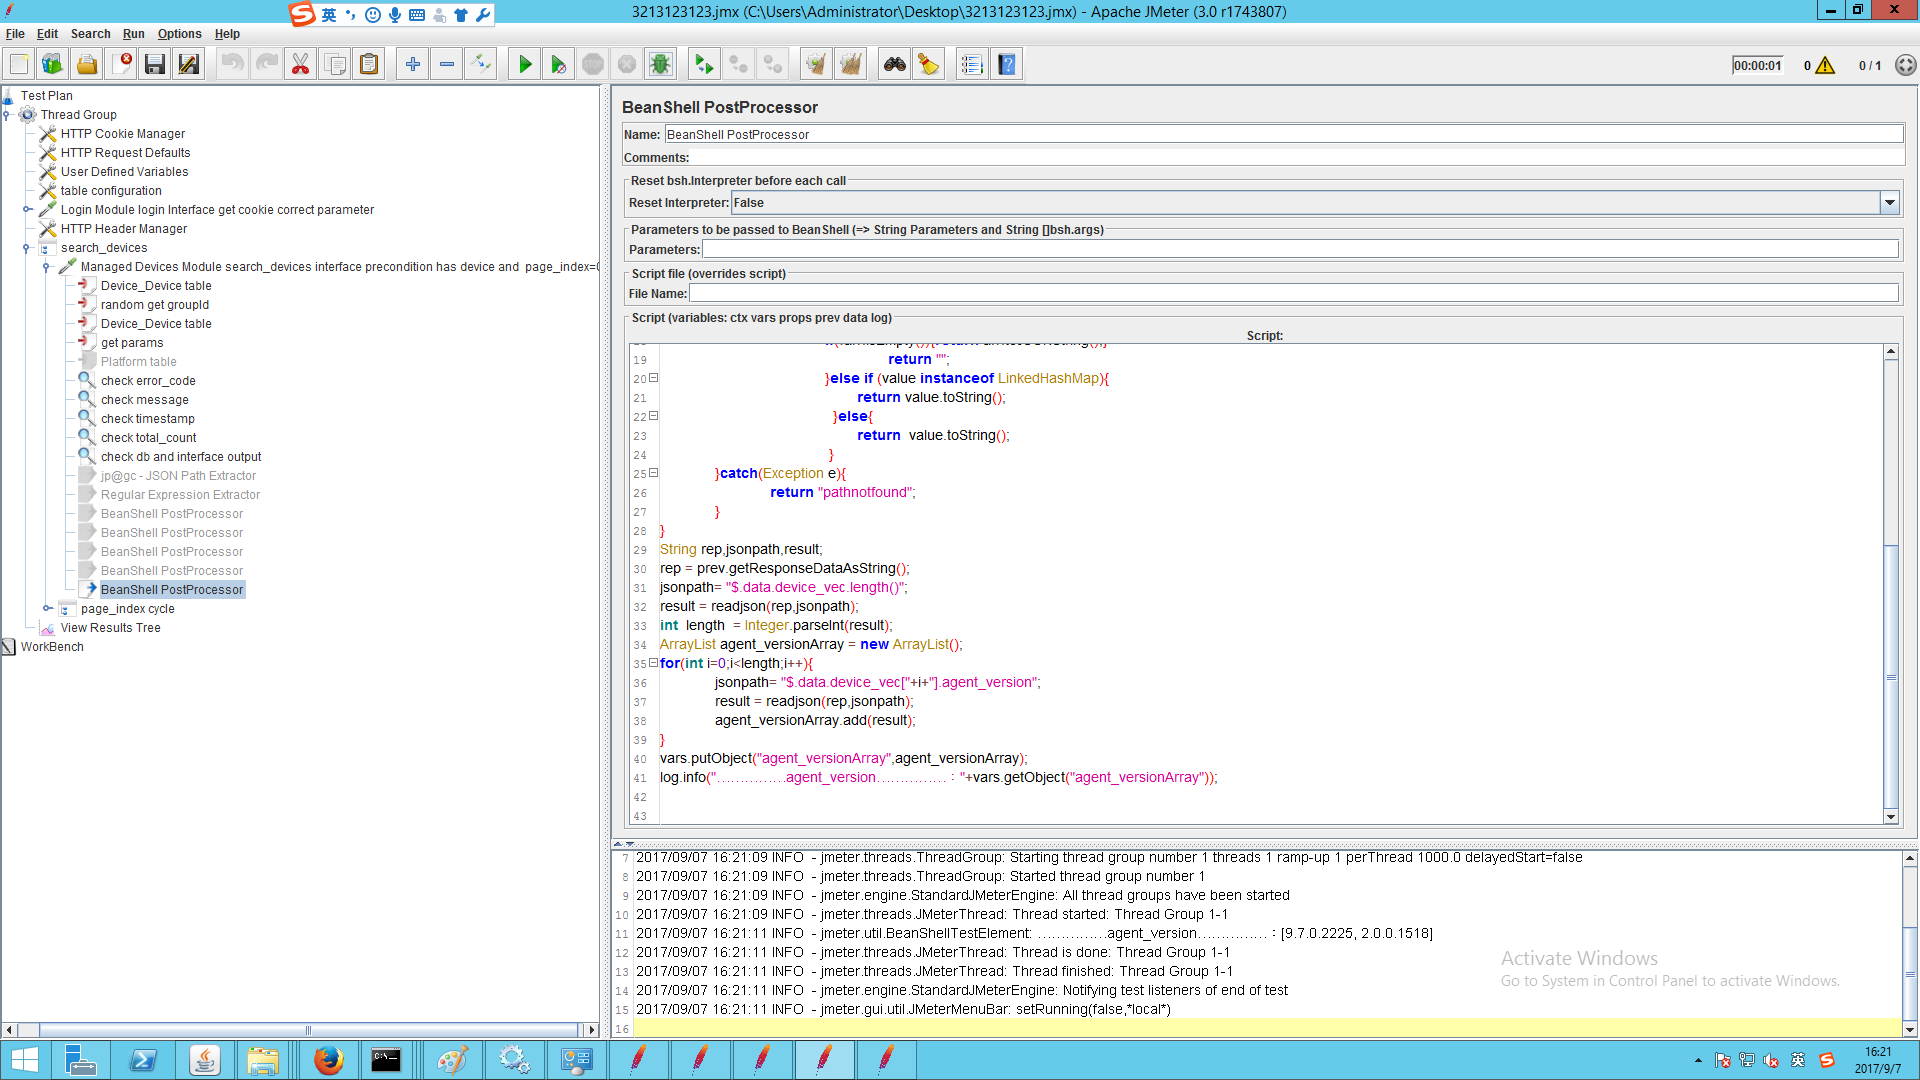
    3.如果是循环读取,那就要算出List的长度做循环---用jsonpath读取方式去循环取(前面的jsonpath方法不再贴)


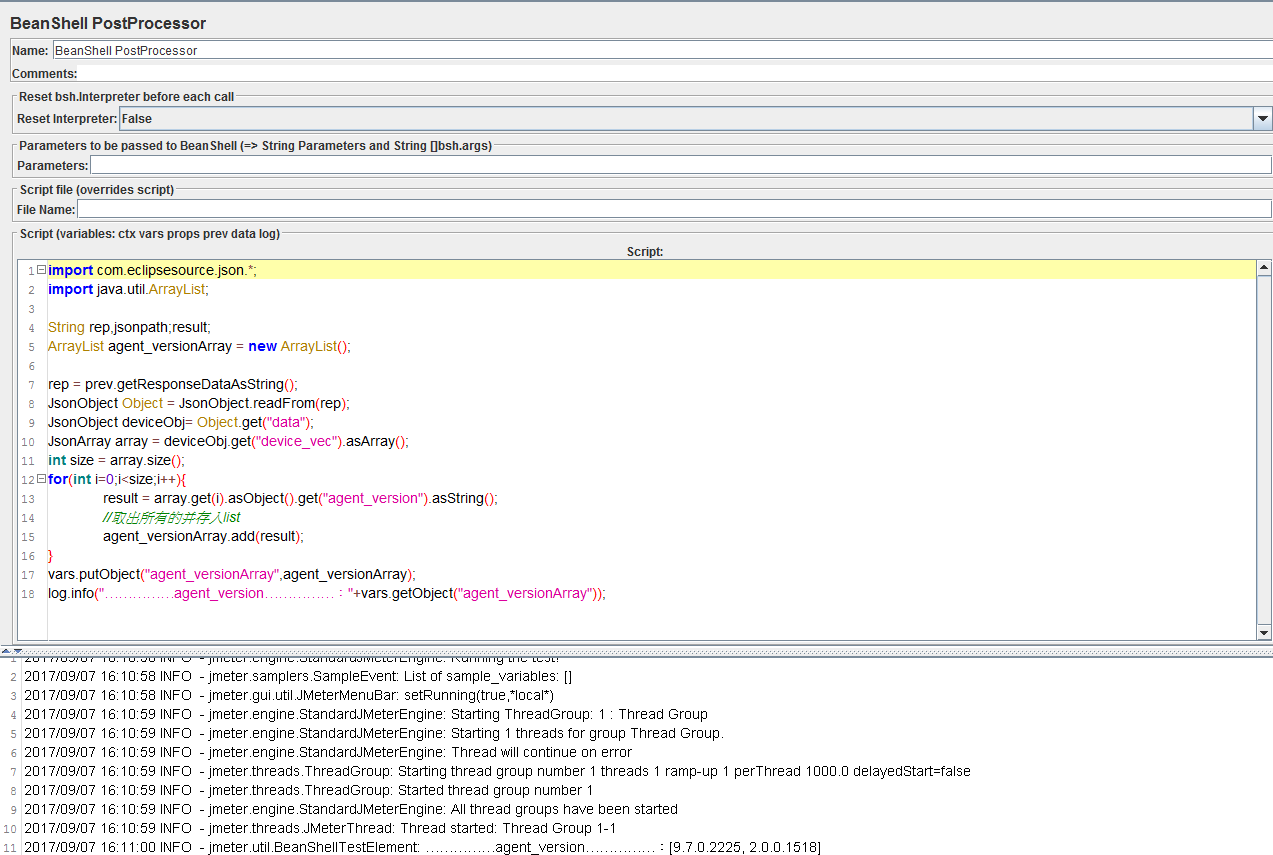
    4.如果是循环读取,那就要算出List的长度做循环---用com.eclipsesource.json api 读取方式循环读

    如下:


    总结

    本文列举出了三种可用的从Json格式的返回值中提取数据的方法,正则表达式对于简单的Json格式的数据的快速标准化非常占优势。而JsonPath插件可以用于创建能够被维护修改的脚本,但是需要额外的插件安装工作。而最后的带JSON库的BeanShell确实非常详细并且依赖于Java语言的灵活性可以进行进一步的开发。


1951/1012345678910>
Open Toolbar