
-
Webking -"Static Analysis" does not apply to the selected items.
2010-11-12 11:15:09
"Static Analysis" does not apply to the selected items.
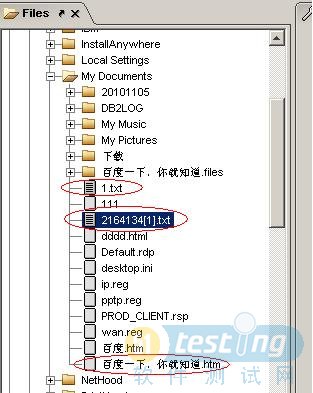
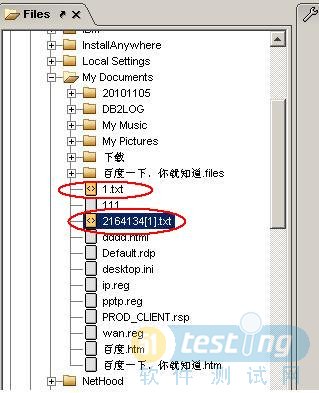
遇到的问题和解决方法

过程:
我的文档图标是:
而别人的是:
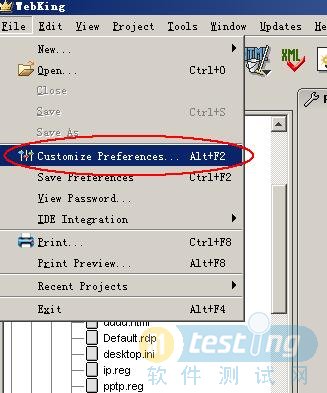
通过仔细看E文帮助文件,通过修改MIME Type解决:
-
AVT test tool-Webking
2010-11-11 13:55:36
introduction
WebKing™, from Parasoft Corporation, is a source code validation tool for HTML. It is used to check HTML documents for proper syntax and standards compliance, including accessibility standards. WebKing can be used to test static web pages served from a web server, and can also be used to test HTML pages created dynamically by web applications and portal web sites.
WebKing is used to validate compliance of the IBM Corporate Instruction 162 Web Accessibility Checklist. Keep in mind that WebKing only covers a subset of the checkpoints in the checklist, and WebKing can only do a technical validation of the HTML syntax. The appropriateness of the text or alternative text and the other checkpoints in the checklist must still be manually validated.
In the development environment, WebKing has a plug-in for WebSphere Studio Application Developer (WSAD), which enables web page debugging during development. That feature is not discussed in this document. See WebKing's on-line plug-ins documentation for details.
This document is intended solely to describe the use of WebKing as a software accessibility testing tool. For a more comprehensive guide to using WebKing, refer to the WebKing on-line documentation. For additional information, go to the ParaSoft Web site.
set up
After Installing WebKing, the following customization should be made:
- Start WebKing.
- Customize preferences to set the path depth and add additional mime types for HTML source files:
- From the WebKing menu, select "File" and then select "Customize Preferences".
- Select the "Misc" tab.
- Under "Path Testing", which can be found by paging down into the panel, select the "Limit depth of path inspection to" radio button and then enter "3" into the text entry field. This will limit the time consumed if you use the Path Creation wizard to automatically create unique paths.
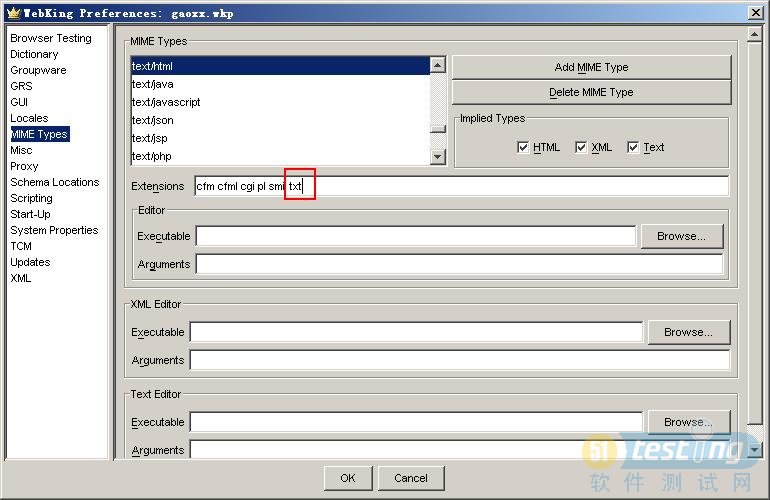
- Select the "MIME Types" tab.
- Select "text/html" in the "MIME/Types" list box located in the upper left hand portion of the panel.
- In the "Extensions" text/html entry field add the appropriate MIME Types as valid HTML extensions for your application. For example: cfm cfml cgi pl smil.
- Click the "OK" button.
- Customize the tools for the browser and configure Static Analysis:
- From the WebKing menu, select "Tools" and then select "Customize", the "Customize Tools" dialog will be displayed.
- Select the "Tools" tab and then arrow down to select "Browse".
- In the resulting right hand panel, select the "Internet Explorer" radio button in the "Browser" section. We recommend Internet Explorer since "Record using browser" function is not currently supported with Firefox browser.
- Return to the left hand panel of the "Tools" tab and then page down to select "Static Analysis".
- In the resulting right hand panel, check the box for "Step 4a: Check Web Accessibility (WCAG 2.0)".
- Make sure the "Refresh" checkbox is unchecked.
- Click the "OK" button.
- To save all your configurations: select "File" and then select "Save Preferences".
useing working
WebKing can be used to test for files or directories on local file system, a single url or the entire web site. It also can be used to test for other web standards beside accessibility standards. For more information please visit the IBM WebKing Knowledge Community Web site.
"Run Accessibility Test" methods(执行AVT 的方法)
There are many ways to execute the accessibility step in WebKing. Users can use one of the following methods when asked to "Run Accessibility Test" in the examples:
- Click on the "Static Analysis" icon (the one that has a triangle picture on it) or
- Click on the "Common Standards CodeWizard" icon (the one that has a red had picture on it) and then select "Step 4a: Check Web Accessibility (WCAG 2.0)" or
- From the WebKing menu, select "Tools" and then select "Static Analysis" or
- From the WebKing menu, select "Tools", "Common Standards CodeWizard" and then select "Step 4a: Check Web Accessibility (WCAG 2.0)".
The following are some step by step examples on how to test accessibility with WebKing.
Example 1: Checking files on local file system for Accessibility
This example is used when testing files directly from local file system or from a mapped network drive.
- Ensure that you have configured WebKing per the setup instructions above.
- From the WebKing menu, select "View" and then select "Show File Viewer".
- Select the "Files" tab in the left hand panel.
- Navigate through the directory tree and select the desired file or files or entire directory.
- Run Accessibility Test using one of the methods listed above.
- Accessibility violations will be displayed in the right hand panel.
Example 2: Checking a Web site for Accessibility by creating a simple project
This example is used when testing static web pages served from a web server.
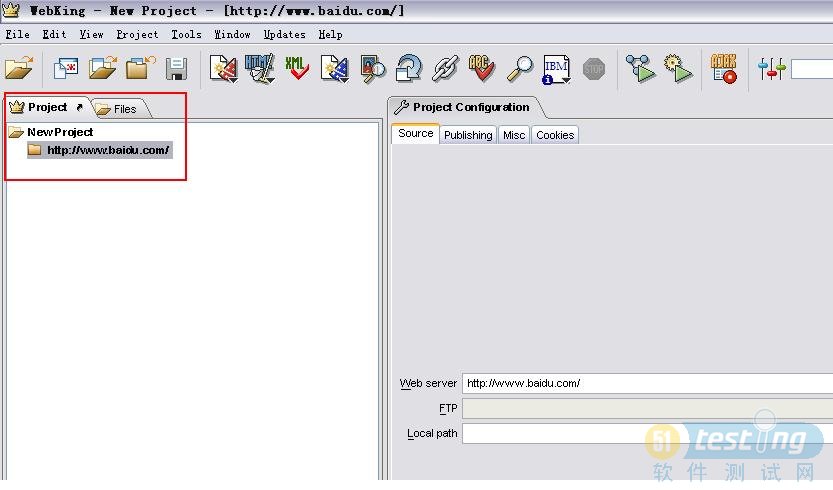
- From the WebKing menu, select "File", "New" and then select "Project".
2.On the "Source" tab, enter the URL in the "Start URL" field

3、If you want WebKing to load only the subdirectories from the initial start URL, select the "Restrict scanning to deepest subdirectory of Start URL" option
如果你只想通过最初始的开始界面装载子目录,选择“限制从开始页面检查最深的子目录”选项。
4.If you want WebKing to follow redirects to sites that are not specified as allowed URLs, select the "Follow redirects not specified as restrictions in the table" option
(不太懂啥意思,看后面翻过来补充)
5、Add or remove an URL entry in the "Allowable and Restricted URLs" table is optional.
6、Select the desired "Loading depth". (定义深度,0表示当前页)
Note: A loading depth of "0" (zero) tells WebKing to test only the page specified by the URL. A non-zero depth tells WebKing to follow links from the first page to the depth specified. When testing a live web site, a loading depth of zero is suggested the first time you test the site. As your test progresses, you can test each URL in your site individually with a loading depth of zero, or you may choose to specify the main entry page URL, and increase the loading depth to include all pages within the site.7、Select the "Project" tab, enter a project name and then click OK.
8、WebKing will then load the project. You may be prompted for Form. or Password input while the site loads.
Note: WebKing is able to test Web sites that accept HTTP cookies or require password entry. When WebKing loads a site that requires authentication, WebKing prompts the user to enter valid username/password pairs as needed. Passwords can be saved in the project, modified or deleted.9、In the left hand panel, WebKing will create a "Project" tab, with the project name and URL or directory displayed.
10、At this point, you can highlight the URL, the project name, a single file or a directory in the project
11、Run Accessibility Test using one of the methods listed above.
12、Accessibility violations will be displayed in the right hand panel.
Example 3: Checking a dynamic Web site for Accessibility by creating a path
This example is used when testing HTML pages created dynamically by web applications or portal web sites.
Note: This example requires Internet Explorer to be installed on the system because the "Record using browser" function is not currently supported with Firefox.
- From the WebKing menu, select "File", "New" and then select "Project".
2、On the "Source" tab, enter the URL in the "Start URL" field
- If you want WebKing to load only the subdirectories from the initial start URL, select the "Restrict scanning to deepest subdirectory of Start URL" option
- If you want WebKing to follow redirects to sites that are not specified as allowed URLs, select the "Follow redirects not specified as restrictions in the table" option
- Add or remove an URL entry in the "Allowable and Restricted URLs" table is optional.
- Set the "Loading depth" to "0" (zero) so only the initial page will be loaded.
- Select the "create paths" option then click OK.
- On the "Path Creation Wizard" dialog, select "Record using browser", select "Record Only" and then click OK.
- A browser will pop up with the initial page, continue to click on links or fill out forms on the web page to set up your testing path. When finish, close your browser.
- A path is created on the "Paths" tab. Select the top node "Paths" to check for the whole path.
- Run Accessibility Test using one of the methods listed above.
- Accessibility violations will be displayed in the right hand panel.

标题搜索
我的存档
数据统计
- 访问量: 52170
- 日志数: 30
- 文件数: 2
- 建立时间: 2009-02-01
- 更新时间: 2012-03-15
