Since : I always work for my future.
And : Linux is the future.
So: I work for Linux

-
测试的目的,软件测试人员的角色和测试设计
2008-08-06 01:09:21
这是一个很大的问题,但是也是一个很小的问题。问题大到有时候只有管理测试的manager才能回答,但是问题也小到每一个做具体测试的人员也必须回答。
测试有很多种类,但是具体到某一个测试,我们必须清楚这个测试的目的:是为了验证某个已经修复的BUG,还是为了验证软件中某个功能目前的状态,还是为了确认软件最基本的功能在特定状态下的运行情况,亦或是为了全面检测软件的各种功能。。。只有彻底清楚了目的,我们才能知道这次测试是为“谁”服务--不是每一个测试都是为了客户。至少我有时候是为了验证开发人员的某个想法,有时候是因为产品经理想比较一下我们的产品和竞争对手的产品,有时候是为了验证某个BUG,有时候是为了全面测试。
了解了测试的目的,也就明白了测试人员在这次测试中的角色。从而就能够由此出发设计测试内容,调整测试手段,确定最佳的测试报告---有时候,即便是一个为了一个简单的测试结果写的一个邮件,也是我们的测试报告,需要认真对待的。
最近犯了这个错误,浪费了我几乎一周的时间。
-
压力测试 (stress testing) 工具:SLAMD (Distributed Load Generation Engine)
2008-06-25 03:10:03
公司同事介绍了一个做压力测试的工具软件:SLAMD (http://slamd.com)
根据这个网站自己的介绍,它可以做“LDAP, HTTP, SMTP, IMAP, and POP, or any database that can be accessed via JDBC”--也就是所有能够用JDBC的地方。
网上没有更多的资料,这个工具现在是开源软件,但是好像已经两年没有什么更新了。不知道应用是否广泛。看来需要花点时间读读它的源程序了。
它的官方网站介绍如下:SLAMD Distributed Load Generation Engine
The SLAMD Distributed Load Generation Engine (SLAMD) is a Java-based application designed for stress testing and performance analysis of network-based applications. It was originally developed by Sun Microsystems, Inc., but it has been released as an open source application under the Sun Public License, which is an OSI-approved open source license. The main site for obtaining information about SLAMD is http://www.slamd.com/, but it is also available as a java.net project.
SLAMD was originally developed for the purpose of benchmarking and analyzing the performance of LDAP directory servers, and it is the most powerful and flexible tool available for this task. However, it is also well-suited for testing other kinds of network applications and has been used for things like Web servers and Web-based applications, relational databases, and mail servers. It can also be used for non-network based applications (and in fact, it is used for comparing things like CPU power and memory latency across a number of different kinds of systems), although its distributed nature makes it ideal for systems that can be accessed remotely.
SLAMD provides a Java-based API to make it possible to quickly develop custom workloads, and it also contains an embedded scrīpting engine that can make it easy to stress applications using protocols like LDAP, HTTP, SMTP, IMAP, and POP, or any database that can be accessed via JDBC. It also includes tools for recording and playing back TCP traffic, and a utility for intercepting LDAP communication and writing it as a scrīpt that may be executed in the SLAMD scrīpting engine.
-
selenium & firefox 3 (beta 5)
2008-06-07 06:22:47
现有版本的selenium不能支持火狐3,需要加入一个补丁程序。
selenium已经有了补丁,相关论坛在这里:
http://jira.openqa.org/browse/SIDE-171
补丁程序可以在这里下载:http://jira.openqa.org/secure/attachment/11491/ff3_patch.tar
这个论坛里面没有说明如何安装,其实也很简单。只要更新在selenium-server.jar里面的两个子目录就可以了。这两个子目录是:- customProfileDirCUSTFF
- customProfileDirCUSTFFCHROME
- jar uf selenium-server.jar ./customProfileDirCUSTFF
- jar uf selenium-server.jar ./customProfileDirCUSTFFCHROME
-
网页自动测试 7. 从局部再回到整体
2008-06-06 07:44:16
每一个独立的测试程序都必须反复的调试,直到确认在正确的环境测试和提供正确的数据的情况下运行无误--也就是说,我们QA写的程序同样是程序,也需要经过测试和调整。虽然在某些方面和开发人员的程序有不一样的地方,但是基本的原理不应该有任何的差别。
调试我所有的程序花费了我不少的时间,在时间比较紧张的情况下,有些地方我就没有修复,仅仅是在程序里面留下一些说明,准备下次改正。
自动化测试当然是指在短时间里面测试一系列的功能,所以在单个测试程序完成和调试之后,我还需要些一个调用这些测试程序的程序。这个程序需要有如下的功能
1。自动调用单个测试程序
2。检查测试程序的执行结果,并记录
3。在所有调用的程序完成之后,打印测试报告。
完成了这些,才能说完成了部分的自动化测试--也就是说我们还有很多的工作要做。
这个是它的一次执行结果:$> ./exetestplan.pl showcase.testplan /tmp/testplan.log
Using test plan file [showcase.testplan]
Loading test plan file...
Load admin_principal_add_rpc.t
Load admin_principal_add_snmp.t
Load admin_policy_default_ui.t
Load admin_add_group.t
Load admin_edit_group_active-inactive.t
Load admin_edit_group_addgroupmember.t
Load admin_edit_group_cancle_editing.t
Load admin_edit_group_delete.t
Load admin_edit_group_descrīption.t
Load admin_edit_group_gid.t
Load admin_edit_group_name.t
Load admin_edit_group_removegroupmember.t
Loading test case finished
Using log file [/tmp/testplan.log]
Test plan [showcase.testplan] starts ...
testcase [admin_principal_add_rpc.t]...success
testcase [admin_principal_add_snmp.t]...success
testcase [admin_policy_default_ui.t]...success
testcase [admin_add_group.t]...success
testcase [admin_edit_group_active-inactive.t]...success
testcase [admin_edit_group_addgroupmember.t]...success
testcase [admin_edit_group_cancle_editing.t]...success
testcase [admin_edit_group_delete.t]...success
testcase [admin_edit_group_descrīption.t]...success
testcase [admin_edit_group_gid.t]...success
testcase [admin_edit_group_name.t]...success
testcase [admin_edit_group_removegroupmember.t]...success
================ summary report =================
total test 12, passed (12), failed (0), skipped (0)
test case failed
test case skipped
test case success
admin_principal_add_rpc.t
admin_principal_add_snmp.t
admin_policy_default_ui.t
admin_add_group.t
admin_edit_group_active-inactive.t
admin_edit_group_addgroupmember.t
admin_edit_group_cancle_editing.t
admin_edit_group_delete.t
admin_edit_group_descrīption.t
admin_edit_group_gid.t
admin_edit_group_name.t
admin_edit_group_removegroupmember.t
log file: [/tmp/testplan.log]
================ end of summary report =================
调用单个程序的主程序如下:#!/usr/bin/perl
use strict;
use warnings;
#******** Global variables ********#
our $testplanfile;
our @testcases;
our $total=0;
our $pass=0;
our $fail=0;
our $skip=0;
our @case_passed;
our @case_failed;
our @case_skipped;
our $log="/tmp/testplan.log";
#**************************#
our $x=@ARGV;
if ($x==1){
$testplanfile = $ARGV[0];
print "\nUsing test plan file [$testplanfile]";
print "\nUsing default log file [$log]";
loadtestcases();
}
elsif ($x==2){
$testplanfile = $ARGV[0];
$log = $ARGV[1];
print "\nUsing test plan file [$testplanfile]";
loadtestcases();
if (!open (LOG , ">$log")){
print "\nopen to write [$log] ERROR";
exit (0);
}
print "\nUsing log file [$log]";
}else{
print "\nUsage: exetestplan.pl <testplan> <log file>\n";
exit (0);
}
#**************************#
print "\n\nTest plan [$testplanfile] starts ...";
foreach my $testcase (@testcases){
my $testresult = run_one_test($testcase);
$total ++;
if ($testresult == 0){ # if test failed
$fail++;
push @case_failed, $testcase;
}
if ($testresult == 1){ # if test success
$pass++;
push @case_passed, $testcase;
}
if ($testresult == 2){ # if test scrīpt file does not exist
$skip++;
push @case_skipped, $testcase;
}
}
print "\n================ summary report =================\n";
print "\ntotal test $total, passed ($pass), failed ($fail), skipped ($skip)";
print "\ntest case failed";
foreach (@case_failed){
print "\n ".$_;
}
print "\ntest case skipped";
foreach (@case_skipped){
print "\n ".$_;
}
print "\ntest case success";
foreach (@case_passed){
print "\n ".$_;
}
close LOG;
print "\nlog file: [$log]\n";
print "\n\n================ end of summary report =================\n";
#******** sub routines ********#
sub run_one_test{
my $testscrīpt = shift;
my $cmd;
my $return;
my $result;
my @ok;
my @notok;
my $subtotal=0;
my $subpass=0;
my $subfail=0;
print LOG "\n";
print LOG gettimestamp()."[$testscrīpt] starts ...";
print "\ntestcase [$testscrīpt]...";
if (-e $testscrīpt){
$cmd="perl $testscrīpt 2>&1";
}else{
print "skipped";
print LOG gettimestamp()."file [$testscrīpt] does not exist, skip this one";
return 2;
}
print LOG gettimestamp()."cmd is [$cmd]";
$result =`$cmd`;
print LOG gettimestamp()."the testcase response is below";
my @lines = split(/\n/, $result );
foreach my $line (@lines){
print LOG "\n\t".$line;
if ($line =~ /^ok/){
push @ok, $line;
$subtotal++;
$subpass++;
}
if ($line =~ /^not ok/){
push @notok, $line;
$subtotal++;
$subfail++;
}
}
print LOG gettimestamp()."end of the testcase response";
print LOG gettimestamp()."total steps $subtotal, passed ($subpass), failed ($subfail)";
print LOG gettimestamp()."the following test steps success:";
foreach my $okline (@ok){
print LOG gettimestamp().$okline;
}
print LOG gettimestamp()."the following test steps failed";
foreach my $notokline (@notok){
print LOG gettimestamp().$notokline;
}
print LOG gettimestamp()."[$testscrīpt] ends";
if (($subtotal == $subpass) && ($subtotal > 0)){
print "success";
return 1;
}else{
print "failed";
return 0;
}
}#run_one_test
sub gettimestamp {
# return current string type timestamp
my ($sec,$min,$hour,$mday,$mon,$year,$wday,$yday,$isdst) = localtime(time) ;
my $timestamp = ($year+1900)."/".($mon+1)."/".$mday.":".$hour.":".$min.":".$sec;
return "\n[".$timestamp."] ";
}#gettimestamp
sub loadtestcases{
print "\n\tLoading test plan file...";
if (!open(TESTPLAN, $testplanfile)){
print "\nCan not read test plan file [$testplanfile]";
exit(0);
}
my $single_testcase;
while ($single_testcase = <TESTPLAN>){
next if $single_testcase =~ m/^#/; # ignore commends line ==> starts with "#" char
next if $single_testcase =~ m/^\s*$/; # ignore empty lines
chop $single_testcase;
$single_testcase =~ s/^\s*//g;
$single_testcase =~ s/\s*$//g;
print "\n\tLoad $single_testcase";
push @testcases , $single_testcase;
}
close TESTPLAN;
print "\n\tLoading test case finished\n";
}
-
网页自动测试 6. 细节的继续和完成
2008-06-03 06:44:38
(要保持一个每天都写写的习惯还真的不是很容易)
细节的东西花费的时间是最长的。因为它最是繁琐。
我的selenium automation 包含的细节步骤如下:
1 录制:recording scrīpts
这部分是利用selenium 的 IDE firefox plugin 完成的
2 修改录制的脚本。
录制的脚本里面包含的都是固定的测试数据。自动化测试需要的是动态的数据。所以如果仅仅依靠录制的脚本是无法完成自动化测试的。
2-1 录制的脚本样本如下:
下面这段代码是用来改变用户的居住的城市的数据。use strict;
use warnings;
use Time::HiRes qw(sleep);
use Test::WWW::Selenium;
use Test::More "no_plan";
use Test::Exception;
my $sel = Test::WWW::Selenium->new( host => "localhost",
port => 4444,
browser => "*firefox",
browser_url => "http://localhost:4444" );
$sel->open_ok(https://ipaserver.test.com/ipa/user/show?uid=a001);
$sel->wait_for_page_to_load_ok("30000");
$sel->click_ok("//input[\@value='Edit User']");
$sel->wait_for_page_to_load_ok("30000");
$sel->type_ok("form_l", "San Francisco");
$sel->click_ok("document.form.submit[2]");
$sel->wait_for_page_to_load_ok("30000");
$sel->is_text_present_ok("a001 updated!");
$sel->is_text_present_ok("City: San Francisco");
可以看到这里面有很多需要改动的地方。以上红色的部分都是需要根据实际测试需要而临时变化。(1) 用户名,(2)(新)地址。
除此之外,测试用户(a001)必须要先建立,然后才能进行这项测试,而在测试之后,这个测试用户也必须要删除,以免影响后续的测试。所以,一个完整的逻辑如下:IPAutil::env_check($host, $port, $browser, $browser_url, $ldap_server, $base, $scope, $adminpw);
prepare_data();
run_test($testdata);
cleanup_data($testdata);
简单的说,任何单个完整的测试程序都需要包含这些基本元素:
* 设立测试环境
* 测试数据准备和建立
* 测试
* 测试数据清除和测试环境归原
上面这段脚本程序如果用手工,时间太长(完整的程序附后)所以我又写了另外一个程序去自动生成上面的脚本。
=========================
下面是一个完整的测试程序
#!/usr/bin/perl
use strict;
use warnings;
use Time::HiRes qw(sleep);
use Test::WWW::Selenium;
use Test::More tests => 9;
use Test::Exception;
use Net::LDAP;
use Net::LDAP::Util qw(ldap_error_text);
use lib '/home/yi/workspace/ipawebgui/support';
use IPAutil;
use IPADataStore;
# global veriables
our $configfile="test.conf";
our $testid=1038;
our $testuid;
our $testgid;
our $testfulluid;
our $testfullgid;
our $testdata;
our @datakeys=("form_l");
our $host;
our $port;
our $browser;
our $browser_url;
our $sel;
our $ldap_server;
our $base;
our $scope;
our $adminpw;
our $ldap;
our $ssh;
our $ipaadmin;
our $ipaadminpw;
our $grpdesc;
# read configruation file
our $config=IPAutil::readconfig($configfile);
$host=$config->{'host'};
$port=$config->{'port'};
$browser=$config->{'browser'};
$browser_url=$config->{'browser_url'};
$ldap_server=$config->{'ldap_server'};
$base=$config->{'base'};
$scope=$config->{'scope'};
$adminpw = $config->{'adminpw'};
$ldap = Net::LDAP->new($ldap_server)or die "ldap error: $@ \nsuggest: check your firewall";
my $result=$ldap->bind( "cn=directory manager", password => $adminpw, version => 3 );
# we might not need this block, but leave them here for now
# ldap bind need test before all test starts
if ( $result->code )
{
print " failed, error as below: ";
my $errstr = $result->code;
print "Error code: $errstr\n";
$errstr = ldap_error_text($errstr);
print "$errstr\n";
exit 1;
}else{
print "bind as 'cn=directory manager' success\n";
}
$ssh = "ssh root\@$host";
$ipaadmin = $config->{"ipaadmin"};
$ipaadminpw = $config->{"ipaadminpw"};
# Test starts here
$testuid="seluser_".$testid;
$testgid="selgrp_".$testid;
$testfulluid="uid=sel_user_".$testid.",".$base;
$testfullgid="cn=sel_grp_".$testid.",cn=groups,cn=accounts,".$base;
$grpdesc = "automatic generated, gid=$testgid";
IPAutil::env_check($host, $port, $browser, $browser_url, $ldap_server, $base, $scope, $adminpw);
prepare_data();
run_test($testdata);
cleanup_data($testdata);
#=========== sub =============
sub run_test {
# test case name (admin_edituser_city) from source (admin_edituser_city.pl)
# auto generated at 2008/5/26:10:37:52
$sel = Test::WWW::Selenium->new(host=>$host,port=>$port,browser=>$browser,browser_url=>$browser_url);
#$sel->open_ok(https://ipaserver.test.com/ipa/user/show?uid=a001);
$sel->open_ok("/ipa/user/show?uid=$testuid");
$sel->wait_for_page_to_load_ok("30000");
$sel->click_ok("//input[\@value='Edit User']");
$sel->wait_for_page_to_load_ok("30000");
$sel->type_ok("form_l", "$testdata->{'form_l'}");
$sel->click_ok("document.form.submit[2]");
$sel->wait_for_page_to_load_ok("30000");
$sel->is_text_present_ok("$testuid updated!");
$sel->is_text_present_ok("City: $testdata->{'form_l'}");
} #admin_edituser_city
sub prepare_data{
kinit(); # this has to run before any selenium test starts
$testdata = IPADataStore::construct_testdata($testid, @datakeys);
#IPAutil::ldap_adddummyuser($ldap, $testfulluid);
#IPAutil::ldap_adddummygroup($ldap, $testfullgid);
IPAutil::ipa_createuser($ssh, $testuid);
#IPAutil::ipa_creategroup($ssh, $testgid, $grpdesc);
}
sub cleanup_data{
#IPADataStore::cleanup_testdata($testid, $testdata);
#IPAutil::ldap_delete($ldap, $testfulluid);
#IPAutil::ldap_delete($ldap, $testfullgid);
IPAutil::ipa_deleteuser($ssh, $testuid);
#IPAutil::ipa_deletegroup($ssh, $testgid);
kdestroy();
}
sub kinit{
my $kinitcmd = "$ssh \"echo $ipaadminpw | kinit $ipaadmin\"";
my $result = `$kinitcmd`;
if ($result =~/kinit/){
#error 1: kinit(v5): Cannot resolve network address for KDC in realm ...bla bla bla
#error 2: kinit(v5): Password incorrect while getting initial credentials
return 0;
}else{
my $klist = "$ssh klist";
my $init_result = `$klist`;
if ($init_result =~ /klist: No credentials cache found/){
return 0;
}else{
return 1;
}
}#if kinit success, then double confirm with klist
}#kinit
sub kdestroy{
my $kdestroycmd = "$ssh kdestroy";
my $result = `$kdestroycmd`;
}#kdestroy -
网页自动测试 5. 细节的开始
2008-05-10 01:20:06
有了全盘的计划,就需要马上开始做细节的部分。
在过去的一段时间里面,我重复的犯着同一个错误:每次写全盘计划的时候总是会过于小心,写完之后踌躇不已,不敢马上开始下一步的细节部分。现在看来这种小心是需要的,但是踌躇不前则是不对的。
全盘计划是为了让我有一个全面的了解,但是更加重要的是需要我不断提醒自己全局的观念,而不是责备求全。没有人能够一次过写好一个细致而没有任何遗漏的计划,我们总是需要在随后的细节部分不断的回头完善这个全局。
昨天我就是在做这些细节的部分。已经有了100多个录制下来的测试脚本,但是还有更多的要去做。老板过来问我完成得如何,我只能老实告诉他说一个星期是不可能的了,我需要到下个星期才能完成。而且这种完成也不是最后的完工--因为即便是测试程序,也不过是另外一种程序而已,我们同样需要测试我们的测试程序。我这段时间的工作,更多的是将整个测试程序的框架确定下来。
下个星期的工作将更加繁杂而细致
-
网页自动测试 思考 :能否用被测试的软件去证明它自己
2008-05-08 00:19:07
测试中会经常碰到一个问题:我们能否用被测试的软件去证明它自己?
举例来说,我测试的这么项目里面有几个密切相关的功能,如果能够将之放到一起,似乎可以节省大量的时间,例如:先执行“增加新用户”--然后执行“搜索用户”确认新增加的用户存在--然后执行“删除用户”--只要我们最后检测新增加的用户不存在,似乎就好了,如此似乎可以提高测试的效率,但是事实上,这是行不通的。
原因很简单,我们目前测试的基础理念是:根据预估的结果去比较软件实际执行的结果,如果两者相同,则测试通过,否则失败。而上面的测试中,我们忽略了所有的中间过程,有太多的可能会让我们得到同样的结果:(1)如果增加新用户根本就没有成功(2)如果用户的部分资料没有被正确的传送(3)如果系统已经存在该用户,我们也无法得知
。。。类似的原因还可以找出很多,归根结底一句话:我们不能够用没有被检测的东西去检测它自己。
做为一个软件测试人员,还是要不厌其烦才好
-
网页自动测试 4. 全盘设计 (3)
2008-05-08 00:04:27
自动化测试也是一个软件,虽然它也许比较简单。
我前面的文件目录说明如下:
support目录包含所有的自动化测试需要调用的系统资源,
--test_util.pm 包括需要调用的功能部件(functions)
--record_selenium_scrīpt.pm 包括所有的由selenium IDE产生的脚本。将之集中一处的好处是将来可以根据需要随时调用
smog目录包含所有的smog测试的perl文件,每个独立的功能对应一个独立的测试文件。同时,tp_smog.pl是一个特殊的文件。tp 是 test plan的缩写,我的想法是用这一个文件控制所有的其它测试文件,并产生测试报告
acceptance 和 corner 基本同smog。它们也各自有自己的test plan文件。
具体的区别在随后的源程序里面可以看得到
-
网页自动测试 4. 全盘设计 (2)
2008-05-07 09:23:59
分析清楚了,接下来就是我要完成的文件清单了
|---- support
|---- test_util.pm
|---- record_selenium_scrīpt.pm
|---- smog
|---- tp_smog.pl (test plan scrīpt)
|---- tc_general_selfservice_ui.pl
|---- tc_general_selfservice_functional.pl
|---- tc_general_search_user_ui.pl
|---- tc_general_search_user_functional.pl
|---- tc_general_search_group_ui.pl
|---- tc_general_search_group_functional.pl
|---- tc_admin_adduser_ui.pl
|---- tc_admin_adduser_functional.pl
|---- tc_admin_search_user_ui.pl
|---- tc_admin_search_user_functional.pl
|---- tc_admin_modify_user_ui.pl
|---- tc_admin_modify_user_functional.pl
|---- tc_admin_modify_user_logic.pl
|---- tc_admin_active_user_ui.pl
|---- tc_admin_active_user_functional.pl
|---- tc_admin_delete_user_ui.pl
|---- tc_admin_delete_user_functional.pl
|---- tc_admin_addgroup_ui.pl
|---- tc_admin_addgroup_functional.pl
|---- tc_admin_search_group_ui.pl
|---- tc_admin_search_group_functional.pl
|---- tc_admin_modify_group_ui.pl
|---- tc_admin_modify_group_functional.pl
|---- tc_admin_modify_group_logic.pl
|---- tc_admin_active_group_ui.pl
|---- tc_admin_active_group_functional.pl
|---- tc_admin_delete_group_ui.pl
|---- tc_admin_delete_group_functional.pl
|---- tc_admin_add_principal_ui.pl
|---- tc_admin_add_principal_functional.pl
|---- tc_admin_add_principal_logic.pl
|---- tc_admin_search_principal_ui.pl
|---- tc_admin_search_principal_functional.pl
|---- acceptance
|---- tp_acceptance.pl
|---- corner
|---- tp_corner.pl
-
网页自动测试 4. 全盘设计
2008-05-07 00:55:46
刚刚入行的时候,我请教前辈,应该如何做软件测试,她告诉我一句话:Think before you do。而后她告诉我,我应该制作一个测试覆盖的表格,详细的列出所有我需要做的测试,并且在随后的测试中不断的添加想到的方方面面,这样我就能不断的补充细节而永远不会失去对全局的把握。这后来就成为我做测试的一个基本工作习惯。
写自动测试程序当然也不能摆脱这些基本的规律。因为无论是自动还是手动测试,都是一种手段而已,其目的是为了验证软件产品的质量。一味的将所有的测试自动化其实是不合理的。
列出测试覆盖表格(Testing Matrix)也很简单,不过是将工作细化而已.细化的原则是从简单到复杂,从部件到整体。
列表如下:
1. general user
* self service (modify user) (UF)
* search user (UF)
* search group (UF)
2. administrator
* User
o add user (UFL)
o search user (UF)
o modify user (UFL)
o active/in-active user (UF)
o delete user (UF)
* Group
o add group (UFL)
o search group (UF)
o modify group (UFL)
o active/in-active group (UF)
o delete group (UF)
* Policy
o Manage Policy (UF)
o manage search policy (UF)
o manage password policy (UF)
o manage user settings (UF)
* Self service (UF)
(凡例:U:UI测试, F:功能测试,L:逻辑流程测试)
功能测试的目的是为了保证网页能够将正确的信息传递给后台服务器,和将后台服务器的资料准确的显示在网页上,至于后台如何操作,则不是网页的功能测试的内容。我们需要独立的后台功能测试
UI测试的目的是为了保证网页的页面设计元素准确的显示在网页上
举例来说,对于同一个增加新用户的页面,UI测试是为了确认网页上会出现诸如“输入姓名”,“输入密码”等等的选项,至于用户在这些选项杀功能输入的数据是否被准确的输入了后台服务器,则是功能测试的内容。--之所以将这两个看起来紧密结合的部分分开,是因为这样会让我们的每一步测试都从一个最小的单元开始,不至于有任何疏忽和遗漏。
逻辑流程测试也是必须的,比如说用户登录的页面在收到几次不匹配的用户名和密码之后,也许在逻辑流程上就可以转到另外一个提醒页面。
表格有了,我们还需要确认测试的程度。如下:
1. smog testing
2. acceptance tseting
3. regression testing
4. corner testing (enchanced testing for cortner cases), also called extrem condition testing
如果从测试数据的角度来分析,这些分类很容易理解。
somg testing:只提供符合要求的数据,确认功能在正确的数据情况下工作正常,这一级测试的目的是为了验证产品的最基本功能的完备
acceptance testing:根据设计的要求,提供正常范围内的合格和不合格的数据,目的是为了检测软件在正常情况下的正常使用
regression testing:在数据提供上和acceptance testing没有不同,但是涵盖更加广泛的产品功能,它由acceptance testing发展而来,仅仅是在功能上更加完备而已。
corner testing:提供比较极端情况下的数据,比如几百个字符长度的用户名和密码,目的是检验产品在极端情况下的对数据的处理能力--这种处理能力不是为了验证产品的“稳定性”,而是为了验证产品对数据处理的“正确性”
-
网页自动测试 3.一个独立的测试单元
2008-05-06 07:04:16
写一个完成的测试软件和写其它的测试软件没有什么不同,大体上是两种方法,top-down, or bottoms-up
要么从顶到底,从整体到局部,要么从底到顶,从局部到具体。只要始终不失去对全局的把握,无论那种方法都是没有关系的。
我习惯上是从底到顶,因为当我能够实现一个最小的测试单元的时候,我会更加有信心。
====
即便是最小的测试单元,它也是需要完整的规划的。我设计中的逻辑步骤如下:
1。建立测试环境
2。建立测试数据
3。开始测试
4。清理测试数据
5。完成
在考虑了模块化之后,我的主测试程序如下:
-------- tc_adduser.pl -----------
#!/usr/bin/perl
use strict;
use warnings;
use Time::HiRes qw(sleep);
use Test::WWW::Selenium;
use Test::More tests => 11;
use Test::Exception;
use lib '/path/to/util pm file';
use Util;
# global veriables
our $host;
our $port;
our $browser;
our $browser_url;
our $configfile="test.conf";
# read configruation file
our $config=Util::readconfig($configfile);
$host=$config->{'host'};
$port=$config->{'port'};
$browser=$config->{'browser'};
$browser_url=$config->{'browser_url'};
# check testing environment
if (envcheck()){
print "\nEnvironment is ready for testing...";
}else{
exit 1;
}
my $testdata=prepare_data();
# run test
run_test($testdata);
cleanup_data($testdata);
print "\ntest finished\n";
------------------ end of main, (not end of file) ---------
功能部件如下:
#######################################################
######## sub routiens ###########
#######################################################
# run all test case here
sub run_test{
print "\ntest starts...\n";
my $data=shift;
my $sel = Test::WWW::Selenium->new( host => $host,
port => $port,
browser => $browser,
browser_url => $browser_url);
$sel->open_ok("/ipa");
$sel->click_ok("link=Add User");
$sel->wait_for_page_to_load_ok("30000");
$sel->type_ok("form_title", $data->{'title'});
$sel->type_ok("form_givenname", $data->{'givenname'});
$sel->type_ok("form_sn", $data->{'sn'});
$sel->type_ok("form_krbprincipalkey", $data->{'krbprincipalkey'});
$sel->type_ok("form_krbprincipalkey_confirm", $data->{'krbprincipalkey'});
$sel->click_ok("document.form.submit[1]");
$sel->wait_for_page_to_load_ok("30000");
$sel->is_text_present_ok($data->{'sn'}." added!");
}# run_test
# loadconfig : this sub will call readconfig, and do environment check on the input data
# return 1 if (1) config file can read (2) configuration data is ok
sub envcheck{
my $retval=0;
if (defined $host || defined $port || defined $browser || defined $browser_url)
{
print "\ntest with the following configuration:\n";
print "\nhost : $host";
print "\nport : $port";
print "\nbrowser: $browser";
print "\nurl : $browser_url";
print "\nstart environment check";
if (pinghost($host, $port)){
print "\nEnviromnent report: selenium server alive at [$host:$port]";
$retval=1;
}else{
print "\nEnvironment report: selenium server can not be reached at [$host:$port]";
print "\nexit testing on error: can not reach selenium server\n";
}
}else
{
print "no test.conf found, and no default value defined, exit test";
}
return $retval;
}#envcheck
# prepare_data : this sub will generate testing data.
sub prepare_data{
#TODO: i need make sure this data does not exist before we start test
my %newuser=('title'=>'auto001',
'givenname'=>'selenium',
'sn'=>'002',
'krbprincipalkey'=>'password123');
return \%newuser;
}# prepare_data
sub cleanup_data{
#TODO: Clean data from server, so we have clean system each time
print "\ntest data should be deleted from server, so we have a clean system after we finish the test";
}
------------ now this is end of tc_adduser.pl -------------
----- here is the util.pm -----------
#!/usr/bin/perl
# filename: general utilities
#
package Util;
use Carp;
#use vars qw($VERSION @ISA @EXPORT @EXPORT_OK);
use IO::Socket;
require Exporter;
#require AutoLoader;
$VERSION='0.01';
@ISA=qw(Exporter);
@EXPORT = qw(printhash printarray loadconfig pinghost);
# in: hash reference
# out:NONE, just print
sub printhash {
my $hash=shift;
my %h=%$hash;
foreach (sort keys %h){
print "\nkey=[$_] value=[$h{$_}]";
}
}
sub printarray {
my $arrey=shift;
my @a=@$array;
foreach (sort @a){
print "\n value=[$_]";
}
}
# readconfig : input: a key=value pair config file
sub readconfig{
my $configfile=shift;
my %c;
if (open(CONFIG,$configfile)){
print "\nloading configruation fle [$configfile] ...";
my @con= <CONFIG>;
foreach my $line (@con){
chomp($line);
# the basic format of config file would be: position = name ; sample data 0=version
next if $line=~ m/^#/; # ignore commends line ==> starts with "#" char
next if $line=~ m/^\s*$/; # ignore empty lines
next if $line=~ m/^\[/; # ignore lines such as [system]
my @pair = split(/=/,$line);
$pair[0] =~s/ //g; # replace " " - white space with nothing, which means delete all white space
$pair[1] =~s/ //g;
$c{$pair[0]} = $pair[1];
#print $pair[0];
#print $pair[1];
}
print " done \n";
close CONFIG;
}else{
print "\nfile [$configfile] can not open ";
}
return \%c;
}#readconfig
##############################
# network utilities #
##############################
sub pinghost{
# input: ($host, $port)
# output: return 1 if remote host active on given port, otherwise, return 0
my ($host, $port)= @_;
my $return = 0;
# Try to connect
my $remote = IO::Socket::INET->new(
Proto => "tcp",
PeerAddr => $host,
PeerPort => $port,
Timeout => 8,
);
# verify response
if ($remote) {
# print "$host is alive\n";
close $remote;
$return = 1;
}
return $return;
}
1;
----------------- end of Util.pm ------------------
今天的任务就到此为止了。
完成了一个独立测试单元是为了给我一个具体而微的全局概念。我现在基本上知道我还需要做那些工作了。我需要好好想一下,给出一个任务清单--等于是列出一个具体的设计方案
-
网页自动测试 2. 理解selenium的perl 工具
2008-05-06 02:34:39
要用到selenium的perl工具,自然需要对它有所了解。
selenium的perl工具很好用,在和selenium IDE联合到一起之后,写一段即便是很复杂的测试程序也变得很简单:
=======tc_adduser.pl========
#!/usr/bin/perl
use strict;
use warnings;
use Time::HiRes qw(sleep);
use Test::WWW::Selenium;
use Test::More "no_plan";
use Test::Exception;
my $sel = Test::WWW::Selenium->new( host => "master",
port => 4444,
browser => "*firefox",
browser_url => "https://master.test.com");
$sel->open_ok("/landingpage");
$sel->click_ok("link=Add User");
$sel->wait_for_page_to_load_ok("30000");
$sel->type_ok("form_title", "auto001");
$sel->type_ok("form_givenname", "selenium");
$sel->type_ok("form_sn", "001");
$sel->type_ok("form_krbprincipalkey", "some123");
$sel->type_ok("form_krbprincipalkey_confirm", "some123");
$sel->click_ok("document.form.submit[1]");
$sel->wait_for_page_to_load_ok("30000");
$sel->is_text_present_ok("s001 added!");
=======tc_adduser.pl end========
这段程序的目的就是建立一个新的用户。
程序执行也很容易:
$ perl tc_adduser.pl
ok 1 - open, /landingpage
ok 2 - click, link=Add User
ok 3 - wait_for_page_to_load, 30000
ok 4 - type, form_title, auto001
ok 5 - type, form_givenname, selenium
ok 6 - type, form_sn, 001
ok 7 - type, form_krbprincipalkey, some123
ok 8 - type, form_krbprincipalkey_confirm, some123
ok 9 - click, document.form.submit[1]
ok 10 - wait_for_page_to_load, 30000
ok 11 - is_text_present, s001 added!
1..11
我自己希望能够对selenium的perl module 有更多的了解,所以花了些时间看进去。
基本上,任何一个类似于open_ok的程序都是调用Test::Simple的ok程序。从它的源程序里面可以看出来:
========== Selenium.pm 源程序 ==================
...前面省略:
sub AUTOLOAD {
my $name = $AUTOLOAD;
$name =~ s/.*:://;
return if $name eq 'DESTROY';
my $sub;
if ($name =~ /(\w+)_(is|isnt|like|unlike)$/i) {
my $getter = "get_$1";
my $comparator = $comparator{lc $2};
# make a subroutine that will call Test::Builder's test methods
# with selenium data from the getter
if ($no_locator{$1}) {
$sub = sub {
my( $self, $str, $name ) = @_;
diag "Test::WWW::Selenium running $getter (@_[1..$#_])"
if $self->{verbose};
$name = "$getter, '$str'"
if $self->{default_names} and !defined $name;
no strict 'refs';
return $Test->$comparator( $self->$getter, $str, $name );
};
}
else {
$sub = sub {
my( $self, $locator, $str, $name ) = @_;
diag "Test::WWW::Selenium running $getter (@_[1..$#_])"
if $self->{verbose};
$name = "$getter, $locator, '$str'"
if $self->{default_names} and !defined $name;
no strict 'refs';
return $Test->$comparator( $self->$getter($locator), $str, $name );
};
}
}
elsif ($name =~ /(\w+?)_?ok$/i) {
my $cmd = $1;
# make a subroutine for ok() around the selenium command
$sub = sub {
my( $self, $arg1, $arg2, $name ) = @_;
if ($self->{default_names} and !defined $name) {
$name = $cmd;
$name .= ", $arg1" if defined $arg1;
$name .= ", $arg2" if defined $arg2;
}
diag "Test::WWW::Selenium running $cmd (@_[1..$#_])"
if $self->{verbose};
local $Test::Builder::Level = $Test::Builder::Level + 1;
my $rc = '';
eval { $rc = $self->$cmd( $arg1, $arg2 ) };
die $@ if $@ and $@ =~ /Can't locate object method/;
diag($@) if $@;
return ok( $rc, $name );
};
}
# jump directly to the new subroutine, avoiding an extra frame stack
if ($sub) {
no strict 'refs';
*{$AUTOLOAD} = $sub;
goto &$AUTOLOAD;
}
else {
# try to pass through to WWW::Selenium
my $sel = 'WWW::Selenium';
my $sub = "${sel}::${name}";
goto &$sub if exists &$sub;
my ($package, $filename, $line) = caller;
die qq(Can't locate object method "$name" via package ")
. __PACKAGE__
. qq(" (also tried "$sel") at $filename line $line\n);
}
}
=================== end of source code of Selenium.pm ===================
了解了这个,也就比较容易写更复杂一些的测试语句了。
-
网页自动测试 1. overview
2008-05-06 01:21:46
我现在手上的项目是一个网站的自动测试。我原来都是做后台的服务器配置和一些API的自动测试,网页的测试做的不多。现在需要独自将所有的网页UI和功能测试全部自动化。虽然网站的内容不是很多,但是也算是一个小而全的项目。我前面的两篇就是为我现在的任务做准备的。我同时也会将我在网上找到的资料贴出来。
网站包括内容如下:
1。用户资料管理
2。用户权限管理
这里面自然也包含一些简单的搜索功能。
网页是基于APACHE,后台语言是python,用户的login是基于Kerberos Server
测试工具:selenium remote controller + selenium IDE + selenium perl driver (Test::WWW:Sekenium)
自动测试使用的语言: perl + perl Test::Simple + Test::More module
(perl有很丰富的测试用的module,这里有一个很不错的介绍:Perl Test Module 介绍)
我有一个星期的时间完成所有的东西
-
写一个最最简单的perl module
2008-05-03 03:28:17
虽然用perl用了一段时间,但是从来没有独立写过一个module。因为要开始用perl写些selenium的测试软件了,所以需要用到这个。
我现在需要的其实很简单,我需要将大部分的常用的功能部件(functions)放到一起,然后随时调用。我目前还不需要复杂的OO功能。因为以前没有搞过,所以今天很花了一些时间。
perl的module文件可以非常简单,我的如下:
====== perl module file ======
#!/usr/bin/perl#
#file name: Util.pm
package Util;
use Carp;
use IO::Socket;
require Exporter;
$VERSION='0.01';
@ISA=qw(Exporter);
@EXPORT = qw(pinghost printhash);
sub printhash {
my $hash=shift;
my %h=%$hash;
foreach (sort keys %h){
print "\nkey=[$_] value=[$h{$_}]";
}
}
sub pinghost{
# input: ($host, $port)
# output: return 1 if remote host active on given port, otherwise, return 0
my ($host, $port)= @_;
my $return = 0;
# Try to connect
my $remote = IO::Socket::INET->new(
Proto => "tcp",
PeerAddr => $host,
PeerPort => $port,
Timeout => 8,
);
# verify response
if ($remote) {
print "$host is alive\n";
close $remote;
$return = 1;
}
return $return;
}
1; # don't forget this line
========= End of the file ======
如果需要调用的话,可以如下:
====== use the perl module =====
#!/usr/bin/perl
use lib '/home/yi/workspace/ipawebgui/testuitl';
use Util ;
$host="server";
$port=5000;
if (pinghost($host,$port)) {
print "\nserver [$host:$port] alive";
}
else {
print "\nserver [$host:$port] no response";
}
printhash(\%ENV);
============== End of file ==========
这里比较关键的是两个:
1。 在module文件里面需要有Exporter,其目的是将module里面的子程序告知调用的主程序
2。在调用module的主程序里面,需要指明被调用的module的文件地址(use lib 语句)和调用的module的名字(Util)
这个人写的很不错,比较完备:
http://springfield.pm.org/meetings/modules.html
-
配置 selenium rc for HTTPS 测试
2008-05-01 06:31:06
selenium is an automation tool, you can get it form here: seleium.openqa.org
用selenium测试HTTPS比较麻烦,搞了三天才将基本的东西设置好
1。选择工具
selenium有好几种,首先需要确定的是哪种工具适合
* selenium IDE: 是一个firefox的plug-in,这个基本上对任何测试都有用,主要是因为可以省下大量的手写测试的时间。根据我的经验,最新的版本(1.0 beta)在RHEL 5.0上不能用,所以我用的是0.87版本。
在这里下载:http://selenium-ide.openqa.org/download.jsp不过它只能在firefox上用
* selenium rc : 这个是用来遥控的。(rc = remote controller)如果你需要在一台电脑上控制其它几台电脑进行测试,我用的就是这个。不过我用它的主要原因是它支持比较多的脚本语言(perl,python。。。)写自动测试程序比较容易
* selenium core : 只能支持Selenese语言(a simple scrīpting language. Selenese has a number of strict limitations: it has no conditionals (no "if" statements), and it has no loops (no "for" statements). This can make writing complicated tests difficult or even impossible.)如果需要知道比较具体的区别的话,还是看它们自己的文件:http://wiki.openqa.org/pages/viewpage.action?pageId=7632
2。配置
配置有很多步骤和方面,首先需要了解的是selenium rc的工作流程
图片看起来好像复杂,但是实际上我们可以将所有的部件放到一台机器上。我们需要了解的是它的工作流程。
selenium包含三个部件:
测试程序(testing scrīpt)
selenium rc (selenium server)
browser (firefox, in my case)
他们之间的关系如下
testing scrīpt <=>selenium server <=> browser
(1)测试程序将HTTP/HTTPS请求发给selenium server
(2)selenium server将请求转发(also called proxing)给browser,
(3)browser 执行请求,得到执行结果,然后回复给selenium server
(4)selenium server 将回复转发给测试程序*
(5)测试程序检验测试结果,记录之,然后执行下一个测试
这个过程中,selenium server和browser必须要在同一台机器上,但是测试程序可以随意。我的配置是三者都在同一台机器上。
测试环境配置 (testing environment configuration)
* perl (我使用的是perl)
用perl写selenium的测试程序需要首先安装必要的module: Test::WWW::Selenium
我的安装方式如下:
$> yum install perl.CPAN.386
-- yum 是linux里面的程序包安装程序
$> perl -MCPAN -e "install Test::WWW::Selenium"
--安装Selenium会同时要求你同时安装一些其它的module,比如Test::Mock Test::MockObject Test::More Test::Exception Test::Mock:LWP Test::Pod. 如果你的CPAN配置好了的话,这些安装都是自动的,安装过程中如果有提问,直接回车就好,一般不会有太多问题 (如果需要重新配置perl CPAN,比如说我
$> perl -MCPAN -e "shell"
CPAN> o conf init
* JAVA
Selenium server 是用Java写的,所以你需要有JAVA。我开始用的是IBM JAVA 1.5后来才发现不行,就转到了SUN的JRE1.6
* Selenium Core : 在selenium rc 的网站上说需要 selenium core,但是我的经验是不必管它
* Selenium Server:
** 下载: Selenium 1.0 Major release
** unzip selenium-remote-control-1.0-beta-1-dist.zip
** 到这里其实就可以了,但是让程序跑起来,这里需要一个额外的配置: 将firefox-bin放到系统路径里面去
$> export PATH=$PATH:/usr/lib/firefox-1.5.0.9*
* HTTPS
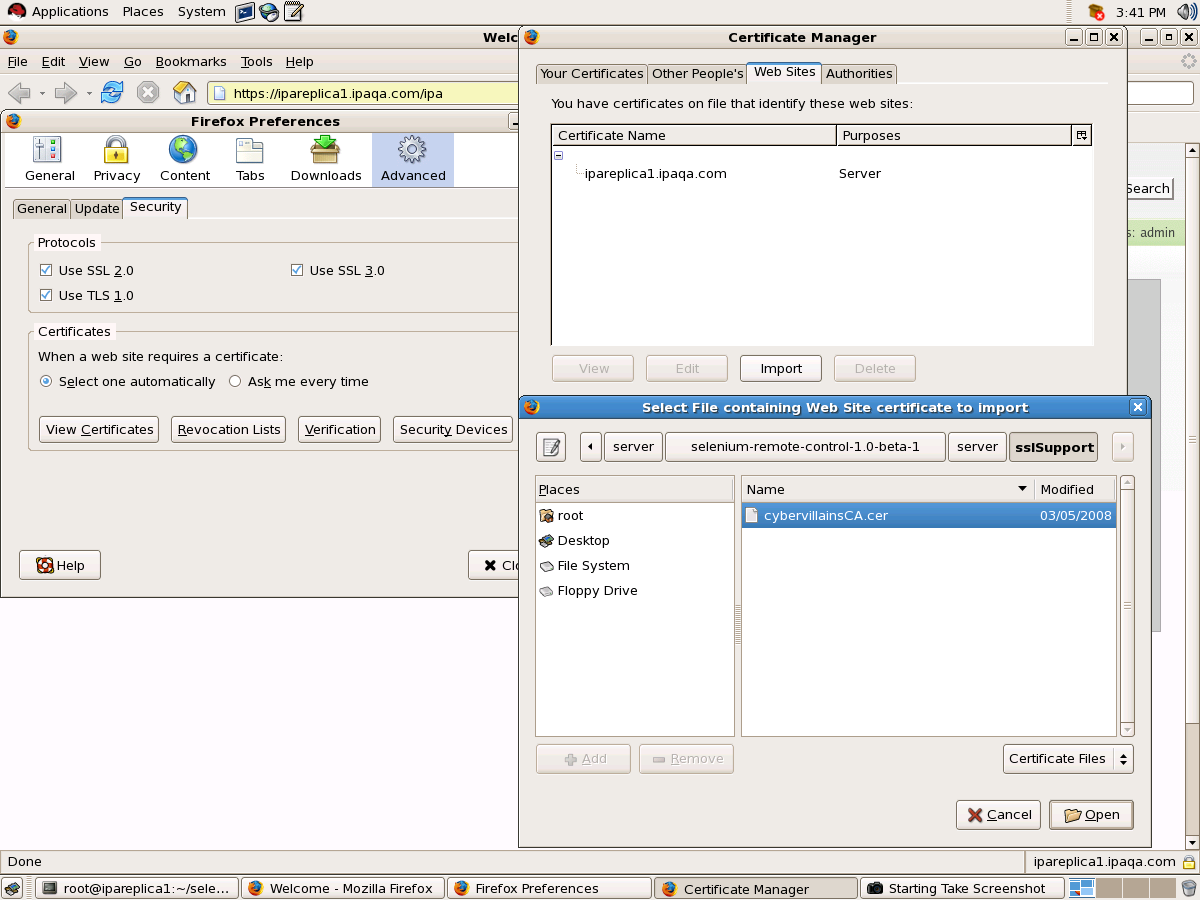
前面的都很简单。如果你不需要测试HTTPS,那么前面的配置就足够了。但是要让selenium server用HTTPS,还需要将一个专门用于测试的cert放到firefox里面去。步骤如下:
** open firefox
** import certificates:
*** go to "Edit->Preference"
-> open "Advanced" tab
-> click "Security" (or "Encryption" )
-> click "view certificates", a new window will open,
-> then select "Web Sites" tab
-> then click "import"(图片如下)
3。最后一步,就是怎么让程序跑起来。这里有三个问题需要注意:
1> selenium rc beta 1。0 的SSL cert已经过期了(4/18/2008),所以我们需要将我们的系统时间改回到过期之前。
$> date 041800002007
2> 需要用让selenium server使用刚刚设定好的firefox profile
3> 需要设置一个特定的参数(trustAllCertificates),让所有的SSL请求能够顺利通达。[这条在selenium正式的网站上没有写出来,是通过看源程序找到的]
我的命令如下:
让selenium server跑起来:
java -jar ~/server/selenium-server.jar \
-log /tmp/selenium.log \
-trustAllSSLCertificates \
-multiWindow \
-firefoxProfileTemplate /opt/ipatest.profile
15:52:10.698 INFO - Writing debug logs to /tmp/selenium.log
15:52:10.699 INFO - Java: Sun Microsystems Inc. 10.0-b19
15:52:10.699 INFO - OS: Linux 2.6.18-8.el5 i386
15:52:10.702 INFO - v1.0-beta-1 [2201], with Core v1.0-beta-1 [1994]
15:52:10.758 INFO - Version Jetty/5.1.x
15:52:10.760 INFO - Started HttpContext[/selenium-server/driver,/selenium-server/driver]
15:52:10.762 INFO - Started HttpContext[/selenium-server,/selenium-server]
15:52:10.763 INFO - Started HttpContext[/,/]
15:52:10.772 INFO - Started SocketListener on 0.0.0.0:4444
15:52:10.773 INFO - Started org.mortbay.jetty.Server@5ac072
让测试程序跑起来:
perl test.pl
我的test.pl 程序开头部分如下:
----------------------------
#!/usr/bin/perl
use strict;
use warnings;
use Time::HiRes qw(sleep);
use Test::WWW::Selenium;
use Test::More "no_plan";
use Test::Exception;
my $sel = Test::WWW::Selenium->new( host => "localhost",
port => 4444,
browser => "*firefox",
browser_url => "https://some.com");
$sel->open_ok("/testpage");
$sel->click_ok("link=Add User");
$sel->wait_for_page_to_load_ok("30000");
$sel->type_ok("form_title", "auto001");
$sel->type_ok("form_givenname", "selenium");
$sel->type_ok("form_sn", "001");
$sel->type_ok("form_krbprincipalkey", "redhat123");
$sel->type_ok("form_krbprincipalkey_confirm", "redhat123");
$sel->click_ok("document.form.submit[1]");
$sel->wait_for_page_to_load_ok("30000");
$sel->is_text_present_ok("s001 added!");
$sel->click_ok("link=Find Users");
$sel->wait_for_page_to_load_ok("30000");
$sel->type_ok("uid", "s101");
$sel->click_ok("//input[\@value='Find Users']");
$sel->wait_for_page_to_load_ok("30000");
$sel->type_ok("uid", "s001");
---------------------------
我其实没有写什么东西,上面的程序都是selenium IDE自动录的。