

TestNG 属性

在这种情况下,首先执行优先级为 1 的测试,然后执行优先级为 2 的测试。
package test;
import org.testng.annotations.AfterGroups;
import org.testng.annotations.BeforeGroups;
import org.testng.annotations.Test;
public class TestNGAttributesExample {
@Test(enabled = false, description = "This test will be skipped as enabled is set to false")
public void disabledTest() {
System.out.println("This method will be skipped from the test run using the attribute enabled=false");
}
@Test(invocationCount = 5, invocationTimeOut = 20, groups = "testngAttributes")
public void invocationCountTest() {
System.out.println("This method will be executed by 5 times");
}
@Test(timeOut = 500, groups = "testngAttributes")
public void baseTest() {
System.out.println("This is base test method");
}
@Test(dependsOnMethods = "baseTest", groups = "testngAttributes")
public void firstDependentTest() {
System.out.println("This is dependent method 1 and will only execute if baseTest passes");
}
@Test(alwaysRun = true, dependsOnMethods = "baseTest", groups = "testngAttributes")
public void secondDependentTest() {
System.out.println(
"This is dependent method 2 and will execute irrespective of baseTest result because of alwaysRun");
}
@BeforeGroups("testngAttributes")
public void beforeGroupMethod() {
System.out.println("This method is executed before testngAttributes group test cases");
}
@AfterGroups("testngAttributes")
public void afterGroupMethod() {
System.out.println("This method is executed after testngAttributes group test cases");
}
}
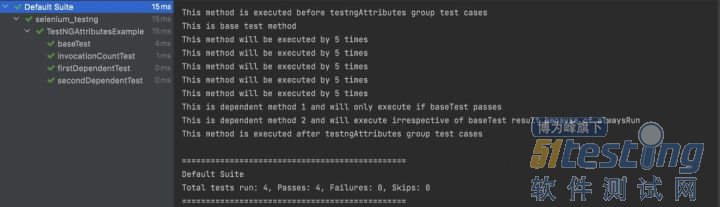
运行上面的代码将给出以下输出:
TestNG 优先级
TestNG 中的测试用例执行由测试用例的优先级控制。但是,如果没有为测试用例分配优先级怎么办。那么是什么决定了测试执行的顺序。
如果有多个测试用例,则 TestNG 默认按字母顺序执行它们。
package test;
import org.testng.annotations.Test;
public class TestNGPrioritiesExample {
@Test(priority = 1)
public void aTest() {
System.out.println("This is test a.");
}
@Test(priority = 2)
public void bTest() {
System.out.println("This is test b.");
}
@Test
public void cTest() {
System.out.println("This is test c.");
}
@Test(priority = 1)
public void dTest() {
System.out.println("This is test d.");
}
@Test
public void eTest() {
System.out.println("This is test e.");
}
}
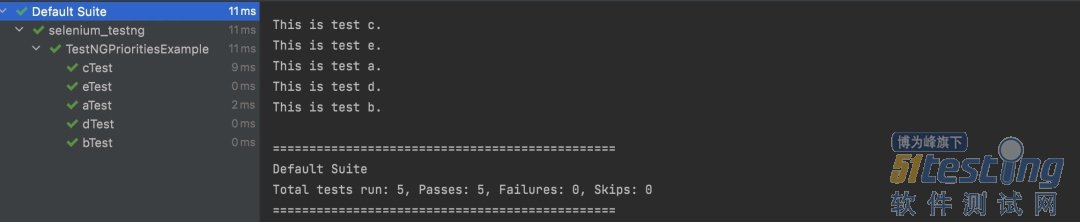
在这种情况下,默认情况下,TestNG 将优先级 = 0 分配给没有该属性的测试。这些测试按字母顺序执行,然后按照优先级逻辑执行其他测试。所以上面代码的输出是 :
TestNG 中的DataProviders
TestNG 中的DataProviders是内置 TestNG 数据驱动测试方法的一部分,用于通过@DataProvider注解将不同的值传递给同一个 TestNG 测试类。
TestNG DataProvider 示例:
@DataProvider(name = "dataProvider_name")
public Object[][] dataProviderMethod() {
return new Object[][] {<values>};
}
此注解仅包含一个属性名称,并且为String类型。如果未提供名称,则方法的名称默认为数据提供者名称,在这种情况下为dataProviderMethod 。
DataProvider 始终返回对象的二维列表,测试方法在每个传递的参数上使用数据驱动的方法在其上执行执行。
让我们举一个简单的跨浏览器代码示例,我们希望在 Chrome 和 Firefox 浏览器上打开一个网站。
package test;
import org.openqa.selenium.WebDriver;
import org.openqa.selenium.chrome.ChromeDriver;
import org.openqa.selenium.firefox.FirefoxDriver;
import org.testng.annotations.DataProvider;
import org.testng.annotations.Test;
public class DataProviderExample {
@DataProvider(name = "browserName")
public Object[][] browserName()
{
return new Object[][] { { "chrome" }, { "firefox" } };
}
@Test(dataProvider = "browserName")
public void crossBrowserTest(String browser)
{
WebDriver driver = null;
System.out.println("Launching browser : " + browser);
switch(browser)
{
case "chrome":
System.setProperty("webdriver.chrome.driver", "<Path_to_your_chrome_driver>");
driver = new ChromeDriver();
break;
case "firefox":
System.setProperty("webdriver.firefox.driver", "<Path_to_your_firefox_driver>");
driver = new FirefoxDriver();
break;
default:
System.out.println("Invalid browser name passed");
}
driver.navigate().to("http://www.taobao.com/");
System.out.println("Navigated Successfully to the website");
}
}
在上面的代码中,我们实现了名为browserName的 DataProvider ,它传递了chrome和firefox两个值。这些值使用参数值传递给测试方法crossBrowserTest,测试用例在两个浏览器上一一执行。
这是跨浏览器测试代码实现的经典示例,我们希望在多个浏览器上执行相同的脚本。执行上面的代码会给出如下输出:
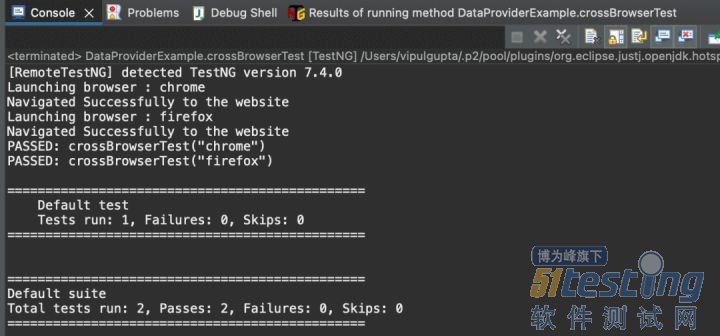
这里要注意的是,不是只有 1 个带有 @Test 注解的测试用例,而是执行显示两个测试用例被执行。这是因为我们向测试用例传递了 2 个不同的值,因为测试数据不同,所以 TestNG 将其视为 2 个单独的测试用例。
TestNG 断言
断言提供了验证测试用例执行的实际结果和预期结果是否匹配的方法,从而决定测试用例的结果是通过还是失败。这些广泛用于验证 Selenium 中任何 TestNG 脚本中的结果。TestNG 断言的一个示例是在用户登录网站后验证仪表板上的用户名。
TestNG 断言的语法:
Assert.Method(actual, expected, message)
·actual:作为执行的一部分从测试用例中获取的实际值。
· 预期:要与实际值进行比较的预期值。
· message : 断言失败时显示的结果。
关于assert常见断言方法及描述如下:
1.assertTrue:判断是否为True。True就通过
2.assertFalse:判断是否为false。false就通过
3.assertSame:判断引用地址是否相同。
4.assertNotSame:判断引用地址是否不相同。
5.assertNull:判断是否为null。
6.assertNotNull:判断是否不为null。
7.assertEquals:判断是否相等,Object类型的对象需要实现haseCode及equals方法。
8.assertNotEquals:判断是否不相等。
9.assertEqualsNoOrder:判断忽略顺序是否相等
TestNG Selenium 实践
到目前为止,TestNG 教程已经涵盖了 TestNG 框架的几乎所有主要功能,下面编写你的第一个 Java 自动化脚本。在下面的代码示例中,我们将结合到目前为止我们学到的所有注解、属性、优先级、DataProvider和断言。
此代码将执行以下测试场景(打印并验证 2 个数字的总和)
1.创建一个将值作为firstValue、secondValue、expectedSum传递的 dataProvider 。
2.打开https://www.lambdatest.com/selenium-playground/simple-form-demo。
3.使用第一组值 {1, 4, 5} 运行测试 1。该测试应该通过,因为预期的总和是正确的。
4.从表单中清除旧值。
5.使用第二组 {2, 4, 7} 运行测试 2。由于预期的总和不正确,因此该测试预期应该失败。我们故意传递不正确的预期值,以查看通过和失败案例的输出和测试报告的差异。当然正常情况下,期望值应该始终是正确的值。
除了这个测试用例之外,我们还将添加两个优先级的测试用例来展示用法,其中一个具有 invocationCount 属性来显示用例按优先级多次执行。
package test;
import java.net.MalformedURLException;
import java.net.URL;
import org.openqa.selenium.By;
import org.openqa.selenium.remote.*;
import org.testng.Assert;
import org.testng.annotations.*;
public class SeleniumTestNGExample {
public RemoteWebDriver driver = null;
String username = "<lambdatest_username>";
String accessKey = "<lambdatest_accesskey>";
@BeforeSuite
public void setUp() {
DesiredCapabilities capabilities = new DesiredCapabilities();
capabilities.setCapability("browserName", "Chrome");
capabilities.setCapability("version", "92.0");
capabilities.setCapability("platform", "Windows 10");
capabilities.setCapability("resolution", "1024x768");
capabilities.setCapability("build", "TestNG Selenium Tutorial");
capabilities.setCapability("name", "TestNG Selenium JAVA");
try {
driver = new RemoteWebDriver(
new URL("https://" + username + ":" + accessKey + "@hub.lambdatest.com/wd/hub"), capabilities);
} catch (MalformedURLException e) {
System.out.println("Invalid grid URL");
}
System.out.println("The driver setup process is completed using BeforeSuite");
}
@BeforeTest
public void browserProfile() {
driver.manage().window().maximize();
System.out.println("The browser profile is updated using BeforeTest");
}
@BeforeClass
public void navigateToUrl() {
driver.get("https://www.lambdatest.com/selenium-playground/simple-form-demo");
System.out.println("Navigated to URL using BeforeClass");
}
@Test(description = "Test case with priority", priority = 1)
public void testPriotity()
{
System.out.println("This case has priority 1");
}
@Test(description = "Test case with priority and invocation count", priority = 2, invocationCount = 2)
public void testInvocationCount()
{
System.out.println("This case has priority 2 and invocation count");
}
@DataProvider(name = "SanityTestData")
public Object[][] sanityTestDataProvider() {
String[][] testData = { { "1", "4", "5" }, { "2", "4", "7" } };
return testData;
}
@Test(dataProvider = "SanityTestData", description = "Test case with group and data provider but without priority
", alwaysRun = true, groups = { "sanity" })
public void testSumOfTwoValues(String firstValue, String secondValue, String expectedSum) {
// to enter data and submit
driver.findElement(By.id("sum1")).sendKeys(firstValue);
driver.findElement(By.id("sum2")).sendKeys(secondValue);
driver.findElement(By.xpath("//button[text()='Get values']")).click();
// to fetch actual result
String actualSum = driver.findElement(By.id("addmessage")).getText();
// to assert actual and expected result
Assert.assertEquals(actualSum, expectedSum,
"Expected and actual results do not match. Expected : " + expectedSum + " and Actual : " + actualSum);
}
@AfterMethod()
public void clearOldData() {
driver.findElement(By.id("sum1")).clear();
driver.findElement(By.id("sum2")).clear();
}
@AfterClass
public void closeDriver() {
driver.quit();
System.out.println("Quit the driver using AfterClass");
}
@AfterTest
public void testReporting() {
System.out.println("Test Report generated using AfterTest");
}
}
本文内容不用于商业目的,如涉及知识产权问题,请权利人联系51Testing小编(021-64471599-8017),我们将立即处理


