

本地安装hexo
npm install hexo-cli -g
hexo init blog
cd blog
npm install
hexo server
使用github pages服务部署hexo
我们用来托管博客的服务叫做 Github Pages,它是 Github 用来提供给个人/组织或者项目的网页服务,只需要部署到你的 Github Repository,推送代码,便可以实时呈现。
首先,你需要有一个 Github 的账号。然后创建一个名称为 .github.io 的仓库来托管网页即可。
以我的 Github 为例,我的用户名是 dumingcode,所以创建一个名为 dumingcode.github.io 的仓库,创建的仓库地址便是:https://github.com/dumingcode/dumingcode.github.io.git 创建完后,我们可以暂时不用管它,不需要往仓库里面 push 任何的东西。
hexo部署配置
接着,我们来配置一下本地的 Hexo。
在博客的根目录下有一个名为 _config.yml 的文件,这是博客的主配置文件。前面的其他部分我们先不理会,后文再谈,我们先看最后的 Deployment 配置项:
# Deployment ## Docs: https://hexo.io/docs/deployment.html deploy: type: |
根据官方的文档显示,现在 Hexo 支持 Git、Heroku、Rsync、OpenShift、FTPSync 等部署方式,我们选择 Git 来部署的话,需要首先安装 hexo-deployer-git 插件:
cnpm install hexo-deployer-git --save然后编辑上面的配置文件:
deploy: type: git repo: <repository url> branch: [branch] message: [message] |
我们需要把刚才创建的仓库地址添加进来,branch 和 message 项可以不填,默认情况下推送到 master 分支,这里我建议使用 SSH 加密的仓库地址(参看 Github 官方文档配置 SSH 免密操作)。
保存配置文件之后,我们在博客的跟目录键入:
hexo g -d便可以把博客部署到 Github 了。现在,所有人都可以通过 http://.github.io 来访问自己的博客。
hexo使用第三方模板
找了半天发现hexo-theme-BlueLake主题很简洁,于是使用下面的命令安装(进入blog根目录执行)。
git clone https://github.com/chaooo/hexo-theme-BlueLake.git themes/BlueLake cnpm install hexo-renderer-jade@0.3.0 --save cnpm install hexo-renderer-stylus --save |
本人搭建好的github个人主页:dumingcode.github.io/,欢迎访问。
hexo部署到阿里云
虽说利用github pages服务能够对外发布博客,但是作为一个码农还是希望有自己的域名博客,但是我比较懒,不想手动发布博客。我想自动化地既发布到github也能同时发布到个人网站。所以决定采用CICD的方法,CICD工具使用开源的jenkins,jenkins也搭建在阿里云个人服务器上。
下载并运行jenkins
注意端口使用的是8081
mkdir /usr/local/jenkins
wget http://mirrors.jenkins.io/war-stable/latest/jenkins.war
nohup java -jar jenkins.war --ajp13Port=-1 --httpPort=8081 &
安装nginx
1、安装nginx依赖
yum -y install gcc zlib zlib-devel pcre-devel openssl openssl-devel wget http://nginx.org/download/nginx-1.13.10.tar.gz tar xvf nginx-1.13.10.tar.gz ./configure --prefix=/usr/local/nginx make make install cd /usr/local/nginx/sbin ./nginx -s reload nginx: [error] open() "/usr/local/nginx/logs/nginx.pid" failed (2: No such file or direc 需要设置nginx.conf ./nginx -c /usr/local/nginx/conf/nginx.conf |
2、nginx.conf配置
upstream jenkins { server 127.0.0.1:8081; keepalive 64; } server { listen 80; server_name jenkins.buyasset.com; client_max_body_size 60M; client_body_buffer_size 512k; location / { port_in_redirect on; proxy_pass http://jenkins/; proxy_set_header Host $host:$server_port; proxy_set_header X-Real-IP $remote_addr; proxy_set_header X-Forwarded-For $proxy_add_x_forwarded_for; proxy_set_header X-Forwarded-Proto $scheme; } } |
以上通过nginx 反向代理jenkins,在浏览器输入jenkins.buyasset.club就能够进入jenkins管理后台。
配置jenkins
在jenkins页面提示目录中找到默认密码,输入jenkis域名,登陆jenkins。

安装jenkins社区推荐的插件

配置github
获取sercret text
登陆github网站,进入 github->Settings->Developer settings-> Generate new token,点击生成完毕一定记录下下面的secret text。
secret text一定要记住,忘记的话只能重新生成。
GitHub webhooks 设置
进入GitHub上指定的项目(hexo 仓库) --> setting --> WebHooks&Services --> add webhook --> 输入刚刚部署jenkins的服务器的IP

图片中标红区域是变化的,后缀都是一样的为github-webhook。
jenkins中的github配置
配置GitHub Plugin
系统管理 --> 系统设置 --> GitHub --> Add GitHub Sever

API URL 输入 https://api.github.com,Credentials点击Add添加,Kind选择Secret Text,具体如下图所示。

设置完成后,点击TestConnection,提示Credentials verified for user UUserName, rate limit: xxx,则表明有效。
创建一个freestyle任务
1、General 设置
填写GitHub project URL, 也就是你的项目主页
eg. https://github.com/your_name/your_repo_name

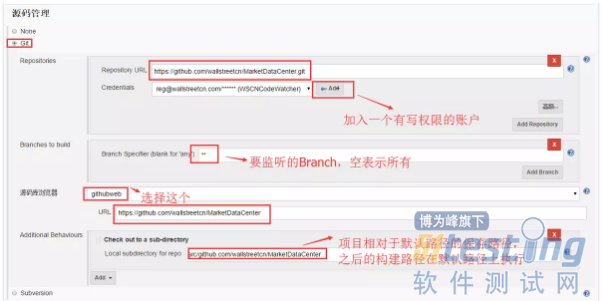
2、配置源码管理
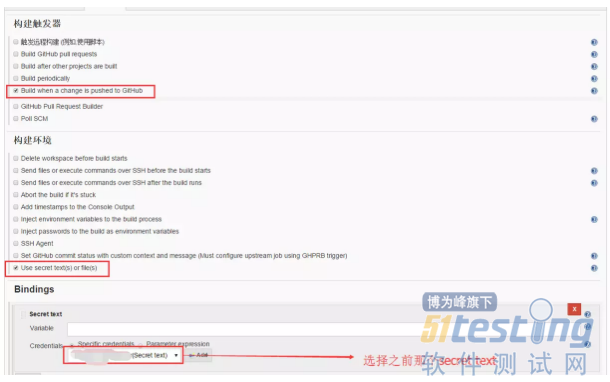
3、构建触发器,构建环境
4、构建

5、构建脚本
将上图的构建脚本替换如下:
cd /var/www/blog(hexo目录)
git pull
hexo clean
hexo g -d
6、构建后操作

7、构建前clone hexo
将hexo初始代码拉取到/var/www/blog目录中,以后jenkins会监控github的push操作,一旦发现push会自动更新。
cd /var/www
git clone https://github.com/dumingcode/dumingcode.github.io.git blog
nginx反向代理hexo
hexo为静态网站,所以直接用nginx反向代理即可,nginx脚本如下:注意root指向的是hexo部署目录。
server { listen 80; server_name blog.buyasset.club; index index.html index.htm index.php default.html default.htm default.php; root /var/www/blog; #error_page 404 /404.html; location ~ .*\.(ico|gif|jpg|jpeg|png|bmp|swf)$ { access_log off; expires 1d; } location ~ .*\.(js|css|txt|xml)?$ { access_log off; expires 12h; } location / { try_files $uri $uri/ =404; } } |
测试CICD效果
进入本地hexo目录,修改发布的博客,然后执行hexo g -d,登陆jenkins发现jenkins已经获取到了push操作,并且执行了自动构建任务。以下为jenkins的变更记录
Site updated: 2018-04-21 13:35:51 (commit: 76f3c53) (details)
Commit 76f3c530d077782fd66a8ca375afaa17cd188286 by duming
Site updated: 2018-04-21 13:35:51
(commit: 76f3c53)
上文内容不用于商业目的,如涉及知识产权问题,请权利人联系博为峰小编(021-64471599-8017),我们将立即处理。


