
-
实现mysql的远程登录10060错误
2010-07-15 11:43:49
今天在使用ruby连接远程机器上的mysql时,出现:in `real_connect': Can't connect to MySQL server on (10060)在网上找了找,发现以下几步可以解决:1.关掉远程机器的windows防火墙开始→控制面板→安全中心——Windows 防火墙 关掉2.授权,可以使用下面的命令来实现远程登录的:
第一个命令:GRANT ALL ON *.* TO root@'%' IDENTIFIED BY 'password' WITH GRANT OPTION;其中root@'%" 中的%表示任意IP地址,也可以指定特定的ip地址。
第二个命令:flush privileges;
经过以上两步,问题解决 -
unix下find常用命令
2010-02-05 17:40:43
1,列出某个目录下的所有文件(包括子目录)
find 目录名 -type f
2.只列出目录
find 目录名 -type d
3.列出某目录下(包括子目录)下文件名包含某串的文件
find 目录名 -type -f -name "*string*"
-
oracle数据库中查询和时间相关的sql语句
2009-11-23 12:17:58
select * from table t where TO_DATE('2009-10-12
16:56:07','YYYY-MM-DD HH24:MI:SS')<GMT_CREATE -
无题
2009-10-14 15:02:50
一. 从小事做起,学会吃亏,与他人合作二. 心有多大,舞台就有多大三. 好好学习,天天向上四. 勇于实践,勇于犯错,善于反思。五. 要有方法、有套路,对问题系统思考、对解决方案有战略性的设计。六. 独立思考,不人云亦云。七. 少抱怨、少空谈、积极主动,多干实事。八. 对职业负责、对目标负责,对自己负责,成功者往往自觉自律、信守承诺、心无旁骛。九. 多点人文修养和审美情趣,看起来与工作不怎么相关,其实太相关了。十. 大家好,才是真的好, 关注人,帮助人,真诚待人,厚道做人。十一. 开放和分享的态度十二. 做好时间管理 -
数据库备份
2009-08-21 16:17:07
最近要做testlink中测试用例的备份,打算把整个数据库都备份下来好了
导出 mysqldump -uroot DB_XXX>rs_XXX.sql ,
导入:mysql -uroot 导入的DB <rs_XXX.sql -
loadrunner: 实现多个场景的自动顺序执行,自动保存结果
2009-02-17 14:57:22
loadrunner并不支持多个场景的测试计划,但是我们可能会有这样的需求,达到无人看守的执行;
解决方法: 使用批处理命令实现:SET M_ROOT="C:\Program Files\Mercury Interactive\Mercury LoadRunner\bin\"
%M_ROOT%\wlrun.exe -TestPath "场景的完整路径.lrs" -Run
%M_ROOT%\wlrun.exe -TestPath "d:\test.lrs" -Run
然后保存到批处理文件中,在系统任务计划中添加定时任务即可实现多场景的自动执行
loadrunner 自动保存结果:通过设置Controller中的Result Directory,让LR在每次运行场景时自动保存返回结果。
Directory中指定的是返回结果的保存路径,选中“Automatically create a results directory for each scenario execution”项后,再输入一个“Results Name”,LR就会负责在每次场景执行结束后自动保存返回结果到指定的目录中,并且将根据Results Name中的值,每次按照顺序生成新的返回结果目录。 -
如何查看数据库进程链接数是否达到了最大设置
2009-02-17 14:51:18
进程启动多个,如何查看是否超过了系统的最大极限
问题解决方法 mysqladmin -uXXX -pXXX -hxxx processlist | wc -
ruby gems 升级
2008-12-15 11:29:32
gem update --system
-
awk学习笔记二
2008-11-11 14:42:32
将一个文件中重复的行打印出来:
awk 'seen[$0]++ == 1' <filename>Sample input file:
eins
deux
drei
quattro
deux
sechs
drei
acht
huit
neuf
six
deuxThe output:
deux
drei统计某个路径下所有文件的大小:
ls -l | awk '{sum+=$5} END {print sum}'
-
seleniumRC_ruby测试环境配置和使用简介
2008-07-30 16:01:51
1 什么是Selenium RC
Selenium RC,全称 Selenium Remote Control。它启动一个本地的代理服务器,通过接收本地客户端程序发出的请求来启动、关闭浏览器,并对浏览器进行输入、点击以及对浏览器内容验证等操作。
Ø 可以使用多种语言编写脚本
Ø 有独立的服务器端
Ø 测试脚本产生命令,发送给服务器端
Ø 服务器端用JS控制浏览器
2 如何配置Selenium RC的运行环境
2.1 安装Java Runtime Environment (JRE)
Selenium RC 的开发语言为java,需要运行在JRE
2.2 安装ruby
安装完成后在环境变量path中添加ruby的安装路径,如c:\ruby\bin
2.3 下载SeleniumRC
请到http://www.openqa.org/selenium-rc/download.action 下载最新的SeleniumRC。解压后,一般会有如下文件夹列表:
selenium-dotnet-client-driver-
selenium-java-client-driver-
selenium-perl-client-driver-
selenium-php-client-driver-
selenium-python-client-driver-
selenium-ruby-client-driver-
selenium-server-
另:selenium-server.jar包在 selenium-server-
2.4 运行Demo
1. 启动Selenium RC。打开命令行,进入selenium-server.jar所在目录,运行:java -jar selenium-server.jar
2. 打开另一个命令行,进入\selenium-ruby-client-driver-
3 Firefox Selenium IDE插件的使用
3.1 在Firefox浏览器中下载安装Selenium IDE插件
下载地址:http://www.openqa.org/selenium-ide/
3.2 使用Selenium IDE录制测试用例脚本
1. 使用Firefox访问 http://www.yahoo.cn
2. 点击“工具(T)”选项,选择“Selenium IDE”,运行Selenium IDE,点击红色圆形图标开始录制
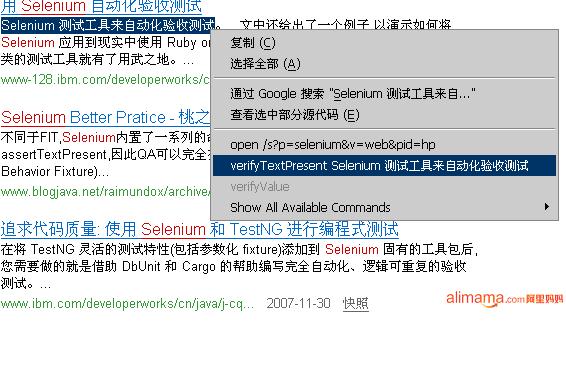
3. 返回浏览器,在yahoo.cn的搜索框输入Selenium,点击搜索按钮
4. 进入搜索结果页后,为测试用例增加断言,如图:
5. 至此测试用例录制完毕,再次点击红色圆形图标结束录制。再验证用例是否可以运行成功。点击Selenium IDE上的运行按钮,如图:
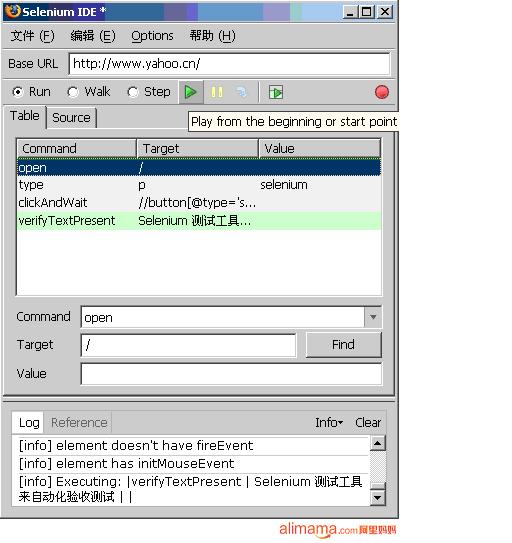
如果每行的运行结果都是绿色,表示用例运行成功。
6. 将该用例保存为ruby格式的测试用例。选择Selenium IDE的Options->Format->ruby Selenium RC,得到ruby代码,将代码保存为test.ruby(注,文件名需要和代码里的类名相同,并且文件应保存为UTF-8编码格式)
7. 在命令行下进入到test.ruby所在的文件夹,运行 ruby test.ruby 即可重现刚才的搜索及验证步骤。
4 参考资料
l SeleniumRC 官方指南:http://openqa.org/selenium-rc/tutorial.html
l Selenium 中文:http://wiki.javascud.org/display/SEL/Home
-
ruby_学习笔记:读写excel文件
2008-05-14 11:12:44
测试工作中,批量的数据通常会放到excel表格中,测试输出的数据写回表格中,这样输入输出易于管理,同时清晰明了,
使用ruby来操作excel文件首先需要在脚本里包含以下语句
require 'win32ole'把win32ole包含进来后,就可以通过和windows下的excel api进行交互来对excel文件进行读写了.
打开excel文件,对其中的sheet进行访问:
excel = WIN32OLE::new('excel.Application')
workbook = excel.Workbooks.Open('c:\examples\spreadsheet.xls')
worksheet = workbook.Worksheets(1) #定位到第一个sheet
worksheet.Select读取数据:
worksheet.Range('a12')['Value'] #读取a12中的数据
data = worksheet.Range('a1:c12')['Value'] #将数据读入到一个二维表
找到第一处a列的值为空值
line = 1
while worksheet.Range("a#{line}")['Value']
line=line+1
end #line的值为第一处空白行的行数
将第一列的值读入到一个数组中
line = '1'
data = []
while worksheet.Range("a#{line}")['Value']
data << worksheet.Range("a#{line}:d#{line}")['Value']
line.succ!
end
将数据写入到excel表格中
worksheet.Range('e2')['Value'] = Time.now.strftime '%d/%m/%Y' #单个值
worksheet.Range('a5:c5')['Value'] = ['Test', '25', 'result'] #将一个数组写入
调用宏定义
excel.Run('SortByNumber')设置背景色
worksheet.Range('a3:f5').Interior['ColorIndex'] = 36 #pale yellow
# 将背景色恢复成无色
worksheet.Range('a3:f5').Interior['ColorIndex'] = -4142 # XlColorIndexNone constant
# 使用Excel constant 将背景色恢复成无色
worksheet.Range('a3:f5').Interior['ColorIndex'] = ExcelConst::XlColorIndexNone
保存
workbook.Close(1)
# 或
workbook.SaveAs 'myfile.xls'
# 默认路径是系统定义的"我的文档"
结束会话
excel.Quit一些相对完整的代码片段
创建一个excel文件并保存
require 'win32ole'
excel = WIN32OLE.new("excel.application")
excel.visible = true # in case you want to see what happens
workbook = excel.workbooks.add
workbook.saveas('c:\examples\spreadsheet1.xls')
workbook.close操作excel文件的几个重要元素
Excel => workbook => worksheet => range(cell)
我理解的是excel为类名,workbook为一个具体的(excel文件)实例,创建好实例后,worksheet是实例(workbook,工作簿)中的一个工作表,然后可以对工作表中的每个单元格(range(cell))进行具体的读写------------------按照这样操作肯定没有错,不过下面的这些语句又让我有些疑惑
excel.workbooks("Mappe1").worksheets("Tabelle1").range("a1").value #读取名为Mappe1的excel文件中工作表名为Tabelle1的a1单元格中的值
excel.worksheets("Tabelle1").range("a1").value #作用同第一条语句
excel.activeworkbook.activesheet.range("a1").value #作用同第一条语句
excel.activesheet.range("a1").value #作用同第一条语句
excel.range("a1").value #作用同第一条语句excel可以直接操作所有的属性,默认为当前活跃的工作簿/工作表
对单元格的操作:某个单元格: sheet.range("a1")
a1到c3的值: sheet.range("a1", "c3") 或 sheet.range("a1:c3")
第一列: sheet.range("a:a")
第三行: sheet.range("3:3")
获得单元格的值:
range.text #读取值,返回为字符串格式,如果单元格内为数字,有可能会被截断小数点后的位数
sheet.range("a1").textrange.value #读取值,数字不会截断
sheet.range("a1").value对单元格设置值
sheet.range("a1").value = 1.2345
或
sheet.range("a1").value = '1.2345'迭代访问:
sheet.range("a1:a10").each{|cell|puts cell.value}
如果范围是一个矩形,则会按行循环迭代访问
sheet.range("a1:b5").each{|cell|puts cell.value}block迭代,并打印出每行的第一个值
sheet.range("b3:c7").rows.each{|r|puts r.cells(1,1).value} -
watir:扩展IE标签
2008-05-13 15:36:33
watir:如何扩展IE标签
我们知道watir支持link,button,textfield...这些HTML标签,但是还有些标签它目前还不支持,如font,em,i,ol,如果在测试中遇到了这些标签怎么办呢?
可以通过扩展来解决:
将以下代码加到脚本的前面module Watir
class Em < NonControlElement
TAG = 'em'
end
module Container
def em(how, what)
return Em.new(self, how, what) //此处Em第一个字母要大写,不然运行会报错
end
end
end然后试试:
ie.em(:text,'链接').click
哈,可以工作了
类似的可以解决其他目前不支持的标签,如font,i等.
如果熟悉xpath,也可以用xpath来解决,这部分待研究. -
ruby_学习笔记:字符串处理函数
2008-04-22 18:42:22
最最常用的字符串处理函数1.返回字符串的长度
str.length => integer2.判断字符串中是否包含另一个串
str.include? other_str => true or false"hello".include? "lo" #=> true
"hello".include? "ol" #=> false
"hello".include? ?h #=> true3.字符串插入:
str.insert(index, other_str) => str"abcd".insert(0, 'X') #=> "Xabcd"
"abcd".insert(3, 'X') #=> "abcXd"
"abcd".insert(4, 'X') #=> "abcdX"
"abcd".insert(-3, 'X') #=> "abXcd"
"abcd".insert(-1, 'X') #=> "abcdX"4.字符串分隔,默认分隔符为空格
str.split(pattern=$;, [limit]) => anArray" now's the time".split #=> ["now's", "the", "time"]
"1, 2.34,56, 7".split(%r{,\s*}) #=> ["1", "2.34", "56", "7"]
"hello".split(//) #=> ["h", "e", "l", "l", "o"]
"hello".split(//, 3) #=> ["h", "e", "llo"]
"hi mom".split(%r{\s*}) #=> ["h", "i", "m", "o", "m"]"mellow yellow".split("ello") #=> ["m", "w y", "w"]
"1,2,,3,4,,".split(',') #=> ["1", "2", "", "3", "4"]
"1,2,,3,4,,".split(',', 4) #=> ["1", "2", "", "3,4,,"]
5.字符串替换
str.gsub(pattern, replacement) => new_str
str.gsub(pattern) {|match| block } => new_str"hello".gsub(/[aeiou]/, '*') #=> "h*ll*" #将元音替换成*号
"hello".gsub(/([aeiou])/, '<\1>') #=> "h<e>ll<o>" #将元音加上尖括号,\1表示保留原有字符???
"hello".gsub(/./) {|s| s[0].to_s + ' '} #=> "104 101 108 108 111 "
字符串替换二:
str.replace(other_str) => str
s = "hello" #=> "hello"
s.replace "world" #=> "world"6.字符串删除:
str.delete([other_str]+) => new_str
"hello".delete "l","lo" #=> "heo"
"hello".delete "lo" #=> "he"
"hello".delete "aeiou", "^e" #=> "hell"
"hello".delete "ej-m" #=> "ho"7.去掉前和后的空格
str.lstrip => new_str" hello ".lstrip #=> "hello "
"hello".lstrip #=> "hello"8.字符串匹配
str.match(pattern) => matchdata or nil9.字符串反转
str.reverse => new_str"stressed".reverse #=> "desserts"
10.去掉重复的字符
str.squeeze([other_str]*) => new_str
"yellow moon".squeeze #=> "yelow mon" #默认去掉串中所有重复的字符
" now is the".squeeze(" ") #=> " now is the" #去掉串中重复的空格
"putters shoot balls".squeeze("m-z") #=> "puters shot balls" #去掉指定范围内的重复字符
11.转化成数字
str.to_i=> str
"12345".to_i #=> 12345
chomp和chop的区别:
chomp:去掉字符串末尾的\n或\r
chop:去掉字符串末尾的最后一个字符,不管是\n\r还是普通字符"hello".chomp #=> "hello"
"hello\n".chomp #=> "hello"
"hello\r\n".chomp #=> "hello"
"hello\n\r".chomp #=> "hello\n"
"hello\r".chomp #=> "hello"
"hello".chomp("llo") #=> "he""string\r\n".chop #=> "string"
"string\n\r".chop #=> "string\n"
"string\n".chop #=> "string"
"string".chop #=> "strin"
"x".chop.chop #=> "" -
ruby_学习笔记:读写文件
2008-04-22 18:31:11
读文件:
第一种方法:
$result='d:\\rs.txt'
File.open($result, "r") do |file|
file.each_line do |line|
if line.length>20
puts line.chop.length #去掉最后一个换行字符,并显示该行实际字符串的长度
puts line
end
end
end
第二种方法:
filename='d:\\rs.txt'
while File.exists?(filename) #如果源文件存在就执行下面的操作
file=File.open(filename,'r')
while (lines=file.gets)
puts lines
end
写文件:
$filename="C:\\Automation\\rss"+".txt"
$logfile = File.new($filename,"a")
iCount=0while(iCount<10) //循环写入10行
$logfile.puts "http://xxxx/rs#{iCount}.xml"
iCount=iCount+1
end今天又笨了一次,由于要比较两个文件的不同,于是考虑用ruby来写个脚本
实现,刚开始的时候使用双重
File.open($file1, "r") do |file1|
file1.each_line do |line1|
总是报错,后来改成先把文件读到一个数组里,然后循环比较,成功.
其实这是个笨方法,在unix下使用三个命令就可以完成了.
1.先使用sort指令将文件中的数据按照要求的索引进行排序,
2.然后使用uniq指令将重复数据去掉
3.再使用diff命令就可以了.
-
awk 学习笔记
2008-04-15 20:28:08
数据样本
subdate score url
2006-04-01 4299 http://aaa.163.com/111.html
2006-04-01 6999 http://aaa.163.com/121.html
2006-04-02 7899 http://aaa.163.com/131.html
2006-04-02 4999 http://aaa.163.com/141.html
2006-04-02 8999 http://aaa.163.com/151.html
2006-04-04 9999 http://aaa.163.com/161.html
2006-04-04 8999 http://aaa.163.com/171.html
2006-04-05 4999 http://aaa.163.com/181.html
提取
仅列出 2006-04-01 所有信息 。
{ if ($1 == “2006-04-01”) print $0 }仅列出 URL信息。
{ print $3 }仅列出 日期信息,要求不可重复。
{ dtList[$1]++ } END { for (dtStr in dtList) print dtStr}统计
统计 每天 出现的URL数量 。
{ dtList[$1]++ } END { for (I in dtList) print dtList[i] “\t” I }统计 每天 出现的score > 5999 的URL数量 。
加上 if ($2 > 5999)计算 2006-04-01 所有 score 总和。
{ total+=$2 } END { print “total ” total }计算 2006-04-01 score 平均值。
BEGIN{total=0;count=0}{ total += $2; count++; } END { print “avg:” total/count }显示每个字段信息。
awk '{ for (i=1;i<=NF; i++) print “$” i ":\t" $i }‘
计算某列的和(该列为数字):
awk 'BEGIN{sum=0}{sum+=$2}END{print sum}'
在某行前加上某个字符串
awk '{printf "data/news/newsbuffer3-060904_dataDir/";printf $0;printf "\n";}' ./perf.list > l.txt提取出最后一列
cat performance.list |awk '{print $NF}' >>perf.list -
web测试容易遗漏的通用点
2008-04-11 15:19:52
1.浏览器的后退按钮
提交表单一条已经成功提交的记录,back后再提交,看系统会如何处理。
检查多次使用back健的情况在有back的地方,back,回到原来的页面,再back,重复几次,看是否会报错。2.通过修改URL中的参数,向服务器发起请求,看看会有什么样的结果.
利用一些工具,如http watch,可以记录和捕获向服务器发起的URL请求,然后修改其中的参数向服务器发起请求
该功能点可以和安全测试结合起来.3.对表单多次提交
对提交按钮快速多次点击提交,看看会不会在数据库中形成多条记录.
网速或响应快时,这点容易被遗漏,但用户的网络可能慢,很容易多次点击提交如果前端做了处理,试试捕获在提交时生成的URL,绕过页面,再次对服务器发起请求,会有什么结果
4.光标的跳转
执行操作后,光标是否停留在合适的位置.
如邮箱登录,输完用户名回车后,光标应该跳转到密码框内.细节问题,但是影响用户感受5.tab键是否功能正确
和光标的跳转类似,特别是在有输入项时,查看tab键的焦点顺序是否正确5.对全角/半角符号的输入测试
有输入项时,要考虑全/半角字条的输入,及GBK字符暂时想到这么多,会在以后再补充,也欢迎大家来做补充
-
[转]loadrunner 面试题
2008-04-02 19:04:03
英文的,不过觉得很好....
- What is load testing? - Load testing is to test that if the application works fine with the loads that result from large number of simultaneous users, transactions and to determine weather it can handle peak usage periods.
- What is Performance testing? - Timing for both read and update transactions should be gathered to determine whether system functions are being performed in an acceptable timeframe. This should be done standalone and then in a multi user environment to determine the effect of multiple transactions on the timing of a single transaction.
- Did u use LoadRunner? What version? - Yes. Version 7.2.
- Explain the Load testing process? -
Step 1: Planning the test. Here, we develop a clearly defined test plan to ensure the test scenarios we develop will accomplish load-testing objectives. Step 2: Creating Vusers. Here, we create Vuser scrīpts that contain tasks performed by each Vuser, tasks performed by Vusers as a whole, and tasks measured as transactions. Step 3: Creating the scenario. A scenario describes the events that occur during a testing session. It includes a list of machines, scrīpts, and Vusers that run during the scenario. We create scenarios using LoadRunner Controller. We can create manual scenarios as well as goal-oriented scenarios. In manual scenarios, we define the number of Vusers, the load generator machines, and percentage of Vusers to be assigned to each scrīpt. For web tests, we may create a goal-oriented scenario where we define the goal that our test has to achieve. LoadRunner automatically builds a scenario for us. Step 4: Running the scenario.
We emulate load on the server by instructing multiple Vusers to perform tasks simultaneously. Before the testing, we set the scenario configuration and scheduling. We can run the entire scenario, Vuser groups, or individual Vusers. Step 5: Monitoring the scenario.
We monitor scenario execution using the LoadRunner online runtime, transaction, system resource, Web resource, Web server resource, Web application server resource, database server resource, network delay, streaming media resource, firewall server resource, ERP server resource, and Java performance monitors. Step 6: Analyzing test results. During scenario execution, LoadRunner records the performance of the application under different loads. We use LoadRunner’s graphs and reports to analyze the application’s performance. - When do you do load and performance Testing? - We perform load testing once we are done with interface (GUI) testing. Modern system architectures are large and complex. Whereas single user testing primarily on functionality and user interface of a system component, application testing focuses on performance and reliability of an entire system. For example, a typical application-testing scenario might depict 1000 users logging in simultaneously to a system. This gives rise to issues such as what is the response time of the system, does it crash, will it go with different software applications and platforms, can it hold so many hundreds and thousands of users, etc. This is when we set do load and performance testing.
- What are the components of LoadRunner? - The components of LoadRunner are The Virtual User Generator, Controller, and the Agent process, LoadRunner Analysis and Monitoring, LoadRunner Books Online.
- What Component of LoadRunner would you use to record a scrīpt? - The Virtual User Generator (VuGen) component is used to record a scrīpt. It enables you to develop Vuser scrīpts for a variety of application types and communication protocols.
- What Component of LoadRunner would you use to play Back the scrīpt in multi user mode? - The Controller component is used to playback the scrīpt in multi-user mode. This is done during a scenario run where a vuser scrīpt is executed by a number of vusers in a group.
- What is a rendezvous point? - You insert rendezvous points into Vuser scrīpts to emulate heavy user load on the server. Rendezvous points instruct Vusers to wait during test execution for multiple Vusers to arrive at a certain point, in order that they may simultaneously perform a task. For example, to emulate peak load on the bank server, you can insert a rendezvous point instructing 100 Vusers to deposit cash into their accounts at the same time.
- What is a scenario? - A scenario defines the events that occur during each testing session. For example, a scenario defines and controls the number of users to emulate, the actions to be performed, and the machines on which the virtual users run their emulations.
- Explain the recording mode for web Vuser scrīpt? - We use VuGen to develop a Vuser scrīpt by recording a user performing typical business processes on a client application. VuGen creates the scrīpt by recording the activity between the client and the server. For example, in web based applications, VuGen monitors the client end of the database and traces all the requests sent to, and received from, the database server. We use VuGen to: Monitor the communication between the application and the server; Generate the required function calls; and Insert the generated function calls into a Vuser scrīpt.
- Why do you create parameters? - Parameters are like scrīpt variables. They are used to vary input to the server and to emulate real users. Different sets of data are sent to the server each time the scrīpt is run. Better simulate the usage model for more accurate testing from the Controller; one scrīpt can emulate many different users on the system.
- What is correlation? Explain the difference between automatic correlation and manual correlation? - Correlation is used to obtain data which are unique for each run of the scrīpt and which are generated by nested queries. Correlation provides the value to avoid errors arising out of duplicate values and also optimizing the code (to avoid nested queries). Automatic correlation is where we set some rules for correlation. It can be application server specific. Here values are replaced by data which are created by these rules. In manual correlation, the value we want to correlate is scanned and create correlation is used to correlate.
- How do you find out where correlation is required? Give few examples from your projects? - Two ways: First we can scan for correlations, and see the list of values which can be correlated. From this we can pick a value to be correlated. Secondly, we can record two scrīpts and compare them. We can look up the difference file to see for the values which needed to be correlated. In my project, there was a unique id developed for each customer, it was nothing but Insurance Number, it was generated automatically and it was sequential and this value was unique. I had to correlate this value, in order to avoid errors while running my scrīpt. I did using scan for correlation.
- Where do you set automatic correlation options? - Automatic correlation from web point of view can be set in recording options and correlation tab. Here we can enable correlation for the entire scrīpt and choose either issue online messages or offline actions, where we can define rules for that correlation. Automatic correlation for database can be done using show output window and scan for correlation and picking the correlate query tab and choose which query value we want to correlate. If we know the specific value to be correlated, we just do create correlation for the value and specify how the value to be created.
- What is a function to capture dynamic values in the web Vuser scrīpt? - Web_reg_save_param function saves dynamic data information to a parameter.
- When do you disable log in Virtual User Generator, When do you choose standard and extended logs? - Once we debug our scrīpt and verify that it is functional, we can enable logging for errors only. When we add a scrīpt to a scenario, logging is automatically disabled. Standard Log Option: When you select
Standard log, it creates a standard log of functions and messages sent during scrīpt execution to use for debugging. Disable this option for large load testing scenarios. When you copy a scrīpt to a scenario, logging is automatically disabled Extended Log Option: Select
extended log to create an extended log, including warnings and other messages. Disable this option for large load testing scenarios. When you copy a scrīpt to a scenario, logging is automatically disabled. We can specify which additional information should be added to the extended log using the Extended log options. - How do you debug a LoadRunner scrīpt? - VuGen contains two options to help debug Vuser scrīpts-the Run Step by Step command and breakpoints. The Debug settings in the Options dialog box allow us to determine the extent of the trace to be performed during scenario execution. The debug information is written to the Output window. We can manually set the message class within your scrīpt using the lr_set_debug_message function. This is useful if we want to receive debug information about a small section of the scrīpt only.
- How do you write user defined functions in LR? Give me few functions you wrote in your previous project? - Before we create the User Defined functions we need to create the external
library (DLL) with the function. We add this library to VuGen bin directory. Once the library is added then we assign user defined function as a parameter. The function should have the following format: __declspec (dllexport) char* <function name>(char*, char*)Examples of user defined functions are as follows:GetVersion, GetCurrentTime, GetPltform are some of the user defined functions used in my earlier project. - What are the changes you can make in run-time settings? - The Run Time Settings that we make are: a) Pacing - It has iteration count. b) Log - Under this we have Disable Logging Standard Log and c) Extended Think Time - In think time we have two options like Ignore think time and Replay think time. d) General - Under general tab we can set the vusers as process or as multithreading and whether each step as a transaction.
- Where do you set Iteration for Vuser testing? - We set Iterations in the Run Time Settings of the VuGen. The navigation for this is Run time settings, Pacing tab, set number of iterations.
- How do you perform functional testing under load? - Functionality under load can be tested by running several Vusers concurrently. By increasing the amount of Vusers, we can determine how much load the server can sustain.
- What is Ramp up? How do you set this? - This option is used to gradually increase the amount of Vusers/load on the server. An initial value is set and a value to wait between intervals can be
specified. To set Ramp Up, go to ‘Scenario Scheduling Options’ - What is the advantage of running the Vuser as thread? - VuGen provides the facility to use multithreading. This enables more Vusers to be run per
generator. If the Vuser is run as a process, the same driver program is loaded into memory for each Vuser, thus taking up a large amount of memory. This limits the number of Vusers that can be run on a single
generator. If the Vuser is run as a thread, only one instance of the driver program is loaded into memory for the given number of
Vusers (say 100). Each thread shares the memory of the parent driver program, thus enabling more Vusers to be run per generator. - If you want to stop the execution of your scrīpt on error, how do you do that? - The lr_abort function aborts the execution of a Vuser scrīpt. It instructs the Vuser to stop executing the Actions section, execute the vuser_end section and end the execution. This function is useful when you need to manually abort a scrīpt execution as a result of a specific error condition. When you end a scrīpt using this function, the Vuser is assigned the status "Stopped". For this to take effect, we have to first uncheck the “Continue on error” option in Run-Time Settings.
- What is the relation between Response Time and Throughput? - The Throughput graph shows the amount of data in bytes that the Vusers received from the server in a second. When we compare this with the transaction response time, we will notice that as throughput decreased, the response time also decreased. Similarly, the peak throughput and highest response time would occur approximately at the same time.
- Explain the Configuration of your systems? - The configuration of our systems refers to that of the client machines on which we run the Vusers. The configuration of any client machine includes its hardware settings, memory, operating system, software applications, development tools, etc. This system component configuration should match with the overall system configuration that would include the network infrastructure, the web server, the database server, and any other components that go with this larger system so as to achieve the load testing objectives.
- How do you identify the performance bottlenecks? - Performance Bottlenecks can be detected by using monitors. These monitors might be application server monitors, web server monitors, database server monitors and network monitors. They help in finding out the troubled area in our scenario which causes increased response time. The measurements made are usually performance response time, throughput, hits/sec, network delay graphs, etc.
- If web server, database and Network are all fine where could be the problem? - The problem could be in the system itself or in the application server or in the code written for the application.
- How did you find web server related issues? - Using Web resource monitors we can find the performance of web servers. Using these monitors we can analyze throughput on the web server, number of hits per second that
occurred during scenario, the number of http responses per second, the number of downloaded pages per second. - How did you find database related issues? - By running “Database” monitor and help of “Data Resource Graph” we can find database related issues. E.g. You can specify the resource you want to measure on before running the controller and than you can see database related issues
- Explain all the web recording options?
- What is the difference between Overlay graph and Correlate graph? - Overlay Graph: It overlay the content of two graphs that shares a common x-axis. Left Y-axis on the merged graph show’s the current graph’s value & Right Y-axis show the value of Y-axis of the graph that was merged. Correlate Graph: Plot the Y-axis of two graphs against each other. The active graph’s Y-axis becomes X-axis of merged graph. Y-axis of the graph that was merged becomes merged graph’s Y-axis.
- How did you plan the Load? What are the Criteria? - Load test is planned to decide the number of users, what kind of machines we are going to use and from where they are run. It is based on 2 important documents, Task Distribution Diagram and Transaction profile. Task Distribution Diagram gives us the information on number of users for a particular transaction and the time of the load. The peak usage and off-usage are decided from this Diagram. Transaction profile gives us the information about the transactions name and their priority levels with regard to the scenario we are deciding.
- What does vuser_init action contain? - Vuser_init action contains procedures to login to a server.
- What does vuser_end action contain? - Vuser_end section contains log off procedures.
- What is think time? How do you change the threshold? - Think time is the time that a real user waits between actions. Example: When a user receives data from a server, the user may wait several seconds to review the data before responding. This delay is known as the think time. Changing the Threshold: Threshold level is the level below which the recorded think time will be ignored. The default value is five (5) seconds. We can change the think time threshold in the Recording options of the Vugen.
- What is the difference between standard log and extended log? - The standard log sends a subset of functions and messages sent during scrīpt execution to a log. The subset depends on the Vuser type Extended log sends a detailed scrīpt execution messages to the output log. This is mainly used during debugging when we want information about: Parameter substitution. Data returned by the server. Advanced trace.
- Explain the following functions: - lr_debug_message - The lr_debug_message function sends a debug message to the output log when the specified message class is set. lr_output_message - The lr_output_message function sends notifications to the Controller Output window and the Vuser log file. lr_error_message - The lr_error_message function sends an error message to the LoadRunner Output window. lrd_stmt - The lrd_stmt function associates a character string (usually a SQL statement) with a cursor. This function sets a SQL statement to be processed. lrd_fetch - The lrd_fetch function fetches the next row from the result set.
- Throughput - If the throughput scales upward as time progresses and the number of Vusers increase, this indicates that the bandwidth is sufficient. If the graph were to remain relatively flat as the number of Vusers increased, it would
be reasonable to conclude that the bandwidth is constraining the volume of
data delivered. - Types of Goals in Goal-Oriented Scenario - Load Runner provides you with five different types of goals in a goal oriented scenario:
- The number of concurrent Vusers
- The number of hits per second
- The number of transactions per second
- The number of pages per minute
- The transaction response time that you want your scenario
- Analysis Scenario (Bottlenecks): In Running Vuser graph correlated with the response time graph you can see that as the number of Vusers increases, the average response time of the check itinerary transaction very gradually increases. In other words, the average response time steadily increases as the load
increases. At 56 Vusers, there is a sudden, sharp increase in the average response
time. We say that the test broke the server. That is the mean time before failure (MTBF). The response time clearly began to degrade when there were more than 56 Vusers running simultaneously. - What is correlation? Explain the difference between automatic correlation and manual correlation? - Correlation is used to obtain data which are unique for each run of the scrīpt and which are generated by nested queries. Correlation provides the value to avoid errors arising out of duplicate values and also optimizing the code (to avoid nested queries). Automatic correlation is where we set some rules for correlation. It can be application server specific. Here values are replaced by data which are created by these rules. In manual correlation, the value we want to correlate is scanned and create correlation is used to correlate.
- Where do you set automatic correlation options? - Automatic correlation from web point of view, can be set in recording options and correlation tab. Here we can enable correlation for the entire scrīpt and choose either issue online messages or offline actions, where we can define rules for that correlation. Automatic correlation for database, can be done using show output window and scan for correlation and picking the correlate query tab and choose which query value we want to correlate. If we know the specific value to be correlated, we just do create correlation for the value and specify how the value to be created.
What is a function to capture dynamic values in the web vuser scrīpt? - Web_reg_save_param function saves dynamic data information to a parameter.
- What is load testing? - Load testing is to test that if the application works fine with the loads that result from large number of simultaneous users, transactions and to determine weather it can handle peak usage periods.
-
ruby/watir :几个小的总结
2008-03-14 10:50:01
assert的几种用法
代码示例:1.assert(ie.contains_text('Please Sign In to Continue'))2. assert_match(forward, $ie.textField(:id, "Subject").getContents, " fails ")3.assert_equal('pass', rh['status'])怎样获得当前文件的路径File.dirname(__FILE__).to_s模拟多次发送键盘操作模拟多次发送键盘操作,如发送4次tab键.当然可以用一个for循环来实现,但其实使用 $ie.send_keys('{tab 4}')就可以了使用ruby,如何生成excel文档,并以当前的日期为文件名?
利用系统提供的saveas(sFileName)函数sDate=t1.strftime("%Y_%m_%d_%H_%M") //生成当前时间串$sResultName=DIR+sDate+".xls" //文件名@excel = WIN32OLE::new('excel.Application')
@workbook = @excel.Workbooks.Add()@workbook.SaveAs ($sResultName)
-
ruby/watir开发,eclipse环境配置
2008-03-13 14:59:25
Step1: Install Ruby
step2: download Watir Gem to C:\ruby\lib\ruby\gems\1.8\gems.
step3:launch DOS command prompt and goto directory where Watir gem is saved C:\ruby\lib\ruby\gems\1.8\gems, type gem install xxxx.gem (xxx = watir gem name) or just type "gem install watir" (it will automatically install whatever package in the current dir)
Step4:config Eclipse
(1) Download RDT: Install Ruby Development Tool Using the Eclipse Update Manager( RDT ) ,
(4) unzip the download file
(5) run eclipse.exe进入eclipse环境
(6) Help->Software Updates->Find and Install
(7) In the dialog choose "Search for new features to install" and push next
(8) Select “New Archived Site”, then select the package “RDT” just download
(9) Then do as the follow screenshot:
(10):最后把ruby文件导入就可以了.
-
watir:键盘指令发送列表
2008-03-13 14:40:05
详细参见:
www.autoitscrīpt.com/autoit3/docs/appendix/SendKeys.htm
在watir中一般使用ie.send_keys()来模拟键盘操作,如
ie.send_keys("{Enter}")表示发送回车
列出一些常用的:Send("{TAB}") Navigate to next control (button, checkbox, etc) Send("+{TAB}") Navigate to previous control. Send("^{TAB}") Navigate to next WindowTab (on a Tabbed dialog window) Send("^+{TAB}") Navigate to previous WindowTab. Send("{SPACE}") Can be used to toggle a checkbox or click a button. Send("{+}") Usually checks a checkbox (if it's a "real" checkbox.) Send("{-}") Usually unchecks a checkbox. Send("{NumPadMult}") Recursively expands folders in a SysTreeView32. {ENTER} ENTER key on the main keyboard {ALT} ALT {BACKSPACE} or {BS} BACKSPACE {DELETE} or {DEL} DELETE {UP} Up arrow {DOWN} Down arrow {LEFT} Left arrow {RIGHT} Right arrow {HOME} HOME {END} END {ESCAPE} or {ESC} ESCAPE
连续多次发送某个键盘指令,可以使用以下格式:
如:Send("{DEL 4}") 表示模拟连续按4次del键
标题搜索
我的存档
数据统计
- 访问量: 23541
- 日志数: 25
- 建立时间: 2008-03-12
- 更新时间: 2010-07-15
