

ЁЁЁЁAnsibleздЖЏЛЏХфжУЙмРэ
ЁЁЁЁ1.ЪВУДЪЧAnsible
ЁЁЁЁAnsibleЪЧвЛИіITздЖЏЛЏЕФХфжУЙмРэЙЄОпЃЌздЖЏЛЏжївЊЬхЯждкAnsibleМЏГЩСЫЗсИЛЕФФЃПщЃЌЗсИЛЕФЙІФмЕФзщМўЃЌПЩвдЭЈЙ§вЛИіУќСюЭъГЩвЛЯЕСаЕФВйзїЁЃНјЖјФмМѕЩйЮвУЧЕФжиИДадЙЄзїКЭЮЌЛЄГЩБОЃЌвдЬсИпЙЄзїаЇТЪ
ЁЁЁЁ2.AnsibleПЩвдЭъГЩФФаЉЙІФм
ЁЁЁЁ1ЃЉХњСПжДаадЖГЬУќСюЃЌПЩвдЖдNЖрЬЈжїЛњЭЌЪБНјааУќСюЕФжДааЁЃ
ЁЁЁЁ2ЃЉХњСПХфжУШэМўЗўЮёЃЌПЩвдгУНјааздЖЏЛЏЕФЗНЪНХфжУКЭЙмРэЗўЮёЁЃ
ЁЁЁЁ3ЃЉЪЕЯжШэМўПЊЗЂЙІФмЃЌjumpserverЕзВуЪЙгУansibleРДЪЕЯжЕФздЖЏЛЏЙмРэЁЃ
ЁЁЁЁ4ЃЉБрХХИпМЖЕФITШЮЮёЃЌansibleЕФPlaybookЪЧвЛУХБрГЬгябдЃЌПЩвдгУРДУшЛцвЛЬзITМмЙЙЁЃ
ЁЁЁЁ3.AnsibleЕФЬиЕу
ЁЁЁЁ1ЃЉШнвзбЇЯАЃЌЮоДњРэФЃЪНЃЌВЛЯёsalt stackМШвЊбЇЯАПЭЛЇЖЫгжвЊбЇЯАЗўЮёЖЫЃЌЛЙвЊбЇЯАПЭЛЇЖЫгыЗўЮёЖЫжЎМфЭЈбЖавщЁЃ
ЁЁЁЁ2ЃЉВйзїСщЛюЃЌЬхЯждкAnsibleгаНЯЖрЕФФЃПщЃЌЬсЙЉСЫЗсИЛЕФЙІФмЁЂplaybookдђЬсЙЉРрЫЦгкБрГЬгябдЕФИДдгЙІФмЁЃ
ЁЁЁЁ3ЃЉМђЕЅвзгУЃЌЬхЯждкAnsibleвЛИіУќСюПЩвдЭъГЩКмЖрЪТЧщЁЃ
ЁЁЁЁ4ЃЉАВШЋадИпЃЌвђЮЊAnsibleЪЙгУСЫSSHавщНјааЭЈбЖЃЌМДАВШЋвВЮШЖЈЁЃ
ЁЁЁЁ5ЃЉвЦжВадИпЃЌПЩвдНЋаДКУЕФplaybookПНБДжСШЮвтЛњЦїНјаажДааЁЃ
ЁЁЁЁ4.AnsibleЛљДЁМмЙЙ
ЁЁЁЁ]
ЁЁЁЁ5.AnsibleХфжУ
ЁЁЁЁ1ЃЉАВзАAnsible
ЁЁЁЁ[root@manager ~]# yum install ansible -y
ЁЁЁЁ2ЃЉВщПДAnsibleАцБО
ЁЁЁЁ[root@manager ~]# ansible --version
ЁЁЁЁansible 2.8.5#АцБО
ЁЁЁЁ config file = /etc/ansible/ansible.cfg#ХфжУЮФМўЫљдкТЗОЖ
ЁЁЁЁ configured module search path = [u'/root/.ansible/plugins/modules', u'/usr/share/ansible/plugins/modules']#ФЃПщЕФЫбЫїТЗОЖ
ЁЁЁЁ ansible python module location = /usr/lib/python2.7/site-packages/ansible#pythonФЃПщЫљдкЕФТЗОЖ
ЁЁЁЁ executable location = /usr/bin/ansible#жДааУќСюЕФЮЛжУ
ЁЁЁЁ python version = 2.7.5 (default, Oct 30 2018, 23:45:53) [GCC 4.8.5 20150623 (Red Hat 4.8.5-36)]#pythonАцБО
ЁЁЁЁВтЪдansibleХфжУЮФМўЕФгХЯШМЖ
ЁЁЁЁANSIBLE_CONFIG#вЛИіХфжУЮФМўЃЈзюИпгХЯШМЖ1ЃЉ
ЁЁЁЁansible.cfg#ЕБЧАЯюФПФПТМжаЃЈ2ЃЉ
ЁЁЁЁ.ansible.cfg#ЕБЧАжДаагУЛЇЕФМвФПТМЃЈ3ЃЉ
ЁЁЁЁ/etc/ansible/ansible.cfg#ХфжУЮФМўжаЃЈ4ЃЉ
ЁЁЁЁ1.ЖЈвхХфжУЮФМў
ЁЁЁЁ[root@manager ~]# export ANSIBLE_CONFIG="/tmp/ansible.cfg"#ЖЈвхвЛИіansible
ЁЁЁЁ[root@manager ~]# touch /tmp/ansible.cfg
ЁЁЁЁ[root@manager ~]# ansible --version
ЁЁЁЁansible 2.8.5
ЁЁЁЁ config file = /tmp/ansible.cfg
ЁЁЁЁ configured module search path = [u'/root/.ansible/plugins/modules', u'/usr/share/ansible/plugins/modules']
ЁЁЁЁ ansible python module location = /usr/lib/python2.7/site-packages/ansible
ЁЁЁЁ executable location = /usr/bin/ansible
ЁЁЁЁ python version = 2.7.5 (default, Oct 30 2018, 23:45:53) [GCC 4.8.5 20150623 (Red Hat 4.8.5-36)]
ЁЁЁЁ2ЁЃдкprojcet1ЩЯВщПДгХЯШМЖ
ЁЁЁЁ[root@manager ~]# mkdir /project1
ЁЁЁЁ[root@manager ~]# touch /project1/ansible.cfg
ЁЁЁЁ[root@manager project1]# ansible --version
ЁЁЁЁansible 2.8.5
ЁЁЁЁ config file = /root/project1/ansible.cfg
ЁЁЁЁ configured module search path = [u'/root/.ansible/plugins/modules', u'/usr/share/ansible/plugins/modules']
ЁЁЁЁ ansible python module location = /usr/lib/python2.7/site-packages/ansible
ЁЁЁЁ executable location = /usr/bin/ansible
ЁЁЁЁ python version = 2.7.5 (default, Oct 30 2018, 23:45:53) [GCC 4.8.5 20150623 (Red Hat 4.8.5-36)]
ЁЁЁЁ3ЁЃдкprojcet2ЩЯВщПДгХЯШМЖ
ЁЁЁЁ[root@manager ~]# mkdir /project2
ЁЁЁЁ[root@manager ~]# touch /project2/ansible.cfg
ЁЁЁЁ[root@manager project1]# ansible --version
ЁЁЁЁansible 2.8.5
ЁЁЁЁ config file = /root/project2/ansible.cfg
ЁЁЁЁ configured module search path = [u'/root/.ansible/plugins/modules', u'/usr/share/ansible/plugins/modules']
ЁЁЁЁ ansible python module location = /usr/lib/python2.7/site-packages/ansible
ЁЁЁЁ executable location = /usr/bin/ansible
ЁЁЁЁ python version = 2.7.5 (default, Oct 30 2018, 23:45:53) [GCC 4.8.5 20150623 (Red Hat 4.8.5-36)]
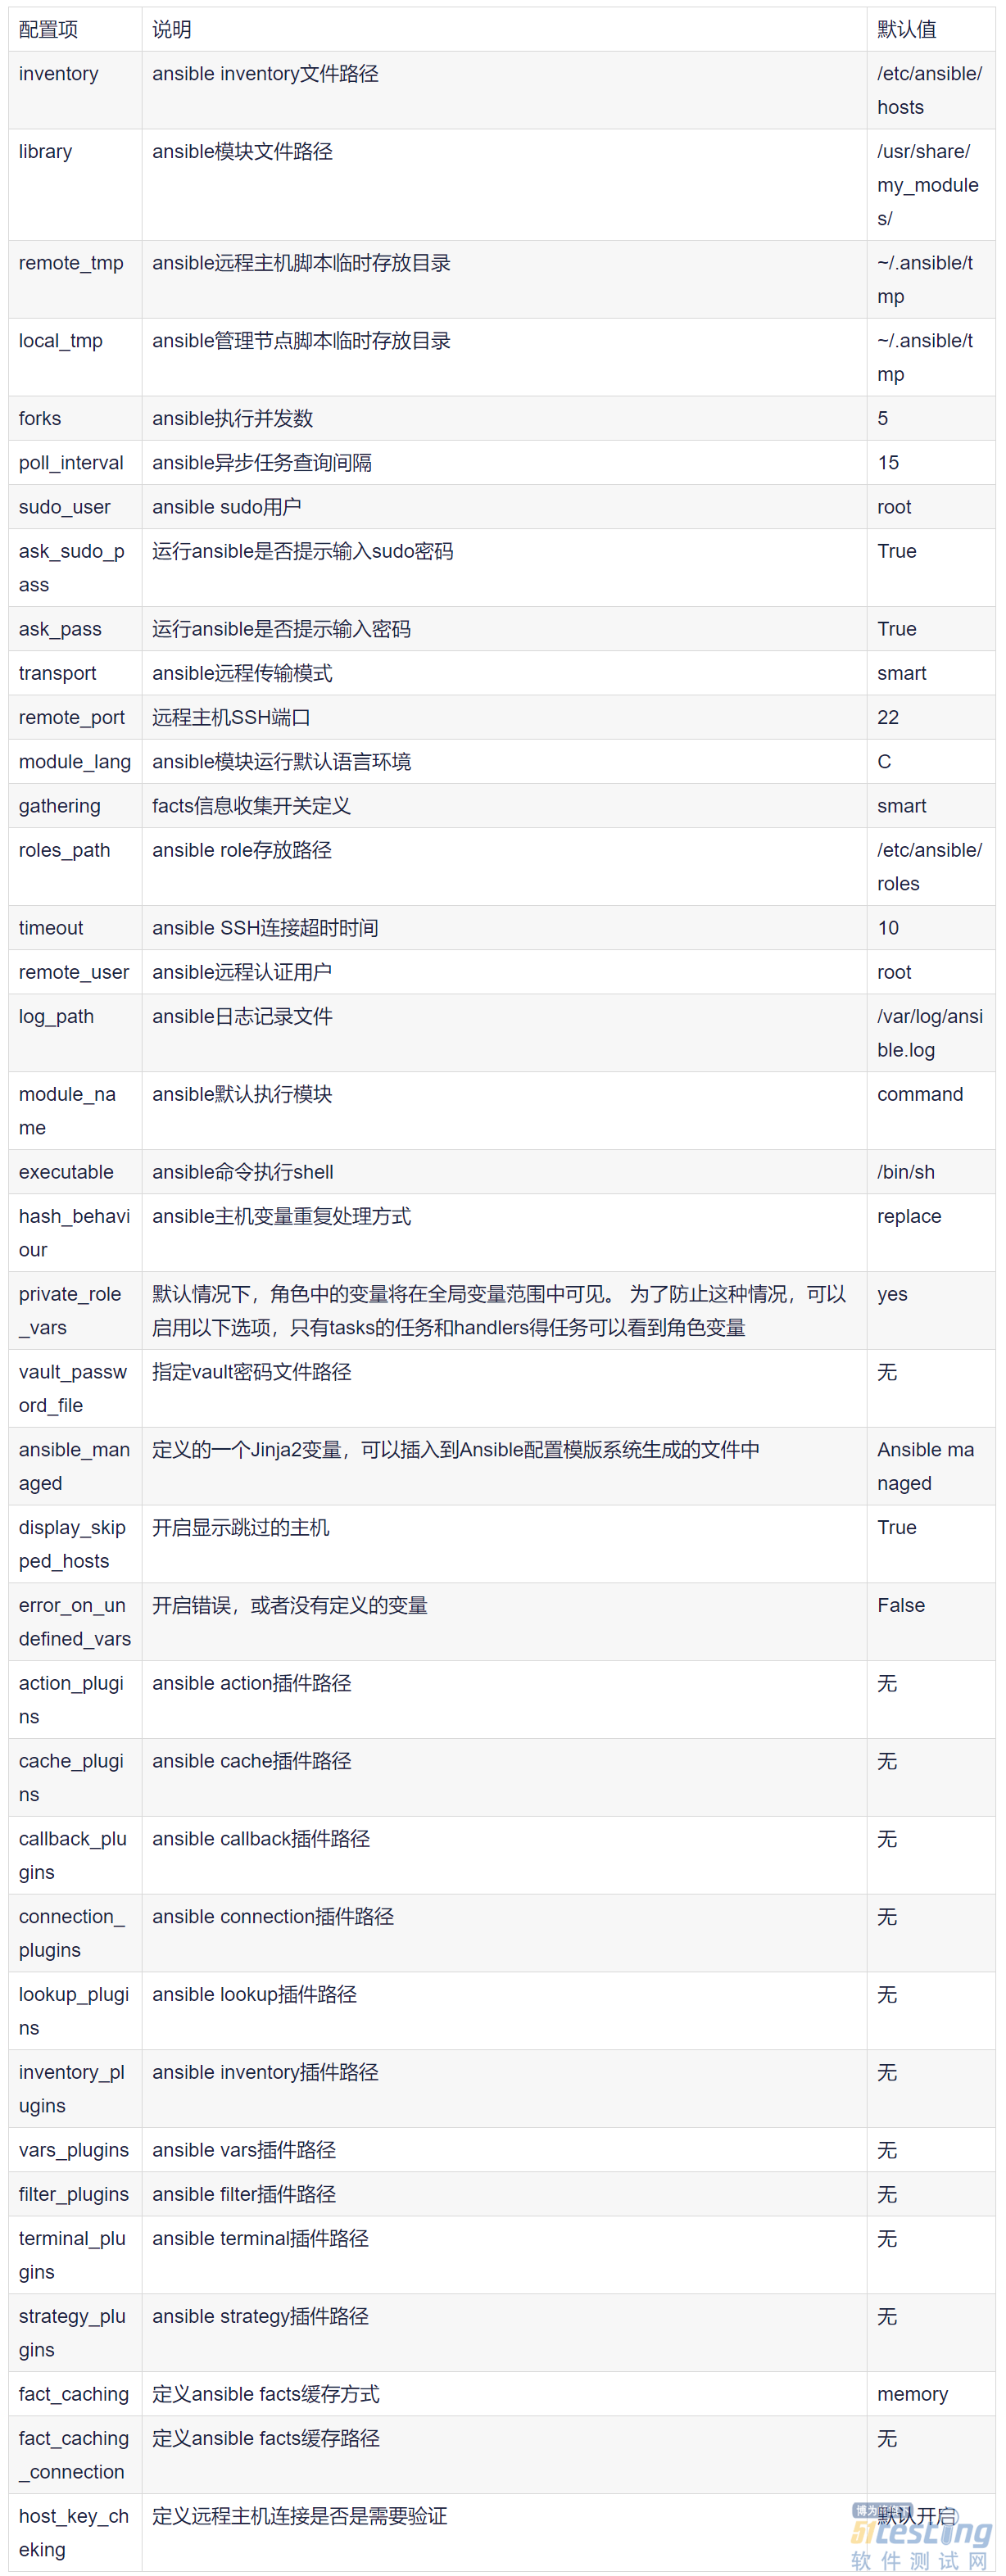
ЁЁЁЁХфжУбЁЯюЯъНт
ЁЁЁЁ6.ansibleinventoryжїЛњЧхЕЅ
ЁЁЁЁ1ЃЉЛљгкipЕижЗ+УмТыЕФЗНЪН
ЁЁЁЁ[root@manager project1]# vim hosts
ЁЁЁЁ[webservers]#ЖЈвхзщУћ
ЁЁЁЁ172.16.1.7 ansible_ssh_user='root' ansible_ssh_pass='1'
ЁЁЁЁ172.16.1.8 ansible_ssh_user='root' ansible_ssh_pass='1'
ЁЁЁЁ2ЃЉЛљгкУмдПЕФЗНЪН
ЁЁЁЁ1.ДДНЈУмдП
ЁЁЁЁ[root@manager ~]# mkdir .ssh #ДДНЈУмдПЫљашвЊДцЗХЕФФПТМ
ЁЁЁЁ[root@manager ~]# ssh-keygen -t rsa -b 4096#ЩњГЩУмдПЃЌвЛТЗЛиГЕ
ЁЁЁЁ2.НЋЙЋдПЭЦЫЭжСЖдЖЫжїЛњ
ЁЁЁЁ[root@manager ~]# ssh-copy-id -i ~/.ssh/id_rsa.pub root@172.16.1.7
ЁЁЁЁ[root@manager ~]# ssh-copy-id -i ~/.ssh/id_rsa.pub root@172.16.1.8
ЁЁЁЁ3.ХфжУзщ
ЁЁЁЁ[root@manager project1]# vim hosts
ЁЁЁЁ[webservers]
ЁЁЁЁ172.16.1.7
ЁЁЁЁ172.16.1.8
ЁЁЁЁ3ЃЉГЁОАШ§ЃЌжїЛњзщЪЙгУЗНЪН
ЁЁЁЁ3.ГЁОАШ§ЁЂжїЛњзщЪЙгУЗНЪН
ЁЁЁЁ[lbservers] #ЖЈвхlbserversзщ
ЁЁЁЁ172.16.1.5 172.16.1.6
ЁЁЁЁ[webservers] #ЖЈвхwebserverзщ
ЁЁЁЁ172.16.1.7 172.16.1.8
ЁЁЁЁ[servers:children] #ЖЈвхserversзщАќРЈСНИізгзщ[lbservers,webserver]
ЁЁЁЁlbservers webserver
ЁЁЁЁ4ЃЉВщПДзщЫљгааХЯЂ
ЁЁЁЁ[root@manager project1]# ansible all --list-host -i hosts
ЁЁЁЁ hosts (2):
ЁЁЁЁ 172.16.1.7
ЁЁЁЁ 172.16.1.8
ЁЁЁЁAnsibleГЃгУФЃПщ
ЁЁЁЁ1.ЪВУДЪЧad-hoc
ЁЁЁЁad-hocМђЖјбджЎОЭЪЧСйЪБУќСюЃЌжДааЭъОЭНсЪјЃЌВЛЛсБЃДцЁЃ
ЁЁЁЁ2.ad-hocФЃЪНЕФЪЙгУГЁОА
ЁЁЁЁЖрЬЈжїЛњВщПДФГИіНјГЬЪЧЗёЦєЖЏЃЌЛђПНБДжИЖЈЮФМўЕНБОЕиЁЃ
ЁЁЁЁ3.ad-hocФЃЪНУќСюЕФЪЙгУ
ЁЁЁЁansible oldboy -m command -a 'df -h'
ЁЁЁЁ4.ЪЙгУad-hocжДаавЛДЮдЖГЬУќСюЃЌзЂвтЙлВьЗЕЛиНсЙћЕФбеЩЋ
ЁЁЁЁТЬЩЋЃКДњБэБЛЙмРэЖЫжїЛњУЛгаБЛаоИФЁЃ
ЁЁЁЁЛЦЩЋЃКДњБэБЛЙмРэЖЫжїЛњаоИФГЩЙІЁЃ
ЁЁЁЁщйКьЩЋЃКДњБэГіЯжСЫЙЪеЯЁЃ
ЁЁЁЁ5.ansibleФЃПщ
ЁЁЁЁcommand#жДааУќСюФЌШЯВЛжЇГжЙмЕР
ЁЁЁЁshell#жДааУќСюжЇГжЙмЕР
ЁЁЁЁyum_reposity#yumВжПтХфжУ
ЁЁЁЁyum#yumАВзАШэМў
ЁЁЁЁget_url#КЭliunxЕФ wget вЛжТ
ЁЁЁЁcopy#ПНБДХфжУЮФМў
ЁЁЁЁserver|systemd#ЦєЖЏЗўЮё
ЁЁЁЁuser#ДДНЈгУЛЇ
ЁЁЁЁgroup#ДДНЈзщ
ЁЁЁЁfile#ДДНЈФПТМЁЂДДНЈЮФМўЁЂЕнЙщЪкШЈ
ЁЁЁЁmount#Йвди
ЁЁЁЁcron#ЖЈЪБШЮЮё
ЁЁЁЁfirewalld#ЗРЛ№ЧН
ЁЁЁЁselinux#selinux
ЁЁЁЁcommand
ЁЁЁЁansible webservers -a "ps axu|grep nginx" -i hosts #ВЛжЇГжЙмЕР(МђЕЅУќСюЁЂЕЅЬѕУќСю)
ЁЁЁЁshell
ЁЁЁЁansible webservers -m shell -a "ps axu|grep nginx" i hosts #жЇГжЙмЕР
ЁЁЁЁyum
ЁЁЁЁstateЃК
ЁЁЁЁpresentАВзА
ЁЁЁЁabsentаЖди
ЁЁЁЁlatestзюаТ
ЁЁЁЁenablerepo#жИЖЈЪЙгУФГИіВжПт
ЁЁЁЁdisablerepo#жИЖЈХХГ§ФГИіВжПт
ЁЁЁЁ#1.АВзАзюаТЕФhttpdЗўЮё,ХХГ§webtatic-phpИУВжПт
ЁЁЁЁ[root@manager project1]# ansible webserver -m yum -a "name=httpd state=latest disablerepo=webtatic-php" -i hosts
ЁЁЁЁ#2.вЦГ§httpdЗўЮё
ЁЁЁЁ[root@manager project1]# ansible webserver -m yum -a "name=httpd state=absent" -i hosts
ЁЁЁЁ#3.АВзАhttpdжИЖЈДгФГИіВжПтАВзА
ЁЁЁЁ[root@manager project1]# ansible webserver -m yum -a "name=httpd state=latest enablerepo=testing" -i hosts
ЁЁЁЁ#4.ЭЈЙ§urlЗНЪННјааАВзА
ЁЁЁЁ[root@manager project1]# ansible webservers -m yum -a "name=https://mirrors.aliyun.com/zabbix/zabbix/3.0/ rhel/7/x86_64/zabbix-agent-3.0.0-1.el7.x86_64.rpm state=present disablerepo=webtatic-php" -i hosts
ЁЁЁЁ#5.ЭЈЙ§ШэМўАќАВзА
ЁЁЁЁ- name: install nginx rpm from a local file (ШэМўАќ БиаыдкБЛПиЖЫжїЛњ) [root@manager project1]# ansible webservers -m yum -a "name=/root/zabbix-agent-4.0.0-2.el7.x86_64.rpm state=present disablerepo=webtatic-php" -i hosts
ЁЁЁЁcopy
ЁЁЁЁsrc#БОЕиТЗОЖЃЌПЩвдЪЧЯрЖдЃЌПЩвдЪЧОјЖд
ЁЁЁЁdest#ФПБъЮЛжУ
ЁЁЁЁowner#Ъєжї
ЁЁЁЁgroup#Ъєзщ
ЁЁЁЁmode#ШЈЯо
ЁЁЁЁbackup#БИЗн
ЁЁЁЁ#ПНБДБОЕиЮФЕЕЕНЖдЖЫжїЛњ
ЁЁЁЁ[root@manager project1]# ansible webservers -m copy -a "src=./file/ansible.oldxu.com.conf dest=/etc/nginx/conf.d/ansible.oldxu.com.conf owner=root group=root mode=644" -i hosts
ЁЁЁЁ#ПНБДБОЕиЮФЕЕЕНЖдЖЫжїЛњЃЌВЂБИЗндДЮФМў
ЁЁЁЁ[root@manager project1]# ansible webservers -m copy -a "src=./file/ansible.oldxu.com.conf dest=/etc/nginx/conf.d/ansible.oldxu.com.conf owner=root group=root mode=644 backup=yes" -i hosts
ЁЁЁЁservice/systemd
ЁЁЁЁstate
ЁЁЁЁstarted#ЦєЖЏ
ЁЁЁЁstopped#ЭЃжЙ
ЁЁЁЁrestarted#жиЦє
ЁЁЁЁreloaded#жиди
ЁЁЁЁ
ЁЁЁЁenabled#ЪЧЗёПЊЛњздЦє
ЁЁЁЁyes#ЪЧ
ЁЁЁЁno#Зё
ЁЁЁЁ
ЁЁЁЁ[root@manager project1]# ansible webservers -m systemd -a "name=nginx state=restarted enabled=yes" -i hosts
ЁЁЁЁfile
ЁЁЁЁ#ДДНЈ /code/ansible
ЁЁЁЁpath#ТЗОЖ
ЁЁЁЁstate
ЁЁЁЁtouch#ДДНЈЮФМў
ЁЁЁЁdirectory#ДДНЈФПТМ
ЁЁЁЁowner#Ъєжї
ЁЁЁЁgroup#Ъєзщ
ЁЁЁЁmode#ШЈЯо
ЁЁЁЁ#зМБИеОЕу
ЁЁЁЁ[root@manager project1]# ansible webservers -m file -a "path=/code/ansible state=directory mode=755 owner=www group=www" -i hosts
ЁЁЁЁ#зМБИеОЕуДњТы
ЁЁЁЁ[root@manager project1]# ansible webservers -m copy -a "src=./file/index.html dest=/code/ansible/index.html owner=www group=www mode=644" -i hosts
ЁЁЁЁuser group
ЁЁЁЁ[root@manager project1]# ansible webservers -m group -a "name=www gid=666 state=present" -i hosts
ЁЁЁЁ#user
ЁЁЁЁname#УћГЦ
ЁЁЁЁuid#uid
ЁЁЁЁgroup#зщУћЛђgid
ЁЁЁЁcreate_home#ЪЧЗёДДНЈМвФПТМ
ЁЁЁЁsystem#ЪЧЗёзїЮЊЯЕЭГзщ
ЁЁЁЁshell#ЕЧТМshell
ЁЁЁЁstate#зДЬЌ
ЁЁЁЁpresentДДНЈФЌШЯ
ЁЁЁЁabsentЩОГ§
ЁЁЁЁremove#МгЩЯremoveЧхГ§МвФПТМ
ЁЁЁЁgroups#ИНМгзщ
ЁЁЁЁappend#
ЁЁЁЁpassword#ДДНЈУмТы
ЁЁЁЁ# ГЬађЪЙгУ www 666 666 /sbin/nologin /home -->Юо
ЁЁЁЁ[root@manager project1]# ansible webservers -m user -a "name=www uid=666 group=666 create_home=no shell=/sbin/nologin state=present" -i hosts
ЁЁЁЁ# е§ГЃгУЛЇ oldxu 1000 1000 /bin/bash /home/oldxu
ЁЁЁЁ[root@manager project1]# ansible webservers -m user -a "name=oldxu" -i hosts
ЁЁЁЁ# вЦГ§oldxuгУЛЇ,ВЂЩОГ§МвФПТМЫљгаФкШн.
ЁЁЁЁ[root@manager project1]# ansible webservers -m user -a "name=oldxu state=absent remove=yes" -i hosts
ЁЁЁЁ# ДДНЈ otherгУЛЇ.гаСНИіИНМгзщroot bin,ДДНЈМвФПТМ,жИЖЈЕЧТМ shell,ЩшЖЈУмТы123
ЁЁЁЁ#ЩњГЩвЛИіУмТы
ЁЁЁЁansible all -i localhost, -m debug -a "msg={{ '123' | password_hash('sha512', 'mysecretsalt') }}"
ЁЁЁЁ[root@manager project1]# ansible webservers -m user -a 'name=other groups='root,bin' create_home=yes shell=/bin/bash password="$6$mysecretsalt$gIIYs0Xgc7sSQkH.zKaz8/Afa MomYzR1QZYtccwmJcUt8VpLq4D055UCCX4MlwgePOP80ZRwhppv BF72RIAVi/"' -i hosts
ЁЁЁЁmount
ЁЁЁЁ#ЬсЧАзМБИКУnfsЗўЮёЖЫ
ЁЁЁЁ[root@web01 ~]# showmount -e 172.16.1.31
ЁЁЁЁExport list for 172.16.1.31:
ЁЁЁЁ/data/zrlog 172.16.1.0/24
ЁЁЁЁ/data/zh 172.16.1.0/24
ЁЁЁЁ/data/edu 172.16.1.0/24
ЁЁЁЁ/data/blog 172.16.1.0/24
ЁЁЁЁ#гУЙмРэЖЫВйзїБЛПиЖЫ,ШУБЛПиЖЫЙвдиnfsДцДЂЪ§Он
ЁЁЁЁpresent #аДШы/etc/fstab
ЁЁЁЁabsent #аЖди/etc/fstab
ЁЁЁЁmounted #СйЪБЙвди
ЁЁЁЁunmounted #аЖдиЕБЧАЙвди
ЁЁЁЁ#ЙвдиЙ§ГЬжа,ШчЙћФПТМВЛДцдк,дђЛсДДНЈИУФПТМ
ЁЁЁЁ[root@manager project1]# ansible webservers -m mount -a "src=172.16.1.31:/data/zrlog path=/test_zrlog fstype=nfs opts=defaults state=mounted" -i hosts
ЁЁЁЁ#аЖдиЙ§ГЬжаЃЌЛсАбИУФПТМЩОГ§
ЁЁЁЁ[root@manager project1]# ansible webservers -m mount -a "src=172.16.1.31:/data/zrlog path=/test_zrlog fstype=nfs opts=defaults state=unmounted" -i hosts
ЁЁЁЁДэЮѓЪЕР§ЃК
ЁЁЁЁ[root@manager project1]# ansible webservers -m mount -a "src=172.16.1.31:/data/blog fstype=nfs opts=defaults state=mounted" -i hosts
ЁЁЁЁ172.16.1.7 | FAILED! => {
ЁЁЁЁ "ansible_facts": {
ЁЁЁЁ "discovered_interpreter_python": "/usr/bin/python"
ЁЁЁЁ },
ЁЁЁЁ "changed": false,
ЁЁЁЁ "msg": "missing required arguments: path"
ЁЁЁЁ}
ЁЁЁЁ172.16.1.8 | FAILED! => {
ЁЁЁЁ "ansible_facts": {
ЁЁЁЁ "discovered_interpreter_python": "/usr/bin/python"
ЁЁЁЁ },
ЁЁЁЁ "changed": false,
ЁЁЁЁ "msg": "missing required arguments: path"
ЁЁЁЁ}
ЁЁЁЁcron
ЁЁЁЁminute #Зж
ЁЁЁЁhour #ЪБ
ЁЁЁЁday #Ше
ЁЁЁЁmonth #дТ
ЁЁЁЁweek #жм
ЁЁЁЁjob #жДааШЮЮёЕФУќСю
ЁЁЁЁ#діМгЖЈЪБШЮЮё
ЁЁЁЁ[root@manager project1]# ansible webservers -m cron -a 'name=test_job minute=00 hour=02 job="/bin/bash /server/scripts/client_to_data_server.sh &>/dev/null"' -i hosts
ЁЁЁЁ#вЦГ§ЖЈЪБШЮЮё
ЁЁЁЁ[root@manager project1]# ansible webservers -m cron -a 'name=test job="/bin/bash /server/scripts/test.sh &>/dev/null" state=absent' -i hosts
ЁЁЁЁfirewalld
ЁЁЁЁ1.ПЊЦєЗРЛ№ЧН
ЁЁЁЁ[root@manager project1]# ansible webservers -m systemd -a "name=firewalld state=started" -i hosts
ЁЁЁЁ2.еыЖдЗўЮё
ЁЁЁЁ[root@manager project1]# ansible webservers -m firewalld -a "service=http state=enabled" -i hosts
ЁЁЁЁ3.еыЖдЖЫПк
ЁЁЁЁ[root@manager project1]# ansible webservers -m firewalld -a "port=9999/tcp state=enabled" -i hosts
ЁЁЁЁ4.еыЖдsourceРДдД
ЁЁЁЁ[root@manager project1]# ansible webservers -m firewalld -a "source=172.16.1.0/24 state=enabled permanent=yes" -i hosts
ЁЁЁЁ172.16.1.8 | CHANGED => {
ЁЁЁЁ "ansible_facts": {
ЁЁЁЁ "discovered_interpreter_python": "/usr/bin/python"
ЁЁЁЁ },
ЁЁЁЁ "changed": true,
ЁЁЁЁ "msg": "Permanent operation, Added 172.16.1.0/24 to zone public"
ЁЁЁЁ}
ЁЁЁЁ172.16.1.7 | CHANGED => {
ЁЁЁЁ "ansible_facts": {
ЁЁЁЁ "discovered_interpreter_python": "/usr/bin/python"
ЁЁЁЁ },
ЁЁЁЁ "changed": true,
ЁЁЁЁ "msg": "Permanent operation, Added 172.16.1.0/24 to zone public"
ЁЁЁЁ}
ЁЁЁЁ5.еыЖдrule
ЁЁЁЁ[root@manager project1]# ansible webservers -m firewalld -a 'rich_rule="rule family=ipv4 source address=10.0.0.1/32 service name=http accept" state=enabled' -i hosts
ЁЁЁЁselinux
ЁЁЁЁ[root@manager project1]# ansible webservers -m selinux -a "state=disabled" -i hosts
ЁЁЁЁБОЮФФкШнВЛгУгкЩЬвЕФПЕФЃЌШчЩцМАжЊЪЖВњШЈЮЪЬтЃЌЧыШЈРћШЫСЊЯЕ51TestingаЁБр(021-64471599-8017)ЃЌЮвУЧНЋСЂМДДІРэ


