

Java代码的质量管理,分为三个方面:
· 代码风格
· 代码静态分析
· 单元测试
这刚好是三个递进的层次:代码看起来如何 -> 代码分析起来如何 -> 代码跑起来如何, Java在这几个方面都提供了非常优秀的工具和几乎无缝的Eclipse集成。
#代码风格
这个主要由Eclipse管理,设置在Preference/Java/Code Style中, 包括:
· Cleanup - 自动添加/删除/修改代码以更好的符合代码标准, 可以通过选中文件/文件夹,然后右键/Source/Cleanup运行.
· Code Template - 添加代码片段或者注释时使用的模板,注释可以通过Alt+Shift+J插入
· Formatter - 自动格式化代码,与Cleanup不同之处是只改变格式,通过Ctrl+Shift+F运行,如果要处理整理项目,可以选中项目文件夹/右键/Source/Format进行格式化,还有个自动化的方法是通过Save Action在保存时自动格式化
· Organize Imports - 自动添加import,自动排序import, 快捷键为Ctrl+Shift+O
Eclipse对于代码风格的支持是如此的强大以至于你很难写出不符合标准的代码 - 这点对于C++来讲,Visual Studio的支持就逊色的多了。
#代码静态分析
-Check Style
Check Style基于源代码进行分析,最初版本是提供一些代码风格的检查,但后来逐步增加了功能,也会检查一些基本的代码设计上的问题,比如函数参数应该为final,不需要override的函数,应该是final的之类的。
Check Style可以在Preference/Check Style中进行配置,如果你想disable某些选项,你需要copy一份自己的设置先, CheckStyle Configuration对话框即可以用来配置,也是查看各个style解释的绝好地方:

在开发的时候直接使用Eclipse编译调试,但在发布的时候,一般还会使用ant来编译一个最终的jar或者war出来,况且,如果需要跑CI,ant编译脚本必不可少,checkstyle也提供了ant task:
<target name="checkstyle" description="Run check styles"> <mkdir dir="${checkstyle.dir}" /> <checkstyle config="${checkstyleinstall.dir}/sun_checks.xml"> <fileset dir="${src.dir}" includes="**/*.java" /> <fileset dir="${test.dir}" includes="**/*.java" /> <formatter type="plain" /> <formatter type="xml" toFile="${checkstyle.dir}/checkstyle_errors.xml" /> </checkstyle> </target> |
-Findbugs
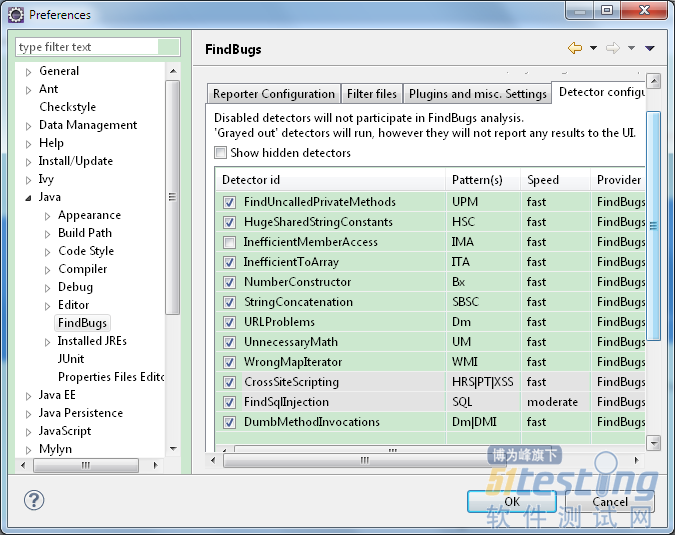
Findbugs基于bytecode分析,但可以没有source code,它主要是分析代码中bug pattern (容易引发bug的代码写法),其配置,或者说reference,可以在Preference/Java/Findbugs/Detector Configuration中找到,主要包括几个不同的category:Malicious code vulnerability, Dodge code, Bad practice, Correctness, Internationalization, Performance, Security, Multithreaded correctness, Experimental。另外, Findbugs采用的是plugin architecture,用户可以方便的植入自己特定的检查。
Findbugs还提供了一些annotation,如NonNull, CheckForNull等,通过用户的配合进行更好的检查。
除了Eclipse的plugin,Findbugs也提供了ant task:
<target name="findbugs" depends="jar"> <mkdir dir="${findbugs.dir}" /> <findbugs home="${findbugs.home}" output="xml" outputFile="${findbugs.dir}\interviewerportal-findbugs.xml"> <sourcePath path="${src.dir}" /> <class location="${target.jar.name}" /> </findbugs> </target> |
#单元测试
自然是JUnit,使用非常简单,知道@Test和Assert就可以写testcase了, 进一步就是使用TestFixture(@Before, @After, @BeforeClass, @AfterClass)写一拨testcase,其他详细点的,基本看看JUnit FAQ就搞定了:http://junit.sourceforge.net/doc/faq/faq.htm
同样,也可以放到ant中:
<path id="classpath"> <fileset file="${target.jar.name}" /> </path> <target name="junit" depends="jar"> <mkdir dir="${report.dir}" /> <junit printsummary="yes"> <classpath> <path refid="classpath" /> </classpath> <formatter type="xml" /> <batchtest todir="${report.dir}"> <fileset dir="${test.dir}" includes="**/*Test.java" /> </batchtest> </junit> </target> <target name="junitreport" depends="junit"> <junitreport todir="${report.dir}"> <fileset dir="${report.dir}" includes="TEST-*.xml" /> <report todir="${report.dir}" /> </junitreport> </target> |
另外,Junit只是个工具,用好工具是一方面,写出好的testcase又是另外一回事,这本小书值得一读:《单元测试之道》, 尤其是第四章和第五章,讲了如何来设计测试用例。
本文内容不用于商业目的,如涉及知识产权问题,请权利人联系博为峰小编(021-64471599-8017),我们将立即处理


