

NetDiscover是一款基于Vert.x、RxJava2实现的爬虫框架。我最近添加了两个模块:Selenium模块、DSL模块。
一. Selenium模块
添加这个模块的目的是为了让它能够模拟人的行为去操作浏览器,完成爬虫抓取的目的。
Selenium是一个用于Web应用程序测试的工具。Selenium测试直接运行在浏览器中,就像真正的用户在操作一样。支持的浏览器包括IE(7, 8, 9, 10, 11),Mozilla Firefox,Safari,Google Chrome,Opera等。这个工具的主要功能包括:测试与浏览器的兼容性——测试你的应用程序看是否能够很好得工作在不同浏览器和操作系统之上。测试系统功能——创建回归测试检验软件功能和用户需求。支持自动录制动作和自动生成 .Net、Java、Perl等不同语言的测试脚本。
Selenium包括了一组工具和API:Selenium IDE,Selenium RC,Selenium WebDriver,和Selenium Grid。
其中,Selenium WebDriver 是一个支持浏览器自动化的工具。它包括一组为不同语言提供的类库和”驱动“(drivers)可以使浏览器上的动作自动化。
1.1 适配多个浏览器
正是得益于Selenium WebDriver ,Selenium模块可以适配多款浏览器。目前在该模块中支持Chrome、Firefox、IE以及PhantomJS(PhantomJS是一个无界面的,可脚本编程的WebKit浏览器引擎)。
package com.cv4j.netdiscovery.selenium; import org.openqa.selenium.WebDriver; import org.openqa.selenium.chrome.ChromeDriver; import org.openqa.selenium.firefox.FirefoxDriver; import org.openqa.selenium.ie.InternetExplorerDriver; import org.openqa.selenium.phantomjs.PhantomJSDriver; import org.openqa.selenium.remote.CapabilityType; import org.openqa.selenium.remote.DesiredCapabilities; /** * Created by tony on 2018/1/28. */ public enum Browser implements WebDriverInitializer { CHROME { @Override public WebDriver init(String path) { System.setProperty("webdriver.chrome.driver", path); return new ChromeDriver(); } }, FIREFOX { @Override public WebDriver init(String path) { System.setProperty("webdriver.gecko.driver", path); return new FirefoxDriver(); } }, IE { @Override public WebDriver init(String path) { System.setProperty("webdriver.ie.driver", path); return new InternetExplorerDriver(); } }, PHANTOMJS { @Override public WebDriver init(String path) { DesiredCapabilities capabilities = new DesiredCapabilities(); capabilities.setCapability("phantomjs.binary.path", path); capabilities.setCapability(CapabilityType.ACCEPT_SSL_CERTS, true); capabilities.setJavascriptEnabled(true); capabilities.setCapability("takesScreenshot", true); capabilities.setCapability("cssSelectorsEnabled", true); return new PhantomJSDriver(capabilities); } } } |
1.2 WebDriverPool
之所以使用WebDriverPool,是因为每次打开一个WebDriver进程都比较耗费资源,所以创建一个对象池。我使用Apache的Commons Pool组件来实现对象池化。
packagecom.cv4j.netdiscovery.selenium.pool; importorg.apache.commons.pool2.impl.GenericObjectPool; importorg.openqa.selenium.WebDriver; /** *Createdbytonyon2018/3/9. */ publicclassWebDriverPool{ privatestaticGenericObjectPool<WebDriver>webDriverPool=null; /** *如果需要使用WebDriverPool,则必须先调用这个init()方法 * *@paramconfig */ publicstaticvoidinit(WebDriverPoolConfigconfig){ webDriverPool=newGenericObjectPool<>(newWebDriverPooledFactory(config)); webDriverPool.setMaxTotal(Integer.parseInt(System.getProperty( "webdriver.pool.max.total","20")));//最多能放多少个对象 webDriverPool.setMinIdle(Integer.parseInt(System.getProperty( "webdriver.pool.min.idle","1")));//最少有几个闲置对象 webDriverPool.setMaxIdle(Integer.parseInt(System.getProperty( "webdriver.pool.max.idle","20")));//最多允许多少个闲置对象 try{ webDriverPool.preparePool(); }catch(Exceptione){ thrownewRuntimeException(e); } } publicstaticWebDriverborrowOne(){ if(webDriverPool!=null){ try{ returnwebDriverPool.borrowObject(); }catch(Exceptione){ thrownewRuntimeException(e); } } returnnull; } publicstaticvoidreturnOne(WebDriverdriver){ if(webDriverPool!=null){ webDriverPool.returnObject(driver); } } publicstaticvoiddestory(){ if(webDriverPool!=null){ webDriverPool.clear(); webDriverPool.close(); } } publicstaticbooleanhasWebDriverPool(){ returnwebDriverPool!=null; } } |
1.3 SeleniumAction
Selenium 可以模拟浏览器的行为,例如点击、滑动、返回等等。这里抽象出一个SeleniumAction类,用于表示模拟的事件。
package com.cv4j.netdiscovery.selenium.action; import org.openqa.selenium.By; import org.openqa.selenium.WebDriver; /** * Created by tony on 2018/3/3. */ public abstract class SeleniumAction { public abstract SeleniumAction perform(WebDriver driver); public SeleniumAction doIt(WebDriver driver) { return perform(driver); } public static SeleniumAction clickOn(By by) { return new ClickOn(by); } public static SeleniumAction getUrl(String url) { return new GetURL(url); } public static SeleniumAction goBack() { return new GoBack(); } public static SeleniumAction closeTabs() { return new CloseTab(); } } |
1.4 SeleniumDownloader
Downloader是爬虫框架的下载器组件,例如可以使用vert.x的webclient、okhttp3等实现网络请求的功能。如果需要使用Selenium,必须要使用SeleniumDownloader来完成网络请求。
SeleniumDownloader类可以添加一个或者多个SeleniumAction。如果是多个SeleniumAction会按照顺序执行。
尤为重要的是,SeleniumDownloader类中webDriver是从WebDriverPool中获取,每次使用完了会将webDriver返回到连接池。
package com.cv4j.netdiscovery.selenium.downloader; import com.cv4j.netdiscovery.core.config.Constant; import com.cv4j.netdiscovery.core.domain.Request; import com.cv4j.netdiscovery.core.domain.Response; import com.cv4j.netdiscovery.core.downloader.Downloader; import com.cv4j.netdiscovery.selenium.action.SeleniumAction; import com.cv4j.netdiscovery.selenium.pool.WebDriverPool; import com.safframework.tony.common.utils.Preconditions; import io.reactivex.Maybe; import io.reactivex.MaybeEmitter; import io.reactivex.MaybeOnSubscribe; import io.reactivex.functions.Function; import org.openqa.selenium.JavascriptExecutor; import org.openqa.selenium.WebDriver; import java.util.LinkedList; import java.util.List; /** * Created by tony on 2018/1/28. */ public class SeleniumDownloader implements Downloader { private WebDriver webDriver; private List<SeleniumAction> actions = new LinkedList<>(); public SeleniumDownloader() { this.webDriver = WebDriverPool.borrowOne(); // 从连接池中获取webDriver } public SeleniumDownloader(SeleniumAction action) { this.webDriver = WebDriverPool.borrowOne(); // 从连接池中获取webDriver this.actions.add(action); } public SeleniumDownloader(List<SeleniumAction> actions) { this.webDriver = WebDriverPool.borrowOne(); // 从连接池中获取webDriver this.actions.addAll(actions); } @Override public Maybe<Response> download(Request request) { return Maybe.create(new MaybeOnSubscribe<String>(){ @Override public void subscribe(MaybeEmitter emitter) throws Exception { if (webDriver!=null) { webDriver.get(request.getUrl()); if (Preconditions.isNotBlank(actions)) { actions.forEach( action-> action.perform(webDriver) ); } emitter.onSuccess(webDriver.getPageSource()); } } }).map(new Function<String, Response>() { @Override public Response apply(String html) throws Exception { Response response = new Response(); response.setContent(html.getBytes()); response.setStatusCode(Constant.OK_STATUS_CODE); response.setContentType(getContentType(webDriver)); return response; } }); } /** * @param webDriver * @return */ private String getContentType(final WebDriver webDriver) { if (webDriver instanceof JavascriptExecutor) { final JavascriptExecutor jsExecutor = (JavascriptExecutor) webDriver; // TODO document.contentType does not exist. final Object ret = jsExecutor .executeScript("return document.contentType;"); if (ret != null) { return ret.toString(); } } return "text/html"; } @Override public void close() { if (webDriver!=null) { WebDriverPool.returnOne(webDriver); // 将webDriver返回到连接池 } } } |
1.5 一些有用的工具类
此外,Selenium模块还有一个工具类。它包含了一些scrollTo、scrollBy、clickElement等浏览器的操作。
还有一些有特色的功能是对当前网页进行截幕,或者是截取某个区域。
public static void taskScreenShot(WebDriver driver,String pathName){ //指定了OutputType.FILE做为参数传递给getScreenshotAs()方法,其含义是将截取的屏幕以文件形式返回。 File srcFile = ((TakesScreenshot)driver).getScreenshotAs(OutputType.FILE); //利用IOUtils工具类的copyFile()方法保存getScreenshotAs()返回的文件对象。 try { IOUtils.copyFile(srcFile, new File(pathName)); } catch (IOException e) { e.printStackTrace(); } } public static void taskScreenShot(WebDriver driver,WebElement element,String pathName) { //指定了OutputType.FILE做为参数传递给getScreenshotAs()方法,其含义是将截取的屏幕以文件形式返回。 File srcFile = ((TakesScreenshot) driver).getScreenshotAs(OutputType.FILE); //利用IOUtils工具类的copyFile()方法保存getScreenshotAs()返回的文件对象。 try { //获取元素在所处frame中位置对象 Point p = element.getLocation(); //获取元素的宽与高 int width = element.getSize().getWidth(); int height = element.getSize().getHeight(); //矩形图像对象 Rectangle rect = new Rectangle(width, height); BufferedImage img = ImageIO.read(srcFile); BufferedImage dest = img.getSubimage(p.getX(), p.getY(), rect.width, rect.height); ImageIO.write(dest, "png", srcFile); IOUtils.copyFile(srcFile, new File(pathName)); } catch (IOException e) { e.printStackTrace(); } } /** * 截取某个区域的截图 * @param driver * @param x * @param y * @param width * @param height * @param pathName */ public static void taskScreenShot(WebDriver driver,int x,int y,int width,int height,String pathName) { //指定了OutputType.FILE做为参数传递给getScreenshotAs()方法,其含义是将截取的屏幕以文件形式返回。 File srcFile = ((TakesScreenshot) driver).getScreenshotAs(OutputType.FILE); //利用IOUtils工具类的copyFile()方法保存getScreenshotAs()返回的文件对象。 try { //矩形图像对象 Rectangle rect = new Rectangle(width, height); BufferedImage img = ImageIO.read(srcFile); BufferedImage dest = img.getSubimage(x, y, rect.width, rect.height); ImageIO.write(dest, "png", srcFile); IOUtils.copyFile(srcFile, new File(pathName)); } catch (IOException e) { e.printStackTrace(); } } |
1.6 使用Selenium模块的实例
在京东上搜索我的新书《RxJava 2.x 实战》,并按照销量进行排序,然后获取前十个商品的信息。
1.6.1 创建多个Actions,并按照顺序执行。
第一步,打开浏览器输入关键字
package com.cv4j.netdiscovery.example.jd; import com.cv4j.netdiscovery.selenium.Utils; import com.cv4j.netdiscovery.selenium.action.SeleniumAction; import org.openqa.selenium.WebDriver; import org.openqa.selenium.WebElement; /** * Created by tony on 2018/6/12. */ public class BrowserAction extends SeleniumAction{ @Override public SeleniumAction perform(WebDriver driver) { try { String searchText = "RxJava 2.x 实战"; String searchInput = "//*[@id=\"keyword\"]"; WebElement userInput = Utils.getWebElementByXpath(driver, searchInput); userInput.sendKeys(searchText); Thread.sleep(3000); } catch (InterruptedException e) { e.printStackTrace(); } return null; } } |
第二步,点击搜索按钮进行搜索
package com.cv4j.netdiscovery.example.jd; import com.cv4j.netdiscovery.selenium.Utils; import com.cv4j.netdiscovery.selenium.action.SeleniumAction; import org.openqa.selenium.By; import org.openqa.selenium.WebDriver; /** * Created by tony on 2018/6/12. */ public class SearchAction extends SeleniumAction { @Override public SeleniumAction perform(WebDriver driver) { try { String searchBtn = "/html/body/div[2]/form/input[4]"; Utils.clickElement(driver, By.xpath(searchBtn)); Thread.sleep(3000); } catch (InterruptedException e) { e.printStackTrace(); } return null; } } |
第三步,对搜索的结果点击”销量“进行排序
packagecom.cv4j.netdiscovery.example.jd; importcom.cv4j.netdiscovery.selenium.Utils; importcom.cv4j.netdiscovery.selenium.action.SeleniumAction; importorg.openqa.selenium.By; importorg.openqa.selenium.WebDriver; /** *按照销量进行排序 *Createdbytonyon2018/6/12. */ publicclassSortActionextendsSeleniumAction{ @Override publicSeleniumActionperform(WebDriverdriver){ try{ StringsaleSortBtn="//*[@id=\"J_filter\"]/div[1]/div[1]/a[2]"; Utils.clickElement(driver,By.xpath(saleSortBtn)); Thread.sleep(3000); }catch(InterruptedExceptione){ e.printStackTrace(); } returnnull; } } |
1.6.2 创建解析类PriceParser
执行上述actions之后,并对返回的html进行解析。将解析后的商品信息传给后面的Pipeline。
package com.cv4j.netdiscovery.example.jd; import com.cv4j.netdiscovery.core.domain.Page; import com.cv4j.netdiscovery.core.parser.Parser; import org.jsoup.Jsoup; import org.jsoup.nodes.Document; import org.jsoup.select.Elements; /** * Created by tony on 2018/6/12. */ public class PriceParser implements Parser{ @Override public void process(Page page) { String pageHtml = page.getHtml().toString(); Document document = Jsoup.parse(pageHtml); Elements elements = document.select("div[id=J_goodsList] li[class=gl-item]"); page.getResultItems().put("goods_elements",elements); } } |
1.6.3 创建Pileline类PricePipeline
用于打印销量最高的前十个商品的信息。
package com.cv4j.netdiscovery.example.jd; import com.cv4j.netdiscovery.core.domain.ResultItems; import com.cv4j.netdiscovery.core.pipeline.Pipeline; import lombok.extern.slf4j.Slf4j; import org.jsoup.nodes.Element; import org.jsoup.select.Elements; /** * Created by tony on 2018/6/12. */ @Slf4j public class PricePipeline implements Pipeline { @Override public void process(ResultItems resultItems) { Elements elements = resultItems.get("goods_elements"); if (elements != null && elements.size() >= 10) { for (int i = 0; i < 10; i++) { Element element = elements.get(i); String storeName = element.select("div[class=p-shop] a").first().text(); String goodsName = element.select("div[class=p-name p-name-type-2] a em").first().text(); String goodsPrice = element.select("div[class=p-price] i").first().text(); log.info(storeName + " " + goodsName + " ¥" + goodsPrice); } } } } |
1.6.4 完成JDSpider
此时,多个action会按照顺序执行,downloader采用SeleniumDownloader。
packagecom.cv4j.netdiscovery.example.jd; importcom.cv4j.netdiscovery.core.Spider; importcom.cv4j.netdiscovery.selenium.Browser; importcom.cv4j.netdiscovery.selenium.action.SeleniumAction; importcom.cv4j.netdiscovery.selenium.downloader.SeleniumDownloader; importcom.cv4j.netdiscovery.selenium.pool.WebDriverPool; importcom.cv4j.netdiscovery.selenium.pool.WebDriverPoolConfig; importjava.util.ArrayList; importjava.util.List; /** *Createdbytonyon2018/6/12. */ publicclassJDSpider{ publicstaticvoidmain(String[]args){ WebDriverPoolConfigconfig=newWebDriverPoolConfig("example/chromedriver",Browser.CHROME);//设置浏览器的驱动程序和浏览器的类型,浏览器的驱动程序要跟操作系统匹配。 WebDriverPool.init(config);//需要先使用init,才能使用WebDriverPool List<SeleniumAction>actions=newArrayList<>(); actions.add(newBrowserAction()); actions.add(newSearchAction()); actions.add(newSortAction()); SeleniumDownloaderseleniumDownloader=newSeleniumDownloader(actions); Stringurl="https://search.jd.com/"; Spider.create() .name("jd") .url(url) .downloader(seleniumDownloader) .parser(newPriceParser()) .pipeline(newPricePipeline()) .run(); } } |
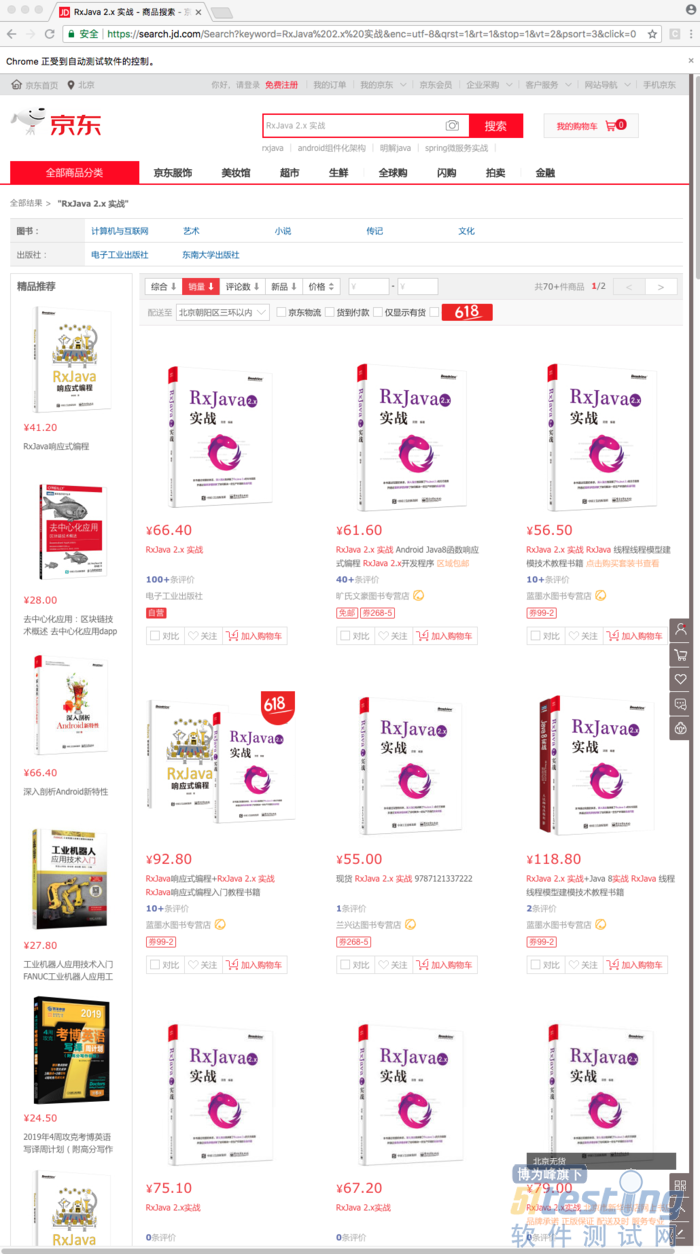
Selenium控制Chrome的行为.png

爬虫显示结果.png
二. DSL模块
该模块是由Kotlin编写的,使用它的特性进行DSL的封装。
package com.cv4j.netdiscovery.dsl import com.cv4j.netdiscovery.core.Spider import com.cv4j.netdiscovery.core.downloader.Downloader import com.cv4j.netdiscovery.core.parser.Parser import com.cv4j.netdiscovery.core.pipeline.Pipeline import com.cv4j.netdiscovery.core.queue.Queue /** * Created by tony on 2018/5/27. */ class SpiderWrapper { var name: String? = null var parser: Parser? = null var queue: Queue? = null var downloader: Downloader? = null var pipelines:Set<Pipeline>? = null var urls:List<String>? = null } fun spider(init: SpiderWrapper.() -> Unit):Spider { val wrap = SpiderWrapper() wrap.init() return configSpider(wrap) } private fun configSpider(wrap:SpiderWrapper):Spider { val spider = Spider.create(wrap?.queue) .name(wrap?.name) var urls = wrap?.urls urls?.let { spider.url(urls) } spider.downloader(wrap?.downloader) .parser(wrap?.parser) wrap?.pipelines?.let { it.forEach { // 这里的it指wrap?.pipelines spider.pipeline(it) // 这里的it指pipelines里的各个pipeline } } return spider } |
举个例子,使用DSL来创建一个爬虫并运行。
val spider = spider {
name = "tony"
urls = listOf("http://www.163.com/","https://www.baidu.com/")
pipelines = setOf(ConsolePipeline())
}
spider.run()
它等价于下面的java代码
Spider.create().name("tony1")
.url("http://www.163.com/", "https://www.baidu.com/")
.pipeline(new ConsolePipeline())
.run();
DSL可以简化代码,提高开发效率,更抽象地构建模型。不过话说回来,DSL也有缺陷,能够表达的功能有限,并且不是图灵完备的。
总结
爬虫框架github地址:https://github.com/fengzhizi715/NetDiscovery
最近,它的更新不是很频繁,因为公司的项目比较忙。不过每次更新我会尽量保证质量。
之后的版本主要是打算结合实时图像处理框架cv4j,以便更好地完善爬虫框架。
上文内容不用于商业目的,如涉及知识产权问题,请权利人联系博为峰小编(021-64471599-8017),我们将立即处理。


