一、安装
pytest支持python 2.6--3.5之间的版本,同时可以在windows、unix系统上安装
安装方式:
| pip install pytest |
安装完成后,可以查看版本:
| pytest --version |
二、第一个测试例子
1.创建test_sample.py文件,创建一个方法、一个用例
# content of test_sample.py def func(x): return x + 1 def test_answer(): assert func(3) == 5 |
2.执行
$ pytest =========================== test session starts ============================ platform linux -- Python 3.x.y, pytest-4.x.y, py-1.x.y, pluggy-0.x.y cachedir: $PYTHON_PREFIX/.pytest_cache rootdir: $REGENDOC_TMPDIR collected 1 item test_sample.py F [100%] ================================= FAILURES ================================= _______________________________ test_answer ________________________________ def test_answer(): > assert func(3) == 5 E assert 4 == 5 E + where 4 = func(3) test_sample.py:5: AssertionError ========================= 1 failed in 0.12 seconds ========================= |
此测试返回失败报告,因为func(3)不返回5。
三、pytest参数
1、-K EXPRESSION
执行某个关键字的用例
用例要匹配给出的表达式;使用python的语法,匹配的范围是文件名、类名、函数名为变量,用and来区分
如下面一段测试用例:
# content of test.py class TestClass(object): def test_zne(self): x = "this" assert 'h' in x def test_two(self): x = "hello" assert hasattr(x, 'check') def test_a(self): assert 1==2 |
运行pytest时带-k参数
| pytest -k "test and TestClass and not test_a" test.py |
结果如下:
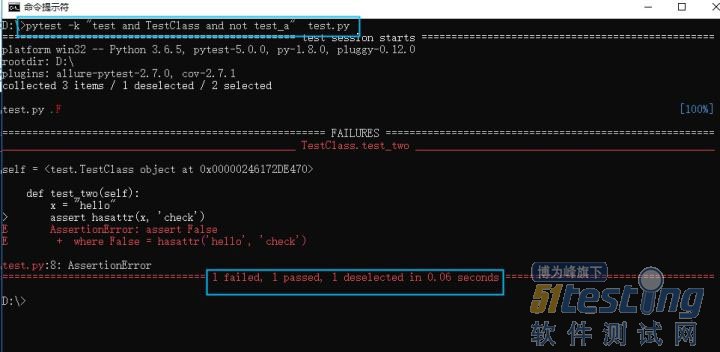
可以看出,test_a这个用例被取消选择了,没有运行了
3、--maxfail=num
当错误个数到达给定数时,退出测试,这里就不列举实例了,结果与-x类似
4、-m MARKEXPR
只能运行有相应标识的测试用例,使用这个参数,测试用例要使用@pytest.mark.marker修饰
如下实例:
# content of test.py import pytest class TestClass(object): def test_one(self): '''new_etests''' x = "this" assert 'h' in x @pytest.mark.slow def test_two(self): '''new_sssetests''' x = "hello" assert hasattr(x, 'check') def test_a(self): assert 1==2 |
teste_two使用了@pytest.mark.slow来修饰
在使用时,使用如下参数
| pytest –m slow test.py |
结果如下:
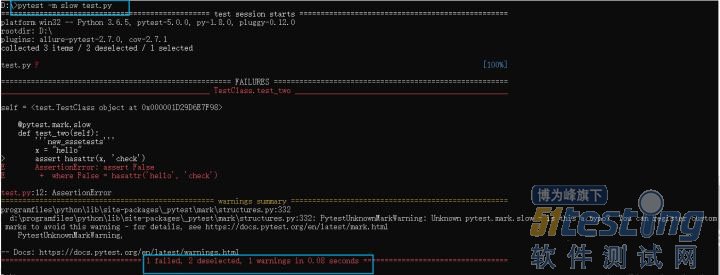
从上图中可以看出,只运行了一个我们带有标识的用例。
注意,-m后面不能带''号(单引号),只能带“”(双引号),不然识别不到
如果要运行多个标识的话,用表达式,如下:
pytest -m "slow or faster" 运行有slow标识或 faster标识用例 pytest -m "slow and faster" 运行有slow和faster标识的用例 pytest -m "slow and not faster" 运行有slow和没有faster标识的用例 |
5、 -v, --verbose
详细结果
6、-q, --quiet
极简结果显示,简化控制台的输出,可以看出输出信息和之前不添加-q不信息不一样, 下图中有两个..点代替了pass结果
7、-s
输入我们用例中的调式信息,比如print的打印信息等,我们在用例中加上一句 print(driver.title),我们再运行一下我们的用例看看,调试信息输出
8、-V
可以输出用例更加详细的执行信息,比如用例所在的文件及用例名称等
9、--junit-xml=path
输出xml文件格式,在与jenkins做集成时使用
10、 --result-log=path
将最后的结果保存到本地文件中
注意:标黄的是经常使用的
四、pytest 用例规则
pytest可以在不同的函数、包中发现用例,发现的规则如下
·文件名以test_开头的py文件
·以test_开头的函数
·以Test开头的类
·以test_开头的方法(与2类似)
·要注意的是所有的包必须要有init.py文件(在使用各种编辑器时会自动生成)
五、pytest运行方式
1.单独执行某一个py文件里所有的用例
| pytest test.py |
2.执行目录下所有用例
| pytest testcase/ |
3.单独执行某个用例
以函数形式的用例 pytest test_login.py::test_1 以类形式的用例 pytest test_login.py::TestClass::test_1 |
六、pytest fixture
pytest支持以xUnit格式型的测试模型(setup/teardown),但还与python自带的unittest还是有一点差别,如下
·模块形式----使用setup_module/teardown_module
·函数形式----使用setup_function/teardown_function
·类形式----使用setup_class/teardown_class
·方法形式---使用setup_method/teardown_method
注意:
1)pytest也可以直接运行unittest模式的测试用例
2)如果你在pytest模式中使用setupClass()函数是不行的,不会识别,但如果用例类继承之unittest.Testcase,还是可以识别的
1、fixture scope的范围参数
之前使用@pytest.fixture(scope='module')来定义框架,scope的参数有以下几种
·function 每一个用例都执行
·class 每个类执行
·module 每个模块执行(函数形式的用例)
·session 每个session只运行一次,在自动化测试时,登录步骤可以使用该session
2、调用fixture的三种方法
2.1函数或类里面方法直接传fixture的函数参数名称
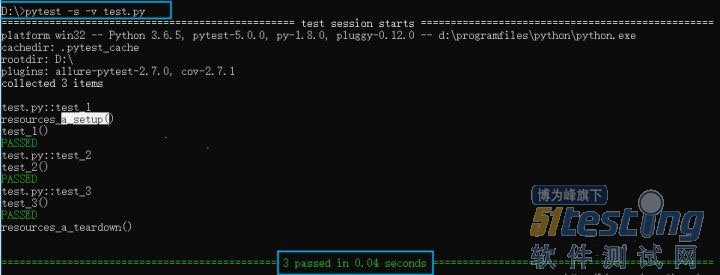
from __future__ import print_function import pytest @pytest.fixture(scope='module') def resource_a_setup(request): print('\nresources_a_setup()') def resource_a_teardown(): print('\nresources_a_teardown()') request.addfinalizer(resource_a_teardown) def test_1(resource_a_setup): print('test_1()') def test_2(): print('\ntest_2()') def test_3(resource_a_setup): print('\ntest_3()') |
使用-s -v运行查看详情如下:
2.2使用装饰器@pytest.mark.usefixtures()修饰需要运行的用例
import pytest # test_fixture1.py @pytest.fixture() def test1(): print('\n开始执行function') @pytest.mark.usefixtures('test1') def test_a(): print('---用例a执行---') @pytest.mark.usefixtures('test1') class TestCase: def test_b(self): print('---用例b执行---') def test_c(self): print('---用例c执行---') if __name__ == '__main__': pytest.main(['-s', 'test_fixture1.py']) 输出结果: platform win32 -- Python 3.7.0, pytest-4.0.2, py-1.7.0, pluggy-0.8.0 rootdir: C:\Program Files\PycharmProjects\exercise, inifile:collected 3 items test_fixture1.py 开始执行function .---用例a执行--- 开始执行function .---用例b执行--- 开始执行function .---用例c执行--- [100%] ========================== 3 passed in 0.06 seconds =========================== Process finished with exit code 0 |
2.3叠加usefixtures
如果一个方法或者一个class用例想要同时调用多个fixture,可以使用@pytest.mark.usefixture()进行叠加。注意叠加顺序,先执行的放底层,后执行的放上层:
import pytest # test_fixture1.py @pytest.fixture() def test1(): print('\n开始执行function1') @pytest.fixture() def test2(): print('\n开始执行function2') @pytest.mark.usefixtures('test1') @pytest.mark.usefixtures('test2') def test_a(): print('---用例a执行---') @pytest.mark.usefixtures('test2') @pytest.mark.usefixtures('test1') class TestCase: def test_b(self): print('---用例b执行---') def test_c(self): print('---用例c执行---') if __name__ == '__main__': pytest.main(['-s', 'test_fixture1.py']) 输出结果: ============================= test session starts ============================= platform win32 -- Python 3.7.0, pytest-4.0.2, py-1.7.0, pluggy-0.8.0 rootdir: C:\Program Files\PycharmProjects\exercise, inifile:collected 3 items test_fixture1.py 开始执行function2 开始执行function1 .---用例a执行--- 开始执行function1 开始执行function2 .---用例b执行--- 开始执行function1 开始执行function2 .---用例c执行--- [100%] ========================== 3 passed in 0.03 seconds =========================== Process finished with exit code 0 |
3.usefixtures与传fixture区别
如果fixture有返回值,那么usefixture就无法获取到返回值,这个是装饰器usefixture与用例直接传fixture参数的区别。
当fixture需要用到return出来的参数时,只能讲参数名称直接当参数传入,不需要用到return出来的参数时,两种方式都可以。
4.fixture自动使用autouse=True
当用例很多的时候,每次都传这个参数,会很麻烦。fixture里面有个参数autouse,默认是False没开启的,可以设置为True开启自动使用fixture功能,这样用例就不用每次都去传参了
autouse设置为True,自动调用fixture功能。
import pytest # test_fixture1.py @pytest.fixture(scope='module', autouse=True) def test1(): print('\n开始执行module') @pytest.fixture(scope='class', autouse=True) def test2(): print('\n开始执行class') @pytest.fixture(scope='function', autouse=True) def test3(): print('\n开始执行function') def test_a(): print('---用例a执行---') def test_d(): print('---用例d执行---') class TestCase: def test_b(self): print('---用例b执行---') def test_c(self): print('---用例c执行---') if __name__ == '__main__': pytest.main(['-s', 'test_fixture1.py']) 输出结果: ============================= test session starts ============================= platform win32 -- Python 3.7.0, pytest-4.0.2, py-1.7.0, pluggy-0.8.0 rootdir: C:\Program Files\PycharmProjects\exercise, inifile:collected 4 items test_fixture1.py 开始执行module 开始执行class 开始执行function .---用例a执行--- 开始执行class 开始执行function .---用例d执行--- 开始执行class 开始执行function .---用例b执行--- 开始执行function .---用例c执行--- |
5.conftest.py的作用范围
一个工程下可以建多个conftest.py的文件,一般在工程根目录下设置的conftest文件起到全局作用。在不同子目录下也可以放conftest.py的文件,作用范围只能在改层级以及以下目录生效。
目录结构:
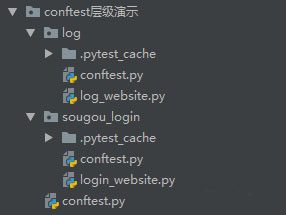
5.1conftest在不同的层级间的作用域不一样
# conftest层级展示/conftest.py import pytest @pytest.fixture(scope='session', autouse=True) def login(): print('----准备登录----') # conftest层级展示/sougou_login/conftest import pytest @pytest.fixture(scope='session', autouse=True) def bai_du(): print('-----登录百度页面-----') # conftest层级展示/sougou_login/login_website import pytest class TestCase: def test_login(self): print('hhh,成功登录百度') if __name__ == '__main__': pytest.main(['-s', 'login_website.py']) 输出结果: ============================= test session starts ============================= platform win32 -- Python 3.7.0, pytest-4.0.2, py-1.7.0, pluggy-0.8.0 rootdir: C:\Program Files\PycharmProjects\conftest层级演示\sougou_login, inifile:collected 1 item login_website.py ----准备登录---- -----登录百度页面----- .hhh,成功登录百度 [100%] ========================== 1 passed in 0.03 seconds =========================== Process finished with exit code 0 |
5.2conftest是不能跨模块调用的(这里没有使用模块调用)
# conftest层级演示/log/contfest.py import pytest @pytest.fixture(scope='function', autouse=True) def log_web(): print('打印页面日志成功') # conftest层级演示/log/log_website.py import pytest def test_web(): print('hhh,成功一次打印日志') def test_web1(): print('hhh,成功两次打印日志') if __name__ == '__main__': pytest.main(['-s', 'log_website.py']) 输出结果: ============================= test session starts ============================= platform win32 -- Python 3.7.0, pytest-4.0.2, py-1.7.0, pluggy-0.8.0 rootdir: C:\Program Files\PycharmProjects\conftest层级演示\log, inifile: collected 2 items log_website.py ----准备登录---- 打印页面日志成功 hhh,成功一次打印日志 .打印页面日志成功 hhh,成功两次打印日志 . ========================== 2 passed in 0.02 seconds =========================== |
本文内容不用于商业目的,如涉及知识产权问题,请权利人联系博为峰小编(021-64471599-8017),我们将立即处理