


3.2.3驱动模块
该模块主要是实现对UI循环遍历,UI控件定位,手势控制等功能操作。我们使用的框架是EARLGREY框架,该框架是google开源的非常好用的一款自动化框架。
简而言之,是一个内嵌式框架(以framework形式内嵌至应用中)。同步性:需要等待的操作自动等待,wait和sleep写错了可见性检测:因为是直接对应用内对象操作,所以有可能给一个用户看不到的元素发送触控事件了。这个可以防止出现这种情况,浏览器使用的 Webdriver 里面也有类似特性。模拟用户操作:使用 APP 级别的触控对象,而非元素级别的事件触发。简而言之,屏幕上不可见的元素都操作不了了。
驱动模块架构设计如图6-5所示。

图6-5 驱动模块架构图
从上图6-5可以看出主要分为8个核心功能构成:
Action:定义各种操作模型,手势动作。比如怎样定位一个控件,怎样单击一个控件。Additions:扩展接口层,提供一些扩展操作的模块,如何获取XCDOE底层操作数据,接口功能等方面。
Synchronization:同步机制处理,不用再手工的等待前一个事件结束才能执行下一个事件。
Common:基础公共模块,把一些具有共性的操作进行封装提炼,作为公共基础数据模块。
Core:核心数据层,主要是封装设置终端设备的自动化操作句柄,搜寻UI控件的支持匹配,创建用户交互的接口,设置数据源,键盘定义操作,以及窗口搜寻的层次,算法定义。
Event:封装触摸信息的基本对象操作,失败触摸事件的注入流程。
Exception:处理记录异常的堆栈跟踪处理程序,包括失败处的图形层次结构。
Matcher:定义匹配控件的表达方式,简单或者复杂的逻辑处理各种匹配算法。
(1)使用方式
使用方式,去github的官网直接下载最新的源码,然后解压到你的自动化框架地方。然后将其EarlGrey.Xcodeproj工程拖动到我们的框架target下面。然后在编译target设置里面加入该框架支持。设置如图6-6所示。
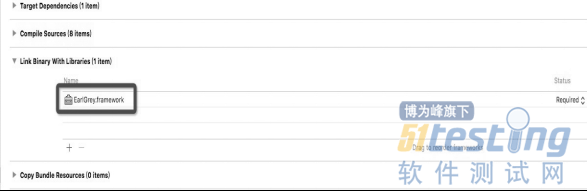
图6-6 EarlGrey框架配置图
至此配置完毕,现在就可以放心在里面扩展自己的功能了。
(2)功能特性
官方给了两套用例,一套是 OC 写的,另一套是 swift 写的。内容一样。里面的写法很有学习价值。这里以 OC 为例,简单记录一下。循序渐进,从找元素、对元素操作、找元素+断言、对元素操作+断言四个阶段编写。从这些用例看出,EarlGrey 的 API 中找元素与元素操作是分离的,而非像 KIF 那样合并在一起。实例如下代码所示,是单击控件操作,不包含查找元素。查找元素在别的类中实现,达到元素操作和匹配的分离。
//单击控件操作 - (void)tapAccessibilityLabel:(NSString *)lable VariableParameter:(NSString *) VariableParameter{ id<GREYMatcher> elementMatcher = grey_allOf(grey_accessibilityLabel(lable), grey_sufficientlyVisible(),grey_enabled(),nil); NSString *description = [self doVariableParameter:VariableParameter]; [self stepLogStart:description]; BOOL elementFlag = [self judgeElementsExists:elementMatcher Label:lable]; if (elementFlag) { [[EarlGrey selectElementWithMatcher:elementMatcher] performAction:grey_tap()]; [self rightLog:description]; if (warnFlag) { [self screenShotMemory]; } } warnFlag = FALSE; [self stepLogEnd]; } |
如上代码展示了如何捕获 ERROR (写法和一些老的 UIKit 函数类似,返回的是 error 的地址而非内容)。
这里的 error 原因是有不止一个匹配的元素。其识别元素主要是采用从keywidow的根目录开始遍历所有的叶子元素,然后定位匹配的UI控件,叶子节点如下图6-7所示。
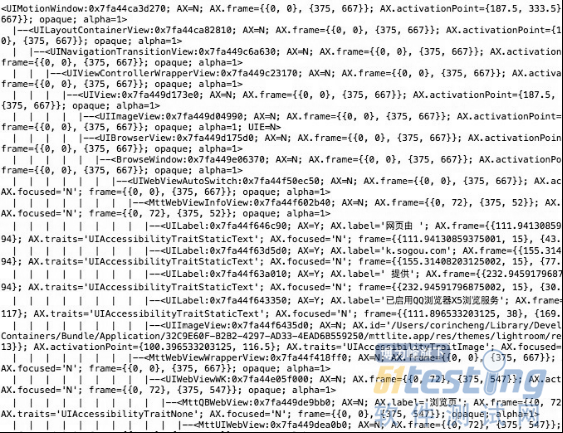
图6-7 控件叶子结构图
这就是采用调用接口获取到的控件树形机构表,其中可以看到根节点是从keywindow根目录开始的,然后遍历当前界面的所有可见的元素。采用的中序遍历树节点的形式,直到搜索到所有的节点为止。匹配控件的方式包装的接口如下代码方式。
/** Shorthand for GREYMatchers::matcherForKeyWindow. */ GREY_EXPORT id<GREYMatcher> grey_keyWindow(void); /** Shorthand for GREYMatchers::matcherForAccessibilityLabel:. */ GREY_EXPORT id<GREYMatcher> grey_accessibilityLabel(NSString *label); /** Shorthand for GREYMatchers::matcherForAccessibilityID:. */ GREY_EXPORT id<GREYMatcher> grey_accessibilityID(NSString *accessibilityID); /** Shorthand for GREYMatchers::matcherForAccessibilityValue:. */ GREY_EXPORT id<GREYMatcher> grey_accessibilityValue(NSString *grey_accessibilityValue); /** Shorthand for GREYMatchers::matcherForAccessibilityTraits:. */ GREY_EXPORT id<GREYMatcher> grey_accessibilityTrait(UIAccessibilityTraits traits); /** Shorthand for GREYMatchers::matcherForAccessibilityElementIsFocused. */ GREY_EXPORT id<GREYMatcher> grey_accessibilityFocused(void); /** Shorthand for GREYMatchers::matcherForAccessibilityHint:. */ GREY_EXPORT id<GREYMatcher> grey_accessibilityHint(NSString *hint); /** Shorthand for GREYMatchers::matcherForText:. */ GREY_EXPORT id<GREYMatcher> grey_text(NSString *inputText); /** Shorthand for GREYMatchers::matcherForFirstResponder. */ GREY_EXPORT id<GREYMatcher> grey_firstResponder(void); /** Shorthand for GREYMatchers::matcherForSystemAlertViewShown. */ GREY_EXPORT id<GREYMatcher> grey_systemAlertViewShown(void); /** Shorthand for GREYMatchers::matcherForMinimumVisiblePercent:. */ GREY_EXPORT id<GREYMatcher> grey_minimumVisiblePercent(CGFloat percent); /** Shorthand for GREYMatchers::matcherForSufficientlyVisible. */ GREY_EXPORT id<GREYMatcher> grey_sufficientlyVisible(void); /** Shorthand for GREYMatchers::matcherForInteractable. */ GREY_EXPORT id<GREYMatcher> grey_interactable(void); /** Shorthand for GREYMatchers::matcherForNotVisible. */ GREY_EXPORT id<GREYMatcher> grey_notVisible(void); |
多种类型全面的匹配方式可以满足尽可能多的实现方式。
手势定义也有多种方式,包括我们常用的单击、双击、滑动、左滑动、右滑动、长压等等。完全能够满足我们对日常自动化测试需求。手势包装如下代码所示。
/** Shorthand macro for GREYActions::actionForMoveSliderToValue:. */ GREY_EXPORT id<GREYAction> grey_moveSliderToValue(float value); /** Shorthand macro for GREYActions::actionForSetStepperValue:. */ GREY_EXPORT id<GREYAction> grey_setStepperValue(double value); /** Shorthand macro for GREYActions::actionForTap. */ GREY_EXPORT id<GREYAction> grey_tap(void); /** Shorthand macro for GREYActions::actionForTapAtPoint:. */ GREY_EXPORT id<GREYAction> grey_tapAtPoint(CGPoint point); /** Shorthand macro for GREYActions::actionForTypeText:. */ GREY_EXPORT id<GREYAction> grey_typeText(NSString *text); /** Shorthand macro for GREYActions::actionForReplaceText:. */ GREY_EXPORT id<GREYAction> grey_replaceText(NSString *text); /** Shorthand macro for GREYActions::actionForClearText. */ GREY_EXPORT id<GREYAction> grey_clearText(void); /** Shorthand macro for GREYActions::actionForTurnSwitchOn:. */ GREY_EXPORT id<GREYAction> grey_turnSwitchOn(BOOL on); /** Shorthand macro for GREYActions::actionForSetDate:. */ GREY_EXPORT id<GREYAction> grey_setDate(NSDate *date); /** Shorthand macro for GREYActions::actionForSetPickerColumn:toValue:. */ GREY_EXPORT id<GREYAction> grey_setPickerColumnToValue(NSInteger column, NSString *value); /** Shorthand macro for GREYActions::actionForJavaScriptExecution:output:. */ GREY_EXPORT id<GREYAction> grey_javaScriptExecution(NSString *js, __strong NSString **outResult); |
有时候搜寻一个UI控件时,可能找不到,或者出现多个的情况,这个时候我们需要定义错误的机制,好下一次继续遍历。这个时候就需要进一步的匹配准确的方式,比如匹配一个BUTTON是出现了两个相同的按钮,这个时候就需要进一步的匹配条件,选出所需要操作的那个控件,可以使用grey_allOf,grey_anyOff,matches等函数实现,代码如下代码所示。
id<GREYMatcher> elementMatcher = grey_allOf(grey_accessibilityLabel(lable), grey_sufficientlyVisible(),grey_enabled(),nil); NSString *description = [self doVariableParameter:VariableParameter]; [self stepLogStart:description]; |
采用了grey_allOf匹配 UIButton方式匹配唯一的控件。
该框架主要包含core,common,Assertion,Event,Matcher,Synchronization等模块,我们主要实现的功能都包含这个模块里面,截图如图6-8所示。

图6-8 代码结构图
这一节主要讲解了驱动模块的功能和实现方式。
(3)系统资源模块
这个模块主要是获取一些底层系统的资源数据信息,包括执行自动化脚本时候的系统性能资源数据信息,主要封装指标形式如下:
SystemResources包如图6-9所示,包含下面的代码层级。
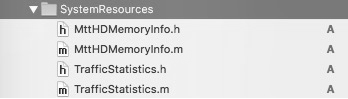
图6-9 系统资源代码结构图
获取设备信息功能代码如下所示。
static MttHDMemoryInfo* instanceMemoryInfo = nil; static dispatch_once_t onceToken; dispatch_once(&onceToken, ^{ instanceMemoryInfo = [[MttHDMemoryInfo alloc] init]; }); @synchronized(instanceMemoryInfo) { vm_statistics_data_t vmstat; mach_msg_type_number_t count = HOST_VM_INFO_COUNT; [instanceMemoryInfo getReidentMemory] ; [instanceMemoryInfo getSystemPhysicsMemory] ; [instanceMemoryInfo getUserableMemory] ; if (host_statistics(mach_host_self(), HOST_VM_INFO, (host_info_t)&vmstat, &count) == KERN_SUCCESS) { instanceMemoryInfo->_free_memory = vmstat.free_count * PAGESIZE_PER_MB ; instanceMemoryInfo->_wire_memory = vmstat.wire_count * PAGESIZE_PER_MB; instanceMemoryInfo->_active_memory = vmstat.active_count * PAGESIZE_PER_MB; instanceMemoryInfo->_inactive_memory = vmstat.inactive_count * PAGESIZE_PER_MB; instanceMemoryInfo->_purges_memory = vmstat.purgeable_count * PAGESIZE_PER_MB; instanceMemoryInfo->_speculative_memory = vmstat.speculative_count * PAGESIZE_PER_MB; instanceMemoryInfo->_total_memory = instanceMemoryInfo->_free_memory + instanceMemoryInfo->_wire_memory + instanceMemoryInfo->_active_memory + instanceMemoryInfo->_inactive_memory + instanceMemoryInfo->_purges_memory + instanceMemoryInfo->_speculative_memory + instanceMemoryInfo->_resident_memory; } } return instanceMemoryInfo; |
获取设备当前可用内存,如下代码所示。
+ (NSUInteger)currentFreeMemory { MttHDMemoryInfo *memoryInfo = [MttHDMemoryInfo currentMemoryInfo]; return (NSUInteger)(memoryInfo->_free_memory + memoryInfo->_purges_memory + memoryInfo->_speculative_memory ); } |
获取当前APP占用的内存,如下代码所示。
+ (NSUInteger)otherAPPUsedMemory { MttHDMemoryInfo *memoryInfo = [MttHDMemoryInfo currentMemoryInfo]; return [memoryInfo getOtherMemory]; } |
获取其它APP占用的内存,如下代码所示。
+ (NSInteger)selfUsedMemoryRate { MttHDMemoryInfo *memoryInfo = [MttHDMemoryInfo currentMemoryInfo]; return (((memoryInfo->_resident_memory + memoryInfo->_wire_memory)*100)/memoryInfo->_physics_memory) ; } |
获取cpu使用率,如下代码所示。
+(float)cpu_usage { kern_return_t kr; task_info_data_t tinfo; mach_msg_type_number_t task_info_count; task_info_count = TASK_INFO_MAX; kr = task_info(mach_task_self(), TASK_BASIC_INFO, (task_info_t)tinfo, &task_info_count); if (kr != KERN_SUCCESS) { return -1; } // task_basic_info_t basic_info; thread_array_t thread_list; mach_msg_type_number_t thread_count; thread_info_data_t thinfo; mach_msg_type_number_t thread_info_count; thread_basic_info_t basic_info_th; //uint32_t stat_thread = 0; // Mach threads //basic_info = (task_basic_info_t)tinfo; // get threads in the task kr = task_threads(mach_task_self(), &thread_list, &thread_count); if (kr != KERN_SUCCESS) { return -1; } // if (thread_count > 0) // // stat_thread += thread_count; long tot_sec = 0; long tot_usec = 0; float tot_cpu = 0; int j; for (j = 0; j < thread_count; j++) { thread_info_count = THREAD_INFO_MAX; kr = thread_info(thread_list[j], THREAD_BASIC_INFO, (thread_info_t)thinfo, &thread_info_count); if (kr != KERN_SUCCESS) { return -1; } basic_info_th = (thread_basic_info_t)thinfo; if (!(basic_info_th->flags & TH_FLAGS_IDLE)) { tot_sec = tot_sec + basic_info_th->user_time.seconds + basic_info_th->system_time.seconds; tot_usec = tot_usec + basic_info_th->system_time.microseconds + basic_info_th->system_time.microseconds; tot_cpu = tot_cpu + basic_info_th->cpu_usage / (float)TH_USAGE_SCALE * 100.0; } } // for each thread kr = vm_deallocate(mach_task_self(), (vm_offset_t)thread_list, thread_count * sizeof(thread_t)); assert(kr == KERN_SUCCESS); return tot_cpu; } |
目前提供的接口形式如下,可以供应用层接口调用。如下代码所示。
@property(nonatomic, readonly) double free_memory; @property(nonatomic, readonly) double wire_memory; @property(nonatomic, readonly) double active_memory; @property(nonatomic, readonly) double inactive_memory; @property(nonatomic, readonly) double purges_memory; @property(nonatomic, readonly) double speculative_memory; @property(nonatomic, readonly) double total_memory; @property(nonatomic, readonly) double resident_memory; @property(nonatomic, readonly) double physics_memory; @property(nonatomic, readonly) double userable_memory; + (MttHDMemoryInfo *)currentMemoryInfo; + (NSUInteger)currentFreeMemory; //当前可用内存,单位 MB + (NSUInteger)currentSelfUsedMemory; //当前自身占用的内存,单位 MB + (NSUInteger)otherAPPUsedMemory; // 其它APP占用内存,单位 MB + (NSInteger)selfUsedMemoryRate ; //自身占用与总内存的比率 + (NSInteger)freeMemoryRate ; //空闲内存与总内存的比率 + (NSUInteger)otherUsedMemoryRate; //其它占用内存比率 +(float)cpu_usage; |
3.3中间层
本节主要讲解中间层的实现方式,以及中间包含的模块和功能部分。
3.3.1控件调用封装层
该模块主要是分为一级二级接口封装形式,提供给脚本使用的接口。其衔接的就是底层模块的驱动模块部分,脚本调用该接口实现对UI控件的操作。主要封装控件和手势一起使用,方便用户编写脚本和调试使用,和底层隔离开来。
其模块主要包含三个文件MttScriptInterface、MttScriptDataParser、MttInvocations。分别是一级接口、脚本调用、二级接口,内部逻辑分离,重写XCTEST的一些功能。文件结构如图6-10所示:

图6-10中间层代码结构图
MttScriptInterface主要包含常用的控件调用形式,如下代码所示:
//单击控件 - (void)tapAccessibilityLabel:(NSString *)lable VariableParameter:(NSString *)VariableParameter; //单击控件 - (void)tapUIAccessibilityTraitButtonLabel:(NSString *)lable VariableParameter:(NSString *)VariableParameter; //长压控件 - (void)pressAccessibilityLabel:(NSString *)lable VariableParameter:(NSString *)VariableParameter; //向左滑动控件 - (void)swipLeftAccessibilityLabel:(NSString *)lable VariableParameter:(NSString *)VariableParameter; //多个控件选择 - (void)tapAccessibilityLabel:(NSString *)lable Label2:(NSString *)lable2 VariableParameter:(NSString *)VariableParameter; //单击坐标控件 - (void)tapAtPoint:(CGFloat)x PointY:(CGFloat)y VariableParameter:(NSString *)VariableParameter; //单击Button控件 - (void)tapUIButtonAccessibilityLabel:(NSString *)lable VariableParameter:(NSString *)VariableParameter; //单击输入文本控件 - (void)typeTextAccessibilityValue:(NSString *)lable TypeText:(NSString *)typeText VariableParameter:(NSString *)VariableParameter; //单击输入文本控件 - (void)typeTextAccessibilityLabel:(NSString *)lable TypeText:(NSString *)typeText VariableParameter:(NSString *)VariableParameter; //单击搜索控件 - (void)tapUITextFieldAccessibilityLabel:(NSString *)lable VariableParameter:(NSString *)VariableParameter; //向左慢慢滑动控件 - (void)swipeSlowLeftAccessibilityLabel:(NSString *)lable VariableParameter:(NSString *)VariableParameter; //坐标窗口快速向上滑动 - (void)swipeFastUp:(NSString *)VariableParameter; //坐标窗口快速向下滑动 - (void)swipeFastDown:(NSString *)VariableParameter; //坐标窗口快速向左滑动 - (void)swipeFastLeft:(NSString *)VariableParameter; //坐标窗口快速向右滑动 - (void)swipeFastRight:(NSString *)VariableParameter; //坐标窗口慢速向上滑动 - (void)swipeSlowUp:(NSString *)VariableParameter; //坐标窗口慢速向下滑动 - (void)swipeSlowDown:(NSString *)VariableParameter; //判断控件是否存在 - (BOOL)existElemetsAccessibilityLabel:(NSString *)lable VariableParameter:(NSString *)VariableParameter; //判断控件是否存在 - (BOOL)existUIButtonElemetsAccessibilityLabel:(NSString *)lable VariableParameter:(NSString *)VariableParameter; //判断控件不存在 - (void)noExistLogElemetsAccessibilityLabel:(NSString *)lable VariableParameter:(NSString *)VariableParameter; //判断控件存在 - (void)existLogElemetsAccessibilityLabel:(NSString *)lable VariableParameter:(NSString *)VariableParameter; |
比如单击BUTTON控件的封装形式如下方代码所示,其封装思路是首先获取到控件,然后判断控件是否存在,接着再对控件进行点击操作,其它的控件封装也是类似的实现方式。如下代码所示:
//单击控件操作 - (void)tapAccessibilityLabel:(NSString *)lable VariableParameter:(NSString *)VariableParameter{ id<GREYMatcher> elementMatcher = grey_allOf(grey_accessibilityLabel(lable), grey_sufficientlyVisible(),grey_enabled(),nil); NSString *description = [self doVariableParameter:VariableParameter]; [self stepLogStart:description]; BOOL elementFlag = [self judgeElementsExists:elementMatcher Label:lable]; if (elementFlag) { [[EarlGrey selectElementWithMatcher:elementMatcher] performAction:grey_tap()]; [self rightLog:description]; if (warnFlag) { [self screenShotMemory]; } } warnFlag = FALSE; [self stepLogEnd]; } |
其中elementFlag就是嵌入了成功失败的判断方式,如果成功再去点击控件,[self stepLogStart:description]则是LOG日志的记录方式。
3.3.2截图模块
本模块主要是iOS系统下的一种可控截屏机制,这种机制基于多进程自动化测试框架。实现的一种可控截屏机制。只要是基于多进程控制的UI自动化测试框架,都可以应用该发明实现可控截屏机制。该框架的运行机制不是单进程的,而是多进程的运行方式,框架编译运行后,会有测试进程A,被测试APP进程B,所以就需要进程A控制被测试进程B,进行截屏机制操作。但是iOS系统是不支持多进程控制的,就需要一种全新的可控的操作方式,以进程A为载体控制被测试进程B,进行截屏操作。
首先需要在被测试APP中,嵌入服务监听程序,该程序主要是监听约定好的手机端口,建立session连接,注册截屏事件,解析事件报文,回调截屏事件函数,获取图片,封装结果报文,返回截图报文。其次在测试进程A中,需要有客户端控制功能,获取到约定的被测试进程APP的监控地址,然后向改地址建立session连接,回调截屏事件函数,封装截屏报文,发送截屏事件报文,监控回传的结果报文,解析结果报文,获取图像信息,图像处理(格式,大小,像素),然后保存图像,断开连接服务。具体的分析流程如图6-11所示。
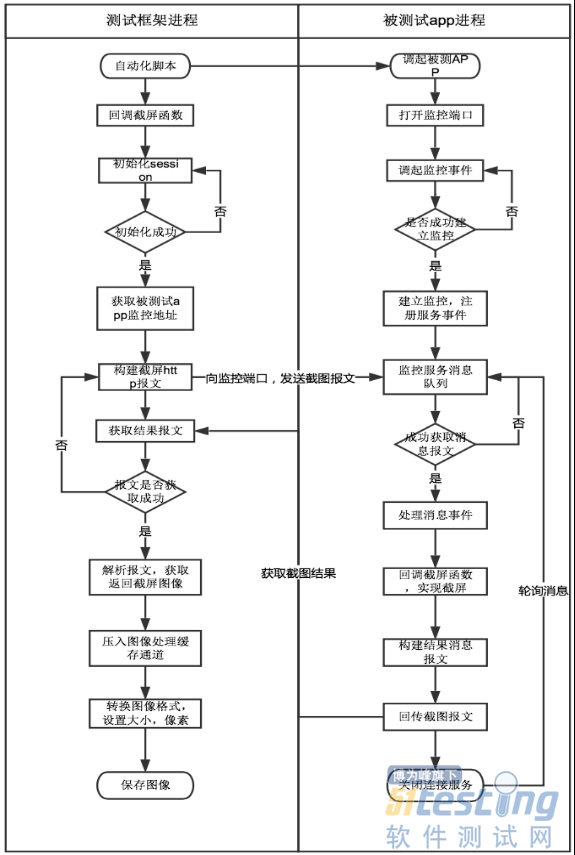
图6-9截图模块流程图
其实现步骤主要如下:
步骤1:搭建开发环境,配置好UITEST自动化测试框架(测试进程定义为A,被测试APP进程定义为B,后续将使用A,B代替两种进程)。
步骤2:编译运行后,A调起B,这时候B自动打开监控端口,监控指定的手机端口。如果监控成功,则执行步骤3,否则重新进程监控。
步骤3:建立成功监控后,开始注册截屏服务事件。
步骤4:B的监控线程会持续的监控服务消息队列,当监控到截屏服务事件后,则执行步骤7,否则一直轮寻队列。
步骤5:A执行回调截屏函数,开始向B监控的手机端口,发起session链接,如果初始化链接成功,则执行步骤6,否则重新尝试链接。
步骤6:开始构建http形式的截图报文,然后向B发送该事件报文。
步骤7:B从监控服务队列中获取到事件报文后,开始处理该消息事件,回调B的截屏事件函数,开始截屏,当截屏结束后,返回截屏图像。
步骤8:构建带图像的结果消息报文,然后B将该报文回传给A,然后B关闭该次链接服务,重新开始执行步骤4。
步骤9: A获取到B发送的结果消息报文后,检查报文是否完整有效,如果成功则执行步骤10,否则继续执行步骤5。
步骤10:A成功获取报文后,解析出消息中的图像信息,然后将图像压入图像处理缓存通道,进行图像集中处理,包括图像格式处理,像素处理,大小调整等,然后保存图像。
部分功能实现如下代码所示。
+ (NSString *)imageWithScreenshot:(NSString *)imagePath imageName:(int)name { //NSData *imageData = [self dataWithScreenshotInPNGFormat]; //UIImage *image = [self dataWithScreenshotInPNGFormat]; NSString *imageDirectory = [imagePath stringByAPPendingPathComponent:@"screenShot"]; NSFileManager *fileManager = [NSFileManager defaultManager]; BOOL fileExists = [fileManager fileExistsAtPath:imagePath]; if (!fileExists) { [fileManager createDirectoryAtPath:imagePath withIntermediateDirectories:YES attributes:nil error:nil]; } fileExists = [fileManager fileExistsAtPath:imageDirectory]; if (!fileExists) { [fileManager createDirectoryAtPath:imageDirectory withIntermediateDirectories:YES attributes:nil error:nil]; } NSString *pictureName= [NSString stringWithFormat:@"screenShow_%d.png",name]; NSString *savedImagePath = [imageDirectory stringByAPPendingPathComponent:pictureName]; UIWindow *screenWindow = [[UIAPPlication sharedAPPlication] keyWindow]; UIGraphicsBeginImageContext(screenWindow.frame.size);//全屏截图,包括window [screenWindow.layer renderInContext:UIGraphicsGetCurrentContext()]; UIImage *viewImage = UIGraphicsGetImageFromCurrentImageContext(); UIGraphicsEndImageContext(); NSData *imageViewData =UIImagePNGRepresentation(viewImage); [imageViewData writeToFile:savedImagePath atomically:YES]; NSArray *pathArray = [savedImagePath componentsSeparatedByString:@"/"]; NSUInteger len = [pathArray count]; if (len > 3) { NSString *imagePath_1 = [[pathArray objectAtIndex:(len-4)] stringByAPPendingPathComponent:[pathArray objectAtIndex:(len-3)]]; NSString *imagePath_2 = [imagePath_1 stringByAPPendingPathComponent:[pathArray objectAtIndex:(len-2)]]; savedImagePath = [imagePath_2 stringByAPPendingPathComponent:[pathArray objectAtIndex:(len-1)]]; } return savedImagePath; } |
3.3.3日志处理模块
Log包下面的所有代码,分析整合UITEST原有日志功能。重新定义日志级别。重定向NSLOG日志功能,主要是标准输出,标准出错管道的信息。分析定义日志存储位置,按照等级写入日志文件。其代码结构如下代码所示。
//打印日志信息 - (void)writeScriptLog:(NSString*)message LogLevel:(NSUInteger)level{ switch (level) { case LOG_FLAG_ERROR: NSLog(@"[UITESTLOG]-[ERROR]-[%@]",message); break; case LOG_FLAG_WARN: NSLog(@"[UITESTLOG]-[WARN]-[%@]",message); break; case LOG_FLAG_INFO: NSLog(@"[UITESTLOG]-[INFO]-[%@]",message); break; default: NSLog(@"[UITESTLOG]-[DEBUG]-[%@]",message); break; } } |
底层Log日志需要HOOK机制才能抓取到,所以我们就需要重定向操作,stderr、stdout这两个管道的日志信息,我们需要抓取到Log日志文件中。实现日志代码如下所示。
-(NSString *)redirectNSLogToDocumentFolder:(NSString *)taskName scriptName:(NSString *)LogName { //如果已经连接Xcode调试则不输出到文件 NSArray *homePath = NSSearchPathForDirectoriesInDomains(NSDesktopDirectory, NSUserDomainMask, YES); NSString *LogPath = [homePath objectAtIndex:0]; NSArray *pathArray = [LogPath componentsSeparatedByString:@"/"]; NSString *LogDirectoryPath = [[pathArray objectAtIndex:1] stringByAPPendingPathComponent:[pathArray objectAtIndex:2]]; NSString *LogDirectory = [[@"/" stringByAPPendingString:LogDirectoryPath] stringByAPPendingPathComponent:@"Desktop/UITest/UITestLog"]; NSFileManager *fileManager = [NSFileManager defaultManager]; BOOL fileExists = [fileManager fileExistsAtPath:LogDirectory]; if (!fileExists) { [fileManager createDirectoryAtPath:LogDirectory withIntermediateDirectories:YES attributes:nil error:nil]; } NSString *taskDirectory = [LogDirectory stringByAPPendingPathComponent:taskName]; fileExists = [fileManager fileExistsAtPath:taskDirectory]; if (!fileExists) { [fileManager createDirectoryAtPath:taskDirectory withIntermediateDirectories:YES attributes:nil error:nil]; } NSDateFormatter *formatter = [[NSDateFormatter alloc] init]; [formatter setLocale:[[NSLocale alloc] initWithLocaleIdentifier:@"zh_CN"]]; [formatter setDateFormat:@"yyyy-MM-dd-HH-mm-ss"]; //每次启动后都保存一个新的日志文件中 NSString *dateStr = [formatter stringFromDate:[NSDate date]]; LogFilePath = [taskDirectory stringByAPPendingFormat:@"/%@ %@.Log",LogName,dateStr]; NSString *imagePath = [taskDirectory stringByAPPendingFormat:@"/%@ %@",LogName,dateStr]; originH1 = dup(STDERR_FILENO); // 将Log输入到文件 //freopen([LogFilePath cStringUsingEncoding:NSASCIIStringEncoding], "a+", stdout); freopen([LogFilePath cStringUsingEncoding:NSASCIIStringEncoding], "a+", stderr); //未捕获的Objective-C异常日志 //NSSetUncaughtExceptionHandler (&UncaughtExceptionHandler); return imagePath; } |
部分代码如上所示,打印输出的日志形式如下图所示,就可以分层次分级别的实现日志分析部分。日志截图形式如图6-12所示。
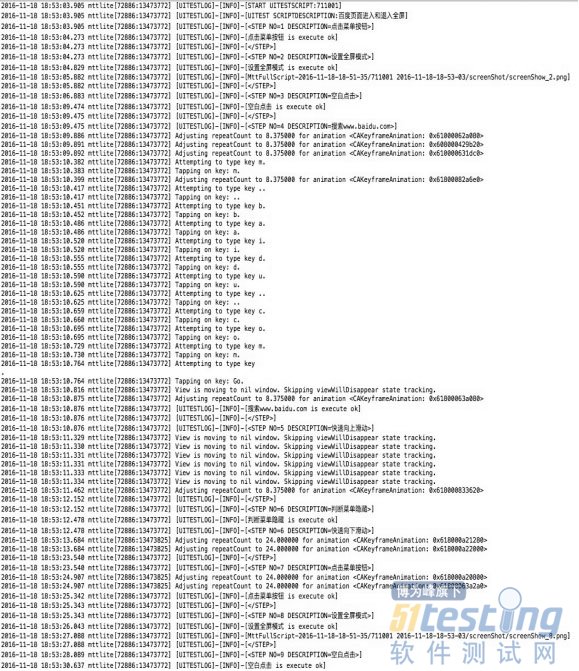
图6-12 日志结构图
上图日志清晰明了输出了脚本执行的情况,为以后我们日志分析模块分析日志提供有力的保证,而且获取到了全部的日志信息,包括测试框架输出的日志,被测试APP实现的日志信息,为我们分析脚本执行情况提供详细的数据信息。
本文选自《腾讯iOS测试实践》第六章,本站经机械工业出版社和作者的授权。
版权声明:51Testing软件测试网获机械工业出版社和作者授权连载本书部分章节。
任何个人或单位未获得明确的书面许可,不得对本文内容复制、转载或进行镜像,否则将追究法律责任。


