1.1.1 Activity的构成
Activity的构成并不是一个Activity对象再加上一个布局文件那么简单,在Activity和开发人员设置的视图之间还隔着两层。实际上视图会被设置给一个Window类,这个Window中含有一个DecorView,这个DecorView才是整个窗口的顶级视图。开发人员设置的布局会被设置到这个DecorView的mContentParent布局中。也就是说Android中实际上内置了一些系统布局文件xml,我们在xml中定义的视图最终会被设置到这些系统布局的特定节点之下,这样就形成了整个DecorView。结构如图1-2所示。
从图1-2中可以看到,我们的Activity之下有一个PhoneWindow,这个PhoneWindow是Window的实现类,然后Window之下包含一个DecorView,DecorView实际上是页面的顶级视图,它从一些系统布局中加载,并且在运行时将开发人员设置给Activity的布局资源添加到系统布局的mContentParent中。这样一来,用户界面就被添加到系统布局中了,而系统布局会为我们设置好标题栏区域等。
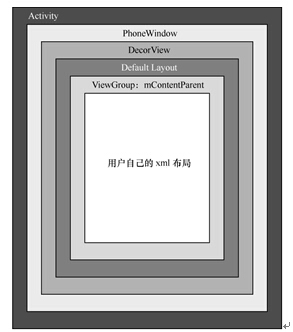
▲图1-2 Activity结构
下面就是一个名为screen_title的系统布局xml文件:
<?xml version="1.0" encoding="utf-8"?> <LinearLayout xmlns:android="http://schemas.android.com/apk/res/android" android:orientation="vertical" android:fitsSystemWindows="true"> <!-- Popout bar for action modes --> <ViewStub android:id="@+id/action_mode_bar_stub" android:inflatedId="@+id/action_mode_bar" android:layout="@layout/action_mode_bar" android:layout_width="match_parent" android:layout_height="wrap_content" android:theme="?attr/actionBarTheme" /> <FrameLayout android:layout_width="match_parent" android:layout_height="?android:attr/windowTitleSize" style="?android:attr/windowTitleBackgroundStyle"> <TextView android:id="@android:id/title" style="?android:attr/windowTitleStyle" android:background="@null" android:fadingEdge="horizontal" android:gravity="center_vertical" android:layout_width="match_parent" android:layout_height="match_parent" /> </FrameLayout> <!-这里就是开发人员设置的布局所填充的位置--> <FrameLayout android:id="@android:id/content" android:layout_width="match_parent" android:layout_height="0dip" android:layout_weight="1" android:foregroundGravity="fill_horizontal|top" android:foreground="?android:attr/windowContentOverlay" /> </LinearLayout> |
上述xml文件中包含了actionbar和标题栏区域,下面就是开发人员设置给Activity的布局区域,这个区域被添加到名为content的布局中,而这整个screen_title.xml又是DecorView的子视图,因此,最终用户界面会显示为标题栏、开发人员设置的界面。例如我们的Activity布局代码如下:
<RelativeLayout xmlns:android="http://schemas.android.com/apk/res/android" xmlns:tools="http://schemas.android.com/tools" android:layout_width="match_parent" android:layout_height="match_parent" android:paddingLeft="@dimen/activity_horizontal_margin" android:paddingRight="@dimen/activity_horizontal_margin" android:paddingTop="@dimen/activity_vertical_margin" android:gravity="center" android:paddingBottom="@dimen/activity_vertical_margin" tools:context=".MainActivity"> <TextView android:text="@string/hello_world" android:layout_width="wrap_content" android:textSize="30sp" android:gravity="center" android:layout_height="wrap_content" /> </RelativeLayout> |
该布局的根视图为RelativeLayout,其中只有一个居中的TextView。运行后的界面如图1-3所示。
jtm_chap01显示的区域就是id为title的TextView,而Hello World就是content布局下的一个子视图。当Activity的onResume函数被调用之后,用户界面就显示在我们面前了。
本文选自《Android开发进阶—从小工到专家》第一章,本站经人民邮电出版社和作者的授权。
版权声明:51Testing软件测试网获人民邮电出版社和作者授权连载本书部分章节。
任何个人或单位未获得明确的书面许可,不得对本文内容复制、转载或进行镜像,否则将追究法律责任。