

Spring单测的探究
我们还是以一个简单的例子开始吧
@RunWith(SpringRunner.class)
@ContextConfiguration(locations = { "/spring/spring-mybeans.xml" })
public class SpringRunnerTest {
@Autowired
private MyTestBean myTestBean;
@Test
public void test() {
myTestBean.test();
}
}
这里先粗滤的概括下运行单测时发生了什么。首先,@RunWith注解了该测试类,所以Junit框架会先用SpringRunnerTest.class作为参数创建SpringRunner的实例,然后调用SpringRunner的run方法运行测试,该方法中会启动Spring容器,加载@ContextConfiguration注解指定的Bean配置文件,同时也会处理@Autowired注解为SpringRunnerTest的实例注入myTestBean,最后运行test()测试用例。
简言之就是先通过SpringRunner启动Spring容器,然后运行测试方法。接下来探究一下SpringRunner启动Spring容器的过程。
public final class SpringRunner extends SpringJUnit4ClassRunner {
public SpringRunner(Class<?> clazz) throws InitializationError {
super(clazz);
}
}
public class SpringJUnit4ClassRunner extends BlockJUnit4ClassRunner {
...
}
SpringRunner和SpringJUnit4ClassRunner实际是等价的,可以认为SpringRunner是SpringJUnit4ClassRunner的一个别名,这里着重看下SpringJUnit4ClassRunner类的实现。
SpringJUnit4ClassRunner继承了BlockJUnit4ClassRunner,前面着重分析过BlockJUnit4ClassRunner,它运行的是一个标准的JUnit4测试模型,SpringJUnit4ClassRunner则是在此基础上做了一些扩展,扩展的内容主要包括:
·扩展了构造函数,多创建了一个TestContextManager实例。
· 扩展了createTest()方法,会额外调用TestContextManager的prepareTestInstance方法。
· 扩展了beforeClass,在执行@BeforeClass注解的方法前,会先调用TestContextManager的beforeTestClass方法。
· 扩展了before,在执行@Before注解的方法前,会先调用TestContextManager的beforeTestMethod方法。
· 扩展了afterClass,在执行@AfterClass注解的方法之后,会再调用TestContextManager的afterTestClass方法。
· 扩展了after,在执行@After注解的方法之后,会再调用TestContextManager的after方法。
TestContextManager是Spring测试框架的核心类,官方的解释是:TestContextManager is the main entry point into the Spring TestContext Framework. Specifically, a TestContextManager is responsible for managing a single TestContext.
TestContextManager管理着TestContext,而TestContext则是对ApplicationContext的一个再封装,可以把TestContext理解为增加了测试相关功能的Spring容器。 TestContextManager同时也管理着TestExecutionListeners,这里使用观察者模式提供了对测试运行过程中的关键节点(如beforeClass, afterClass等)的监听能力。
所以通过研究TestContextManager,TestContext和TestExecutionListeners的相关实现类的代码,就不难发现测试时Spring容器的启动秘密了。关键代码如下:
public class DefaultTestContext implements TestContext {
...
public ApplicationContext getApplicationContext() {
ApplicationContext context = this.cacheAwareContextLoaderDelegate.loadContext(this.mergedContextConfiguration);
if (context instanceof ConfigurableApplicationContext) {
@SuppressWarnings("resource")
ConfigurableApplicationContext cac = (ConfigurableApplicationContext) context;
Assert.state(cac.isActive(), () ->
"The ApplicationContext loaded for [" + this.mergedContextConfiguration +
"] is not active. This may be due to one of the following reasons: " +
"1) the context was closed programmatically by user code; " +
"2) the context was closed during parallel test execution either " +
"according to @DirtiesContext semantics or due to automatic eviction " +
"from the ContextCache due to a maximum cache size policy.");
}
return context;
}
...
}
在DefaultTestContext的getApplicationContext方法中,调用了cacheAwareContextLoaderDelegate的loadContext,最终辗转调到Context的refresh方法,从而构筑起Spring容器上下文。时序图如下:
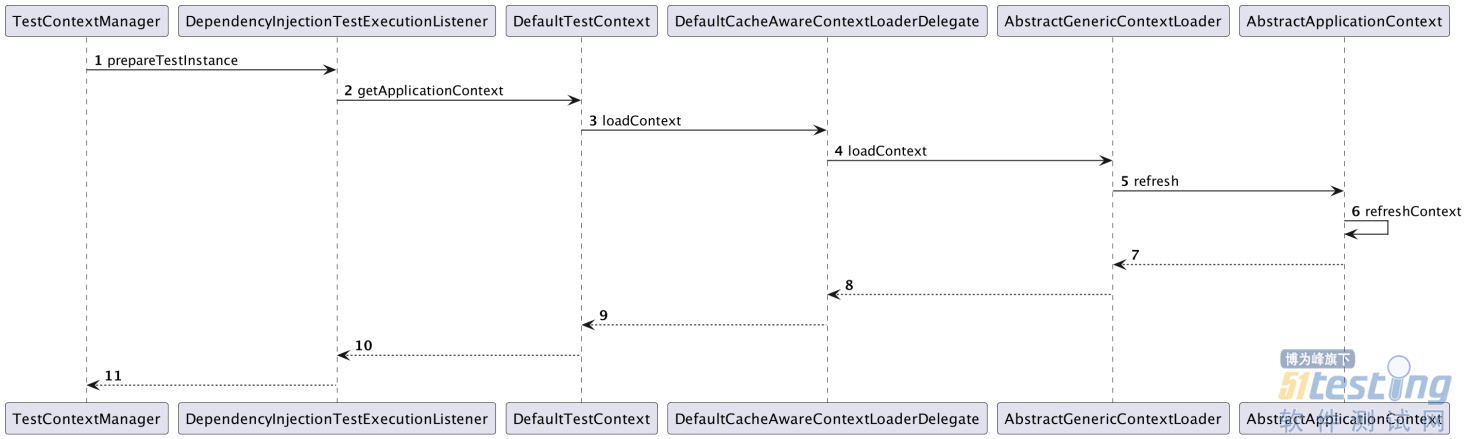
那么getApplicationContext方法又是在哪里被调用的呢?
前面介绍过,TestContextManager扩展了createTest()方法,会额外调用其prepareTestInstance方法。
public void prepareTestInstance(Object testInstance) throws Exception {
if (logger.isTraceEnabled()) {
logger.trace("prepareTestInstance(): instance [" + testInstance + "]");
}
getTestContext().updateState(testInstance, null, null);
for (TestExecutionListener testExecutionListener : getTestExecutionListeners()) {
try {
testExecutionListener.prepareTestInstance(getTestContext());
}
catch (Throwable ex) {
if (logger.isErrorEnabled()) {
logger.error("Caught exception while allowing TestExecutionListener [" + testExecutionListener +
"] to prepare test instance [" + testInstance + "]", ex);
}
ReflectionUtils.rethrowException(ex);
}
}
}
prepareTestInstance方法中会调用所有TestExecutionListener的prepareTestInstance方法,其中有一个叫做DependencyInjectionTestExecutionListener的监听器会调到TestContext的getApplicationContext方法。
public void prepareTestInstance(TestContext testContext) throws Exception {
if (logger.isDebugEnabled()) {
logger.debug("Performing dependency injection for test context [" + testContext + "].");
}
injectDependencies(testContext);
}
protected void injectDependencies(TestContext testContext) throws Exception {
Object bean = testContext.getTestInstance();
Class<?> clazz = testContext.getTestClass();
// 这里调用TestContext的getApplicationContext方法,构建Spring容器
AutowireCapableBeanFactory beanFactory = testContext.getApplicationContext().getAutowireCapableBeanFactory();
beanFactory.autowireBeanProperties(bean, AutowireCapableBeanFactory.AUTOWIRE_NO, false);
beanFactory.initializeBean(bean, clazz.getName() + AutowireCapableBeanFactory.ORIGINAL_INSTANCE_SUFFIX);
testContext.removeAttribute(REINJECT_DEPENDENCIES_ATTRIBUTE);
}
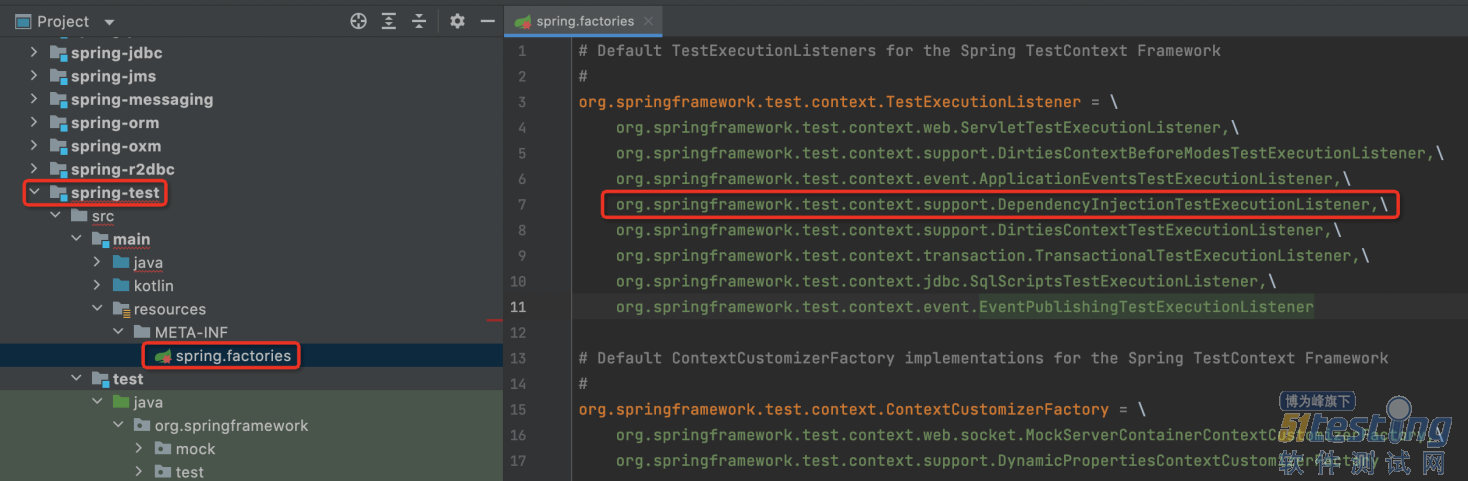
还剩最后一个问题,DependencyInjectionTestExecutionListener是如何被添加的呢?答案是spring.factories.
至此Spring单测的启动过程就探究明白了,接下来看下SpringBoot的。
SpringBoot单测的探究
一个简单的SpringBoot单测例子:
@RunWith(SpringRunner.class)
@SpringBootTest(classes = Application.class)
public class MySpringBootTest {
@Autowired
private MyTestBean myTestBean;
@Test
public void test() {
myTestBean.test();
}
}
@Target(ElementType.TYPE)
@Retention(RetentionPolicy.RUNTIME)
@Documented
@Inherited
@BootstrapWith(SpringBootTestContextBootstrapper.class)
public @interface SpringBootTest {
...
}
粗滤说明一下,这里还是通过SpringRunner的run方法启动测试,其中会启动Spring容器,而@SpringBootTest则提供了启动类,同时通过@BootstrapWith提供的SpringBootTestContextBootstrapper类丰富了TestContext的能力,使得其支持了SpringBoot的一些特性。这里着重探究下@BootstrapWith注解以及SpringBootTestContextBootstrapper。
前面在介绍TestContextManager时,并没有讲到其构造函数以及TestContext的实例化过程,这里将其补上
public TestContextManager(Class<?> testClass) {
this(BootstrapUtils.resolveTestContextBootstrapper(BootstrapUtils.createBootstrapContext(testClass)));
}
public TestContextManager(TestContextBootstrapper testContextBootstrapper) {
this.testContext = testContextBootstrapper.buildTestContext();
registerTestExecutionListeners(testContextBootstrapper.getTestExecutionListeners());
}
public abstract class AbstractTestContextBootstrapper implements TestContextBootstrapper {
...
public TestContext buildTestContext() {
return new DefaultTestContext(getBootstrapContext().getTestClass(), buildMergedContextConfiguration(),
getCacheAwareContextLoaderDelegate());
}
...
}
构建DefaultTestContext需要传3个参数:
·testClass,被测试的类元数据
· MergedContextConfiguration,封装了声明在测试类上的与测试容器相关的注解,如@ContextConfiguration, @ActiveProfiles, @TestPropertySource
· CacheAwareContextLoaderDelegate,用来loading或closing容器
那么当我们需要扩展TestContext的功能,或者不想用DefaultTestContext时,应该怎么办呢?最简单的方式自然是新写一个类实现TestContextBootstrapper接口,并覆写buildTestContext()方法,那么如何告诉测试框架要使用新的实现类呢?@BootstrapWith就派上用场了。这里来看下BootstrapUtils.resolveTestContextBootstrapper的代码
static TestContextBootstrapper resolveTestContextBootstrapper(BootstrapContext bootstrapContext) {
Class<?> testClass = bootstrapContext.getTestClass();
Class<?> clazz = null;
try {
clazz = resolveExplicitTestContextBootstrapper(testClass);
if (clazz == null) {
clazz = resolveDefaultTestContextBootstrapper(testClass);
}
if (logger.isDebugEnabled()) {
logger.debug(String.format("Instantiating TestContextBootstrapper for test class [%s] from class [%s]",
testClass.getName(), clazz.getName()));
}
TestContextBootstrapper testContextBootstrapper =
BeanUtils.instantiateClass(clazz, TestContextBootstrapper.class);
testContextBootstrapper.setBootstrapContext(bootstrapContext);
return testContextBootstrapper;
}
...
}
private static Class<?> resolveExplicitTestContextBootstrapper(Class<?> testClass) {
Set<BootstrapWith> annotations = AnnotatedElementUtils.findAllMergedAnnotations(testClass, BootstrapWith.class);
if (annotations.isEmpty()) {
return null;
}
if (annotations.size() == 1) {
return annotations.iterator().next().value();
}
// 获取@BootstrapWith注解的值
BootstrapWith bootstrapWith = testClass.getDeclaredAnnotation(BootstrapWith.class);
if (bootstrapWith != null) {
return bootstrapWith.value();
}
throw new IllegalStateException(String.format(
"Configuration error: found multiple declarations of @BootstrapWith for test class [%s]: %s",
testClass.getName(), annotations));
}
这里会通过@BootstrapWith注解的值,实例化定制的TestContextBootstrapper,从而提供定制的TestContext
SpringBootTestContextBootstrapper就是TestContextBootstrapper的实现类,它通过间接继承AbstractTestContextBootstrapper类扩展了创建TestContext的能力,这些扩展主要包括:
1. 将ContextLoader替换为了SpringBootContextLoader
2. 增加了DefaultTestExecutionListenersPostProcessor对TestExecutionListener进行增强处理
3. 增加了对webApplicationType的处理
接下来看下SpringBootContextLoader的相关代码:
public class SpringBootContextLoader extends AbstractContextLoader {
@Override
public ApplicationContext loadContext(MergedContextConfiguration config)
throws Exception {
Class<?>[] configClasses = config.getClasses();
String[] configLocations = config.getLocations();
Assert.state(
!ObjectUtils.isEmpty(configClasses)
|| !ObjectUtils.isEmpty(configLocations),
() -> "No configuration classes "
+ "or locations found in @SpringApplicationConfiguration. "
+ "For default configuration detection to work you need "
+ "Spring 4.0.3 or better (found " + SpringVersion.getVersion()
+ ").");
SpringApplication application = getSpringApplication();
// 设置mainApplicationClass
application.setMainApplicationClass(config.getTestClass());
// 设置primarySources
application.addPrimarySources(Arrays.asList(configClasses));
// 添加configLocations
application.getSources().addAll(Arrays.asList(configLocations));
// 获取environment
ConfigurableEnvironment environment = getEnvironment();
if (!ObjectUtils.isEmpty(config.getActiveProfiles())) {
setActiveProfiles(environment, config.getActiveProfiles());
}
ResourceLoader resourceLoader = (application.getResourceLoader() != null)
? application.getResourceLoader()
: new DefaultResourceLoader(getClass().getClassLoader());
TestPropertySourceUtils.addPropertiesFilesToEnvironment(environment,
resourceLoader, config.getPropertySourceLocations());
TestPropertySourceUtils.addInlinedPropertiesToEnvironment(environment,
getInlinedProperties(config));
application.setEnvironment(environment);
// 获取并设置initializers
List<ApplicationContextInitializer<?>> initializers = getInitializers(config,
application);
if (config instanceof WebMergedContextConfiguration) {
application.setWebApplicationType(WebApplicationType.SERVLET);
if (!isEmbeddedWebEnvironment(config)) {
new WebConfigurer().configure(config, application, initializers);
}
}
else if (config instanceof ReactiveWebMergedContextConfiguration) {
application.setWebApplicationType(WebApplicationType.REACTIVE);
if (!isEmbeddedWebEnvironment(config)) {
new ReactiveWebConfigurer().configure(application);
}
}
else {
application.setWebApplicationType(WebApplicationType.NONE);
}
application.setInitializers(initializers);
// 运行SpringBoot应用
return application.run();
}
}
可以看到这里构建了SpringApplication,设置了mainApplicationClass,设置了primarySources,设置了initializers,最终通过application.run()启动了SpringBoot应用。
至此SpringBoot单测的启动过程也探究明白了,接下来看下Maven插件是如何运行单测的。
Maven插件如何运行单测
我们知道maven是通过一系列的插件帮助我们完成项目开发过程中的构建、测试、打包、部署等动作的,当在Console中运行maven clean test命令时,maven会依次运行以下goal:
·maven-clean-plugin:2.5:clean,用于清理target目录
· maven-resources-plugin:2.6:resources,将主工程目录下的资源文件移动到target目录下的classes目录中
· maven-compiler-plugin:3.1:compile,将主工程目录下的java源码编译为字节码,并移动到target目录下的classes目录中
· maven-resources-plugin:2.6:testResources,将测试工程目录下的资源文件移动到target目录下的test-classes目录中
· maven-compiler-plugin:3.1:testCompile,将测试工程目录下的java源码编译为字节码,并移动到target目录下的classes目录中
· maven-surefire-plugin:2.12.4:test,运行单测
我们扒下maven-surefire-plugin插件的代码看一下。首先引入下maven-surefire-plugin和surefire-junit4包,方便我们查看代码:
<dependency>
<groupId>org.apache.maven.plugins</groupId>
<artifactId>maven-surefire-plugin</artifactId>
<version>2.9</version>
</dependency>
<dependency>
<groupId>org.apache.maven.surefire</groupId>
<artifactId>surefire-junit4</artifactId>
<version>3.0.0-M7</version>
</dependency>
核心代码在org.apache.maven.plugin.surefire.AbstractSurefireMojo#execute中,这里就不贴代码了,有兴趣的可以自己看下。总之这里会用JUnit4ProviderInfo中的信息通过反射实例化JUnit4Provider对象,然后调用其invoke方法,在改方法中会最终实例化Runner并调用其run方法。核心代码如下:
private static void execute( Class<?> testClass, Notifier notifier, Filter filter )
{
final int classModifiers = testClass.getModifiers();
if ( !isAbstract( classModifiers ) && !isInterface( classModifiers ) )
{
Request request = aClass( testClass );
if ( filter != null )
{
request = request.filterWith( filter );
}
Runner runner = request.getRunner();
if ( countTestsInRunner( runner.getDescription() ) != 0 )
{
runner.run( notifier );
}
}
}
总结
至此单元测试运行的相关原理就探究完了,我们来回顾下有哪些内容吧。
1. 通过IDEA直接运行单测时,会通过JUnitStarter的main方法作为入口,最终调用Junit运行单元测试。
2. Junit4将@Before、@Test、@After这些注解打标的方法都抽象成了Statement,整个单测的运行过程,实际上就是一系列Statement的运行过程。方法的调用是通过反射的方式实现的。
3. 借助于@RunWith(SpringRunner.class)注解,测试框架会运行SpringRunner实例的run方法,通过TestContextManager创建TestContext,并启动Spring容器。SpringRunner和SpringJUnit4ClassRunner实际上是等价的。
4. 借助于@SpringBootTest和@BootstrapWith(SpringBootTestContextBootstrapper.class)注解,测试框架通过SpringBootTestContextBootstrapper增强了TestContext,达到了启动SpringBoot应用的目的。
5. Maven通过运行maven-surefire-plugin:2.12.4:test启动单元测试,其核心是通过JUnit4Provider调用了JUnit框架的代码。
本文内容不用于商业目的,如涉及知识产权问题,请权利人联系51Testing小编(021-64471599-8017),我们将立即处理


