

本来笔者想对安卓Instrumentation和Uiautomator测试框架进行一番尝试,也百度了很多相关的博客,然后发现很多文章都是互相摘抄,某部分内容也没有及时更新,更不适用于现在最新的安卓开发环境。例如Instrumentation的ActivityInstrumrntationTestCase2子类,在最近的android包,反编译查看源代码时发现,直接被注释为了@deprecated(不建议使用);包括uiautomator,部分博客上写的是直接将platform下的uiautumator.jar复制进lib,然而同样的问题,在我反编译查看源码时发现,uiautumator.jar的所有方法都被注释为了@deprecated。谷歌对uiautomator的支持目前都集中在android.support.test包中。
所以读千篇博客,不如自己从官方文档细细查阅。
Instrumented Unit Tests
可以译为“设备单元测试”,指可以运行在安卓物理设备或者模拟器上的单元测试,它的一个最大的好处就是可以利用现有的安卓框架,以及谷歌提供的Android Testing Support Library来开发我们想要的任何自动化测试功能。缺点是对测试人员要求太高,需要深入了解安卓开发。然而对于一个有志于安卓自动化及性能的测试人员来说,从底层开始了解,绝对有益无害。
Google推荐了两种自动化UI测试的方式,第一种是利用Espresso,这种方式适用于单个应用程序的测,测试环境是android 2.2(API 8)及其以上;第二种是UiAutoMator,这种方式适用于多个应用程序的测试,测试环境是android 4.3(API 18)及其以上。我们先来看Espresso。
手写一个测试APP
首先我们自己尝试编写一个简单的测试APP
第一个活动页面:
package com.example.linrong.activitytest; import android.app.Activity; import android.content.Intent; import android.os.Bundle; import android.view.Menu; import android.view.MenuItem; import android.view.View; import android.view.Window; import android.widget.Button; import android.widget.Toast; /** * Created by LINRONG on 2017/5/14. */ public class FirstActivity extends Activity { @Override protected void onCreate(Bundle savedInstanceState){ super.onCreate(savedInstanceState); requestWindowFeature(Window.FEATURE_NO_TITLE); setContentView(R.layout.first_layout); Button button1 = (Button) findViewById(R.id.button_1); button1.setOnClickListener(new View.OnClickListener() { @Override public void onClick(View v) { // Toast.makeText(FirstActivity.this,"You clicked Button 1", // Toast.LENGTH_SHORT).show(); Intent intent = new Intent("com.example.linrong.activitytest.ACTION_START"); startActivity(intent); } }); } @Override public boolean onCreateOptionsMenu(Menu menu){ getMenuInflater().inflate(R.menu.main,menu); return true; } @Override public boolean onOptionsItemSelected(MenuItem item){ switch (item.getItemId()){ case R.id.add_item: Toast.makeText(this, "you clicked Add", Toast.LENGTH_SHORT).show(); break; case R.id.remove_item: Toast.makeText(this, "you clicked Remove", Toast.LENGTH_SHORT).show(); break; default: } return true; } } |
第二个活动页面:
package com.example.linrong.activitytest; import android.app.Activity; import android.content.Intent; import android.net.Uri; import android.os.Bundle; import android.view.View; import android.view.Window; import android.widget.Button; /** * Created by LINRONG on 2017/6/3. */ public class SecondActivity extends Activity { @Override public void onCreate(Bundle savedInstanceState){ super.onCreate(savedInstanceState); requestWindowFeature(Window.FEATURE_NO_TITLE); setContentView(R.layout.second_layout); Button button2 = (Button) findViewById(R.id.button_2); button2.setOnClickListener(new View.OnClickListener() { @Override public void onClick(View v) { Intent intent = new Intent(Intent.ACTION_VIEW); intent.setData(Uri.parse("http://www.baidu.com")); startActivity(intent); } }); } } |
模拟器上运行效果如下,从上往下一次是一个可点击的button(点击跳转另一个活动),文本输入框,标签和一张图片:

image.png
环境配置
鉴于配置Instrumented Unit Tests环境时踩了很多坑,把遇到的坑都拿出来给读者分享;
指定工程的依赖关系,在build.gradle文件中,注意Espresso运行环境是需要API18以上,也就是minSdkVersion必须大于18,不然会报错;
dependencies { androidTestCompile 'com.android.support:support-annotations:24.0.0' androidTestCompile 'com.android.support.test:runner:0.5' androidTestCompile 'com.android.support.test:rules:0.5' // Optional -- Hamcrest library androidTestCompile 'org.hamcrest:hamcrest-library:1.3' // Optional -- UI testing with Espresso androidTestCompile 'com.android.support.test.espresso:espresso-core:2.2.2' // Optional -- UI testing with UI Automator androidTestCompile 'com.android.support.test.uiautomator:uiautomator-v18:2.1.2' } |
声明运行器
android { defaultConfig { testInstrumentationRunner "android.support.test.runner.AndroidJUnitRunner" } } |
报错:[Android Error converting bytecode to dex: Cause: Dex cannot parse version 52 byte code]
这个问题困扰了我很久,网上也没有很明确的解决方案,后来去问了社区才得以解决,这个涉及到安卓的编译工具-jack,Jack (Java Android Compiler Kit)是新的Android 编译工具,从Android 6.0 开始加入,替换原有的编译工具,例如javac, ProGuard, jarjar和 dx。它主要负责将java代码编译成dex包,并支持代码压缩,混淆等。Jack支持JDK1.7,并且整合了一下特性。但是我的java开发环境时JDK1.8,如果要jack支持jdk1.8,需要在build.gradle中进行声明;
compileOptions { sourceCompatibility JavaVersion.VERSION_1_8 targetCompatibility JavaVersion.VERSION_1_8 } defaultConfig { jackOptions { enabled true } |
这样添加了依赖问题就解决了;
第一个测试程序
在Android Studio中,项目创建完成后自然会有一个测试目录,用于存放我们的单元测试代码(谷歌的开发和测试本就是一体的,可参见《谷歌是怎么测试的》)。简单的使用语法在注释中,更深层次的用法放到下一讲。
package com.example.linrong.activitytest; import android.content.Context; import android.support.test.InstrumentationRegistry; import android.support.test.espresso.core.deps.guava.base.Strings; import android.support.test.rule.ActivityTestRule; import android.support.test.runner.AndroidJUnit4; import android.support.test.filters.LargeTest; import static android.support.test.espresso.assertion.ViewAssertions.matches; import static android.support.test.espresso.matcher.ViewMatchers.isClickable; import static android.support.test.espresso.matcher.ViewMatchers.withId; import static android.support.test.espresso.matcher.ViewMatchers.withText; import android.support.test.espresso.matcher.ViewMatchers; import org.junit.Rule; import org.junit.Test; import org.junit.runner.RunWith; import static android.support.test.espresso.Espresso.onView; import static android.support.test.espresso.matcher.ViewMatchers.withText; import static org.junit.Assert.*; /** * Instrumentation test, which will execute on an Android device. * * @see <a href="http://d.android.com/tools/testing">Testing documentation</a> */ @RunWith(AndroidJUnit4.class) //安卓中用以区分不同的测试权限,是否可访问数据库,是否可访问sdk,是否可访问多媒体,是否可访问网络 @LargeTest public class FirstActivityTest { //button1的元素id private static final String BUTTON1_ID = "button_1"; //文本编辑框的元素id private static final String EDIT_TEXT_ID = "edit_text"; // 标签的元素id private static final String TEXT_VIEW_ID = "text_view"; private static final String IMAGE_ID = "image_view"; private static final String EXPECT = "hello world"; //@Rule用以获取我们要测试的activity活动 @Rule public ActivityTestRule<FirstActivity> mActivityRule = new ActivityTestRule<FirstActivity>( FirstActivity.class ); @Test public void useAppContext() throws Exception { // Context of the app under test. Context appContext = InstrumentationRegistry.getTargetContext(); assertEquals("com.example.linrong.activitytest", appContext.getPackageName()); } @Test public void button_is_exist(){ //获取id为1的button,判断是否可点击 onView(withId(R.id.button_1)).check(matches(isClickable())); } @Test public void text_check(){ //获取标签的文字,查看是否与预期一致 onView(ViewMatchers.withId(R.id.text_view)) .check(matches(withText(EXPECT))); } } |
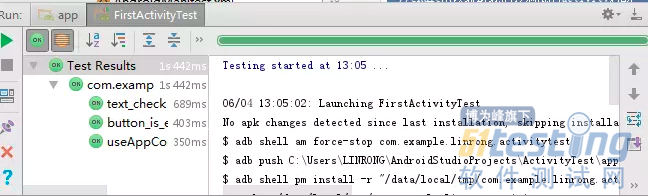
测试结果如下:
上文内容不用于商业目的,如涉及知识产权问题,请权利人联系博为峰小编(021-64471599-8017),我们将立即处理。


