

不知道大家有没有使用过PostMan来调试接口,刚打开postman的时候有有一个加载效果,觉得还不错也不难,于是就趁着今天有时间练了一把手。来看看效果图吧!
这个效果很简单,只要canvas的drawCircle方法和一个属性动画的知识即可完成。照例先放个GitHub传送门:PostManLoading
总体思路
1.画圆,最里面的实心圆;
2.再画圆,外面的三条空心圆;
3.画三个移动的小球。
既然是练手项目,在项目中也不大可能会用到,我就不写的那么详细了~
由于我们要做的是一个方形区域的效果,所以重写onMeasure方法把宽高重置为相等,这个不多说了。
1.画圆,最里面的实心圆:
首先呢,先定义一个半径和空心圆之间的间隔,和初始化一些画笔的操作
private Paint mPaintCircle; private Paint mPaintPoint; private int mRandius = 40; private int mInterval = 50;//空心圆之间的间隔 //初始化操作 mPaintCircle = new Paint(); mPaintCircle.setAntiAlias(true); mPaintCircle.setStyle(Paint.Style.STROKE); mPaintCircle.setStrokeWidth(3); mPaintCircle.setColor(Color.RED); mPaintPoint = new Paint(); mPaintPoint.setAntiAlias(true); mPaintPoint.setStyle(Paint.Style.FILL); mPaintPoint.setColor(Color.RED); |
然后要干嘛来着~,画圆呀!
int centerX = getWidth() / 2;
int centerY = getHeight() / 2;
//绘制实心圆
canvas.drawCircle(centerX, centerY, mRandius, mPaintPoint);
2.再画圆,外面的三条空心圆;
//绘制空心圆,我们以相等的间隔来依次画出
canvas.drawCircle(centerX, centerY, mRandius + mInterval, mPaintCircle);
canvas.drawCircle(centerX, centerY, mRandius + mInterval + mInterval, mPaintCircle);
canvas.drawCircle(centerX, centerY, mRandius + mInterval + mInterval + mInterval, mPaintCircle);
3.画三个移动的小球。
这里是此次博客的核心~
首先,我们分析滚动小球的圆心是在空心圆的轨迹上不停地变化着,但是半径不变,我们暂且定为20个像素。只要我们在属性动画中不停地获取空心圆上轨迹的每一个坐标点然后赋值给小球就可以了。开始了~我们先定义圆心坐标:
//第一个小圆圆心坐标 private float X1; private float Y1; //第二个小圆圆心坐标 private float X2; private float Y2; //第三个小圆圆心坐标 private float X3; private float Y3; |
然后开始写绘制代码,至于代码中的坐标为什么要加centerX 和centerY 这个等你看完就知道了,别急~
//绘制滚动的小圆球
canvas.drawCircle(centerX + X1, centerY + Y1, 20, mPaintPoint);
canvas.drawCircle(centerX + X2, centerY + Y2, 20, mPaintPoint);
canvas.drawCircle(centerX + X3, centerY + Y3, 20, mPaintPoint);
那么我们如何来获取空心圆上的每一个点的坐标呢?不如画个草图吧~

看图,我们要求的就是小红球的圆心坐标也就是空心圆的轨迹上的每一点的坐标值。
deg是对应整个PostManLoadingView的中心的角度值,这个是从0~360°时刻变化着的,既然知道角度,大的空心圆半径R也是已知,那么要求途中的X和Y值就很简单了,一个三角函数就可以:
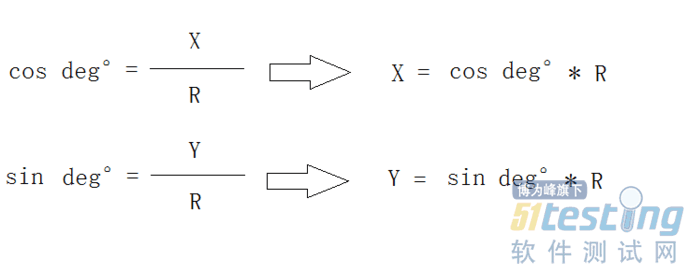
好的,到了这里应该就有人会想到用Math类来求正弦函数和余弦函数了~
但是Math.sin(rad)和Math.cos(rad)方法中需要传入的参数是指弧度rad而不是角度deg,所以这里需要把角度值转化成弧度制再调用Math函数。这里再放一个转化公式~具体详细的解释请看Android角度与弧度
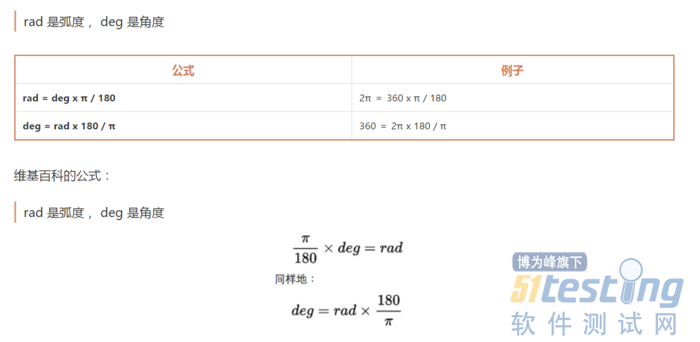
接下来就容易了~
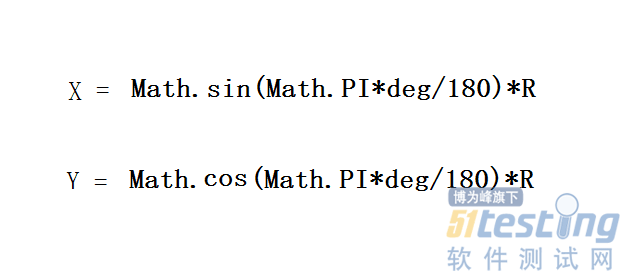
到了这里再来看我们上面留的那个问题就知道为什么了~求出X之后,那么小红球圆心坐标最终的X值是多少呢?很明显就是centerX +X。好的,继续往下走开始撸代码!这里我用一个属性动画ValueAnimator传入0-360代表角度,进而求出每一个度数时的X值和Y值,不说了,看代码
ValueAnimator animator = ValueAnimator.ofFloat(0, 360); animator.setDuration(mRandius * 30); animator.setRepeatCount(ValueAnimator.INFINITE); animator.setRepeatMode(ValueAnimator.RESTART); animator.setInterpolator(new LinearInterpolator()); |
然后去监听这个动画获取每一个角度值~
animator1.addUpdateListener(new ValueAnimator.AnimatorUpdateListener() { @Override public void onAnimationUpdate(ValueAnimator valueAnimator) { float deg = (float) valueAnimator.getAnimatedValue(); float rad = (float) (Math.PI * deg / 180); Y1 = (float) (Math.sin(rad) * (mRandius + mInterval)); X1 = (float) (Math.cos(rad) * (mRandius + mInterval)); } }); |
上文内容不用于商业目的,如涉及知识产权问题,请权利人联系博为峰小编(021-64471599-8017),我们将立即处理。


