

高斯模糊
高斯模糊(英语:Gaussian Blur),也叫高斯平滑,是在Adobe Photoshop、GIMP以及Paint.NET等图像处理软件中广泛使用的处理效果,通常用它来减少图像杂讯以及降低细节层次。这种模糊技术生成的图像,其视觉效果就像是经过一个半透明屏幕在观察图像,这与镜头焦外成像效果散景以及普通照明阴影中的效果都明显不同。高斯平滑也用于计算机视觉算法中的预先处理阶段,以增强图像在不同比例大小下的图像效果。 从数学的角度来看,图像的高斯模糊过程就是图像与正态分布做卷积。由于正态分布又叫作高斯分布,所以这项技术就叫作高斯模糊。图像与圆形方框模糊做卷积将会生成更加精确的焦外成像效果。由于高斯函数的傅立叶变换是另外一个高斯函数,所以高斯模糊对于图像来说就是一个低通滤波器。
高斯模糊运用了高斯的正态分布的密度函数,计算图像中每个像素的变换。

根据一维高斯函数,可以推导得到二维高斯函数:
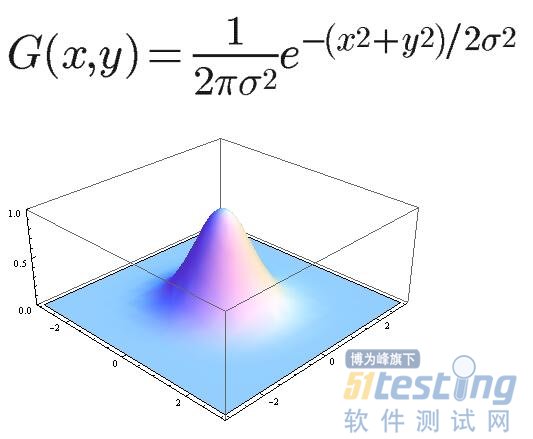
其中r是模糊半径,r^2 = x^2 + y^2,σ是正态分布的标准偏差。在二维空间中,这个公式生成的曲面的等高线是从中心开始呈正态分布的同心圆。分布不为零的像素组成的卷积矩阵与原始图像做变换。每个像素的值都是周围相邻像素值的加权平均。原始像素的值有最大的高斯分布值,所以有最大的权重,相邻像素随着距离原始像素越来越远,其权重也越来越小。这样进行模糊处理比其它的均衡模糊滤波器更高地保留了边缘效果。
其实,在iOS上实现高斯模糊是件很容易的事儿。早在iOS 5.0就有了Core Image的API,而且在CoreImage.framework库中,提供了大量的滤镜实现。
+(UIImage *)coreBlurImage:(UIImage *)image withBlurNumber:(CGFloat)blur { CIContext *context = [CIContext contextWithOptions:nil]; CIImage *inputImage= [CIImage imageWithCGImage:image.CGImage]; //设置filter CIFilter *filter = [CIFilter filterWithName:@"CIGaussianBlur"]; [filter setValue:inputImage forKey:kCIInputImageKey]; [filter setValue:@(blur) forKey: @"inputRadius"]; //模糊图片 CIImage *result=[filter valueForKey:kCIOutputImageKey]; CGImageRef outImage=[context createCGImage:result fromRect:[result extent]]; UIImage *blurImage=[UIImage imageWithCGImage:outImage]; CGImageRelease(outImage); return blurImage; } |
在Android上实现高斯模糊也可以使用原生的API—–RenderScript,不过需要Android的API是17以上,也就是Android 4.2版本。
/** * 使用RenderScript实现高斯模糊的算法 * @param bitmap * @return */ public Bitmap blur(Bitmap bitmap){ //Let's create an empty bitmap with the same size of the bitmap we want to blur Bitmap outBitmap = Bitmap.createBitmap(bitmap.getWidth(), bitmap.getHeight(), Bitmap.Config.ARGB_8888); //Instantiate a new Renderscript RenderScript rs = RenderScript.create(getApplicationContext()); //Create an Intrinsic Blur Script using the Renderscript ScriptIntrinsicBlur blurScript = ScriptIntrinsicBlur.create(rs, Element.U8_4(rs)); //Create the Allocations (in/out) with the Renderscript and the in/out bitmaps Allocation allIn = Allocation.createFromBitmap(rs, bitmap); Allocation allOut = Allocation.createFromBitmap(rs, outBitmap); //Set the radius of the blur: 0 < radius <= 25 blurScript.setRadius(20.0f); //Perform the Renderscript blurScript.setInput(allIn); blurScript.forEach(allOut); //Copy the final bitmap created by the out Allocation to the outBitmap allOut.copyTo(outBitmap); //recycle the original bitmap bitmap.recycle(); //After finishing everything, we destroy the Renderscript. rs.destroy(); return outBitmap; } |
我们开发的图像框架cv4j也提供了一个滤镜来实现高斯模糊。
GaussianBlurFilter filter = new GaussianBlurFilter();
filter.setSigma(10);
RxImageData.bitmap(bitmap).addFilter(filter).into(image2);
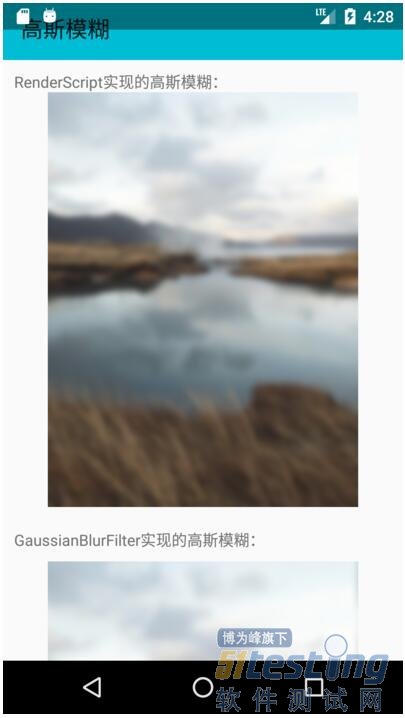

可以看出,cv4j实现的高斯模糊跟RenderScript实现的效果一致。
其中,GaussianBlurFilter的代码如下:
public class GaussianBlurFilter implements CommonFilter { private float[] kernel; private double sigma = 2; ExecutorService mExecutor; CompletionService<Void> service; public GaussianBlurFilter() { kernel = new float[0]; } public void setSigma(double a) { this.sigma = a; } @Override public ImageProcessor filter(final ImageProcessor src){ final int width = src.getWidth(); final int height = src.getHeight(); final int size = width*height; int dims = src.getChannels(); makeGaussianKernel(sigma, 0.002, (int)Math.min(width, height)); mExecutor = TaskUtils.newFixedThreadPool("cv4j",dims); service = new ExecutorCompletionService<>(mExecutor); // save result for(int i=0; i<dims; i++) { final int temp = i; service.submit(new Callable<Void>() { public Void call() throws Exception { byte[] inPixels = src.toByte(temp); byte[] temp = new byte[size]; blur(inPixels, temp, width, height); // H Gaussian blur(temp, inPixels, height, width); // V Gaussain return null; } }); } for (int i = 0; i < dims; i++) { try { service.take(); } catch (InterruptedException e) { e.printStackTrace(); } } mExecutor.shutdown(); return src; } /** * <p> here is 1D Gaussian , </p> * * @param inPixels * @param outPixels * @param width * @param height */ private void blur(byte[] inPixels, byte[] outPixels, int width, int height) { int subCol = 0; int index = 0, index2 = 0; float sum = 0; int k = kernel.length-1; for(int row=0; row<height; row++) { int c = 0; index = row; for(int col=0; col<width; col++) { sum = 0; for(int m = -k; m< kernel.length; m++) { subCol = col + m; if(subCol < 0 || subCol >= width) { subCol = 0; } index2 = row * width + subCol; c = inPixels[index2] & 0xff; sum += c * kernel[Math.abs(m)]; } outPixels[index] = (byte)Tools.clamp(sum); index += height; } } } public void makeGaussianKernel(final double sigma, final double accuracy, int maxRadius) { int kRadius = (int)Math.ceil(sigma*Math.sqrt(-2*Math.log(accuracy)))+1; if (maxRadius < 50) maxRadius = 50; // too small maxRadius would result in inaccurate sum. if (kRadius > maxRadius) kRadius = maxRadius; kernel = new float[kRadius]; for (int i=0; i<kRadius; i++) // Gaussian function kernel[i] = (float)(Math.exp(-0.5*i*i/sigma/sigma)); double sum; // sum over all kernel elements for normalization if (kRadius < maxRadius) { sum = kernel[0]; for (int i=1; i<kRadius; i++) sum += 2*kernel[i]; } else sum = sigma * Math.sqrt(2*Math.PI); for (int i=0; i<kRadius; i++) { double v = (kernel[i]/sum); kernel[i] = (float)v; } return; } } |
空间卷积
二维卷积在图像处理中会经常遇到,图像处理中用到的大多是二维卷积的离散形式。

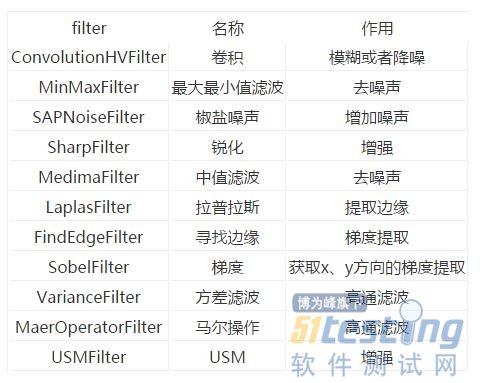
以下是cv4j实现的各种卷积效果。

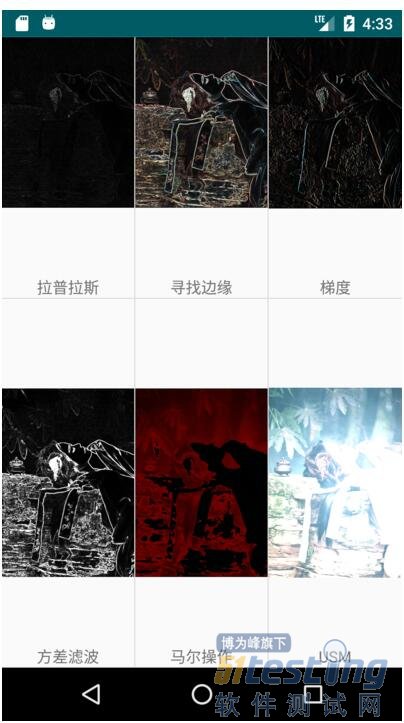
cv4j 目前支持如下的空间卷积滤镜
总结
cv4j 是gloomyfish和我一起开发的图像处理库,目前还处于早期的版本。
目前已经实现的功能:

这周,我们对 cv4j 做了较大的调整,对整体架构进行了优化。还加上了空间卷积功能(图片增强、锐化、模糊等等)。接下来,我们会做二值图像的分析(腐蚀、膨胀、开闭操作、轮廓提取等等)


