

实际上关于api的文档很少很少.从网络中找了好会才发现俩
1.获取API-KEY首先来获取一个API-KEY 通过右上角Administrator--Profile

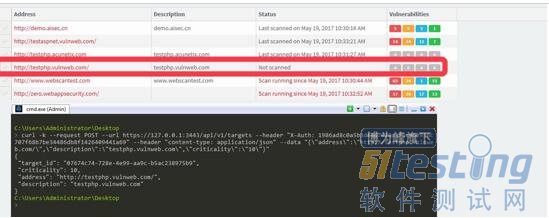
2.建立一个扫描目标
在演示一个扫描之前您将需要会在您想要扫描的网站上建立一个扫描目标。您将需要利用(POST)目标终端去实现它。使用cURL:
curl -k --request POST --url https://127.0.0.1:3443/api/v1/targets --header "X-Auth: apikey" --header "content-type: application/json" --data "{\"address\":\"http://testphp.vulnweb.com/\",\"description\":\"testphp.vulnweb.com\",\"criticality\":\"10\"}"
其中:
- https://127.0.0.1:3443 - 是Acunetix11端口URL(就是你安装了Acunetix11 的电脑)
- API-KEY - 这是Acunetix11的API-KEY,如果你安装了就可以在页面右上角的Administration中生成KEY了。
- http://testphp.vulnweb.com - 是您想要添加的一个扫描目标网址.务必带上http|https
- testphp.vulnweb.com - 是描述扫描目标的词句(非必填)
- 10 - 是目标的临界值 (Critical [30], High [20], Normal [10], Low [0])
命令成功之后会201,以及其它一些数据,其中包括target_id(返回结果中locations最后的一截字符串)
C:\Users\Administrator\Desktop > curl -k --request POST --url https://127.0.0.1:3443/api/v1/targets --header "X-Auth: API_KEY" --header "content-type: application/json" --data "{\"address\":\"http://testphp.vulnw b.com/\",\"description\":\"testphp.vulnweb.com\",\"criticality\":\"10\"}" { "target_id": "07674c74-728e-4e99-aa9c-b5ac238975b9", "criticality": 10, "address": "http://testphp.vulnweb.com/", "description": "testphp.vulnweb.com" } |
3.在一个创建好的目标上运行一个扫描
curl -k -i --request POST --url https://127.0.0.1:3443/api/v1/scans --header "X-Auth: API_KEY" --header "content-type: application/json" --data "{\"target_id\":\"07674c74-728e-4e99-aa9c-b5ac238975b9\",\"profile_id\":\"11111111-1111-1111-1111-111111111111\",\"schedule\":{\"disable\":false,\"start_date\":null,\"time_sensitive\":false}}"
其中:
- https://127.0.0.1:3443 - 是Acunetix11端口URL
- API-KEY - 是您在第1步中生成的的API key
- TARGET-ID - 是您从之前的JSON回复中得到的target_id值
- 11111111-1111-1111-1111-111111111111 - 是扫描profile ID。通过使用(GET)scanning_profiles 端点获得的列表,列表包括了扫描profile和他们的ID。
关于获取target_id
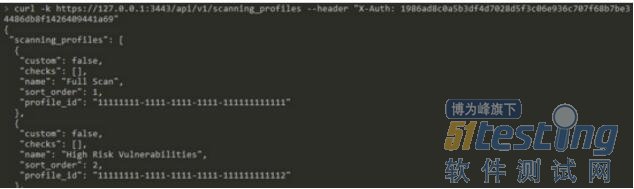
> curl -k https://127.0.0.1:3443/api/v1/scanning_profiles --header "X-Auth: API_KEY" { "scanning_profiles": [ { "custom": false, "checks": [], "name": "Full Scan", "sort_order": 1, "profile_id": "11111111-1111-1111-1111-111111111111" }, { "custom": false, "checks": [], "name": "High Risk Vulnerabilities", "sort_order": 2, "profile_id": "11111111-1111-1111-1111-111111111112" }, { "custom": false, "checks": [], "name": "Cross-site Scripting Vulnerabilities", "sort_order": 3, "profile_id": "11111111-1111-1111-1111-111111111116" }, { "custom": false, "checks": [], "name": "SQL Injection Vulnerabilities", "sort_order": 4, "profile_id": "11111111-1111-1111-1111-111111111113" }, { "custom": false, "checks": [], "name": "Weak Passwords", "sort_order": 5, "profile_id": "11111111-1111-1111-1111-111111111115" }, { "custom": false, "checks": [], "name": "Crawl Only", "sort_order": 6, "profile_id": "11111111-1111-1111-1111-111111111117" } ] } |
启动一个扫描任务
> curl -k -i --request POST --url https://127.0.0.1:3443/api/v1/scans --header "X-Auth: API_KEY" --header "content-type: application/json" --data "{\"target_id\":\"07674c74-728e-4e99-aa9c-b5ac238975b9\",\"profile_id\":\"11111111-1111-1111-1111-111111111111\",\"schedule\":{\"disable\":false,\"start_date\":null,\"time_sensitive\":false}}" HTTP/1.1 201 Created Pragma: no-cache Content-type: application/json; charset=utf8 Cache-Control: no-cache, must-revalidate Expires: -1 Location: /api/v1/scans/a6e36dd0-9976-46a7-9740-29f897f911d6 Date: Fri, 19 May 2017 03:40:12 GMT Transfer-Encoding: chunked { "target_id": "07674c74-728e-4e99-aa9c-b5ac238975b9", "ui_session_id": null, "schedule": { "disable": false, "start_date": null, "time_sensitive": false }, "profile_id": "11111111-1111-1111-1111-111111111111" } |

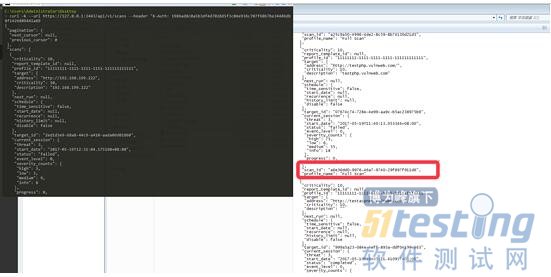
4.查看任务扫描的状态
先获取扫描任务的scan_id
curl -k --url https://127.0.0.1:3443/api/v1/scans --header "X-Auth:API_KEY" --header "content-type: application/json"
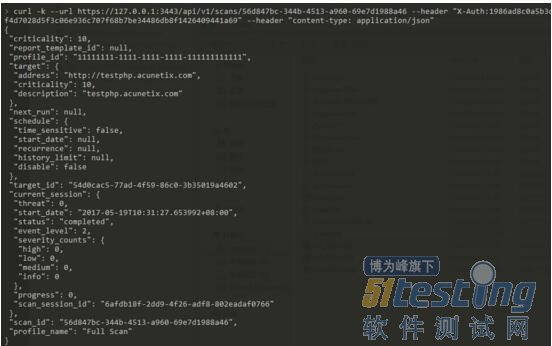
查看具体scan_id 的扫描细节
curl -k --url https://127.0.0.1:3443/api/v1/scans/56d847bc-344b-4513-a960-69e7d1988a46 --header "X-Auth:API-KEY" --header "content-type: application/json"
5.停止任务
apiurl+/scans/+scan_id+/abort
curl -k --url https://127.0.0.1:3443/api/v1/scans/56d847bc-344b-4513-a960-69e7d1988a46/abort --header "X-Auth:API-KEY" --header "content-type: application/json"
6.生成模板
获取模板
curl -k --url https://127.0.0.1:3443/api/v1/scans --header "X-Auth:API-KEY" --header "content-type: application/json"

curl -k -i --request POST --url https://127.0.0.1:3443/api/v1/reports --header "X-Auth: API-KEY" --header "content-type: application/json" --data "{\"template_id\":\"11111111-1111-1111-1111-111111111111\",\"source\":{\"list_type\":\"scans\", \"id_list\":[\"SCAN-ID\"]}}
其中:
- https://127.0.0.1:3443 - 是Acunetix11端口URL
- API-KEY - 是您在第1步中生成的的API key
- SCAN-ID - 是您从之前的JSON回复中获得的scan_id。
会有一个201 HTTP回复显示了请求是成功的 ,并且会包含一个带有id的Location header(例如 Location: /api/v1/reports/54f402f6-7a60-4934-952f-45bfe6c4abf4 )。一旦报告被URL: https://127.0.0.1:3443/reports/download/54f402f6-7a60-4934-952f-45bfe6c4abf4.pdf 访问,这个id可以被用来下载报告。最新版本还会提供HTML版本的报告,并且可以从https://127.0.0.1:3443/reports/download/54f402f6-7a60-4934-952f-45bfe6c4abf4.html 访问。
上文内容不用于商业目的,如涉及知识产权问题,请权利人联系博为峰小编(021-64471599-8017),我们将立即处理。


