

前言
最近刚学习了下Android单元测试,看了小创作的中文系列教程,也看了官方的英文教程,刚接触那几天那叫一个痛苦,简直就是陷入了泥潭,接触到了好多框架,并且不清楚什么情况下到底用哪个框架。我们先从最基础的做起,项目目前使用的是MVP架构,先从P层开始做单元测试,由浅入深。之前老说MVP方便单元测试,到底哪方便了,等真开始做单元测试的时候,才真正开始理解MVP架构。首先是我们的P层是不引入任何Android框架代码的(如果引用了Android框架的代码需要引入其它框架才能做测试),之前理解不够,在P层执行Toast(应该在View层执行)操作了。
我们先来看下需要了解的框架:
JUnit:Java 编程语言的单元测试框架,主要用于断言。
Mockito:Java界使用最广泛的一个mock框架,mock表示在测试环境中创建一个类的虚假对象方便用于验证。Mockito不支持mock匿名类、final类、静态方法和private方法。
PowerMock:扩展了Mockito,支持Mock静态、final、私有方法等。
JUnit
仓库地址:https://github.com/junit-team/junit4
添加依赖:
testCompile 'junit:junit:4.12'
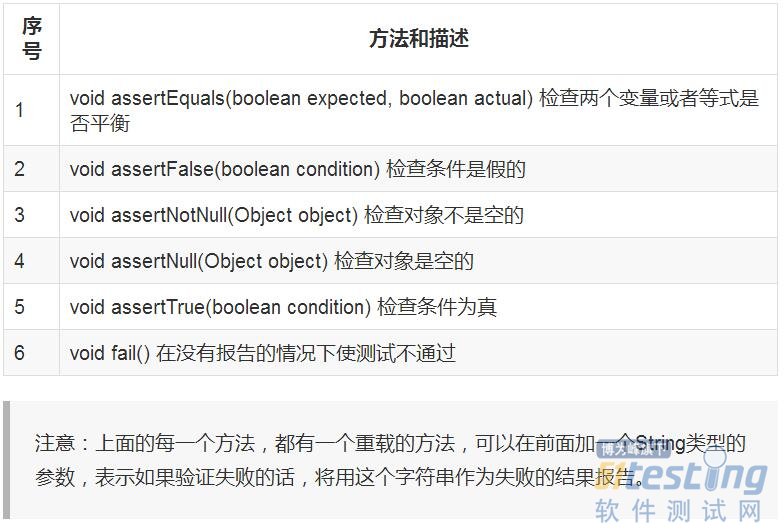
Assert类中比较重要的方法如下:
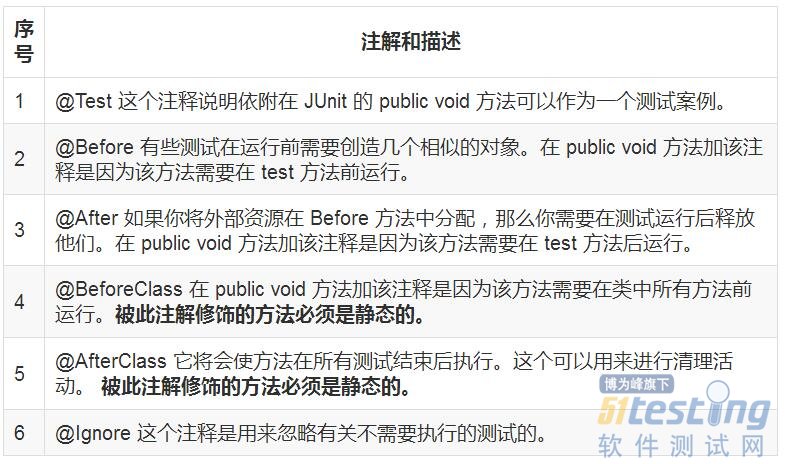
JUnit 中的注解及含义:
超时
Junit 提供了一个指定超时参数。如果一个测试用例执行的毫秒数超过了指定的参数值,那么 Junit 将自动将它标记为失败。
@Test(timeout=1000) public void testPrintMessage() { ... } |
捕获异常
Junit 提供了一个捕获异常的参数。你可以测试代码是否抛出了预期的异常。

参数化
Junit 4 引入了一个新的功能参数化测试。参数化测试允许开发人员使用不同的值反复运行同一个测试。你可以遵循下面的步骤来创建参数化测试。
在测试类上添加注解@RunWith(Parameterized.class)。
创建一个由 @Parameters 注解的公共的静态方法,它返回一个对象的集合(数组)来作为测试数据集合。
创建一个公共的构造函数,参数个数和类型与提供的数据集合一一对应。
为每一列测试数据创建一个实例变量。
用实例变量作为测试数据的来源来创建你的测试用例。
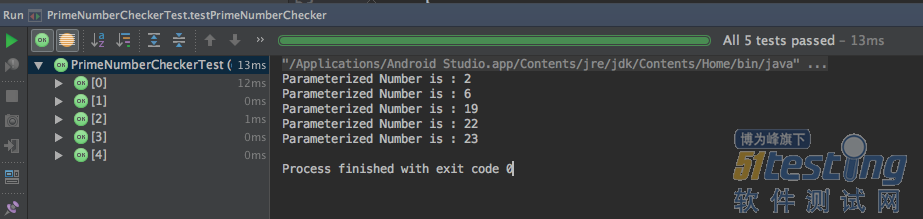
public class PrimeNumberChecker { public Boolean validate(final Integer primeNumber) { for (int i = 2; i < (primeNumber / 2); i++) { if (primeNumber % i == 0) { return false; } } return true; } } import java.util.Arrays; import java.util.Collection; import org.junit.Test; import org.junit.Before; import org.junit.runners.Parameterized; import org.junit.runners.Parameterized.Parameters; import org.junit.runner.RunWith; import static org.junit.Assert.assertEquals; @RunWith(Parameterized.class) public class PrimeNumberCheckerTest { private Integer inputNumber; private Boolean expectedResult; private PrimeNumberChecker primeNumberChecker; @Before public void initialize() { primeNumberChecker = new PrimeNumberChecker(); } // Each parameter should be placed as an argument here // Every time runner triggers, it will pass the arguments // from parameters we defined in primeNumbers() method public PrimeNumberCheckerTest(Integer inputNumber, Boolean expectedResult) { this.inputNumber = inputNumber; this.expectedResult = expectedResult; } @Parameterized.Parameters public static Collection primeNumbers() { return Arrays.asList(new Object[][] { { 2, true }, { 6, false }, { 19, true }, { 22, false }, { 23, true } }); } // This test will run 4 times since we have 5 parameters defined @Test public void testPrimeNumberChecker() { System.out.println("Parameterized Number is : " + inputNumber); assertEquals(expectedResult, primeNumberChecker.validate(inputNumber)); } } |
运行结果:
Mockito
所谓的mock就是创建一个类的虚假的对象,在测试环境中,用来替换掉真实的对象,以达到两大目的:
验证这个对象的某些方法的调用情况,调用了多少次,参数是什么等等
指定这个对象的某些方法的行为,返回特定的值,或者是执行特定的动作
注意:Mockito不支持mock匿名类、final类、静态方法和private方法。
添加依赖:
repositories { jcenter() } dependencies { testCompile "org.mockito:mockito-core:+" } |
验证行为
//静态导入 import static org.mockito.Mockito.*; //创建mock List mockedList = mock(List.class); //使用mock对象 mockedList.add("one"); mockedList.clear(); //验证 verify(mockedList).add("one"); verify(mockedList).clear(); |
stubbing
//你可以mock一个实体类 LinkedList mockedList = mock(LinkedList.class); //处理指定行为 when(mockedList.get(0)).thenReturn("first"); when(mockedList.get(1)).thenThrow(new RuntimeException()); //将会打印"first" System.out.println(mockedList.get(0)); //将会抛出runtime exception System.out.println(mockedList.get(1)); //将会打印"null" 因为get(999)没有指定行为 System.out.println(mockedList.get(999)); //尽管可以验证一个指定行为的调用,但通常这是多余的 //如果你关心get(0)的返回,那会被其它事情打断 //如果你不关心get(0)的返回,那你不应该指定行为,直接验证就可以了 verify(mockedList).get(0); |
默认情况下,所有方法都会有返回值,一个 mock 将返回 null,一个原始/基本类型的包装值或适当的空集。例如,对于一个 int/Integer 就是 0,而对于 boolean/Boolean 就是 false。
Stubbing 可以被覆盖。
一旦 stub,该方法将始终返回一个 stub 的值,无论它被调用多少次。
stubbing 的顺序是重要的。
参数匹配器
Mockito 验证参数值使用 Java 方式:通过使用 equals() 方法。有时,当需要额外的灵活性,可以使用参数匹配器:
//stubbing using built-in anyInt() argument matcher when(mockedList.get(anyInt())).thenReturn("element"); //stubbing using custom matcher (let's say isValid() returns your own matcher implementation): when(mockedList.contains(argThat(isValid()))).thenReturn("element"); //following prints "element" System.out.println(mockedList.get(999)); //you can also verify using an argument matcher verify(mockedList).get(anyInt()); |
参数匹配器允许灵活的验证或 stubbing。自定义参数的匹配信息,请查看 Javadoc 中 ArgumentMatcher 类。如果你正在使用参数的匹配,所有的参数都由匹配器来提供。
下面的示例演示验证,但同样适用于 stubbing:
verify(mock).someMethod(anyInt(), anyString(), eq("third argument")); //above is correct - eq() is also an argument matcher verify(mock).someMethod(anyInt(), anyString(), "third argument"); //above is incorrect - exception will be thrown because third argument is given without an argument matcher. |
验证调用次数
//using mock mockedList.add("once"); mockedList.add("twice"); mockedList.add("twice"); mockedList.add("three times"); mockedList.add("three times"); mockedList.add("three times"); //following two verifications work exactly the same - times(1) is used by default verify(mockedList).add("once"); verify(mockedList, times(1)).add("once"); //exact number of invocations verification verify(mockedList, times(2)).add("twice"); verify(mockedList, times(3)).add("three times"); //verification using never(). never() is an alias to times(0) verify(mockedList, never()).add("never happened"); //verification using atLeast()/atMost() verify(mockedList, atLeastOnce()).add("three times"); verify(mockedList, atLeast(2)).add("five times"); verify(mockedList, atMost(5)).add("three times"); times(1) 是默认的,因此,使用的 times(1) 可以显示的省略。 Stubbing void 方法处理异常 doThrow(new RuntimeException()).when(mockedList).clear(); //following throws RuntimeException: mockedList.clear(); |
有序的验证
// A. Single mock whose methods must be invoked in a particular order List singleMock = mock(List.class); //using a single mock singleMock.add("was added first"); singleMock.add("was added second"); //create an inOrder verifier for a single mock InOrder inOrder = inOrder(singleMock); //following will make sure that add is first called with "was added first, then with "was added second" inOrder.verify(singleMock).add("was added first"); inOrder.verify(singleMock).add("was added second"); // B. Multiple mocks that must be used in a particular order List firstMock = mock(List.class); List secondMock = mock(List.class); //using mocks firstMock.add("was called first"); secondMock.add("was called second"); //create inOrder object passing any mocks that need to be verified in order InOrder inOrder = inOrder(firstMock, secondMock); //following will make sure that firstMock was called before secondMock inOrder.verify(firstMock).add("was called first"); inOrder.verify(secondMock).add("was called second"); // Oh, and A + B can be mixed together at will |
有序验证是为了灵活,你不必一个接一个验证所有的交互。
此外,您还可以通过创建 InOrder 对象传递只与有序验证相关的 mock 。
验证 mock 上不会发生交互
//using mocks - only mockOne is interacted mockOne.add("one"); //ordinary verification verify(mockOne).add("one"); //verify that method was never called on a mock verify(mockOne, never()).add("two"); //verify that other mocks were not interacted verifyZeroInteractions(mockTwo, mockThree); |
寻找多余的调用
//using mocks mockedList.add("one"); mockedList.add("two"); verify(mockedList).add("one"); //following verification will fail verifyNoMoreInteractions(mockedList); |
注意:不建议 verifyNoMoreInteractions() 在每个测试方法中使用。 verifyNoMoreInteractions() 是从交互测试工具包一个方便的断言。只有与它的相关时才使用它。滥用它导致难以维护。
标准创建 mock 方式——使用 @Mock 注解
最小化可重用 mock 创建代码
使测试类更加可读性
使验证错误更加易读,因为字段名称用于唯一识别 mock
public class ArticleManagerTest { @Mock private ArticleCalculator calculator; @Mock private ArticleDatabase database; @Mock private UserProvider userProvider; private ArticleManager manager; @Before public void init(){ MockitoAnnotations.initMocks(this); } ... |
可以使用内建 runner: MockitoJUnitRunner 或者 rule: MockitoRule
更多详见 MockitoAnnotations
另外也可以通过在类上使用@RunWith(MockitoJUnitRunner.class)来达到相同的效果。
Stubbing 连续调用(迭代器式的 stubbing)
when(mock.someMethod("some arg")) .thenThrow(new RuntimeException()) .thenReturn("foo"); //First call: throws runtime exception: mock.someMethod("some arg"); //Second call: prints "foo" System.out.println(mock.someMethod("some arg")); //Any consecutive call: prints "foo" as well (last stubbing wins). System.out.println(mock.someMethod("some arg")); 下面是一个精简版本: when(mock.someMethod("some arg")) .thenReturn("one", "two", "three"); |
回调 Stubbing
Mockito允许使用泛型 Answer 接口。我们建议您只使用thenReturn() 或 thenThrow() 来 stubbing 。但是,如果你有一个需要 stub 到泛型 Answer 接口,这里有一个例子:
when(mock.someMethod(anyString())).thenAnswer(new Answer() { Object answer(InvocationOnMock invocation) { Object[] args = invocation.getArguments(); Object mock = invocation.getMock(); return "called with arguments: " + args; } }); //the following prints "called with arguments: foo" System.out.println(mock.someMethod("foo")); |
doThrow() 家族方法
Stubbing void 方法,需要不同的 when(Object)方法,因为编译器不喜欢括号内无效的方法。在用于 Stubbing void 方法中,doThrow(Throwable…) 代替了 stubVoid(Object)。主要原因是提高可读性和与 doAnswer() 保持一致性。
当你想用 stub void 方法时,使用 doThrow():
doThrow(new RuntimeException()).when(mockedList).clear(); //following throws RuntimeException: mockedList.clear(); |
在调用 when() 的相应地方可以使用 doThrow(), doAnswer(), doNothing(), doReturn() 和 doCallRealMethod(),当stub void 方法和stub 方法在 spy 对象时(见下面),可以不止一次的 stub 相同的方法,在测试的中期来改变 mock 的行为。在所有的 stubbing 调用时,你会更加倾向于使用这些方法来代替 when()。
spy
spy可以实现调用对象的默认实现。
如果不指定mock方法的特定行为,一个mock对象的所有非void方法都将返回默认值:int、long类型方法将返回0,boolean方法将返回false,对象方法将返回null等等;而void方法将什么都不做。
区别:spy对象的方法默认调用真实的逻辑,mock对象的方法默认什么都不做,或直接返回默认值。
//假设目标类的实现是这样的 public class PasswordValidator { public boolean verifyPassword(String password) { return "xiaochuang_is_handsome".equals(password); } } @Test public void testSpy() { //跟创建mock类似,只不过调用的是spy方法,而不是mock方法。spy的用法 PasswordValidator spyValidator = Mockito.spy(PasswordValidator.class); //在默认情况下,spy对象会调用这个类的真实逻辑,并返回相应的返回值,这可以对照上面的真实逻辑 spyValidator.verifyPassword("xiaochuang_is_handsome"); //true spyValidator.verifyPassword("xiaochuang_is_not_handsome"); //false //spy对象的方法也可以指定特定的行为 Mockito.when(spyValidator.verifyPassword(anyString())).thenReturn(true); //同样的,可以验证spy对象的方法调用情况 spyValidator.verifyPassword("xiaochuang_is_handsome"); Mockito.verify(spyValidator).verifyPassword("xiaochuang_is_handsome"); //pass } |
捕获参数
ArgumentCaptor类允许我们在verification期间访问方法的参数。得到方法的参数后我们可以使用它进行测试。
@Captor ArgumentCaptor<List> arguments; @Before public void init() { // Mockito has a very convenient way to inject mocks by using the @Mock annotation. To // inject the mocks in the test the initMocks method needs to be called. MockitoAnnotations.initMocks(this); } @Test public void testArgument() { List asList = Arrays.asList("someElement_test", "someElement"); final List mockedList = mock(List.class); mockedList.addAll(asList); verify(mockedList).addAll(arguments.capture()); final List capturedArgument = arguments.getValue(); assertEquals(capturedArgument.get(1),"someElement"); } |
PowerMock
仓库地址:https://github.com/powermock/powermock
//添加依赖 testCompile "org.powermock:powermock-module-junit4:1.6.4" testCompile "org.powermock:powermock-module-junit4-rule:1.6.4" testCompile "org.powermock:powermock-api-mockito:1.6.4" testCompile "org.powermock:powermock-classloading-xstream:1.6.4" |
PowerMock扩展了EasyMock和Mockito框架,增加了对static和final方法mock支持等功能。
PowerMock有两个重要的注解:
@RunWith(PowerMockRunner.class)
@PrepareForTest( { YourClassWithEgStaticMethod.class })
如果你的测试用例里没有使用注解@PrepareForTest,那么可以不用加注解@RunWith(PowerMockRunner.class),反之亦然。当你需要使用PowerMock强大功能(Mock静态、final、私有方法等)的时候,就需要加注解@PrepareForTest。


