
 java 3D 第二天 场景切换中,我们需要使用SimpleUniverse的getLocale()方法的replaceBranchGroup()方法,在replaceBranchGroup()方法中有两个参数,是要切换的场景对象,参数的顺序为oldScene,newScene。
SimpleUniverse universe = new SimpleUniverse(oldScene);
universe.getLocal().replaceBranchGroup(oldScene,newScene);
要注意的是:切换的场景必须是设置了 setCapability(BranchGroup.ALLOW_DETACH);运行子节点从父节点中分离出去。
这里的代码我们使用java 3D第一天 场景的介绍中将里面的场景复制一份,进行切换使用:代码如下:
package com.first.scene;
import java.applet.Applet;
import java.awt.BorderLayout;
import java.awt.Button;
import java.awt.GraphicsConfiguration;
import java.awt.event.ActionEvent;
import java.awt.event.ActionListener;
import javax.media.j3d.Appearance;
import javax.media.j3d.Background;
import javax.media.j3d.BoundingSphere;
import javax.media.j3d.BranchGroup;
import javax.media.j3d.Canvas3D;
import javax.media.j3d.DirectionalLight;
import javax.media.j3d.Material;
import javax.vecmath.Color3f;
import javax.vecmath.Point3d;
import javax.vecmath.Vector3f;
import com.sun.j3d.utils.applet.MainFrame;
import com.sun.j3d.utils.geometry.ColorCube;
import com.sun.j3d.utils.geometry.Cone;
import com.sun.j3d.utils.universe.SimpleUniverse;
public class first_secen extends Applet implements ActionListener{
SimpleUniverse universe;
Button button;
BranchGroup scene;
BranchGroup scene2;
public BranchGroup createSceneGraph(){
BranchGroup bjRoot = new BranchGroup();
objRoot.setCapability(BranchGroup.ALLOW_DETACH);
BoundingSphere bounds = new BoundingSphere(new Point3d(0.0,0.0,0.0),100.0);
Color3f bgcColor = new Color3f(1.0f,1.0f,1.0f);
Background bg = new Background(bgcColor);
bg.setApplicationBounds(bounds);
objRoot.addChild(bg);
Color3f DirectionalColor = new Color3f(1.f,1.f,1.f);
Vector3f vec = new Vector3f(0.f,0.f,-1.0f);
DirectionalLight diretcton = new DirectionalLight(DirectionalColor,vec);
diretcton.setInfluencingBounds(bounds);
objRoot.addChild(diretcton);
Appearance app = new Appearance();
Material material = new Material();
material.setEmissiveColor(new Color3f(1.0f,0.0f,0.0f));
app.setMaterial(material);
ColorCube colorCube = new ColorCube(0.5);
colorCube.setAppearance(app);
objRoot.addChild(colorCube);
objRoot.compile();
return objRoot;
}
public BranchGroup createSceneGraph1(){
BranchGroup bjRoot = new BranchGroup();
objRoot.setCapability(BranchGroup.ALLOW_DETACH);
BoundingSphere bounds = new BoundingSphere(new Point3d(0.0,0.0,0.0),100.0);
Color3f bgcColor = new Color3f(1.0f,1.0f,1.0f);
Background bg = new Background(bgcColor);
bg.setApplicationBounds(bounds);
objRoot.addChild(bg);
Color3f DirectionalColor = new Color3f(1.f,1.f,1.f);
Vector3f vec = new Vector3f(0.f,0.f,-1.0f);
DirectionalLight diretcton = new DirectionalLight(DirectionalColor,vec);
diretcton.setInfluencingBounds(bounds);
objRoot.addChild(diretcton);
Appearance app = new Appearance();
Material material = new Material();
material.setEmissiveColor(new Color3f(1.0f,0.0f,0.0f));
app.setMaterial(material);
Cone cone = new Cone(0.5f,1.0f,1,app);
objRoot.addChild(cone);
objRoot.compile();
return objRoot;
}
public first_secen(){
setLayout(new BorderLayout());
GraphicsConfiguration config = SimpleUniverse.getPreferredConfiguration();
Canvas3D canvas3d = new Canvas3D(config);
add(canvas3d,BorderLayout.CENTER);
button = new Button("change");
add(button,BorderLayout.WEST);
button.addActionListener(this);
scene = createSceneGraph();
scene2 = createSceneGraph1();
universe = new SimpleUniverse(canvas3d);
universe.getViewingPlatform().setNominalViewingTransform();
universe.addBranchGraph(scene2);
}
public static void main(String[] args){
new MainFrame(new first_secen(), 800,600);
}
@Override
public void actionPerformed(ActionEvent arg0) {
if (arg0.getSource() == button) {
universe.getLocale().replaceBranchGraph(scene2, scene);
}
}
}
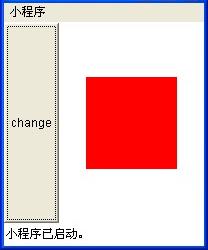
效果图如下:

