
-
Linux系统信息查看命令
2011-05-03 19:29:49
Web服务器
数量
1台
系统
CentOS 5.4 i386 (32-bit) (Linux 2.6.18-164.el5内核)
(注:使用命令head -n 1 /etc/issue查看操作系统版本
使用命令uname –a 查看操作系统内核信息)
应用软件
Apache 1.x/nginx 1.x
CPU
Intel(R) Xeon(R) CPU E5620 @ 2.40GHz 8核
(注:使用命令cat /proc/cpuinfo查看)
Memory
8GB
(注:使用命令free –g 查看)
Disk
Sata硬盘 500GB
(注:使用命令df -m查看)
查看操作系统信息 ----> cat /etc/issue
Welcome to openSUSE 11.2 "Emerald" - Kernel \r (\l).# lsb_release -a
LSB Version: :core-3.1-ia32:core-3.1-noarch:graphics-3.1-ia32:graphics-3.1-noarch
Distributor ID: CentOS
Description: CentOS release 5.4 (Final)
Release: 5.4
Codename: Final
这个命令适用于所有的linux,包括Redhat、SuSE、Debian等发行版。
查看内核信息 ----> uname -a
Linux localhost 2.6.31.14-0.6-desktop #1 SMP PREEMPT 2010-12-10 11:18:32 +0100 i686 i686 i386 GNU/Linux-------------------------------------------------------------
测试机器的硬件信息:
查看CPU信息(型号)
# cat /proc/cpuinfo | grep name | cut -f2 -d: | uniq -c
8 Intel(R) Xeon(R) CPU E5410 @ 2.33GHz
(看到有8个逻辑CPU, 也知道了CPU型号)
# cat /proc/cpuinfo | grep physical | uniq -c
4 physical id : 0
4 physical id : 1
(说明实际上是两颗4核的CPU)-----------------------------
echo "logical CPU number:"
#逻辑CPU个数
cat /proc/cpuinfo | grep "processor" | wc -l
echo "physical CPU number:"
#物理CPU个数:
cat /proc/cpuinfo | grep "physical id" | sort | uniq | wc -l-------------------------------
# getconf LONG_BIT
32
(说明当前CPU运行在32bit模式下, 但不代表CPU不支持64bit)
# cat /proc/cpuinfo | grep flags | grep ' lm ' | wc -l
8
(结果大于0, 说明支持64bit计算. lm指long mode, 支持lm则是64bit)
再完整看cpu详细信息, 不过大部分我们都不关心而已.
# dmidecode | grep 'Processor Information'
查看内 存信息
# cat /proc/meminfo
# uname -a
Linux euis1 2.6.9-55.ELsmp #1 SMP Fri Apr 20 17:03:35 EDT 2007 i686 i686 i386 GNU/Linux
(查看当前操作系统内核信息)
# cat /etc/issue | grep Linux
Red Hat Enterprise Linux AS release 4 (Nahant Update 5)
(查看当前操作系统发行版信息)
查看机器型号
# dmidecode | grep "Product Name"
查看网卡信息
# dmesg | grep -i eth转自:http://www.oschina.net/question/12_30886
--------------------------------------------------------
Linux系统信息查看命令:系统
# uname -a # 查看内核/操作系统/CPU信息
# head -n 1 /etc/issue # 查看操作系统版本 cat /etc/issue
# cat /proc/cpuinfo # 查看CPU信息
model name : Intel(R) Core(TM)2 Duo CPU E7500 @ 2.93GHz
# hostname # 查看计算机名
# lspci -tv # 列出所有PCI设备
# lsusb -tv # 列出所有USB设备
# lsmod # 列出加载的内核模块
# env # 查看环境变量资源# free -m # 查看内存使用量和交换区使用量 free/free -g
# df -h # 查看各分区使用情况
# du -sh <目录名> # 查看指定目录的大小
# grep MemTotal /proc/meminfo # 查看内存总量
# grep MemFree /proc/meminfo # 查看空闲内存量
# uptime # 查看系统运行时间、用户数、负载
# cat /proc/loadavg # 查看系统负载磁盘和分区# mount | column -t # 查看挂接的分区状态
# fdisk -l # 查看所有分区
# swapon -s # 查看所有交换分区
# hdparm -i /dev/hda # 查看磁盘参数(仅适用于IDE设备)
# dmesg | grep IDE # 查看启动时IDE设备检测状况网络# ifconfig # 查看所有网络接口的属性
# iptables -L # 查看防火墙设置
# route -n # 查看路由表
# netstat -lntp # 查看所有监听端口
# netstat -antp # 查看所有已经建立的连接
# netstat -s # 查看网络统计信息进程# ps -ef # 查看所有进程
# top # 实时显示进程状态用户# w # 查看活动用户
# id <用户名> # 查看指定用户信息
# last # 查看用户登录日志
# cut -d: -f1 /etc/passwd # 查看系统所有用户
# cut -d: -f1 /etc/group # 查看系统所有组
# crontab -l # 查看当前用户的计划任务服务# chkconfig --list # 列出所有系统服务
# chkconfig --list | grep on # 列出所有启动的系统服务程序# rpm -qa # 查看所有安装的软件包
#关机: init 0 / halt / shutdown
#重启: init 1 / reboot
说明:本文所涉及示例均在fedora core3下得到。
--------------------------------------------------------------------------------
/proc文件系统下的多种文件提供的系统信息不是针对某个特定进程的,而是能够在整个系统范围的上下文中使用。可以使用的文件随系统配置的变化而变化。命令procinfo能够显示基于其中某些文件的多种系统信息。
以下详细描述/proc下的文件:
--------------------------------------------------------------------------------
/proc/cmdline文件
这个文件给出了内核启动的命令行。它和用于进程的cmdline项非常相似。
示例:
[root@localhost proc]# cat cmdline
ro root=LABEL=/ rhgb quiet
--------------------------------------------------------------------------------
/proc/cpuinfo文件
这个文件提供了有关系统CPU的多种信息。这些信息是从内核里对CPU的测试代码中得到的。文件列出了CPU的普通型号(386,486,586,686等),以及能得到的更多特定信息(制造商,型号和版本)。文件还包含了以bogomips表示的处理器速度,而且如果检测到CPU的多种特性或者bug,文件还会包含相应的标志。这个文件的格式为:文件由多行构成,每行包括一个域名称,一个冒号和一个值。
示例:
[root@localhost proc]# cat cpuinfo
processor : 0
vendor_id : AuthenticAMD
cpu family : 6
model : 8
model name : AMD Athlon(tm) XP 1800+
stepping : 1
cpu MHz : 1530.165
cache size : 256 KB
fdiv_bug : no
hlt_bug : no
f00f_bug : no
coma_bug : no
fpu : yes
fpu_exception : yes
cpuid level : 1
wp : yes
flags : fpu vme de pse tsc msr pae mce cx8 apic mtrr pge mca cmov pat pse36 mmx fxsr sse syscall mmxext 3dnowext 3dnow
bogomips : 2998.27
--------------------------------------------------------------------------------
/proc/devices文件
这个文件列出字符和块设备的主设备号,以及分配到这些设备号的设备名称。
示例:
[root@localhost /]# cat /proc/devices
Character devices:
1 mem
4 /dev/vc/0
4 tty
4 ttyS
5 /dev/tty
5 /dev/console
5 /dev/ptmx
6 lp
7 vcs
10 misc
13 input
14 sound
29 fb
36 netlink
116 alsa
128 ptm
136 pts
180 usb
Block devices:
1 ramdisk
2 fd
3 ide0
9 md
22 ide1
253 device-mapper
254 mdp
--------------------------------------------------------------------------------
/proc/dma文件
这个文件列出由驱动程序保留的DMA通道和保留它们的驱动程序名称。casade项供用于把次DMA控制器从主控制器分出的DMA行所使用;这一行不能用于其它用途。
示例:
[root@localhost ~]# cat /proc/dma
4: cascade
--------------------------------------------------------------------------------
/proc/filesystems文件
这个文件列出可供使用的文件系统类型,一种类型一行。虽然它们通常是编入内核的文件系统类型,但该文件还可以包含可加载的内核模块加入的其它文件系统类型。
示例:
[root@localhost proc]# cat /proc/filesystems
nodev sysfs
nodev rootfs
nodev bdev
nodev proc
nodev sockfs
nodev binfmt_misc
nodev usbfs
nodev usbdevfs
nodev futexfs
nodev tmpfs
nodev pipefs
nodev eventpollfs
nodev devpts
ext2
nodev ramfs
nodev hugetlbfs
iso9660
nodev mqueue
nodev selinuxfs
ext3
nodev rpc_pipefs
nodev autofs
--------------------------------------------------------------------------------
/proc/interrupts文件
这个文件的每一行都有一个保留的中断。每行中的域有:中断号,本行中断的发生次数,可能带有一个加号的域(SA_INTERRUPT标志设置),以及登记这个中断的驱动程序的名字。可以在安装新硬件前,像查看/proc/dma和/proc/ioports一样用cat命令手工查看手头的这个文件。这几个文件列出了当前投入使用的资源(但是不包括那些没有加载驱动程序的硬件所使用的资源)。
示例:
[root@localhost SPECS]# cat /proc/interrupts
CPU0
0: 7039406 XT-PIC timer
1: 6533 XT-PIC i8042
2: 0 XT-PIC cascade
3: 0 XT-PIC uhci_hcd
5: 108 XT-PIC VIA8233, uhci_hcd
8: 1 XT-PIC rtc
9: 0 XT-PIC acpi
10: 0 XT-PIC ehci_hcd
11: 17412 XT-PIC uhci_hcd, eth0
12: 140314 XT-PIC i8042
14: 37897 XT-PIC ide0
15: 60813 XT-PIC ide1
NMI: 0
ERR: 1
--------------------------------------------------------------------------------
/proc/ioports文件
这个文件列出了诸如磁盘驱动器,以太网卡和声卡设备等多种设备驱动程序登记的许多I/O端口范围。
示例:
[root@localhost SPECS]# cat /proc/ioports
0000-001f : dma1
0020-0021 : pic1
0040-0043 : timer0
0050-0053 : timer1
0060-006f : keyboard
0070-0077 : rtc
0080-008f : dma page reg
00a0-00a1 : pic2
00c0-00df : dma2
00f0-00ff : fpu
0170-0177 : ide1
01f0-01f7 : ide0
0376-0376 : ide1
0378-037a : parport0
037b-037f : parport0
03c0-03df : vga+
03f6-03f6 : ide0
03f8-03ff : serial
0800-0803 : PM1a_EVT_BLK
0804-0805 : PM1a_CNT_BLK
0808-080b : PM_TMR
0810-0815 : ACPI CPU throttle
0820-0823 : GPE0_BLK
0cf8-0cff : PCI conf1
dc00-dcff : 0000:00:12.0
dc00-dcff : via-rhine
e000-e0ff : 0000:00:11.5
e000-e0ff : VIA8233
e400-e41f : 0000:00:10.0
e400-e41f : uhci_hcd
e800-e81f : 0000:00:10.1
e800-e81f : uhci_hcd
ec00-ec1f : 0000:00:10.2
ec00-ec1f : uhci_hcdLinux中,cpuinfo详解(多核/多线程)
在Linux系统中,如何详细了解CPU的信息呢? 当然是通过cat /proc/cpuinfo来检查了,但是比如几个物理CPU/几核/几线程,这些问题怎么确定呢?
经过查看,我的开发机器是1个物理CPU,4核8线程,Intel(R) Core(TM) i7 CPU 860 @ 2.80GHz
记录一下,判断的过程和知识。
判断依据:
1.具有相同core id的cpu是同一个core的超线程。
2.具有相同physical id的cpu是同一颗cpu封装的线程或者cores。
英文版:
1.Physical id and core id are not necessarily consecutive but they are unique. Any cpu with the same core id are hyperthreads in the same core.
2.Any cpu with the same physical id are threads or cores in the same physical socket.
echo "logical CPU number:"
#逻辑CPU个数
cat /proc/cpuinfo | grep "processor" | wc -l
echo "physical CPU number:"
#物理CPU个数:
cat /proc/cpuinfo | grep "physical id" | sort | uniq | wc -l
echo "core number in a physical CPU:"
#每个物理CPU中Core的个数:
cat /proc/cpuinfo | grep "cpu cores" | uniq | awk -F: '{print $2}'
#查看每个physical cpu上core id的数量,即为每个物理CPU上的core的个数
cat /proc/cpuinfo | grep "core id"
#是否为超线程?
#如果有两个逻辑CPU具有相同的”core id”,那么超线程是打开的。
#每个物理CPU中逻辑CPU(可能是core, threads或both)的个数:
cat /proc/cpuinfo | grep "siblings"
/proc/cpuinfo 文件包含系统上每个处理器的数据段落。/proc/cpuinfo 描述中有 6 个条目适用于多内核和超线程(HT)技术检查:processor, vendor id, physical id, siblings, core id 和 cpu cores。
processor 条目包括这一逻辑处理器的唯一标识符。
physical id 条目包括每个物理封装的唯一标识符。
core id 条目保存每个内核的唯一标识符。
siblings 条目列出了位于相同物理封装中的逻辑处理器的数量。
cpu cores 条目包含位于相同物理封装中的内核数量。
如果处理器为英特尔处理器,则 vendor id 条目中的字符串是 GenuineIntel。
1.拥有相同 physical id 的所有逻辑处理器共享同一个物理插座。每个 physical id 代表一个唯一的物理封装。
2.Siblings 表示位于这一物理封装上的逻辑处理器的数量。它们可能支持也可能不支持超线程(HT)技术。
3.每个 core id 均代表一个唯一的处理器内核。所有带有相同 core id 的逻辑处理器均位于同一个处理器内核上。
4.如果有一个以上逻辑处理器拥有相同的 core id 和 physical id,则说明系统支持超线程(HT)技术。
5.如果有两个或两个以上的逻辑处理器拥有相同的 physical id,但是 core id 不同,则说明这是一个多内核处理器。cpu cores 条目也可以表示是否支持多内核。
判断CPU是否64位,检查cpuinfo中的flags区段,看是否有lm标识。
Are the processors 64-bit?
A 64-bit processor will have lm ("long mode") in the flags section of cpuinfo. A 32-bit processor will not.
参考我的技术博客:http://www.51testing.com/index.php?uid-225738-action-viewspace-itemid-236367实例:怎么分析?
[xxx]$ cat /proc/cpuinfo
processor : 0
vendor_id : GenuineIntel
cpu family : 6
model : 44
model name : Intel(R) Xeon(R) CPU E5620 @ 2.40GHz
stepping : 2
cpu MHz : 2394.074
cache size : 12288 KB
physical id : 1
siblings : 4
core id : 0
cpu cores : 4
apicid : 32
fpu : yes
fpu_exception : yes
cpuid level : 11
wp : yes
flags : fpu vme de pse tsc msr pae mce cx8 apic sep mtrr pge mca cmov pat pse36 clflush dts acpi mmx fxsr sse sse2 ss ht tm syscall nx pdpe1gb rdtscp lm constant_tsc ida nonstop_tsc pni monitor ds_cpl vmx smx est tm2 cx16 xtpr popcnt lahf_lm
bogomips : 4788.14
clflush size : 64
cache_alignment : 64
address sizes : 40 bits physical, 48 bits virtual
power management: [8]processor : 1
vendor_id : GenuineIntel
cpu family : 6
model : 44
model name : Intel(R) Xeon(R) CPU E5620 @ 2.40GHz
stepping : 2
cpu MHz : 2394.074
cache size : 12288 KB
physical id : 0
siblings : 4
core id : 0
cpu cores : 4
apicid : 0
fpu : yes
fpu_exception : yes
cpuid level : 11
wp : yes
flags : fpu vme de pse tsc msr pae mce cx8 apic sep mtrr pge mca cmov pat pse36 clflush dts acpi mmx fxsr sse sse2 ss ht tm syscall nx pdpe1gb rdtscp lm constant_tsc ida nonstop_tsc pni monitor ds_cpl vmx smx est tm2 cx16 xtpr popcnt lahf_lm
bogomips : 4787.96
clflush size : 64
cache_alignment : 64
address sizes : 40 bits physical, 48 bits virtual
power management: [8]processor : 2
vendor_id : GenuineIntel
cpu family : 6
model : 44
model name : Intel(R) Xeon(R) CPU E5620 @ 2.40GHz
stepping : 2
cpu MHz : 2394.074
cache size : 12288 KB
physical id : 1
siblings : 4
core id : 1
cpu cores : 4
apicid : 34
fpu : yes
fpu_exception : yes
cpuid level : 11
wp : yes
flags : fpu vme de pse tsc msr pae mce cx8 apic sep mtrr pge mca cmov pat pse36 clflush dts acpi mmx fxsr sse sse2 ss ht tm syscall nx pdpe1gb rdtscp lm constant_tsc ida nonstop_tsc pni monitor ds_cpl vmx smx est tm2 cx16 xtpr popcnt lahf_lm
bogomips : 4788.06
clflush size : 64
cache_alignment : 64
address sizes : 40 bits physical, 48 bits virtual
power management: [8]processor : 3
vendor_id : GenuineIntel
cpu family : 6
model : 44
model name : Intel(R) Xeon(R) CPU E5620 @ 2.40GHz
stepping : 2
cpu MHz : 2394.074
cache size : 12288 KB
physical id : 0
siblings : 4
core id : 1
cpu cores : 4
apicid : 2
fpu : yes
fpu_exception : yes
cpuid level : 11
wp : yes
flags : fpu vme de pse tsc msr pae mce cx8 apic sep mtrr pge mca cmov pat pse36 clflush dts acpi mmx fxsr sse sse2 ss ht tm syscall nx pdpe1gb rdtscp lm constant_tsc ida nonstop_tsc pni monitor ds_cpl vmx smx est tm2 cx16 xtpr popcnt lahf_lm
bogomips : 4787.96
clflush size : 64
cache_alignment : 64
address sizes : 40 bits physical, 48 bits virtual
power management: [8]processor : 4
vendor_id : GenuineIntel
cpu family : 6
model : 44
model name : Intel(R) Xeon(R) CPU E5620 @ 2.40GHz
stepping : 2
cpu MHz : 2394.074
cache size : 12288 KB
physical id : 1
siblings : 4
core id : 9
cpu cores : 4
apicid : 50
fpu : yes
fpu_exception : yes
cpuid level : 11
wp : yes
flags : fpu vme de pse tsc msr pae mce cx8 apic sep mtrr pge mca cmov pat pse36 clflush dts acpi mmx fxsr sse sse2 ss ht tm syscall nx pdpe1gb rdtscp lm constant_tsc ida nonstop_tsc pni monitor ds_cpl vmx smx est tm2 cx16 xtpr popcnt lahf_lm
bogomips : 4787.98
clflush size : 64
cache_alignment : 64
address sizes : 40 bits physical, 48 bits virtual
power management: [8]processor : 5
vendor_id : GenuineIntel
cpu family : 6
model : 44
model name : Intel(R) Xeon(R) CPU E5620 @ 2.40GHz
stepping : 2
cpu MHz : 2394.074
cache size : 12288 KB
physical id : 0
siblings : 4
core id : 9
cpu cores : 4
apicid : 18
fpu : yes
fpu_exception : yes
cpuid level : 11
wp : yes
flags : fpu vme de pse tsc msr pae mce cx8 apic sep mtrr pge mca cmov pat pse36 clflush dts acpi mmx fxsr sse sse2 ss ht tm syscall nx pdpe1gb rdtscp lm constant_tsc ida nonstop_tsc pni monitor ds_cpl vmx smx est tm2 cx16 xtpr popcnt lahf_lm
bogomips : 4788.01
clflush size : 64
cache_alignment : 64
address sizes : 40 bits physical, 48 bits virtual
power management: [8]processor : 6
vendor_id : GenuineIntel
cpu family : 6
model : 44
model name : Intel(R) Xeon(R) CPU E5620 @ 2.40GHz
stepping : 2
cpu MHz : 2394.074
cache size : 12288 KB
physical id : 1
siblings : 4
core id : 10
cpu cores : 4
apicid : 52
fpu : yes
fpu_exception : yes
cpuid level : 11
wp : yes
flags : fpu vme de pse tsc msr pae mce cx8 apic sep mtrr pge mca cmov pat pse36 clflush dts acpi mmx fxsr sse sse2 ss ht tm syscall nx pdpe1gb rdtscp lm constant_tsc ida nonstop_tsc pni monitor ds_cpl vmx smx est tm2 cx16 xtpr popcnt lahf_lm
bogomips : 4788.03
clflush size : 64
cache_alignment : 64
address sizes : 40 bits physical, 48 bits virtual
power management: [8]processor : 7
vendor_id : GenuineIntel
cpu family : 6
model : 44
model name : Intel(R) Xeon(R) CPU E5620 @ 2.40GHz
stepping : 2
cpu MHz : 2394.074
cache size : 12288 KB
physical id : 0
siblings : 4
core id : 10
cpu cores : 4
apicid : 20
fpu : yes
fpu_exception : yes
cpuid level : 11
wp : yes
flags : fpu vme de pse tsc msr pae mce cx8 apic sep mtrr pge mca cmov pat pse36 clflush dts acpi mmx fxsr sse sse2 ss ht tm syscall nx pdpe1gb rdtscp lm constant_tsc ida nonstop_tsc pni monitor ds_cpl vmx smx est tm2 cx16 xtpr popcnt lahf_lm
bogomips : 4787.98
clflush size : 64
cache_alignment : 64
address sizes : 40 bits physical, 48 bits virtual
power management: [8]参考:
http://wenku.baidu.com/view/c417a91dfad6195f312ba6e6.html
http://server.it168.com/focus/201001/cpu/
总结:
cpu cores --- cpu 内核数量
processor --- cpu线程数量
[~]$ cat /proc/cpuinfo | grep "processor" | wc -l
8
[~]$ cat /proc/cpuinfo | grep "physical id" | sort | uniq | wc -l
2
http://server.it168.com/focus/201001/cpu/英特尔至强5500与至强5600规格对照表 对比 至强5500 至强5600 发布时间 2009年3月31日 2010年3月16日 代号 Nehalem-EP Westmere-EP 制程工艺 45纳米 32纳米 架构/芯片组 Intel 5520芯片组 Intel 5520芯片组 内核/线程 4核(E5502 是双核) 4核 6核 多线程 8线程 8线程 12线程 型号 8MB缓存、6.40 GT/秒QPI:W5590(3.33 GHz)、W5580(3.20 GHz)、X5570(2.93 GHz)、X5560(2.80 GHz)、X5550(2.66 GHz)
8MB缓存、5.86 GT/秒QPI:E5540(2.53 GHz)、E5530(2.40 GHz)、E5520(2.26 GHz)、L5530(2.40 GHz)、L5520(2.26 GHz)
4MB缓存、4.80 GT/秒QPI:E5506(2.13 GHz)、L5506(2.13 GHz)、E5504(2.00 GHz)、E5502(1.86 GHz)7款:
L5609(1.86GHz)
L5630(2.13GHz)
E5620(2.4GHz)
E5630(2.53GHz)
E5640(2.66GHz)
X5667(3.06GHz)
X5677(3.46GHz)6款:
W3680(3.33GHz)
L5640(2.26GHz)
X5650(2.66GHz)
X5660(2.8GHz)
X5670(2.93GHz)
X5680(3.33GHz)主频 1.86GHz ~ 3.33GHz 1.86-3.46GHz 2.26-3.33GHz QPI数量 2 2 2 QPI速率 4.80 GT/秒,5.86 GT/秒,6.40 GT/秒 6.40 GT/秒 6.40 GT/秒 L2缓存 4 x 256 KB 4 x 256 KB 6 x 256 KB L3缓存 4MB/8MB共享 12MB共享 12MB共享 指令集/虚拟化 SSE,SSE2,SSE3,SSE4.2,Intel-VT,VT-d,Turbo Boost,Hyper-Threading L5609不支持超线程和睿频加速 全部支持Turbo Boost睿频加速技术 内存控制器 集成内存控制器 集成内存控制器 集成内存控制器 三通道DDR3 800/1066/1333MHz 三通道DDR3 800/1066/1333MHz 三通道DDR3 800/1066/1333MHz TDP功耗 60W,80W,95W,130W 40W,80W,95W,130W 60W,95W,130W IT168服务器频道,2009年12月
-
命令行 单引号和双引号
2011-04-27 11:04:42
命令行小技巧:
linux 下面单引号和双引号可以区分,可以嵌套区分 -d '"name:aa","pwd:bb"'
windows 下面不认单引号,双引号可以正确执行,但是换成单引号就报错:
curl: (1) Unsupported protocol: 'http
'q' 不是内部或外部命令,也不是可运行的程序
或批处理文件。
'coordinate' 不是内部或外部命令,也不是可运行的程序
或批处理文件。-----
单引号嵌套双引号: ' " " '
对双引号进行转义 " \" \" "
----
不同操作系统下的路径也是有差异的。注意区分操作。
os path
-
查看apache连接数及apache工作原理
2011-04-15 21:57:01
ps -ef|grep httpd|wc -l
netstat -nat|grep -i "80" |wc -l
netstat -na|grep ESTABLISHED|wc -l
netstat -n | awk '/^tcp/ {++S[$NF]} END {for(a in S) print a, S[a]}'
netstat -na|grep ESTABLISHED|awk '{print $5}'|awk -F: '{print $1}'|sort|uniq -c|sort -r +0n
返回结果示例:
LAST_ACK 5
SYN_RECV 30
ESTABLISHED 1597
FIN_WAIT1 51
FIN_WAIT2 504
TIME_WAIT 1057
其中的SYN_RECV表示正在等待处理的请求数;ESTABLISHED表示正常数据传输状态;TIME_WAIT表示处理完毕,等待超时结束的请求数。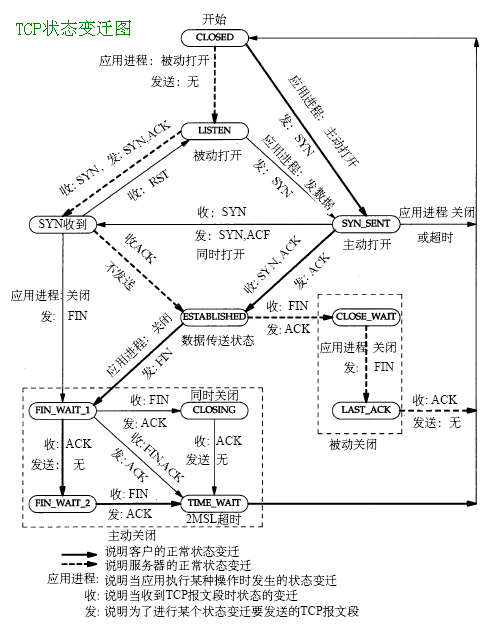 状态:描述
状态:描述
CLOSED:无连接是活动的或正在进行
LISTEN:服务器在等待进入呼叫
SYN_RECV:一个连接请求已经到达,等待确认
SYN_SENT:应用已经开始,打开一个连接
ESTABLISHED:正常数据传输状态
FIN_WAIT1:应用说它已经完成
FIN_WAIT2:另一边已同意释放
ITMED_WAIT:等待所有分组死掉
CLOSING:两边同时尝试关闭
TIME_WAIT:另一边已初始化一个释放
LAST_ACK:等待所有分组死掉转自:http://blog.163.com/mobile-man/blog/static/2180267201002443034392/Linux下查看apache连接数1、查看apache当前并发访问数:
netstat -an | grep ESTABLISHED | wc -l对比httpd.conf中MaxClients的数字差距多少。
2、查看有多少个进程数:
ps aux|grep httpd|wc -l3、可以使用如下参数查看数据
server-status?auto#ps -ef|grep httpd|wc -l
1388
统计httpd进程数,连个请求会启动一个进程,使用于Apache服务器。
表示Apache能够处理1388个并发请求,这个值Apache可根据负载情况自动调整。#netstat -nat|grep -i "80"|wc -l
4341
netstat -an会打印系统当前网络链接状态,而grep -i "80"是用来提取与80端口有关的连接的,wc -l进行连接数统计。
最终返回的数字就是当前所有80端口的请求总数。#netstat -na|grep ESTABLISHED|wc -l
376
netstat -an会打印系统当前网络链接状态,而grep ESTABLISHED 提取出已建立连接的信息。 然后wc -l统计。
最终返回的数字就是当前所有80端口的已建立连接的总数。netstat -nat||grep ESTABLISHED|wc - 可查看所有建立连接的详细记录
查看Apache的并发请求数及其TCP连接状态:
Linux命令:
netstat -n | awk '/^tcp/ {++S[$NF]} END {for(a in S) print a, S[a]}'(这条语句是从 新浪互动社区事业部 新浪互动社区事业部技术总监王老大那儿获得的,非常不错)返回结果示例:
LAST_ACK 5
SYN_RECV 30
ESTABLISHED 1597
FIN_WAIT1 51
FIN_WAIT2 504
TIME_WAIT 1057
其中的
SYN_RECV表示正在等待处理的请求数;
ESTABLISHED表示正常数据传输状态;
TIME_WAIT表示处理完毕,等待超时结束的请求数。---------------------------------------------------------------------------------------------
查看httpd进程数(即prefork模式下Apache能够处理的并发请求数):
Linux命令:
ps -ef | grep httpd | wc -l查看Apache的并发请求数及其TCP连接状态:
Linux命令:
netstat -n | awk '/^tcp/ {++S[$NF]} END {for(a in S) print a, S[a]}'
返回结果示例:
LAST_ACK 5
SYN_RECV 30
ESTABLISHED 1597
FIN_WAIT1 51
FIN_WAIT2 504
TIME_WAIT 1057说明:
SYN_RECV表示正在等待处理的请求数;
ESTABLISHED表示正常数据传输状态;
TIME_WAIT表示处理完毕,等待超时结束的请求数。
http://archive.cnblogs.com/a/1886067/ -
Windows Server 2003不同版本对内存的支持
2011-04-11 14:46:58
Windows Server 2003 Web Edition 32位元版最大能支援2G的RAM,
Windows Server 2003 Standard Edition 32位元版最大能支援4G的RAM,
Windows Server 2003 Enterprise Edition 32位元版最大能支援32G的RAM,
Windows Server 2003 Datacenter Edition 32位元版最大能支援512G的RAM,
此时需要打开PAE,打开方式如下:
找到C:\Boot.ini文件,在ARC路径中添加 /PAE
multi(0)disk(0)rdisk(0)partition(2)\%systemroot%=”Windows Server 2003, XXXX Edition” /PAE
XXXX为实际安装的系统版本 -
Linux下结合SecureCRT通过rz上传文件及sz下载文件
2011-03-15 16:54:13
1.安装软件
aptitude search sz
p funcoeszz - script. with 65 useful mini applications
p lrzsz - Tools for zmodem/xmodem/ymodem file transfer
aptitude install lrzsz
点击Session Options -> Terminal -> X/Y/Zmodem,可以设置上传及下载的目录,这样在linux下输入命令rz时后默认切换到Upload后面所指定的目录,在linux下输入命令sz 文件名时,文件默认下载到Download后面所指定的目录。
2.上传
debian:/home/tmp# ls
default
输入rz命令即可上传文件,文件上传到服务器的当前目录。
debian:/home/tmp# rz
rz waiting to receive.
Starting zmodem transfer. Press Ctrl+C to cancel.
100% 686 bytes 686 bytes/s 00:00:01 0 Errors
文件csft.conf是新上传到linux服务器上面的文件。
debian:/home/tmp# ls
csft.conf default
经我自己亲身测试,上传大点的文件时会导致上传中止,此时只有通过SSH Secure File Transfer Client或WinSCP之类的软件来上传了。
3.下载
debian:/home/software/coreseek-3.2.13/testpack/etc# ls
csft.conf csft_demo_python_pymssql.conf pysource
csft_demo_python.conf csft_mysql.conf
输入“sz + 文件名”即可下载,文件默认下载到SecureCRT中所指定的目录下。
debian:/home/software/coreseek-3.2.13/testpack/etc# sz csft.conf
rz
Starting zmodem transfer. Press Ctrl+C to cancel.
100% 686 bytes 686 bytes/s 00:00:01 0 Errors
延伸阅读:
http://yangzhongfei.blog.163.com/blog/static/461098752010320103811488/
http://blog.csdn.net/Channels_net/archive/2010/05/07/5567038.aspx
http://www.baidu.com/s?wd=linux+rz+sz转自: http://iamcaihuafeng.blog.sohu.com/159696800.html
-
linux下使用scp在服务器之间拷贝文件
2011-03-15 16:53:16
CentOS, 本地服务器,ip: 192.168.1.111
Ubuntu, 远程服务器,ip: 192.168.1.112
1.拷贝远程服务器的目录到本地服务器
远程服务器192.168.1.112上面/tmp目录下面有个test目录,里面有个文件名为test,内容也为test
root@ubuntu:/tmp# cat test/test
test
拷贝远程服务器192.168.1.112的目录/tmp/test到当前目录下。
[root@CentOS_Test_Server tmp]# scp -r root@192.168.1.112:/tmp/test ./
The authenticity of host '192.168.1.112 (192.168.1.112)' can't be established.
RSA key fingerprint is 64:76:a6:1e:23:76:ec:25:5e:c2:f3:ef:fc:ad:48:7b.
Are you sure you want to continue connecting (yes/no)? yes
Warning: Permanently added '192.168.1.112' (RSA) to the list of known hosts.
root@192.168.1.112's password:
test 100% 5 0.0KB/s 00:00
注意拷贝到本地服务器后形成的目录结构为/tmp/test,而不是/tmp/tmp/test,一定要注意,这里比较容易混淆,经过自己亲自测试,再碰到类似的问题心里就有底了。
[root@CentOS_Test_Server tmp]# ls test/
test
2.拷贝远程服务器的文件到本地服务器
将1中拷贝过来的目录test删除
rm -rf test
[root@CentOS_Test_Server tmp]# ls -l | grep test | grep -v "grep"
拷贝远程服务器192.168.1.112的文件/tmp/test/test到当前目录下。
[root@CentOS_Test_Server tmp]# scp root@192.168.1.112:/tmp/test/test ./
root@192.168.1.112's password:
test 100% 5 0.0KB/s 00:00
[root@CentOS_Test_Server tmp]# ls -l | grep test | grep -v "grep"
-rw-r--r-- 1 root root 5 Sep 22 14:07 test
3.拷贝本地服务器的目录到远程服务器
在/tmp目录下面建立目录dir111,在此目录下创建文件file111,内容为file111
[root@CentOS_Test_Server tmp]# mkdir dir111
[root@CentOS_Test_Server tmp]# echo 'content111' > dir111/file111
[root@CentOS_Test_Server tmp]# cat dir111/file111
content111
拷贝本地服务器的目录dir111到远程服务器的目录/tmp下
与上述1中类似,拷贝到远程服务器后形成的目录结构为/tmp/dir111,而不是/tmp/tmp/dir111,一定要注意,这里比较容易混淆。
不管拷贝命令是scp -r dir111 root@192.168.1.112:/tmp还是scp -r /tmp/dir111 root@192.168.1.112:/tmp,在远程服务器上面生成的目录结构均一样,我亲自测试过了。
[root@CentOS_Test_Server tmp]# scp -r /tmp/dir111 root@192.168.1.112:/tmp
root@192.168.1.112's password:
file111 100% 11 0.0KB/s 00:00
远程服务器192.168.1.112上面的内容
root@ubuntu:/tmp# ls
dir111 test vmware-root
root@ubuntu:/tmp# cat dir111/file111
content111
4.拷贝本地服务器的文件到远程服务器
[root@CentOS_Test_Server tmp]# scp dir111/file111 root@192.168.1.112:/tmp
root@192.168.1.112's password:
file111 100% 11 0.0KB/s 00:00
远程服务器192.168.1.112上面的内容
root@ubuntu:/tmp# ls
dir111 file111 test vmware-root
延伸阅读:
http://www.baidu.com/s?wd=linux+scp
http://www.google.com/search?hl=en&source=hp&q=linux+scp转自: http://iamcaihuafeng.blog.sohu.com/160060113.html
-
CURL用法
2011-03-15 16:52:06
CURL是一个超强的命令行工具,其功能非常强大,有Linux/Unix版本的,也有Windows版本的,我平时就经常在Windows下面使用curl做一些测试,非常方便,有时用curl做测试比用浏览器做测试要快得多,方便得多。
1.curl命令帮助选项
C:\>curl --help
Usage: curl [options...] <url>
Options: (H) means HTTP/HTTPS only, (F) means FTP only
-a/--append Append to target file when uploading (F)
-A/--user-agent <string> User-Agent to send to server (H)
--anyauth Tell curl to choose authentication method (H)
-b/--cookie <name=string/file> Cookie string or file to read cookies from (H)
--basic Enable HTTP Basic Authentication (H)
-B/--use-ascii Use ASCII/text transfer
-c/--cookie-jar <file> Write cookies to this file after operation (H)
-C/--continue-at <offset> Resumed transfer offset
-d/--data <data> HTTP POST data (H)
--data-ascii <data> HTTP POST ASCII data (H)
--data-binary <data> HTTP POST binary data (H)
--negotiate Enable HTTP Negotiate Authentication (H)
--digest Enable HTTP Digest Authentication (H)
--disable-eprt Prevent curl from using EPRT or LPRT (F)
--disable-epsv Prevent curl from using EPSV (F)
-D/--dump-header <file> Write the headers to this file
--egd-file <file> EGD socket path for random data (SSL)
--tcp-nodelay Set the TCP_NODELAY option
-e/--referer Referer URL (H)
-E/--cert <cert[:passwd]> Client certificate file and password (SSL)
--cert-type <type> Certificate file type (DER/PEM/ENG) (SSL)
--key <key> Private key file name (SSL)
--key-type <type> Private key file type (DER/PEM/ENG) (SSL)
--pass <pass> Pass phrase for the private key (SSL)
--engine <eng> Crypto engine to use (SSL). "--engine list" for list
--cacert <file> CA certificate to verify peer against (SSL)
--capath <directory> CA directory (made using c_rehash) to verify
peer against (SSL)
--ciphers <list> SSL ciphers to use (SSL)
--compressed Request compressed response (using deflate or gzip)
--connect-timeout <seconds> Maximum time allowed for connection
--create-dirs Create necessary local directory hierarchy
--crlf Convert LF to CRLF in upload
-f/--fail Fail silently (no output at all) on errors (H)
--ftp-create-dirs Create the remote dirs if not present (F)
--ftp-pasv Use PASV instead of PORT (F)
--ftp-ssl Enable SSL/TLS for the ftp transfer (F)
-F/--form. <name=content> Specify HTTP multipart POST data (H)
--form-string <name=string> Specify HTTP multipart POST data (H)
-g/--globoff Disable URL sequences and ranges using {} and []
-G/--get Send the -d data with a HTTP GET (H)
-h/--help This help text
-H/--header <line> Custom header to pass to server (H)
-i/--include Include protocol headers in the output (H/F)
-I/--head Show document info only
-j/--junk-session-cookies Ignore session cookies read from file (H)
--interface <interface> Specify network interface to use
--krb4 <level> Enable krb4 with specified security level (F)
-k/--insecure Allow curl to connect to SSL sites without certs (H)
-K/--config Specify which config file to read
-l/--list-only List only names of an FTP directory (F)
--limit-rate <rate> Limit transfer speed to this rate
-L/--location Follow Location: hints (H)
--location-trusted Follow Location: and send authentication even
to other hostnames (H)
-m/--max-time <seconds> Maximum time allowed for the transfer
--max-redirs <num> Maximum number of redirects allowed (H)
--max-filesize <bytes> Maximum file size to download (H/F)
-M/--manual Display the full manual
-n/--netrc Must read .netrc for user name and password
--netrc-optional Use either .netrc or URL; overrides -n
--ntlm Enable HTTP NTLM authentication (H)
-N/--no-buffer Disable buffering of the output stream
-o/--output <file> Write output to <file> instead of stdout
-O/--remote-name Write output to a file named as the remote file
-p/--proxytunnel Operate through a HTTP proxy tunnel (using CONNECT)
--proxy-anyauth Let curl pick proxy authentication method (H)
--proxy-basic Enable Basic authentication on the proxy (H)
--proxy-digest Enable Digest authentication on the proxy (H)
--proxy-ntlm Enable NTLM authentication on the proxy (H)
-P/--ftp-port <address> Use PORT with address instead of PASV (F)
-q If used as the first parameter disables .curlrc
-Q/--quote <cmd> Send command(s) to server before file transfer (F)
-r/--range <range> Retrieve a byte range from a HTTP/1.1 or FTP server
--random-file <file> File for reading random data from (SSL)
-R/--remote-time Set the remote file's time on the local output
--retry <num> Retry request <num> times if transient problems occur
--retry-delay <seconds> When retrying, wait this many seconds between each
--retry-max-time <seconds> Retry only within this period
-s/--silent Silent mode. Don't output anything
-S/--show-error Show error. With -s, make curl show errors when they occur
--socks <host[:port]> Use SOCKS5 proxy on given host + port
--stderr <file> Where to redirect stderr. - means stdout
-t/--telnet-option <OPT=val> Set telnet option
--trace <file> Write a debug trace to the given file
--trace-ascii <file> Like --trace but without the hex output
-T/--upload-file <file> Transfer <file> to remote site
--url <URL> Spet URL to work with
-u/--user <user[:password]> Set server user and password
-U/--proxy-user <user[:password]> Set proxy user and password
-v/--verbose Make the operation more talkative
-V/--version Show version number and quit
-w/--write-out [format] What to output after completion
-x/--proxy <host[:port]> Use HTTP proxy on given port
-X/--request <command> Specify request command to use
-y/--speed-time Time needed to trig speed-limit abort. Defaults to 30
-Y/--speed-limit Stop transfer if below speed-limit for 'speed-time' secs
-z/--time-cond <time> Transfer based on a time condition
-0/--http1.0 Use HTTP 1.0 (H)
-1/--tlsv1 Use TLSv1 (SSL)
-2/--sslv2 Use SSLv2 (SSL)
-3/--sslv3 Use SSLv3 (SSL)
--3p-quote like -Q for the source URL for 3rd party transfer (F)
--3p-url source URL to activate 3rd party transfer (F)
--3p-user user and password for source 3rd party transfer (F)
-4/--ipv4 Resolve name to IPv4 address
-6/--ipv6 Resolve name to IPv6 address
-#/--progress-bar Display transfer progress as a progress bar
2.查找页面源代码中的指定内容
例如查找京东商城首页含有js的代码
C:\>curl www.360buy.com | find "js"
% Total % Received % Xferd Average Speed Time Time Time Current
Dload Upload Total Spent Left Speed
19 158k 19 31744 0 0 53531 0 0:00:03 --:--:-- 0:00:03 65947<s
cript type="text/javascript" src="http://misc.360buyimg.com/201006/js/jquery-1.2
.6.pack.js"></script>
<script. type="text/javascript" src="http://misc.360buyimg.com/201007/js/g.base.j
s"></script>
76 158k 76 121k 0 0 10763 0 0:00:15 0:00:11 0:00:04 7574<s
pan><a href="http://www.360buy.com/help/ziti/jiangsu.aspx#jssq" target="_blank">
宿迁</a></span>
99 158k 99 158k <span><a href="http://www.360buy.com/hel p/ziti/jiangsu.a
spx#jsnt" target="_blank0">南通</a></span>
100 158k 100 158k 0 0 12557 0 0:00:12 0:00:12 --:--:-- 18859
<script. type="text/javascript" src="http://misc.360buyimg.com/201007/js/
jd.lib.js"></script>
<script. type="text/javascript" src="http://misc.360buyimg.com/201007/js/
p.index.js"></script>
<script. type="text/javascript" src="http://wl.360buy.com/wl.js" ></scrip
t>
document.write(unescape("%3Cscript. src='" + gaJsHost + "google-analytics.com/ga.
js' type='text/javascript'%3E%3C/script%3E"));
2.发送POST请求
a.传递一个参加时可以不用双引号
C:\>curl -d action=get_basic_info http://localhost/1616.net/apps/contact/www/mobile.php
[{"contact_id":"3","last_update_time":"1285832338","md5":"7b682e0c3ed3b3bddb3219
a533477224"},{"contact_id":"2","last_update_time":"1286529929","md5":"49ac542f51
19512682b72f1d44e6fe81"},{"contact_id":"1","last_update_time":"1285830870","md5"
:"3926cb3b0320327c46430c6539d58e5e"}]
b.传递多个参加时必须用双引号,否则会报错
C:\>curl -d "action=edit&contact_id=2&name=testurl" http://localhost/1616.net/apps/contact/www/mobile.php
1
3.下载文件
比如下载百度首页的内容为baidu.html
C:\>curl -o baidu.html www.baidu.com
% Total % Received % Xferd Average Speed Time Time Time Current
Dload Upload Total Spent Left Speed
100 6218 100 6218 0 0 61564 0 --:--:-- --:--:-- --:--:-- 173k
4.将网站产生的cookie内容写入到文件中
用curl -c cookie.txt www.baidu.com
产生的文件cookie.txt的内容如下:
# Netscape HTTP Cookie File
# http://www.netscape.com/newsref/std/cookie_spec.html
# This file was generated by libcurl! Edit at your own risk.
.baidu.com TRUE / FALSE 2147483647 BAIDUID 3EC2799E83C7187A26CBBA67CCB71822:FG=1
5.测试域名绑定
输入命令
C:\>curl -H "Host:www.baidu.com" http://202.108.22.5/
ip地址202.108.22.5是ping域名www.baidu.com以后返回的ip地址。
则返回百度首页所有的内容
如果随便输入一个域名www.abc.com,而ip地址不改变,则返回内容是空的,因为域名与ip地址不匹配了,这样就可以测试域名绑定是否正确了。
C:\>curl -H "Host:www.abc.com" http://202.108.22.5/
curl: (52) Empty reply from server
查看更多http://www.blogkid.net/archives/2668.html
6.查看网站头信息
C:\>curl -I www.baidu.com
HTTP/1.1 200 OK
Date: Fri, 08 Oct 2010 15:32:06 GMT
Server: BWS/1.0
Content-Length: 6218
Content-Type: text/html;charset=gb2312
Cache-Control: private
Expires: Fri, 08 Oct 2010 15:32:06 GMT
Set-Cookie: BAIDUID=6E8167DF4E04A22A0659BBA1BE2905E7:FG=1; expires=Fri, 08-Oct-4
0 15:32:06 GMT; path=/; domain=.baidu.com
P3P: CP=" OTI DSP COR IVA OUR IND COM "
Connection: Keep-Alive
7.查看URL跳转
C:\>curl -L -I www.google.com
HTTP/1.1 302 Found
Location: http://www.google.com.hk/url?sa=p&hl=zh-CN&cki=PREF%3DID%3Dd0fa5e644a9
f891c:FF%3D2:LD%3Dzh-CN:NW%3D1:TM%3D1286551973:LM%3D1286551973:S%3DPQB5WhVsd17Bq
38k&q=http://www.google.com.hk/&ust=1286552003174649&usg=AFQjCNEwGJlI-YF0TG-6BiW
ILw7U2qsr5Q
Cache-Control: private
Content-Type: text/html; charset=UTF-8
Set-Cookie: PREF=ID=d0fa5e644a9f891c:NW=1:TM=1286551973:LM=1286551973:S=oAe_1PXO
MrFd73Jy; expires=Sun, 07-Oct-2012 15:32:53 GMT; path=/; domain=.google.com
Set-Cookie: NID=39=C_aIB4kMtsJnMR5kwJKF9XAhB9_sEKTp5Qe-Y6Zcu7nNVrrBmKrr-687Zhf_r
-wVNniv4kbb8BRCBR52EN2HdxaL2lGCBxUlEWjkGdZctAqdjyzZbwTb2Hh05UgYMTIO; expires=Sat
, 09-Apr-2011 15:32:53 GMT; path=/; domain=.google.com; HttpOnly
Date: Fri, 08 Oct 2010 15:32:53 GMT
Server: gws
Content-Length: 458
X-XSS-Protection: 1; mode=block
HTTP/1.1 302 Found
Location: http://www.google.com.hk/
Cache-Control: private
Content-Type: text/html; charset=UTF-8
Set-Cookie: PREF=ID=d0fa5e644a9f891c:FF=2:LD=zh-CN:NW=1:TM=1286551973:LM=1286551
973:S=PQB5WhVsd17Bq38k; expires=Sun, 07-Oct-2012 15:32:53 GMT; path=/; domain=.g
oogle.com.hk
Date: Fri, 08 Oct 2010 15:32:53 GMT
Server: gws
Content-Length: 222
X-XSS-Protection: 1; mode=block
HTTP/1.1 200 OK
Date: Fri, 08 Oct 2010 15:32:53 GMT
Expires: -1
Cache-Control: private, max-age=0
Content-Type: text/html; charset=Big5
Set-Cookie: PREF=ID=3f9f2340941ea76f:NW=1:TM=1286551973:LM=1286551973:S=m9wrFWJe
Jbk4aFK2; expires=Sun, 07-Oct-2012 15:32:53 GMT; path=/; domain=.google.com.hk
Set-Cookie: NID=39=Mlebw-qjMEK1ABTu-W1YWoQ-Tk27--cOtwLLrDWhmU8y0fqwgeyNz06XBZsYG
9yNwSCO_Ryzzt7q1GUXHgrM2jijr9vmLsW9ZXT2k6pve8f-IrdMyLJok4lRImiskdLR; expires=Sat
, 09-Apr-2011 15:32:53 GMT; path=/; domain=.google.com.hk; HttpOnly
Server: gws
X-XSS-Protection: 1; mode=block
Transfer-Encoding: chunked
curl: (18) transfer closed with outstanding read data remaining
延伸阅读:
http://blog.chinaunix.net/u/5591/showart.php?id=1957520
http://www.blogkid.net/archives/2668.html
http://www.baidu.com/s?wd=curl
http://www.google.com/search?hl=en&source=hp&q=curl
http://blog.s135.com/post/389/转载自: http://iamcaihuafeng.blog.sohu.com/160735369.html
-
Linux中find常见用法示例
2010-09-10 17:37:18
Linux中find常见用法示例
·find path -option [ -print ] [ -exec -ok command ] {} \;
#-print 将查找到的文件输出到标准输出
#-exec command {} \; —–将查到的文件执行command操作,{} 和 \;之间有空格
#-ok 和-exec相同,只不过在操作前要询用户
====================================================-name filename #查找名为filename的文件
-perm #按执行权限来查找
-user username #按文件属主来查找
-group groupname #按组来查找
-mtime -n +n #按文件更改时间来查找文件,-n指n天以内,+n指n天以前
-atime -n +n #按文件访问时间来查GIN: 0px">-ctime -n +n #按文件创建时间来查找文件,-n指n天以内,+n指n天以前
-nogroup #查无有效属组的文件,即文件的属组在/etc/groups中不存在
-nouser #查无有效属主的文件,即文件的属主在/etc/passwd中不存
-newer f1 !f2 找文件,-n指n天以内,+n指n天以前
-ctime -n +n #按文件创建时间来查找文件,-n指n天以内,+n指n天以前
-nogroup #查无有效属组的文件,即文件的属组在/etc/groups中不存在
-nouser #查无有效属主的文件,即文件的属主在/etc/passwd中不存
-newer f1 !f2 #查更改时间比f1新但比f2旧的文件
-type b/d/c/p/l/f #查是块设备、目录、字符设备、管道、符号链接、普通文件
-size n[c] #查长度为n块[或n字节]的文件
-depth #使查找在进入子目录前先行查找完本目录
-fstype #查更改时间比f1新但比f2旧的文件
-type b/d/c/p/l/f #查是块设备、目录、字符设备、管道、符号链接、普通文件
-size n[c] #查长度为n块[或n字节]的文件
-depth #使查找在进入子目录前先行查找完本目录
-fstype #查位于某一类型文件系统中的文件,这些文件系统类型通常可 在/etc/fstab中找到
-mount #查文件时不跨越文件系统mount点
-follow #如果遇到符号链接文件,就跟踪链接所指的文件
-cpio %; #查位于某一类型文件系统中的文件,这些文件系统类型通常可 在/etc/fstab中找到
-mount #查文件时不跨越文件系统mount点
-follow #如果遇到符号链接文件,就跟踪链接所指的文件
-cpio #对匹配的文件使用cpio命令,将他们备份到磁带设备中
-prune #忽略某个目录=====================================================
$find ~ -name "*.txt" -print #在$HOME中查.txt文件并显示
$find . -name "*.txt" -print
$find . -name "[A-Z]*" -print #查以大写字母开头的文件
$find /etc -name "host*" -print #查以host开头的文件
$find . -name "[a-z][a-z][0–9][0–9].txt" -print #查以两个小写字母和两个数字开头的txt文件
$find . -perm 755 -print
$find . -perm -007 -exec ls -l {} \; #查所有用户都可读写执行的文件同-perm 777
$find . -type d -print
$find . ! -type d -print
$find . -type l -print$find . -size +1000000c -print #查长度大于1Mb的文件
$find . -size 100c -print # 查长度为100c的文件
$find . -size +10 -print #查长度超过期作废10块的文件(1块=512字节)$cd /
$find etc home apps -depth -print | cpio -ivcdC65536 -o /dev/rmt0
$find /etc -name "passwd*" -exec grep "cnscn" {} \; #看是否存在cnscn用户
$find . -name "yao*" | xargs file
$find . -name "yao*" | xargs echo "" > /tmp/core.log
$find . -name "yao*" | xargs chmod o-w======================================================
find -name april* 在当前目录下查找以april开始的文件
find -name april* fprint file 在当前目录下查找以april开始的文件,并把结果输出到file中
find -name ap* -o -name may* 查找以ap或may开头的文件
find /mnt -name tom.txt -ftype vfat 在/mnt下查找名称为tom.txt且文件系统类型为vfat的文件
find /mnt -name t.txt ! -ftype vfat 在/mnt下查找名称为tom.txt且文件系统类型不为vfat的文件
find /tmp -name wa* -type l 在/tmp下查找名为wa开头且类型为符号链接的文件
find /home -mtime -2 在/home下查最近两天内改动过的文件
find /home -atime -1 查1天之内被存取过的文件
find /home -mmin +60 在/home下查60分钟前改动过的文件
find /home -amin +30 查最近30分钟前被存取过的文件
find /home -newer tmp.txt 在/home下查更新时间比tmp.txt近的文件或目录
find /home -anewer tmp.txt 在/home下查存取时间比tmp.txt近的文件或目录
find /home -used -2 列出文件或目录被改动过之后,在2日内被存取过的文件或目录
find /home -user cnscn 列出/home目录内属于用户cnscn的文件或目录
find /home -uid +501 列出/home目录内用户的识别码大于501的文件或目录
find /home -group cnscn 列出/home内组为cnscn的文件或目录
find /home -gid 501 列出/home内组id为501的文件或目录
find /home -nouser 列出/home内不属于本地用户的文件或目录
find /home -nogroup 列出/home内不属于本地组的文件或目录
find /home -name tmp.txt -maxdepth 4 列出/home内的tmp.txt 查时深度最多为3层
find /home -name tmp.txt -mindepth 3 从第2层开始查
find /home -empty 查找大小为0的文件或空目录
find /home -size +512k 查大于512k的文件
find /home -size -512k 查小于512k的文件
find /home -links +2 查硬连接数大于2的文件或目录
find /home -perm 0700 查权限为700的文件或目录
find /tmp -name tmp.txt -exec cat {} \;
find /tmp -name tmp.txt -ok rm {} \;find / -amin -10 # 查找在系统中最后10分钟访问的文件
find / -atime -2 # 查找在系统中最后48小时访问的文件
find / -empty # 查找在系统中为空的文件或者文件夹
find / -group cat # 查找在系统中属于 groupcat的文件
find / -mmin -5 # 查找在系统中最后5分钟里修改过的文件
find / -mtime -1 #查找在系统中最后24小时里修改过的文件
find / -nouser #查找在系统中属于作废用户的文件
find / -user fred #查找在系统中属于FRED这个用户的文件查当前目录下的所有普通文件
--------------------------------------------------------------------------------# find . -type f -exec ls -l {} \;
-rw-r–r– 1 root root 34928 2003-02-25 ./conf/httpd.conf
-rw-r–r– 1 root root 12959 2003-02-25 ./conf/magic
-rw-r–r– 1 root root 180 2003-02-25 ./conf.d/README
查当前目录下的所有普通文件,并在- e x e c选项中使用ls -l命令将它们列出
=================================================
在/ l o g s目录中查找更改时间在5日以前的文件并删除它们:
$ find logs -type f -mtime +5 -exec -ok rm {} \;=================================================
查询当天修改过的文件
[root@book class]# find ./ -mtime -1 -type f -exec ls -l {} \;=================================================
查询文件并询问是否要显示
[root@book class]# find ./ -mtime -1 -type f -ok ls -l {} \;
< ls … ./classDB.inc.php > ? y
-rw-r–r– 1 cnscn cnscn 13709 1月 12 12:22 ./classDB.inc.php
[root@book class]# find ./ -mtime -1 -type f -ok ls -l {} \;
< ls … ./classDB.inc.php > ? n
[root@book class]#=================================================
查询并交给awk去处理
[root@book class]# who | awk ’{print $1"\t"$2}’
cnscn pts/0=================================================
awk—grep—sed[root@book class]# df -k | awk ‘{print $1}’ | grep -v ’none’ | sed s"/\/dev\///g"
文件系统
sda2
sda1
[root@book class]# df -k | awk ‘{print $1}’ | grep -v ’none’
文件系统
/dev/sda2
/dev/sda11)在/tmp中查找所有的*.h,并在这些文件中查找“SYSCALL_VECTOR",最后打印出所有包含"SYSCALL_VECTOR"的文件名
A) find /tmp -name "*.h" | xargs -n50 grep SYSCALL_VECTOR
B) grep SYSCALL_VECTOR /tmp/*.h | cut -d’:' -f1| uniq > filename
C) find /tmp -name "*.h" -exec grep "SYSCALL_VECTOR" {} \; -print2)find / -name filename -exec rm -rf {} \;
find / -name filename -ok rm -rf {} \;3)比如要查找磁盘中大于3M的文件:
find . -size +3000k -exec ls -ld {} ;4)将find出来的东西拷到另一个地方
find *.c -exec cp ‘{}’ /tmp ‘;’如果有特殊文件,可以用cpio,也可以用这样的语法:
find dir -name filename -print | cpio -pdv newdir6)查找2004-11-30 16:36:37时更改过的文件
# A=`find ./ -name "*php"` | ls -l –full-time $A 2>/dev/null | grep "2004-11-30 16:36:37"Linux-all, Linux | No Comments »
find 实例
四月 18th, 2006
要在/usr/linux中查找所有的*.h,并在这些文件中查找“SYSCALL_VECTOR",最后打印出所有包含"SYSCALL_VECTOR"的文件名,有以下几种方法实现
find /usr/linux -name "*.h" | xargs -n50 grep SYSCALL_VECTOR
grep SYSCALL_VECTOR /usr/linux/*.h | cut -d’:’ -f1 | uniq > filename
find /usr/linux -name "*.h" -exec grep "SYSCALL_VECTOR" {} \; -print我用find / -name filename| rm -rf,不成功,请问为什么不成功?
find / -name filename -exec rm -rf {} \;
find . -name filename |rm -rf试一下{} 表示你找出来的结果。
\; 则相当于“宪法”,没什么说头,就是这么规定的,在 -exec 后面需要一个表示该命令终结的的符号。可以在 man find 中找到答案。
要让rm识别find的结果,如下:
find / -name filename |xargs rm -rf
之所以find . -name filename |rm -rf不通过,是因为rm命令不接受从标准输入传过来的指令
查找含特定字符串的文件
例如查找当前目录下含有"the string you want find…"字符串的文件:
$find . -type f -exec grep “the string you want find…” {} ; -print从根目录开始查tmpfile,一旦查到马上删除
find / -name "tmpfile" -exec rm {} \;find 的perm问题
请问一下以下命令什么意思?关键是那个数字前的-,其他都还知道
find -name ".*" -perm -007
我知道
find -name ".*" -perm 755
这个是用来查找权限位为755的隐藏文件
噢,对了还有,我上边的命令都省略了find的pathname参数 find默认是查找当前工作目录的吗?
如果我用 -ok 替代 -exec, 那么还需要加上 {} \; 吗?
这个已经清楚,仍然需要,因为 -ok 只是 -exec 的提示模式,它只是多了一个确认操作的步骤,刚才没有读懂那几句E文的意思 呵呵 不好意思
-007是指查找所有用户都可读、写、执行的文件,要小心呀~~~
解释解释?
find -name ".*" -perm -007 和 find -name ".*" -perm 777 有区别吗?
-007是怎么来得呢?
不过有一个问题
我用 find . -perm -100 会列出当前目录 . , 这是为什么呢?下面引用由explover在 2002/10/01 06:15am 发表的内容:
-007是指查找所有用户都可读、写、执行的文件,要小心呀~~~
-007是查找含其它用户(不同组,非属主)可读,写,执行的文件.并不一定要同组可读写,-是指最少权限为007.
下面引用由一颗小白菜在 2002/10/01 10:16am 发表的内容:
OK了, 呵呵
不过有一个问题
我用 find . -perm -100 会列出当前目录 . , 这是为什么呢?
这种方法不会准确的找出目录的. -100是指权限至少是属主可运行.
在unix系统下,你可以拥有对目录文件的执行权你才可以进入一个目录.这便是目录文件被列出的原因.
find . -perm -001 -print找到往往是目录文件.
我的意思当然不是使用这种方法来找目录,只不过不明白其中的 -100 意义了
那以此类推,是不是 -010是指权限至少是owner同组可执行的吗?也就是说其实这里的010和-是分开的,-表示一个至少的意思,而且010才是真正用来描述权限位的?
这样子就明白了 谢谢你噢将find出来的东西拷到另一个地方?
find *.c -exec cp ‘{}’ /tmp ‘;’
如果有特殊文件,可以用cpio,也可以用这样的语法:
find dir -name filename -print | cpio -pdv newdir找出磁盘中某个大小范围内的文件
比如要查找磁盘中大于3M的文件:
find . -size +3000k -exec ls -ld {} ;如何用find查找某一天更改的文件?
可以使用这一行命令来实现:
A=`find ~ -print` | ls -l –full-time $A 2>/dev/null | grep "Jun 27" | grep 1998使用find 命令查找某个时间段的shell怎么写。比如11点到12点的。thanks
创建一个脚本judgetime,内容如下:
ls -l $*|awk ‘{split($8,hour,":");if((hour[1]>23 || hour[1] < 1)&&hour[1]<24)print}’
到要查找的目录下,运行
find ./ -name "*" -exec judgetime {} \;
注意时间格式为24小时制。
thank you ,如果我要精确到分钟呢
touch -t 04241112 starttemp #精确到12分钟
touch -t 04241220 endtemp #截止到12点20
find [dir] -newer starttemp -a ! -newer endtemp -exec ls -l {} \;
newer?
那昨天12:10文件如何呢?
每天执行的时候,用当天的日期和时间戳替换一下不就行了吗?
我不知道他是不是把所有的11:00~12:00的都找出来,是不是只执行一次还是每天都执行?
这种情况俺猜想是自己的东西放在哪忘了,只记得当时是深夜了。
有道理!
不愧是斑竹!
不光知道怎么解决问题,还知道在什么情况下出现这类问题,佩服佩服!
问题又出现了。创建这个文件的时候。本来应该是时间的一栏现在写上了2002,而不是12:00.
等到12:00过了吧!删除指定日期的文件
find ./ -name 文件名 -exec rm -f {} \;
例:删除当前30天内没用过的文件,用如下命令:
find / -atime +30 -exec rm -f {} \;
我自己试着写了一小段SHELL,也用ll ,grep, rm 几个命令,用起来还差强人意。
对过滤出来的文件名列表中用了一个FOR语句,再执行rm 。现在我想把这段SHELL 扩展一下让它每天定时运行将 n 天前的文件删掉,有没有人能给我一些提示,谢谢!
还有个问题,对于前面那位朋友提到的"find / -atime +30 -exec rm -f {} \;
"方法,我很早就试过几次,不过好像都不太对,参数 -atime n 是查找n天前被访问过的文件,我不明白的是这里的时间参照点是什么,以及这个n天是怎么计算的。
问 题二、对于"ll |cut -f 1" 这个命令我是不是用错了,我只想取出 ll 中列出的文件名,但用cut -f 命令做不到 ,我只好换用 ll |cut -c 59- 这种方式得到我要的文件名,but it’s a pool idear !我也试过用awk ,好像也不对,看看大家可不可以给我一些小小的提醒,TKS SO MUCH
问题三、如何改变 I结点 的日期格式 我现在的系统显示的格式是:
-rw-r—– 1 msahz01 users 2253 2002年2月 2日 poheader.i
我想把这换成
-rw-rw-rw- 1 house users 2193 Apr 19 2001 hkdisp.p
如何才能做到这点?
awk 应该可以
ll | awk ‘{print $9}’
删除多少天之前的文件
find /yourpath -mtime +31 -exec rm {} \;
find /yourpath -mtime +366 -exec rm {} \;find中, -ctime, -mtime及其-atime有何区别
请问 -ctime 和 -mtime 有什么关系 ?
如果父目录的 ctime 改变, 那它下面的文件的 ctime 就会自动都改了吗 ?
-ctime 和 -mtime ,-atime 这些信息是存在哪儿呢 ?我用 -mtime -1 找到了新建或改的文件.
但怎样才能找到一天内 mv 来的文件呢( 它们的时间是原有的时间,早于一天 ) ?用-newer选项啊。
你可以先touch一个你想要的时间的文件如下:
$ touch -t 08190800 test
$ ls -l test
-rw-r–r– 1 dba other 0 Aug 19 08:00 test
然后
$ find . -newer test -print
.
./.sh_history
$ ls -l .sh_history
-rw——- 1 dba other 154 Aug 20 17:39 .sh_history用touch可以写出你想要的任何时间的文件,然后用-newer ,! -newer选项即可成功。
1.ctime含inode信息修改的时间.mtime只指文件内容建立或修改的时间.
2 不会.
3.这些信息应该是存在文件系统的超级块里.我查了书 -ctime 是指 inode 的改变(或称文件的状态改变).
请问 inode 存了哪些信息 ?
做了些小测试,-mtime 改, -ctime 一定也改.
改文件名, -ctime 也会改.
谁能回答 i-node 存了哪些东西 ?vi /usr/include/sys/inode.h
班主,我不能 access /usr/include/sys/inode.h .
摘书如下:
Directories contain directory entries. Each entry contains a file or subdirectory name and an index node reference number (i-node number). To increase speed and enhance use of disk space, the data in a file is stored at various locations in the computer’s memory. The i-node contains the addresses used to locate all the scattered blocks of data associated with a file. The i-node also records other information about the file including time of modification and access, access modes, number of links, file owner, and file type.
可我发现 -atime 改了, -ctime 还没改. why ?
( 我先 cat 一个 ASCII 文件,再用 -atime -1 有它用 -ctime -1 居然没有它.)
着岂不跟 inode 信息改变, ctime 就改矛盾吗?我不同意你贴出来的那段文章,正如我提到的那样,atime,ctime,mtime是放到超级块里,在sco unix下是一种叫stat的结构.(stat_32),不同的系统文件系统可能不同.
sco 下inode的结构如下:typedef struct inode
{
struct inode *i_forw; /* inode hash chain */
struct inode *i_back; /* ‘’ */
struct inode *av_forw; /* freelist chain */
struct inode *av_back; /* ‘’ */
int *i_fsptr; /* "typeless" pointer to fs dependent */
ino32_t i_number; /* i number, 1-to-1 with dev address */
ushort i_ftype; /* file type = IFDIR, IFREG, etc. */
short i_fstyp; /* File system type */
off_t i_size; /* size of file */
ushort i_uid; /* owner */
ushort i_gid; /* group of owner */
ushort i_flag;
ushort i_want; /* i_flag extension to avoid MP races */
ushort i_count; /* reference count */
short i_nlink; /* directory entries */
dev_t i_rdev; /* Raw device number */
#define i_namtype i_rdev /* i_ftype==IFNAM subtype */
dev_t i_dev; /* device where inode resides */
struct mount *i_mton;/* ptr to mount table entry that */
/* this directory is mounted on */
struct region *i_rp; /* ptr to shared region if any */
struct stdata *i_sp; /* ptr to associated stream */
struct iisem *isem; /* ptr to XENIX semaphores */
struct iisd *isd; /* ptr to XENIX shared data */
} i_un;
#define i_mnton i_un.i_mton /* i_ftype==IFDIR IMOUNT */
#define i_rptr i_un.i_rp /* i_ftype==IFREG || i_ftype==IFBLK */
#define i_sptr i_un.i_sp /* i_ftype==IFCHR || i_ftype==IFIFO */
#define i_sem i_un.isem /* i_ftype==IFNAM && i_namtype==IFSEM */
#define i_sd i_un.isd /* i_ftype==IFNAM && i_namtype==IFSHD */struct fstypsw *i_fstypp; /* ptr to file system switch FSPTR */
long *i_filocks; /* pointer to filock (structure) list */
unsigned long i_mappages; /* number of pages currently cached */
unsigned long i_vcode; /* read-ahead block save (NFS) */
short i_wcnt; /* write open count or ITEXT count */
struct lockb i_cilock; /* tas to synchronize i_flag changes */
ushort i_rdlocks; /* count of non-exclusive lockers */
} inode_t;所以,访问一个文件不能改变inode信息.
使用chown, chgrp, chmod命令可以很好的比较mtime和ctime
chown改变一个文件的属主,用ctime可以找到,用mtime便找不到.
试试看.多谢斑竹! 我是在 Solaris 上面试的.我是对 -ctime 不明白.
试的结果如下:
修改文件,-mtime 改了, -ctime 也会改.
访问文件,-atime 改了, -ctime 没变.
chown, chgrp, chmod,mv, 都会使 -ctime 改变,但不影响 -atime 和 -mtime.
touch 可以改 -mtime and/or -atime,但 touch -a 只改访问时间时,-ctime也改了.
touch -m 改修改时间时,-ctime当然也改了.
好象还有别的很多东西可以令 -ctime 改变, 搞不清楚.
有什么方法可以显示 -mtime,atime,ctime 吗?
可以用 -ctime 来实现对目录的增量文件进行备份或 transfer 吗 ?
多谢!没有什么工具显示,(可能是俺不知道)
把下面程序里的st_mtime换成st_ctime,或st_atime便可以得到你要的了.
#include
int
main (int argc, char **argv)
{
struct stat buf;
char date[80];
char fname[80];
printf("Enter filename (with full path) to check mtime : ");
scanf("%s",fname);
stat(fname, &buf);
printf ("mtime (in sec) of %s = %ld\n", fname, buf.st_mtime);
strcpy(date, ctime((time_t *)&(buf.st_mtime)));
printf ("mtime (in date) of %s = %s\n", fname, date);
}至于文件备份,有什么不可以的么?
mtime ls -l 最近修改文件内容的时间
atime ls -lu 最近访问文件的时间
ctime ls -li 最近文件有所改变的状态 ,如文件修改,属性\属主 改变 ,节点 ,链接变化等 ,应该是不拘泥只是时间前后的改变俺看了ls的帮助,以为只是按ctime或atime排序,显示的时间还是mtime.
仔细比较了一下,ayhan说的是对的.谢谢ayhan.
多谢 ahyan 提示 ! 我在 Solaris 上试过如下:
mtime 用 ls -l 看到
atime 用 ls -lu 看到
ctime 用 ls -lc 看到. (ls -li 只有 inode number)
摘书如下:
-c Uses time of last modification of the i-node (file
created, mode changed, and so forth) for sorting (-t)
or printing (-l or -n).
-u Uses time of last access instead of last modification
for sorting (with the -t option) or printing (with the
-l option).
-i For each file, prints the i-node number in the first
column of the report.转载自:http://apps.hi.baidu.com/share/detail/11177457
-
Linux常用命令全集,一个网址:http://linux.chinaitlab.com/special/linuxcom/
2010-07-29 13:52:08
Linux常用命令全集,一个网址:http://linux.chinaitlab.com/special/linuxcom/ -
Linux的free命令详解,linux内存分析 及 linux下的cached值问题
2010-06-07 15:42:36
之前测试过程中 linux系统的 cached值一直居高不下,向OP请教后,知道不是问题,是linux系统自身的内存使用机制使然。
先看第一篇文章,通过free命令分析linux的内存:我告诉有朋友我一直用linux.他问我了一下我为什么linux使用的内存这么高.他讲他1G的内在free才232M.讲win xp才用200M的样子.其实啊.linux的内存是很说究的.
如下显示free是显示的当前内存的使用,-m的意思是M字节来显示内容.我们来一起看看.
$ free -m
total used free shared buffers cached
Mem: 1002 769 232 0 62 421
-/+ buffers/cache: 286 715
Swap: 1153 0 1153第一部分Mem行:
total 内存总数: 1002M
used 已经使用的内存数: 769M
free 空闲的内存数: 232M
shared 当前已经废弃不用,总是0
buffers Buffer 缓存内存数: 62M
cached Page 缓存内存数:421M关系:total(1002M) = used(769M) + free(232M)
第二部分(-/+ buffers/cache):
(-buffers/cache) used内存数:286M (指的第一部分Mem行中的used - buffers - cached)
(+buffers/cache) free内存数: 715M (指的第一部分Mem行中的free + buffers + cached)可见-buffers/cache反映的是被程序实实在在吃掉的内存,而+buffers/cache反映的是可以挪用的内存总数。
第三部分是指交换分区, 我想不讲大家都明白.
我想大家看了上面,还是很晕.第一部分(Mem)与第二部分(-/+ buffers/cache)的结果中有关used和free为什么这么奇怪.
其实我们可以从二个方面来解释.
对操作系统来讲是Mem的参数.buffers/cached 都是属于被使用,所以它认为free只有232.
对应用程序来讲是(-/+ buffers/cach).buffers/cached 是等同可用的,因为buffer/cached是为了提高程序执行的性能,当程序使用内存时,buffer/cached会很快地被使用。所以,以应用来看看,以(-/+ buffers/cache)的free和used为主.所以我们看这个就好了.另外告诉大家一些常识.Linux为了提高磁盘和内存存取效率, Linux做了很多精心的设计, 除了对dentry进行缓存(用于VFS,加速文件路径名到inode的转换), 还采取了两种主要Cache方式:Buffer Cache和Page Cache。前者针对磁盘块的读写,后者针对文件inode的读写。这些Cache能有效缩短了 I/O系统调用(比如read,write,getdents)的时间。
记住内存是拿来用的,不是拿来看的.不象windows,无论你的真实物理内存有多少,他都要拿硬盘交换文件来读.这也就是windows为什么常常提示虚拟空间不足的原因.你们想想,多无聊,在内存还有大部分的时候,拿出一部分硬盘空间来充当内存.硬盘怎么会快过内存.所以我们看linux,只要不用swap的交换空间,就不用担心自己的内存太少.如果常常swap用很多,可能你就要考虑加物理内存了.这也是linux看内存是否够用的标准哦.
在linux下使用free命令查看内存使用情况,有buffers和cached两项,以下是它们的区别:buffers是为块设备设计的缓冲。比如磁盘读写,把分散的写操作集中进行,减少磁盘I/O,从而提高系统性能。比如入U盘里cp一个文件,但是U盘读写指示灯未闪动,过了一会儿才闪动。卸载时会清空缓冲,所以有时卸载一个设备需要等待几秒。cached是缓存读取过的内容,下次再读时,如果在缓存中命中,则直接从缓存读取,否则读取磁盘。由于缓存空间有限,过一段时间以后没用的缓存会被移动到swap里面,所以有时看到物理内存还有很多,swap就被利用了。References:本文来自CSDN博客,转载请标明出处:http://blog.csdn.net/shw2004/archive/2010/07/19/5747381.aspx原帖:
问:请教free命令里的 buffers 和 cached 具体啥含义呢 ??答:我是这样理解的:
缓存(cached)是把读取过的数据保存起来,重新读取时若命中(找到需要的数据)就不要去读硬盘了,若没有命中就读硬盘。其中的数据会根据读取频率进行组织,把最频繁读取的内容放在最容易找到的位置,把不再读的内容不断往后排,直至从中删除。
缓冲(buffers)是根据磁盘的读写设计的,把分散的写操作集中进行,减少硬盘的反复寻道,从而提高系统性能。linux有一个守护进程定期清空缓冲内容(即写入磁盘),也可以通过sync命令手动清空缓冲。举个例子吧:我这里有一个ext2的U盘,我往里面cp一个3M的MP3,但U盘的灯没有跳动,过了一会儿(或者手动输入sync)U盘的灯就跳动起来了。卸载设备时会清空缓冲,所以有些时候卸载一个设备时要等上几秒钟。答:统一楼上的理解,对于1
应该是这样:“把最频繁读取的内容放在最容易找到的位置,把不再读的内容不断往后排,直至从中删除”这里内存管理机制是不会删除cached内容的,把没用的cached内容会移动到swap中去!所以我们有时看到物理内存还有很多,swap就被利用了,就是这个原因.
这个在以前的精华贴中讨论过,不同内核版本对buffer和cache的理解有区别
linux内存查看 free 命令在Linux下查看内存我们一般用command free
[root@nonamelinux ~]# free
total used free shared buffers cached
Mem: 386024 377116 8908 0 21280 155468
-/+ buffers/cache: 200368 185656
Swap: 393552 0 393552
下面是对这些数值的解释:
第二行(mem):
total:总计物理内存的大小。
used:已使用多大。
free:可用有多少。
Shared:多个进程共享的内存总额。
Buffers/cached:磁盘缓存的大小。
第三行(-/+ buffers/cached):
used:已使用多大。
free:可用有多少。
第四行就不多解释了。
区别:
第二行(mem)的used/free与第三行(-/+ buffers/cache) used/free的区别。
这 两个的区别在于使用的角度来看,第一行是从OS的角度来看,因为对于OS,buffers/cached 都是属于被使用,所以他的可用内存是8908KB,已用内存是377116KB,其中包括,内核(OS)使用+Application(X, oracle,etc)使用的+buffers+cached.
第三行所指的是从应用程序角度来看,对于应用程序来说,buffers/cached 是等于可用的,因为buffer/cached是为了提高文件读取的性能,当应用程序需在用到内存的时候,buffer/cached会很快地被回收。
所以从应用程序的角度来说,可用内存=系统free memory+buffers+cached.
如上例:
185656=8908+21280+155468
接下来解释什么时候内存会被交换,以及按什么方交换。
当可用内存少于额定值的时候,就会开会进行交换.
如何看额定值(RHEL4.0):
#cat /proc/meminfo
交换将通过三个途径来减少系统中使用的物理页面的个数:
1.减少缓冲与页面cache的大小,
2.将系统V类型的内存页面交换出去,
3.换出或者丢弃页面。(Application 占用的内存页,也就是物理内存不足)。
事实上,少量地使用swap是不是影响到系统性能的。
下面是buffers与cached的区别。
buffers是指用来给块设备做的缓冲大小,他只记录文件系统的metadata以及 tracking in-flight pages.
cached是用来给文件做缓冲。
那就是说:buffers是用来存储,目录里面有什么内容,权限等等。
而cached直接用来记忆我们打开的文件,
做实验进行验证:
如果你想知道他是不是真的生效,你可以试一下,先后执行两次命令#man X ,你就可以明显的感觉到第二次的开打的速度快很多。
实验:在一台没有什么应用的机器上做会看得比较明显。记得实验只能做一次,如果想多做请换一个文件名。
#free
#man X
#free
#man X
#free
你可以先后比较一下free后显示buffers的大小。
另一个实验:
#free
#ls /dev
#free
你比较一下两个的大小,当然这个buffers随时都在增加,但你有ls过的话,增加的速度会变得快,这个就是buffers/chached的区别。
因为Linux将你暂时不使用的内存作为文件和数据缓存,以提高系统性能,当你需要这些内存时,系统会自动释放(不像windows那样,即使你有很多空闲内存,他也要访问一下磁盘中的pagefiles)
使用free命令
将used的值减去 buffer和cache的值就是你当前真实内存使用
linux下内存释放问题
细心的朋友会注意到,当你在linux下频繁存取文件后,物理内存会很快被用光,当程序结束后,内存不会被正常释放,而是一直作为caching.这个问题,貌似有不少人在问,不过都没有看到有什么很好解决的办法.那么我来谈谈这个问题.
先来说说free命令
[root@server ~]# free -m
total used free shared buffers cached
Mem: 249 163 86 0 10 94
-/+ buffers/cache: 58 191
Swap: 511 0 511
其中:
total 内存总数
used 已经使用的内存数
free 空闲的内存数
shared 多个进程共享的内存总额
buffers Buffer Cache和cached Page Cache 磁盘缓存的大小
-buffers/cache 的内存数:used - buffers - cached
+buffers/cache 的内存数:free + buffers + cached
可用的memory=free memory+buffers+cached
有了这个基础后,可以得知,我现在used为163MB,free为86,buffer和cached分别为10,94
那么我们来看看,如果我执行复制文件,内存会发生什么变化.
[root@server ~]# cp -r /etc ~/test/
[root@server ~]# free -m
total used free shared buffers cached
Mem: 249 244 4 0 8 174
-/+ buffers/cache: 62 187
Swap: 511 0 511
在我命令执行结束后,used为244MB,free为4MB,buffers为8MB,cached为174MB,天呐都被cached吃掉了.别紧张,这是为了提高文件读取效率的做法.
引用http://www.wujianrong.com/archives/2007/09/linux_free.html
为了提高磁盘存取效率, Linux做了一些精心的设计, 除了对dentry进行缓存(用于VFS,加速文件路径名到inode的转换), 还采取了两种主要Cache方式:Buffer Cache和Page Cache。前者针对磁盘块的读写,后者针对文件inode的读写。这些Cache有效缩短了 I/O系统调用(比如read,write,getdents)的时间。"
那么有人说过段时间,linux会自动释放掉所用的内存,我们使用free再来试试,看看是否有释放>?
[root@server test]# free -m
total used free shared buffers cached
Mem: 249 244 5 0 8 174
-/+ buffers/cache: 61 188
Swap: 511 0 511
MS没有任何变化,那么我能否手动释放掉这些内存呢???回答是可以的!
/proc是一个虚拟文件系统,我们可以通过对它的读写操作做为与kernel实体间进行通信的一种手段.也就是说可以通过修改/proc中的文件,来对当前kernel的行为做出调整.那么我们可以通过调整/proc/sys/vm/drop_caches来释放内存.操作如下:
[root@server test]# cat /proc/sys/vm/drop_caches
0
首先,/proc/sys/vm/drop_caches的值,默认为0
[root@server test]# sync
手动执行sync命令(描述:sync 命令运行 sync 子例程。如果必须停止系统,则运行 sync 命令以确保文件系统的完整性。sync 命令将所有未写的系统缓冲区写到磁盘中,包含已修改的 i-node、已延迟的块 I/O 和读写映射文件)
[root@server test]# echo 3 > /proc/sys/vm/drop_caches
[root@server test]# cat /proc/sys/vm/drop_caches
3
将/proc/sys/vm/drop_caches值设为3
[root@server test]# free -m
total used free shared buffers cached
Mem: 249 66 182 0 0 11
-/+ buffers/cache: 55 194
Swap: 511 0 511
再来运行free命令,发现现在的used为66MB,free为182MB,buffers为0MB,cached为11MB.那么有效的释放了buffer和cache.
有关/proc/sys/vm/drop_caches的用法在下面进行了说明
/proc/sys/vm/drop_caches (since Linux 2.6.16)
Writing to this file causes the kernel to drop clean caches,
dentries and inodes from memory, causing that memory to become
free.
To free pagecache, use echo 1 > /proc/sys/vm/drop_caches; to
free dentries and inodes, use echo 2 > /proc/sys/vm/drop_caches;
to free pagecache, dentries and inodes, use echo 3 >/proc/sys/vm/drop_caches.
Because this is a non-destructive operation and dirty objects
are not freeable, the user should run sync(8) first.
转载自: http://www.51testing.com/?uid-64098-action-viewspace-itemid-109522 -
linux_在Linux下安装JDK和Tomcat 及Linux常用命令
2009-08-28 17:36:13
2009年8月28日 星期五 11时15分
在Linux下安装JDK和Tomcat
http://www.sudu.cn/info/html/edu/20070101/297416.html
jdk 1.6下载地址:
https://cds.sun.com/is-bin/INTERSHOP.enfinity/WFS/CDS-CDS_Developer-Site/en_US/-/USD/ViewProductDetail-Start?ProductRef=jdk-6u16-oth-JPR@CDS-CDS_Developer
https://cds.sun.com/is-bin/INTERSHOP.enfinity/WFS/CDS-CDS_Developer-Site/en_US/-/USD/ViewFilteredProducts-SingleVariationTypeFiltertomcat下载地址:
http://apache.etoak.com/tomcat/tomcat-5/v5.5.27/bin/
在Linux下安装JDK和Tomcat环境:Linux AS3U8
安装软件:j2sdk-1_4_2_04 , Tomcat-5.5一、安装Tomcat需要先安装jdk。
有不同方法的,本人均采用了第一种方法(已加蓝色),第二种方法未实施。
首先下载JDK:
http://java.sun.com/j2se/1.4.2/download.html
提供了两个类型的下载:1、RPM in self-extracting file (j2sdk-1_4_2_04-linux-i586-rpm.bin)这个也是个自解压文件,不过解压后的文件是j2sdk-1_4_2_04-linux-i586-rpm包,执行rpm命令装到linux上就能了。
安装如下:
#chmod +x ./j2sdk-1_4_2_04-linux-i586-rpm.bin
# ./j2sdk-1_4_2_04-linux-i586-rpm.bin
# rpm -ivh j2sdk-1_4_2_04-linux-i586-rpm
安装软件会将JDK自动安装到 /usr/java/j2sdk1.4.2_04目录下。2、RPM in self-extracting file (j2sdk-1_4_2_04-linux-i586.bin) 这个是自解压的文件,
在linux上安装如下:
# chmod +x ./j2sdk-1_4_2_04-linux-i586.bin
# ./j2sdk-1_4_2_04-linux-i586.bin
在按提示输入yes后,jdk被解压到./j2sdk1.4.2_04目录下。为和下面2中JDK安装路径一致,我们进行下列操作,在/usr/java下建立安装路径,并将文件考到该路径下:
# mkdir /usr/local/java
# cp -fr ./j2sdk1.4.2_04 /usr/local/java二、设置环境变量
1.修改所有用户的环境变量 (需要重启才能生效,看不清的那个字符时冒号)
# vi /etc/profile
在该文件中加入:
export JAVA_HOME=/usr/local/java/j2sdk1.4.2_04
export CLASSPATH=$CLASSPATH:$JAVA_HOME/lib:$JAVA_HOME/jre/lib
export PATH=$JAVA_HOME/bin:$JAVA_HOME/jre/bin:$PATH
一定要在CLASSPATH路径中加入$CLASSPATH:2.修改用户环境变量
假设使用java的用户为 kunp,编辑该用户的.bashrc文件进行环境变量设置。
# vi /home/kunp/.bashrc
在 .bashrc文件中加入:
export JAVA_HOME=/usr/java/j2sdk1.4.2_04
export CLASSPATH=$CLASSPATH:$JAVA_HOME/lib:$JAVA_HOME/jre/lib
export PATH=$JAVA_HOME/bin:$JAVA_HOME/jre/bin:$PATH3.安装成功的标志:
[root@janbe root]# java -version
java version "1.4.2_04"
Java(TM) 2 Runtime Environment, Standard Edition (build 1.4.2_04-b03)
Java HotSpot(TM) Client VM (build 1.4.2_04-b03, mixed mode, sharing)安装重点:把环境变量设置好!
三、安装Tomcat:
把Tomcat解压到 /usr/local
# tar xvzf tomcat-5.5.20.tar.gz
# cd tomcat-5.5.20.tar.gz/bin
# ./startup.shTomcat打开的默认端口是8080,打开
http://localhost:8080
,就会看到已成功安装的提示页面
ps 查看进程 ps -ef | grep java四、命令参考:
VI编辑 : 按 i 进入编辑状态, 修改完毕,按 ESC , 按 shift + : ,输入 wq ,会保存后退出编辑状态。
复制命令: cp /root/software/tomcat-5.5.20.tar.gz /usr/local
复制并重命名文件: cp /root/software/a.txt /usr/local/b.txt
移动文件: mv /root/software/tomcat-5.5.20.tar.gz /usr/local
移动并重命名文件: mv /root/software/a.txt /usr/local/b.txt
查看文件: cat a.txt 或者 more a.txt
创建文件夹: mkdir test
五、错误编辑RedHat profile文件导致系统不能登录的解决办法本文来自CSDN博客,转载请标明出处:http://blog.csdn.net/liucong/archive/2007/06/04/1637951.aspx
在linux中安装jdk需要编辑 /etc/profile 文件,这个文件一但被错误设置就会导致系统不能登陆,具体症状为:登陆图形界面以后会弹出一个对话框 “您的回话只持续不到10秒种。。。。。。”,点击确定就又重新引导,但是还是不能顺利的登录图形界面。对于这个问题可以在命令行模式下把最近对 /etc/profile文件所作的修改去掉即可,具体操作如下:
1。按 shift+ctrl+alt+F1进入命令行模式
2。以root身份登陆
3。按照下面的命令执行
cd etc 回车
/bin/vi profile 回车 (注意:在这里不那能用直接调用Vi 需要指定目录 即 /bin/vi )
上面两个命令可以打开 /etc/profile 文件,
i 回车 (这是vi的插入操作命令)
然后找到你最近修改过的内容,恢复原来状态或者事删除
esc : wq 回车
这时profile文件已经保存更新,重启系统即可顺利进入图形界面
linux 常用命令:
查看linux ip配置 : ifconfig
查看历史命令 : history
查看共享文件夹: ls /mnt/hgfs/共享文件夹名cp命令还可以一次拷贝多个文件 $cp -bi dir1/* dir2 这样就把dir1以及其子文件拷贝到dir2中去了, -bi 为了避免覆盖
查看目录下文件: ls -al
查看绝对路径: pwd
建立一个文件夹: mkdir dir1
建立一个文件: touch file1 touch file1.java
删除一个文件: rm -f file1
删除一个目录: rm -rf dir1切换用户
su jack
su root
输入password
touch test.txt 建立文件
cat test.txt 查看文件
vim test.txt 编辑文件
要进行编辑操作时,先按 i ,就进入了编辑状态;
退出编辑状态: 按 ESC ,此时可以自由移动定位光标, H 左移 L右移 J 下移 K 上移
退出文本: 按ESC, 之后 Shift + :(冒号),进入命令行状态, 输入 q 不保存修改,退出; 输入 wq 保存修改,退出其他: x 删除光标定位的字母 u 撤销上次操作
还有很多。。。。。
查看系统状态命令: top top -d3 -i >> status.txt
各种解_压缩命令---------------------------------------------
.Tar.gz 文件类型
解压:Tar zxvf FileName.Tar.gz
压缩:Tar zcvf FileName.Tar.gz DirName.Tar 文件类型
解包:Tar xvf FileName.Tar
打包:Tar cvf FileName.Tar DirName
(注:Tar是打包,不是压缩!)
---------------------------------------------
.gz 文件类型
解压1:gunzip FileName.gz
解压2:gzip -d FileName.gz
压缩:gzip FileName.Tar.gz 和 .tgz 文件类型
解压:Tar zxvf FileName.Tar.gz
压缩:Tar zcvf FileName.Tar.gz DirName
---------------------------------------------
Linux系统下查看IP配置表2008-07-13 21:00配置IP地址:
/etc/sysconfig/network-scripts/ifcfg-eth0
里面的内容:
[root@localhost network-scripts]# cat ifcfg-eth0
DEVICE=eth0
BOOTPROTO=none
ONBOOT=yes
TYPE=Ethernet
NETMASK=255.255.255.0
IPADDR=192.168.0.2
USERCTL=no
PEERDNS=yes
GATEWAY=192.168.0.1配置完以后:
/etc/init.d/network reload 或 service network查看网卡信息: route -n 查看物理网卡:mii-tool 重启eth0: ifup eth0
查看eth0信息:ethtool eth0 添加IP地址:ifconfig eth0 IP netmask 子网掩码 broadcast 广播地址
在windows Linux中查看 vmware 虚拟机的共享文件夹一. 安装vm tools: vm -》 Install vm tools 工具, vm可以自动完成;
二. 设置共享文件夹: vm -> settings -> options -> share folders -> always enable;
三. 仅以主机为windows,客户机分别为windows和linux为例:
(1)windows客户机中:
1 可以使用 Windows Explorer 访问共享文件夹 -> 系统中整个网络(NT核心客户操作系统里的网上邻居)下 -> VMware Shared Folders网络 -> 共享文件夹;
2 直接在地址栏中输入 \\.host\Shared Folders 即可快速定位到共享文件夹;
3 映射共享文件夹为一个驱动盘,就像网络共享一样:
工具 -> 映射网络驱动器 -> 指定 驱动器 和 盘符。
(2)Linux客户机中:
在Linux虚拟机中,共享文件夹出现在/mnt/hgfs目录里。
http://www.programfan.com/blog/article.asp?id=38023jdk for linux
1. 安装chmod +x jdk-1_5_0_08-linux-i586.bin
./jdk-1_5_0_08-linux-i586.bin
chmod +x jdk-1_5_0_08-linux-i586.rpm
rpm -ivh jdk-1_5_0_08-linux-i586.rpm
2.设置环境变量。
#vi /etc/profile
在最后面加入
# java ......................
JAVA_HOME=/usr/java/jdk1.5.0_08/
CLASSPATH=.:$JAVA_HOME/lib/tools.jar:/lib.dt.jar
PATH=$JAVA_HOME/bin:$PATH
export JAVA_HOME CLASSPATH PATH
保存退出
按esc
:wq
3.用户使用vi /etc/profile.d/java.sh
JAVA_HOME=/usr/java/jdk1.5.0_08/
CLASSPATH=.:$JAVA_HOME/lib/tools.jar:/lib.dt.jar
PATH=$JAVA_HOME/bin:$PATH
export JAVA_HOME CLASSPATH PATH
保存退出
按esc
:wqchmod 755 /etc/profile.d/java.sh
4.执行所有的命令
source /etc/profile
source /etc/profile.d/java.sh
5.测试JAVA是否安装
java -version
redhat9.0重新起动后才可以给所有终端使用信的环境变量(其它方法不知道). -
把桌面、我的文档、IE收藏夹设置到其他位置----更改windows系统设置
2009-05-05 09:23:13
把桌面、我的文档、IE收藏夹设置到其他位置
下面以xp系统,ie浏览器为例,介绍将收藏夹、桌面和我的文档备份到E:\backup\的相应文件夹内,详细步骤如下:
1.打开记事本,将以下内容复制进去,注意第二行一定要留一行空格。
Windows Registry Editor Version 5.00[HKEY_CURRENT_USER\Software\Microsoft\Windows\CurrentVersion\Explorer\User Shell Folders]
"Desktop"=hex(2):65,00,
"Favorites"=hex(2):65,00,
46,00,61,00,76,00,
"Personal"=hex(2):65,00,
4d,00,79,00,20,00,44,00,
00
2.将其保存为.reg文件,然后双击合并进注册表。
3.调出任务管理器将Explorer.exe结束掉,之后再新建任务Explorer.exe,等桌面出来之后它的默认位置已经转移到E盘backup文件夹下了。
4.重启ie,这时收藏夹也转移到 E盘backup文件夹下了。
注意:原来路径中的文件不会转移,需手动剪切过去。上面的就可以了,下面的想了解的就看看
IE收藏夹
1.备份收藏夹的方法:
方法1.依次打开 我的电脑->系统盘(c盘)->Documents and Settings->你的用户名->收藏夹(Favorites) 将这个文件夹复制备份
重装系统后按照上面的路径 覆盖 收藏夹 文件 就可
方法2.打开IE浏览器 点击 文件->导入与导出...->下一步->选者"导出收藏夹"->下一步->选者存放路径 完成备份 注意不要存在系统盘里否者重装系统后将被覆盖
备份好后->重装完系统后
打开IE浏览器->文件>导入与导出...>下一步>选者'导入收藏夹'>一直到完成就可
2.移动收藏夹的办法:
1.先用左键单击“C:\Documents and Settings\用户名”下的收藏夹文件夹,然后在窗口左边的任务栏点“移动这个文件夹”,选要移动到的位置。如:D盘。
2.从屏幕左下角依次点[开始]-[运行],出现对话框后,在“打开”中键入regedit,点[确定]进入注册表编辑器窗口;
依次打开文件夹
HKEY_CURRENT_USER\Software\Microsoft\Windows\CurrentVersion\Explorer\UserShellFolders;
HKEY_LOCAL_MACHINE\Software\Microsoft\Windows\CurrentVersion\Explorer\UserShellFolders
3.在最后打开的UserShellFolders文件夹内容(右侧窗口)中的Favorites项可以看到当前IE收藏夹的位置,双击Favorites左边的图标(标有红色的“ab”),在打开的对话框“数值数据(V)”栏,将“%USERPROFILE%”改成自己定的位置,例如,定在F盘根目录下,改完后“数值数据(V)”栏中的全部内容应为“F:\Favorites”,然后点[确定]完成修改;
说明:系统默认IE收藏夹的位置是%USERPROFILE%\Favorites,其中“%USERPROFILE%”是系统的特殊标记,实际上指C盘上系统默认位置,即C:\DocumentsandSettings\Owner(用资源管理器便可找到)。
4.关闭注册表编辑器窗口,点[开始]-[注销]重装入一下XP或重启一下电脑,使新的设置生效。
(注意:如果想要验证是否修改成功,可以在收藏菜单上点击整理收藏夹。)
我的文档
在Windows XP系统中默认的“我的文档”存放位置是在系统盘中,把“我的文档”存放到另外一个分区,那样就不用怕重装系统时会失去资料了。那如何移动呢?
在Windows桌面上右键点击“我的文档”->属性->在“目标文件夹”选项卡里点击“移动”->选择自己喜欢的文件夹即可。
首先在“开始”菜单或桌面的“我的文档”图标上点击右键,在弹出的菜单中选择“属性”。弹出如图1所示的对话框。
在图1所示页面中选择:“Find Target”为“我的文档”选择目标文件夹,即可完成把“我的文档”的存放位置放置到你自己选定的文件夹中。点击“Move”按钮即可完成“我的文档”文件夹中内容的移动。用这种方法不仅可以实现把“我的文档”移动到其他位置的目的,还可以作为网络备份“我的文档”的一种方法。
[高级]桌面,我的文档,IE收藏夹设置
用注册表编辑方法
首先要在“开始”——“运行”内输入“regedit”打开注册表编辑器,然后要在“文件”<SPAN lang=ZH style="FONT-SIZE: 9pt; COLOR: #333333; mso-bidi-font-family: Arial; mso-fareast-language: ZH; mso-ascii-font-family: Arial; mso-hansi-font-f
 cpuinfo信息查看.rar(8.96 KB)
标题搜索
我的存档
数据统计
- 访问量: 714390
- 日志数: 415
- 图片数: 1
- 文件数: 3
- 建立时间: 2008-12-07
- 更新时间: 2015-07-14
