
-
cmd中运行adb提示adb不是内部或外部命令
2013-07-16 10:40:40
adb不是内部或外部命令,也不是可运行的程序或批量文件。
最近在测试手机功能,同事告诉我让在dos下运行adb
结果出现如标题的错误信息
经查找资料,解决方法如下:
找到安装android的目录:D:\andriod\android-sdks\platform-tools
我把android安装在了D盘的android目录下,找到plantform-tools,下面有三个文件:
adb.exe
AdbWinApi.dll
AdbWinUsbApi.dll
复制这三个文件,分别粘贴在C:Windows/system32
C:Windows/system
再次执行dos下的adb即可。
-
TestDirector8.0安装配置(前台及后台)3
2013-04-24 17:31:27
3.1 对4.2操作步骤进行总结
一、 全客户端移植总结:
Ø 必须保证源数据库和目的数据库创建了监听(本次TD的移植,Oracle和TD安装在两台机器上)。
Ø 需要先创建源数据库的DBSERVER及TD源的project(project创建时使用的是create)。
Ø 再创建目的数据库上的DBSERVER及TD目的project(project创建时使用的是copy)。
Ø 具体请看本文章中的4.2节。
3.2 迁移数据的方式对TD进行移植
一、 TD项目数据
二、 Oracle数据库数据
3.3 TD只数据库移植
前提条件:TD使用的数据库1.8服务器的oracle已经通过其他方式全部移植到新的1.11服务器的oracle上(相当于从1.8复制一份至1.11上)
TD的数据库重新连接到1.11服务器上
移植方式:在已经配置好的oracle文件中修改IP。其他不修改。 -
TestDirector8.0安装配置(前台及后台)2
2013-04-24 17:18:25
2.1 全客户端操作TD数据移植
一、 在目标服务器的TD上创建DB Server :TD(912.168.1.99) 该数据库做为中介。
1. 登录已经安装好的TD服务器,登录site administrator,选择DB Servers标签,

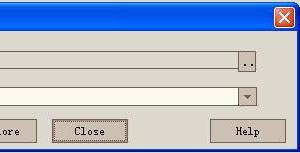
点击new,出现下图:创建一个DB Servers,

由于使用的Oracle数据库,故默认。
Server Alias:填写源数据库的机器别名:TD(192.168.1.99)
DB Admin User:填写源数据库的用户名:td(192.168.1.99)
DB Admin Password:填写源数据库的密码,admin(192.168.1.99)
Default Connection String:填写连接数据库的字符串(由于使用的Oracle数据库,源数据库字符串为以下内容,故字符串的格式如下):
Provider=OraOLEDB.Oracle;DataSource=%DB_SERVER%;User ID=%DB_USER%;Password=%PASSWORD%;
配置好后点击ping,ping成功。
2. 如果出现下图:则表示database 的Server Alias错误表示:无法解析服务名称,则需要修改为:源数据库的服务名:TD(192.168.1.99)。

二、 在目标服务器的TD上创建project:ITALK(192.168.1.99)。
1. 该restore project是做为中介(源服务器上的192.168.1.99)点击下图的Restore Project(红色框)

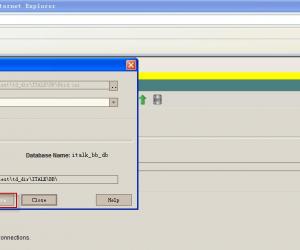
2. 弹出下图页面 Restore Project
选择DBID.INI file location:DBID.INI在源服务器上的TD_DIR相应的项目下(该file location必须是网络上服务器上的TD_DIR目录相应的项目下)。
3. 点击DBID.INI file location后,出现要选择的项目DBID.INI,如下图

选择上图中的:网上邻居192.168.1.99上的C:\TD_DIR\ITALK\BB\Dbid.ini
如果选择本地机器上的Dbid.ini则会报错。
选择文件后,点击restore按钮,如下图
则192.168.1.99服务器上的数据库及项目成功Restore在192.168.1.7的TD上
以上创建的DBServer及project是做为要恢复的中介项目存在。
三、在目的服务器TD(192.168.1.7)创建DBServer及Domain。
1. 创建DBServer(192.168.1.8).
在DBServer上点击new,下图

2. 本次的create database server需要填写目的服务器上的数据库信息。

由于使用的Oracle数据库,故默认。
Server Alias:填写目的数据库的机器别名:TD_NEW(192.168.1.7)
DB Admin User:填写目的数据库的用户名:liuya (192.168.1.7)
DB Admin Password:填写目的数据库的密码,liuya(192.168.1.7)
Default Connection String:填写连接数据库的字符串(由于使用的oracle数据库,字符串的格式如下):
Provider=OraOLEDB.Oracle;DataSource=%DB_SERVER%;User ID=%DB_USER%;Password=%PASSWORD%;
配置好后点击ping,ping成功。
3. 在目的服务器TD(192.168.1.7)创建domain及 project。创建Domain。
创建project点击create project按钮,出现create project页面,如下图中的红色框:
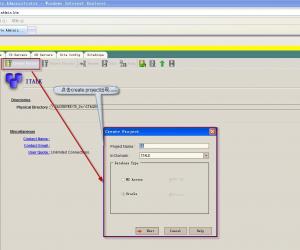
4. 输入project的名字,该project是目的服务器上的project:BB。
选择Oracle数据库(由于目前使用的是Oracle数据库),点击next,出现下图:

server name:选择目的数据库服务器名:TD_NEW(192.168.1.7),这步选择是关键,如果选择不是TD_NEW,(最后一步copy时)则不会在192.168.1.8上创建Project。
如果选择TD则会在192.168.1.99数据库上创建Project。
DB Admin Uer:填写目的数据库的用户名:liuya(192.168.1.8),
DB Admin Password:填写目的数据库的密码:liuya(192.168.1.8)。
5. 点击next,出现下图:
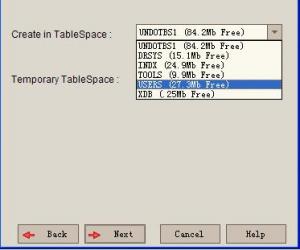
选择create in tablespace:USERS,其他默认,
6. 点击next出现下图:
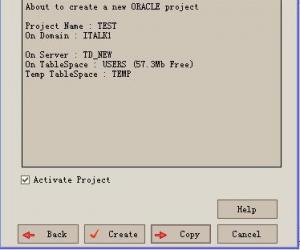
该页面默认
点击copy按钮,这个是移植的关键,通过项目复制功能完成项目数据移植:见下图
在copy对话框里选择复制源(中介项目restore project)并配置恢复项。
From Project:选择中介项目RESTORE:BB,选择select ALL
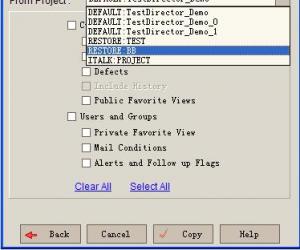
7. 选择复制源后的页面,如下图
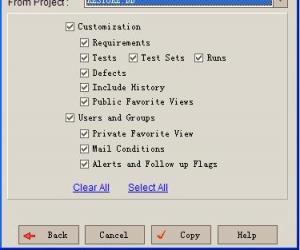
点击copy,经过以上步骤后,中介项目上的数据便移植到目的TD数据库里。移植完后,可将临时建立的连接到源数据库的DB server及Project进行remove操作。如果选择删除Project操作,则会把192.168.1.99上的数据库删除掉(千万小心)。
-
TestDirector8.0安装配置(前台及后台)
2013-04-24 16:56:31
1. 运行环境
移植前环境:Windows 2003 Enterprise Edition SP2,Oracle10,IIS6,TD8.0,该环境下的TD和数据库是安装在一台机器上。TD和Oracle(192.168.1.99)
移植后环境:Windows2003,Oracle9,TD8.0,IIS6,该环境下的TD和数据库是安装在两台机器上的。TD:(192.168.1.7),Oracle:(192.168.1.8)安装在linux系统中。
1.1 数据移植准备
由于TD和Oracle安装在两台机器上,故在安装TD的机器上需要对Oracle进行监听才能访问。如果TD和Oracle安装在一台机器上不需要对Oracle进行监听。
在目的主机192.168.1.7上对Oracle进行监听配置,配置两个数据库的监听:源数据库的监听和目标数据库的监听。
1. 例如:源数据库的监听(192.168.1.99),打开位置如下图

2. 打开程序Oracle下的net manager,出现下图

3. 选中【服务命名】点击创建{绿色加号},
出现:{net服务名向导:欢迎使用},下图

输入要监听的网络服务名,源数据库的服务名:TD(192.168.1.99)
4. 点击【下一步】,出现{net服务名向导:第2页(共5页):协议}下图:

5. 默认选择TCP(internet协议),点击【下一步】,出现{net服务名向导:第3页(共5页):协议设置}下图:

6. 输入要监听服务器的主机名:192.168.1.99(IP),端口默认,点击【下一步】,出现{net服务名向导:第4页(共5页):服务}下图:

7. 输入(Oracle或更高版本)服务名:TD
,点击【下一步】出现下图:
说明:该服务名必须跟本次要监听的Oracle数据库目前使用的服务名相同。

8. 点击测试按钮,如果出现未连接成功,如下图:是由于该用户:scott及口令:tiger被锁定,可以在数据库中进行解锁,或者使用未被锁定的用户名和密码更改登录即可。

9. 如果更改连接测试,测试是否成功,可以通过点击更改登录按钮。
由于本次是使用未锁定的现有的用户名和密码。
点击更改登录按钮,出现下图

输入用户名和口令(192.168.1.99的数据库上的可用账号(用户名:td,密码:admin),点击确定,再点击测试按钮,测试通过即可。
同样的方法创建目标数据库的监听。服务名:TD_NEW(192.168.1.8) -
打开Rose提示license.dll为无效的windows映像--解决方法
2010-12-25 23:36:37
好久不用Rose工具了,今天打开Rose结果弹出提示框:“应用程序或DLL C:\WINDOWS\system32\license.dll为无效的Windows映像。请再检测一遍安装盘”。
还好网络上很多解决方法的。O(∩_∩)O哈哈~,真的管用呢
就下边的:
把common目录下的license.dll拷贝到rose.exe所在的目录,问题轻松解决。
common指:安装目录\Rational\common
rose.exe所在目录:安装目录\Rational\Rose\
-
Team Foundation Server 2010 Key Concepts
2010-11-12 15:37:38
Before I start enumerating the features of TFS 2010, I need to start with some of the big conceptual changes that we’ve made. This post set some architectural groundwork and define some terms that I’ll use in subsequent posts.
Team Project Collections
The first important concept to understand is what we call Team Project Collections (TPCs). In TFS 2008 a TFS server contains a set of Team Projects. Those Team Projects are mostly but not 100% independent of each other. For instance one project can be a branch of another project. Also work item types in 2 projects share the same underlying database schema, making it very easy to run work item tracking queries across projects on the server. All checkins on a server share the same monotonically increasing changeset number and all work item ids are allocated from the same monotonically increasing work item ID, etc. Because of the subtle dependencies, certain things people want to do are difficult (or nearly impossible) – for example, consolidate two Team Foundation Servers into one or back up and restore an individual project.
In TFS 2010 we wanted to solve a long list of scenarios like those and our solution is called Team Project Collections (TPCs). In TFS 2010 a TFS farm (notice I said farm, not server – more on that in a minute) hosts Team Project Collections and not just Team Projects. A Team Project Collection is a group of related Team Projects and a TFS farm can host many Team Project Collections. To try to make an analogy with TFS 2008, it’s as if TFS 2008 could host exactly 1 Team Project Collection per physical TFS server. Just about any statement you might make about a TFS 2008 server would apply to a TFS 2010 Team Project Collection (TPC). For instance, everything I said above about changeset numbers, work item IDs, etc is true of a TFS 2010 Team Project Collection. The key, however, is that Team Project Collections are completely independent of each other. Two Team Project Collections can each have a change set with the same changeset number (but very different contents). They can each have work items with the same work item ID. You used to identify things in TFS by server url + ID. Now you identify them by server url + team project collection + ID.
Let me try to make this concrete with a screen shot. When you connect to a TFS server in TFS 2008, you get a screen that looks like this. As you can see – you pick the server and then one or more Team Projects to work on.

However, in TFS 2010, the Connect to TFS dialog looks like this:

As you can see on the left hand side, there is now a list of Team Project Collections (currently labeled “Directory”) and on the right hand side, you can see a familiar looking list of Team Projects within the selected Collection. The client will only allow you to connect to projects in one TPC at a time.
If all of this sounds vaguely similar to the notions around Sharepoint Site Collections and Sharepoint Sites, that’s because it is. The concepts, benefits and limitations are all quite similar. If you are familiar with the Sharepoint architecture, it will help you understand the TFS 2010 architecture.
Database Changes
The introduction of Team Project Collections has brought with it changes to the organization of the TFS databases. TFS 2008 was composed to 5-7 databases partitioned by subsystem. There was one for Version Control, one for Work Item Tracking, Work Item Tracking attachments, Project Management, Build, Integration, … With the introduction of Team Project Collections, we wanted to consolidate the various subsystem data to make Team Project Collections easier to manage. As a result, the TFS 2010 database architecture is as follows:
TFS_Config – The “root” database that contains centralized TFS configuration data, including the list of all Team Project Collections that this TFS farm is responsible for. If you look at Beta 1 (to be released in the not too distant future), you will see this is currently called TFS_Application but we are changing the name to TFS_Configuration after Beta 1 to make it more consistent with Sharepoint terminology (WSS_Config).
TFS_Warehouse – The TFS 2010 data warehouse database that contains reporting data from all Team Project Collections served by this Farm. This means that the data warehouse provides reporting capabilities across all Team Project Collections in the farm.
TFS_* – One database for each Team Project Collection managed by the TFS farm. For example the “default” one would be TFS_DefaultCollection. Each database contains all of the operational data regardless of sub system (version control, work item tracking, build, etc) for a given Team Project Collection.
Of course, there are still databases for Sharepoint and Report Server where ever you install those components.
I share this information not because I particularly want people mucking around in the databases but rather because I think it helps people understand the changes and large scale TFS administrators will want to be able to understand the SQL characteristics for operations.
TFS Farms
The introduction of the notion of a TFS farm is another big architectural change in TFS 2010. In TFS 2008, we talked about TFS “Servers”. Even then it was a bit of a misnomer since you can install all TFS 2008 capabilities (TFS, SQL, Sharepoint, Reporting Services, …) on a single physical (or virtual) server or distribute them across multiple.
However, it gets even more flexible with TFS 2010 and as such, it’s now really awkward to talk about a TFS “server”. That said, it is still possible (and will likely be common) to install all of the TFS components on a single server.
The big changes that constitute “TFS farms” are the following:
NLB support for TFS application tiers – With TFS 2010, you can configure multiple TFS application tier machines to serve the same set of Team Project Collections. The primary purpose of NLB support is to enable a cleaner and more complete high availability story than in TFS 2008. Any application tier in the farm can fail and the farm will automatically continue to work with hardly any indication to end users of a problem. It also improves things like the operating system patching story (ATs in the farm can individually be taken offline for patching with out shutting users out of the system). And more.
Scale out for SQL data tiers – TFS 2010 now support use of as many SQL Servers as you like. Each data base can be configured to be on any SQL server and because each TPC is an independent database, this gives administrators a great deal of flexibility to manage their SQL server installations. These features can be used to load balance databases across SQL Servers, manage capacity, retire old SQL servers, etc. A project collection can easily be suspended while it is moved between SQL servers without affecting the operation of any other collections.
Summary
Just to reiterate – you don’t have to do any of this. You can still run TFS on a single server and not have to think about multiple ATs or multiple SQL servers. You can stick with one Team Project Collection if you like.
I believe that these new capabilities will significantly change the way enterprises manage their TFS installations in the future. With Team Project Collections and TFS farms, you can create a single, arbitrarily large TFS installation. You can grow it incrementally by adding ATs and SQL Servers as needed. You can evolve it as you need to reconfigure hardware. It provides straight forward high availability. TPCs provide a complete delegation model, allowing you to provide services to different groups without them knowing about each other. TFS 2008 servers will be able to be consolidated as independent Project Collections on TFS 2010 farms.
My intent with this post was to cover the key architectural changes and concepts and not cover the specific features/benefits (but I had to touch on some of them to make it make sense). Subsequent posts will cover this from more of a feature perspective but hopefully you now have the concepts that will help it all make sense.
Thanks,
Brian
-
图文并茂介绍在VS2010里使用TFS2010(转)
2010-11-12 14:40:06
图文并茂介绍在VS2010里使用TFS2010
我们来讲一下如何在VS2010里面创建项目并添加到TFS2010里面。
新建一个项目,并把它添加到TFS,我们会收到下面的错误:

这是因为我们没有为项目创建Team project,而把它直接添加到了Team project collections,这是不允许的。下面我们来创建一个Team Project:

输入Team project的名称和描述:

点击下一步选择过程模板,默认是Agile的模板,也可以选择CMMI的模板,这里我选择了Agile for MSF 5.0的模板,MSF for Agile Software Development 5.0过程框架,是以Scrum模型为基础导向扩展,并且结合了VSTS2010工具的众多测试功能特性,为更多的从事微软.NET技术相关的开发人员以实现高质量的软件产品:

确认一下项目设置

开始创建项目

成功创建后,点击close结束。

现在通过VS2010的Team Explore可以看到刚刚创建的项目了,有三部分Work Items,Builds和Source Control:

现在可以把刚刚创建的VS的项目加入到TFS的项目里:

在TFS里头创建一个文件夹来存放我们的VS项目

按下ok按钮,就把我们的项目加入了TFS,项目还没有真正提交到TFS,可以看到文件前面都多了个“+”

现在我们把代码提交到TFS里头,Check in的时候可以写些说明

TFS2010不仅仅是一个源代码版本控制器,他是一个应用程序生命周期(ALM)工具,可以参看高阳的文章Visual Studio 2010 Ultimate敏捷之道:特性解析,在软件项目的开发过程中重要的开发,测试和构建TFS都提供了完整的支持:

他们之间工作流流程是

这是一种很普遍的工作场景,在一天之中,编写代码,编译一个可工作的软件提交测试,测试发现的bug,修复他们,这样不断的重复,整个过程的支持需要有一个统一的存储库进行支持,然后所有项目可以进行关联。使用TFS的Basic安装就可以完成这样的功能,比纯粹的像VSS,SVN这样的版本控制控制软件有很大的改善,这也能够回答有的网友问TFS有什么优势的疑问了。在TFS的完整版本中还包括自动化测试,虚拟实验室和架构验证的功能。完整版本的流程图是这样子的:

下面我们来看看TFS的Basic安装的三大主要功能Work Items,Builds和Source Control,是怎么样融合在我们的开发过程中:
可以通过Visual Studio的Team Explorer创建工作项,打开Team Explorer:

我们的项目才刚刚创建,第一个迭代还没有开始,常规的流程需要把需求也管理进来,这里只是演示,项目管理过程中的很多东西都将忽略。我导入TFS是一个已经完成的小工具,这个小工具是统计某个月的每篇博客浏览量和评论数量,然后结果生成一个Excel报表提交给微软的技术精英计划。现在发现了一个bug,我们要修复它,修复bug在 TFS里也是一个Work Item,有很多类型:

输入一些相关资料后,点击Save Work Item(保存工作项)。资料将被保存到数据库中。

现在打开Active bugs目录,就可以看到刚刚输入的bug

现在我们来修复这个bug,check out代码

对Check out进行确认

打开Pending Changes标签

点击Work Item标签,我们要把Check in的代码和bug做个关联:

添加注释并Check in,还有搁置集,这里我们不做说明,提交后,这个bug就被修复了,TFS就会做相应的修改记录,在修复的bug列表里头就可以看到:

我们的bug已经修复,并提交到了源代码控制库里了,接下来的工作就是要编译构建一个版本进行测试工作了,通过Team Explorer的Builds定义一个构建:

Team Project要使用Builds是需要进行配置的,如果没有配置会出现下面的错误:

可以通过TFS管理控制台进行配置

选择Team Project Collections

对设置进行确认

配置完成了

配置好了Build Service后就可以创建一个Build了

这个页面上有很多的选择,可以根据你的项目需要进行选择

- 手工
- 持续集成
- 滚动式的构建
- 每个Check in触发一个构建
- 定时进行构建
也可以针对不同情况建立多个多个Build,你看到Buid Defaults有一个黄色的警告标签,每一个Build都会被打上有一个标签,需要有一个地方来存放每次Build的结果,默认没有设置,所以是一个警告标记,我这里使用我机器上的一个共享目录进行存放。


我的栏目
标题搜索
我的存档
数据统计
- 访问量: 8332
- 日志数: 8
- 建立时间: 2008-08-06
- 更新时间: 2013-07-16
