引言
在
Python中,threading库提供了一种简单且方便的方式来实现多线程编程。通过使用线程,可以在程序中并行执行多个任务,提高程序的性能和响应性。
了解线程
线程是程序执行的最小单元,是
操作系统能够进行运算调度的基本单位。与进程不同,线程在同一进程下共享相同的内存空间,因此线程之间的通信更加方便。在Python中,threading库提供了对线程的支持。
创建线程
threading库是Python中的标准库,无需下载,我们只需在文件中导入threading库就可以用了。
创建线程的时候主要有两种方式,第一种是通过继承threading.Thread类,第二种则是通过传递可调用对象给threading.Thread的构造函数,接下来先讲解第一种方式。
1.通过继承threading.Thread类创建线程
import threading
class MyThread(threading.Thread):
def __init__(self, name):
super(MyThread, self).__init__()
self.name = name
def run(self):
print(f"Thread {self.name} is running.")
# 创建线程的实例
thread1 = MyThread(name="Thread 1")
thread2 = MyThread(name="Thread 2")
# 启动线程
thread1.start()
thread2.start()
# 等待线程执行完毕
thread1.join()
thread2.join()
print("Main thread is done.")
第一种方式是最常见的方式,创建线程的时候需要先创建一个类,然后继承threading.Thread,然后再我们创建的类中自定义一个方法,这里我构造的是run方法,在这个方法中我们可以去实现线程需要执行的主要逻辑。
然后通过thread1和thread2创建对应的构造实例,使用线程中的start()方法去启动线程,最后在使用join()等到线程执行完毕,这样我们创建了一个基本的多线程,执行后结果如下:
然后我们再来了解第二种创建线程的方式。
2.通过传递可调用对象创建线程
import threading
def my_function(name):
print(f"Thread {name} is running.")
# 创建线程的实例,传递一个可调用对象和参数
thread1 = threading.Thread(target=my_function, args=("Thread 1",))
thread2 = threading.Thread(target=my_function, args=("Thread 2",))
# 启动线程
thread1.start()
thread2.start()
# 等待线程执行完毕
thread1.join()
thread2.join()
print("Main thread is done.")
这种方式我们是直接通过传递给一个可调用对象给threading.Thread的构造函数,我们所传递的这个可执行对象可以是函数、方法、或者是__call__等方法类的实例,
其中在threading.Thread实例中,通过使用target参数指定我们需要调用的对象,注意这里指定调用对象是不需要加括号,直接传需要调用的可执行对象名就行,后面就和上面一样,通过使用start()方法和join()方法,执行结果也是跟第一种方式一样。
以上两种方式都可以创建线程,选择那种一般取决于个人在项目中的代码风格和偏好,但是最终都是需要确保的是,无论使用哪种方式我们都需要保证在调用的方法中包含有线程的主要逻辑。
线程同步
Python中的线程和其他语言中的线程逻辑也是一样,如果创建了多个线程,那么这几个线程就是共享内存,可能会导致数据竞争和不确定的结果,所以我们需要在线程中加锁(lock)。
1.锁的基本用法
在python中,如果需要对线程加锁我们就需要用到threading.lock()这个方法:
import threading
# 共享资源
counter = 0
# 创建锁对象
my_lock = threading.Lock()
def increment_counter():
global counter
for _ in range(1000000):
with my_lock:
counter += 1
# 创建两个线程,分别增加计数器的值
thread1 = threading.Thread(target=increment_counter)
thread2 = threading.Thread(target=increment_counter)
# 启动线程
thread1.start()
thread2.start()
# 等待两个线程执行完毕
thread1.join()
thread2.join()
print(f"Final counter value: {counter}")
在上述代码中,我们通过创建了一个全局锁对象,然后在调用的可执行对象中,使用with语句来获取锁和释放锁,以此来确保线程共享的资源是原子的。这样可以避免多个线程对counter的参数结果进行数据竞争。
从这个简单的代码上我们可能看不出执行后实际有什么不同,接下来我举一个例子来说明没有加锁和加了锁后的执行结果。
2.不加锁执行
import threading
class BankAccount:
def __init__(self, balance):
self.balance = balance
def withdraw(self, amount):
current_balance = self.balance
new_balance = current_balance - amount
# 模拟取款操作的延迟
threading.Event().wait(0.1)
self.balance = new_balance
return new_balance
# 创建一个共享的银行账户
account = BankAccount(balance=1000)
def withdraw_from_account(account, amount):
for _ in range(3):
new_balance = account.withdraw(amount)
print(f"Withdraw {amount}, New Balance: {new_balance}")
# 创建两个线程进行取款操作
thread1 = threading.Thread(target=withdraw_from_account, args=(account, 100))
thread2 = threading.Thread(target=withdraw_from_account, args=(account, 150))
# 启动两个线程
thread1.start()
thread2.start()
# 等待两个线程执行完毕
thread1.join()
thread2.join()
print(f"Final Balance: {account.balance}")
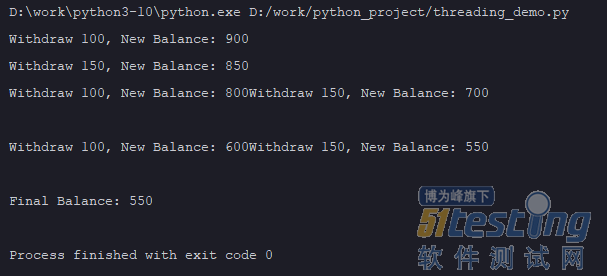
执行结果:
在上面这个不加锁的实例中,我们用withdraw方法来模拟取款操作,然后通过两个线程来对同时对账户进行取款操作,但是由于这个实例中没有加锁,就会出现下面的情况:
·thread1读取了账户余额(假设为1000)。
· thread2也读取了相同的账户余额(仍然是1000)。
· thread1执行取款操作,更新了账户余额为900。
· thread2执行取款操作,更新了账户余额为850。
就这样,本来是同一个账户,但是两个线程都是各管各的,最后导致两个线程都取了3次钱后,最后得出的结果是账户里面还剩了550元。
接下来我们再看看加锁后的执行结果:
import threading
class BankAccount:
def __init__(self, balance):
self.balance = balance
self.lock = threading.Lock()
def withdraw(self, amount):
with self.lock:
current_balance = self.balance
new_balance = current_balance - amount
# 模拟取款操作的延迟
threading.Event().wait(0.1)
self.balance = new_balance
return new_balance
# 创建一个共享的银行账户
account = BankAccount(balance=1000)
def withdraw_from_account(account, amount):
for _ in range(3):
new_balance = account.withdraw(amount)
print(f"Withdraw {amount}, New Balance: {new_balance}")
# 创建两个线程进行取款操作
thread1 = threading.Thread(target=withdraw_from_account, args=(account, 100))
thread2 = threading.Thread(target=withdraw_from_account, args=(account, 150))
# 启动两个线程
thread1.start()
thread2.start()
# 等待两个线程执行完毕
thread1.join()
thread2.join()
print(f"Final Balance: {account.balance}")
同样的实例,我们通过在实例中加锁后再去执行,结果如下:
通过在实例中添加with self.lock后,我们保证了两个线程访问余额blance的原子性,不管是有多少个线程,每个线程访问的余额始终是其他线程取钱后的最新结果,这样就保证了代码程序执行后的结果是正确的。
以上是今天分享的关于Python中一些基本的线程使用,有兴趣的小伙伴想要深入学习threading这个模块的话可以在留言区打出threading,人多的话我下期就继续更新这个模块。