

ЁЁЁЁЖдгкШчКЮдкVS2013жаНјааBoostЕЅдЊВтЪдЃЌетЗНУцзЪСЯЬЋЩйЁЃздМКвВвђДЫзпСЫВЛЩйЭфТЗЁЃЯТЮФНЋЛсВћЪівЛЯТШчКЮдкVS2013жаНјааBoostЕЅдЊВтЪдЁЃ
ЁЁЁЁдкПЊЪМBoostЕЅдЊВтЪджЎЧАЃЌЮвУЧашвЊЯШАВзАVS2013ВхМўBoost Unit Test Adapter (Update 3) вдМАБрвыBoostПтЁЃBoost Unit Test AdapteПЩвддкVS2013жаЕФЁАЙЄОп->РЉеЙгыИќаТЁБжаевЕНВЂАВзАЁЃЖдгкBoost Unit Test AdapterЫљжЇГжЕФBoostПтАцБОЧыВЮПМЭјвГЁЃЮвбЁдёЕФЪЧАцБОКХЮЊ1.55.0ЕФBoostПтЃЈПЩвддкЦфЙйЭјЯТдиЕУЕНЃЉЁЃдкБрвыBoostПтЕФЪБКђЃЌПЩвдВЮПМНЬГЬМАВЉЮФЁЃЮвбЁдёЕФЪЧЭъШЋБрвыЃЈbjam --toolset=msvc-12.0 --build-type=completeЃЉЁЃ
ЁЁЁЁЯТЮФвдМИИіВНжшРДВћЪіЃК
ЁЁЁЁ1. аТНЈНтОіЗНАИМАЙЄГЬ
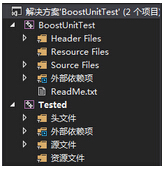
ЁЁЁЁНгЯТРДЃЌЮвУЧаТНЈвЛИіBoostUnitTestНтОіЗНАИЃЌШЛКѓдкИУЗНАИЯТЬэМг(ЪѓБъгвЛїНтОіЗНАИаТНЈЯюФП)СНИіЯюФПЁЃЕквЛИіЯюФПЪЧПеЕФЁАWIN32ЁБЯюФПЁАTestedЁБЃЌСэвЛИіЪЧЁАBoost Unit Test ProjectЁБЯюФПЃЈаТНЈЯюФП->ФЃАх->Visual C++->TestЯТЃЉЁАBoostUnitTestЁБЁЃШчЯТЭМЃК
ЁЁЁЁ2. дкБЛВтЪдЙЄГЬжаЬэМгЮФМў
ЁЁЁЁдкTestedЙЄГЬжаЬэМгвЛИіЭЗЮФМўtested.hМАдДЮФМўtested.cpp. ОпЬхДњТыШчЯТ
1 #include <iostream> 2 3 using namespace std; 4 5 class Tested 6 { 7 public: 8 9 Tested(); 10 virtual ~Tested(); 11 int add(const int a, const int b); 12 13 private: 14 15 }; |
1 #include "tested.h" 2 3 Tested::Tested() 4 { 5 6 } 7 8 Tested::~Tested() 9 { 10 11 } 12 13 int Tested::add(const int a, const int b) 14 { 15 return a + b; 16 } |
ЁЁЁЁдкетРяЃЌЮвУЧВЂВЛашвЊаТНЈвЛИіmainКЏЪ§ЖдетИіРрtestedНјааВтЪдЃЈвђЮЊЮвУЧвбОгаЕЅдЊВтЪдСЫЃЉЃЌЕЋвЛИіГЬађФЌШЯЪЧашвЊmainКЏЪ§ЕФЃЌЫљвддкашвЊдкTestedЯюФПЪєаджаНјааетбљЕФЩшжУЃЈЁАХфжУРраЭЁБИФЮЊЁАЖЏЬЌПт(.dll)ЁБМћЯТЭМЃЉЃК


