

当一个应用的用户越来越多,业务越来越复杂,性能问题就会突显,特别是在低端机上的用户感受尤为明显,甚至会影响到应用的用户活跃度、停留时长等重要指标,提升应用在中低端机上的性能迫在眉睫。如何来对研发同学的优化做出合理的评测我们需要思考下面两点:
要避免“运动式”性能优化, 有不少团队在投入了大量时间和精力对应用进行专项治理之后,由于缺少常态化的管控和治理手段,最终导致性能震荡式波动恶化;
线上的埋点日志数据不能完全反应用户对应用的真实体验和感受;
而影响用户体验最重要的一个指标就是启动耗时,特别是拉新的时候,关于如何测量启动耗时,一般有两个方向:一是通过技术埋点,但基于技术埋点记录数据很难衡量用户真实体感(线上统计数据好?真实体感却差?),而且也无法基于技术埋点获取竞品数据;另一个是通过录屏分帧测试,但是人工录屏逐帧分析会有人为感知误差(结束位边界认知不一致),而且人工性能专项测试持续交付ROI不高,比如录制10次,抽取关键帧取平均值,差不多要花费半个多小时,采样次数越多,耗时越久。由于最近一段时间在看机器学习的书,所以在想能不能拿这个案例来实践一下。
在此之前我也调研了一下业内已有的类似方案:有通过OCR文字识别的、也有通过图像对比的,其中图像对比的方案如果是整图对比,视频启动过程中的广告、首页海报是变化的,这样无法准确识别;另外如果是部分对比,那幺app完整启动后第一屏不完全展示的地方,每次不一定在同一处,于是我参考了各种方案后,结合自己的想法,就把整个方案实现了一遍,接下来详细介绍一下此方案。
整体流程
阶段一主要是采集数据,将视频转换为图片,生成训练数据和测试数据

阶段二主要是训练模型和质量评估

阶段三主要是通过训练好的模型进行预测并计算启动时间

环境准备
由于整个方案我是通过Python实现的,所以本地需要安装好Python环境,这里我使用的是Mac电脑所以默认带的Python环境,但如果要用到Python3需要自己升级,另外要安装pip工具:
| brew install pip3 |
安装scikit-learn,一个简单的机器学习框架,以及依赖的科学计算软件包numpy和算法库scipy:
pip3 install scikit-learn pip3 install numpy pip3 install scipy |
图片处理库OpenCV和imutils:
pip3 install opencv-contrib-python pip3 install imutils |
对视频文件进行分帧处理的ffmpeg:
| brew install ffmpeg |
安装airtest框架(网易的一个跨平台的UI自动化框架):
| pip3 install -U airtest |
安装poco框架(网易的一个跨平台的UI自动化框架):
| pip3 install pocoui |
阶段一
首次安装
由于应用第一次安装会有各种权限弹框,为了避免影响测试准确性,我们需要把第一次安装时候的弹框点掉,然后杀掉应用重新启动计算冷启动时间。
另外要模拟用户真实体感,首先要模拟用户真实的点击应用启动的过程,这时候不能通过adb直接唤起应用,我是通过poco框架来实现点击桌面应用icon的。
poco = AndroidUiautomationPoco() poco.device.wake() poco(text='应用名字').click() poco(text='下一步').click() poco(text='允许').click() poco(text='允许').click() poco(text='允许').click() os.system("adb shell am force-stop {}".format(package_name)) |
启动录屏
用adb命令开启录屏服务,—time-limit 20 表示录屏20秒,一般情况下20秒启动加首页基本能完成,如果是在低端机上可以适当延长时间。
录屏通过单独线程启动。
| subprocess.Popen("adb shell screenrecord --time-limit 20 /sdcard/sample.mp4", shell=True, stdout=subprocess.PIPE, stderr=subprocess.STDOUT) |
启动应用
测试前对被测应用进行安装,然后在点击完权限弹框后,杀掉进程重新点击桌面icon启动应用。
os.system("adb install -r {}".format(apk_path)) poco(text="应用名字").click() |
等录屏结束后杀掉进程,然后重复上面的启动过程,根据采样率决定重复几次。
| os.system("adb shell am force-stop {}".format(package_name)) |
视频分帧
将录制好的视频从手机中拉取到本地,然后通过ffmpeg进行分帧处理。
os.system("adb pull /sdcard/sample.mp4 {}".format(video_local_path)) os.system("ffmpeg -i {} -r 60 {}%d.jpeg".format(video_local_path, test_path)) -r 指定抽取的帧率,即从视频中每秒钟抽取图片的数量。60代表每秒抽取60帧。 |
提取训练集和测试集数据
我们一般把数据按照80%和20%的比例分为训练集和测试集,这里我们可以录制10组数据,把其中8组作为训练集,2组作为测试集。
阶段二
人工标注训练集数据
由于我们是通过图片分类算法来对启动各个阶段进行识别的,所以首先要定义启动的阶段都有哪些,这里我分为5个阶段:
0_desk:桌面阶段
1_start:点击icon图标的阶段
2_splash:闪屏页出现的阶段
3_loading:首页加载的阶段
4_stable:首页渲染稳定的阶段
这五个阶段的图片如下:
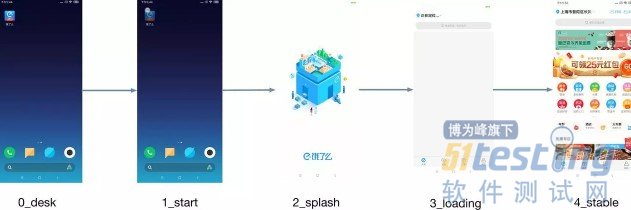
由于应用还会有广告页、业务弹框、首页动态变化等,这些暂时先忽略,不影响整体的测试思路。
特征提取与描述子生成
这里选择SIFT特征,SIFT特征具有放缩、旋转、光照不变性,同时兼有对几何畸变,图像几何变形的一定程度的鲁棒性,使用Python OpenCV扩展模块中的SIFT特征提取接口,就可以提取图像的SIFT特征点与描述子。
词袋生成
词袋生成,是基于描述子数据的基础上,生成一系列的向量数据,最常见就是首先通过K-Means实现对描述子数据的聚类分析,一般会分成100个聚类、得到每个聚类的中心数据,就生成了100 词袋,根据每个描述子到这些聚类中心的距离,决定了它属于哪个聚类,这样就生成了它的直方图表示数据。
SVM分类训练与模型生成
使用SVM进行数据的分类训练,得到输出模型,这里通过sklearn的线性SVM训练实现了分类模型训练与导出。
import cv2 import imutils import numpy as np import os from sklearn.svm import LinearSVC from sklearn.externals import joblib from scipy.cluster.vq import * from sklearn.preprocessing import StandardScaler # Get the training classes names and store them in a list train_path = "dataset/train/" training_names = os.listdir(train_path) # Get all the path to the images and save them in a list # image_paths and the corresponding label in image_paths image_paths = [] image_classes = [] class_id = 0 for training_name in training_names: dir = os.path.join(train_path, training_name) class_path = imutils.imlist(dir) image_paths += class_path image_classes += [class_id] * len(class_path) class_id += 1 # 创建SIFT特征提取器 sift = cv2.xfeatures2d.SIFT_create() # 特征提取与描述子生成 des_list = [] for image_path in image_paths: im = cv2.imread(image_path) im = cv2.resize(im, (300, 300)) kpts = sift.detect(im) kpts, des = sift.compute(im, kpts) des_list.append((image_path, des)) print("image file path : ", image_path) # 描述子向量 descriptors = des_list[0][1] for image_path, descriptor in des_list[1:]: descriptors = np.vstack((descriptors, descriptor)) # 100 聚类 K-Means k = 100 voc, variance = kmeans(descriptors, k, 1) # 生成特征直方图 im_features = np.zeros((len(image_paths), k), "float32") for i in range(len(image_paths)): words, distance = vq(des_list[i][1], voc) for w in words: im_features[i][w] += 1 # 实现动词词频与出现频率统计 nbr_occurences = np.sum((im_features > 0) * 1, axis=0) idf = np.array(np.log((1.0 * len(image_paths) + 1) / (1.0 * nbr_occurences + 1)), 'float32') # 尺度化 stdSlr = StandardScaler().fit(im_features) im_features = stdSlr.transform(im_features) # Train the Linear SVM clf = LinearSVC() clf.fit(im_features, np.array(image_classes)) # Save the SVM print("training and save model...") joblib.dump((clf, training_names, stdSlr, k, voc), "startup.pkl", compress=3) |
预测验证
加载预先训练好的模型,使用模型在测试集上进行数据预测,测试结果表明,对于启动阶段的图像分类可以获得比较好的效果。
下面是预测方法的代码实现:
import cv2 as cv import numpy as np from imutils import paths from scipy.cluster.vq import * from sklearn.externals import joblib def predict_image(image_path, pkl): # Load the classifier, class names, scaler, number of clusters and vocabulary clf, classes_names, stdSlr, k, voc = joblib.load("eleme.pkl") # Create feature extraction and keypoint detector objects sift = cv.xfeatures2d.SIFT_create() # List where all the descriptors are stored des_list = [] im = cv.imread(image_path, cv.IMREAD_GRAYSCALE) im = cv.resize(im, (300, 300)) kpts = sift.detect(im) kpts, des = sift.compute(im, kpts) des_list.append((image_path, des)) descriptors = des_list[0][1] for image_path, descriptor in des_list[0:]: descriptors = np.vstack((descriptors, descriptor)) test_features = np.zeros((1, k), "float32") words, distance = vq(des_list[0][1], voc) for w in words: test_features[0][w] += 1 # Perform Tf-Idf vectorization nbr_occurences = np.sum((test_features > 0) * 1, axis=0) idf = np.array(np.log((1.0 + 1) / (1.0 * nbr_occurences + 1)), 'float32') # Scale the features test_features = stdSlr.transform(test_features) # Perform the predictions predictions = [classes_names[i] for i in clf.predict(test_features)] return predictions |
阶段三
采集新的启动视频
和阶段1采用的方式一样。
用模型进行预测
和阶段2测试模型的做法一样。
计算启动时间
根据预测结果,确定点击应用icon阶段的图片和首页渲染稳定之后的图片,获取两个图片直接的帧数差值,如果前面以60帧抽取图片,那幺总耗时 = 帧数差值 * 1/60,具体计算这部分的代码实现如下:
from airtest.core.api import * from dingtalkchatbot.chatbot import DingtalkChatbot from poco.drivers.android.uiautomation import AndroidUiautomationPoco webhook = 'https://oapi.dingtalk.com/robot/send?access_token=' robot = DingtalkChatbot(webhook) def calculate(package_name, apk_path, pkl, device_name, app_name, app_version): sample = 'sample/screen.mp4' test_path = "dataset/test/" if not os.path.isdir('sample/'): os.makedirs('sample/') if not os.path.isdir(test_path): os.makedirs(test_path) try: os.system("adb uninstall {}".format(package_name)) os.system("adb install -r {}".format(apk_path)) poco = AndroidUiautomationPoco() poco.device.wake() time.sleep(2) poco(text='应用名').click() poco(text='下一步').click() poco(text='允许').click() poco(text='允许').click() poco(text='允许').click() os.system("adb shell am force-stop {}".format(package_name)) subprocess.Popen("adb shell screenrecord --time-limit 20 /sdcard/sample.mp4", shell=True, stdout=subprocess.PIPE, stderr=subprocess.STDOUT) poco(text="应用名").click() time.sleep(20) os.system("adb pull /sdcard/sample.mp4 {}".format(sample)) os.system("adb uninstall {}".format(package_name)) os.system("ffmpeg -i {} -r 60 {}%d.jpeg".format(sample, test_path)) image_paths = [] class_path = list(paths.list_images(test_path)) image_paths += class_path start = [] stable = [] for image_path in image_paths: predictions = predict_image(image_path, pkl) if predictions[0] == '1_start': start += [str(image_path.split('/')[2]).split('.')[0]] elif predictions[0] == '4_stable': stable += [str(image_path.split('/')[2]).split('.')[0]] start_time = int(sorted(start)[0]) stable_time = int(sorted(stable)[0]) print("耗时:%.2f 秒" % ((stable_time - start_time) / 60)) robot.send_text( msg="启动耗时自动化测试结果:\n被测设备:{}\n被测应用:{}\n被测版本:{}\n".format(device_name, app_name, app_version) + "启动耗时:%.2f 秒" % ( (stable_time - start_time) / 60), is_at_all=True) except: shutil.rmtree(test_path) if os.path.exists(sample): os.remove(sample) if __name__ == "__main__": calculate("package_name", "app/app-release.apk", "startup.pkl", "小米MIX3", "应用名", "10.1.1") |
持续集成
根据上面测试方法提供的参数,通过Jenkins配置任务,训练好模型,将以上三个阶段通过Python脚本的形式封装好,另外再配置好WebHook跟打包平台关联好,即可实现自动验证分析计算最新包的首屏加载耗时。
效果
通过人工录屏,然后用QuickTime分帧查看时间轴,计算出的首屏加载耗时跟这套方案得到的结果误差基本在100毫秒以内,但这个过程一次取数需要15分钟左右,而现在这套方案一次取数只需要3分钟左右,效率明显提升,还避免了不同人操作采集标准不一致的问题。
上文内容不用于商业目的,如涉及知识产权问题,请权利人联系博为峰小编(021-64471599-8017),我们将立即处理


