好像不行,查看错误信息后发现我们需要指定Junit运行时参数

将-javaagent:/Users/mc/.m2/repository/net/sf/grinder/grinder-dcr-agent/3.9.1/grinder-dcr-agent-3.9.1.jar填写在VM Options处。再来执行下脚本
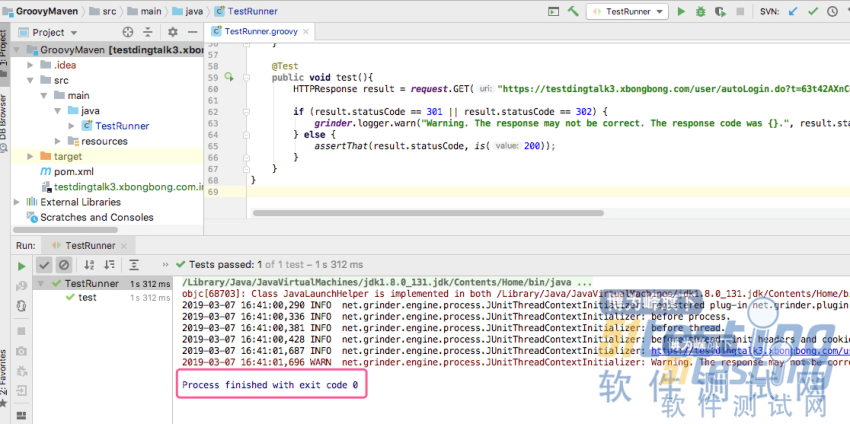
完美执行!接下来我们一起看下如果在IDEA下开发Groovy脚本且使用nGrinder来实现性能测试过程中的常用压测场景。
1.5.0 ngrinder-groovy脚本解释
import static net.grinder.script.Grinder.grinder import static org.junit.Assert.* import static org.hamcrest.Matchers.* import net.grinder.plugin.http.HTTPRequest import net.grinder.plugin.http.HTTPPluginControl import net.grinder.script.GTest import net.grinder.script.Grinder import net.grinder.scriptengine.groovy.junit.GrinderRunner import net.grinder.scriptengine.groovy.junit.annotation.BeforeProcess import net.grinder.scriptengine.groovy.junit.annotation.BeforeThread import org.junit.Before import org.junit.BeforeClass import org.junit.Test import org.junit.runner.RunWith import java.util.Date import java.util.List import java.util.ArrayList import HTTPClient.Cookie import HTTPClient.CookieModule import HTTPClient.HTTPResponse import HTTPClient.NVPair @RunWith(GrinderRunner) class TestRunner { public static GTest testXBBTest public static HTTPRequest request public static NVPair[] headers = [] public static NVPair[] params = [] public static Cookie[] cookies = [] @BeforeProcess public static void beforeProcess() {HTTPPluginControl.getConnectionDefaults().timeout = 6000 testXBBTest = new GTest(1, "销帮帮测试环境") request = new HTTPRequest() grinder.logger.info("BeforeProcess注解");} @BeforeThread public void beforeThread() { testXBBTest.record(this, "testXBBTest") grinder.statistics.delayReports=true; grinder.logger.info("BeforeThread注解");} @Before public void before() { request.setHeaders(headers) cookies.each { CookieModule.addCookie(it, HTTPPluginControl.getThreadHTTPClientContext()) } grinder.logger.info("Before注解,初始化headers和cookies");} @Test public void testXBBTest(){ HTTPResponse result = request.GET("https://testdingtalk3.xbongbong.com/user/autoLogin.do?t=63t42AXnCd6hCEdQl+dOZCXVIiwZVkRhX60J7lPXpv+xZt3tvEB1sT/ld8xQ0FUp7iqSfah+CNgNbYzcwW1d9Q==&nonce=wo0mgi", params) if (result.statusCode == 301 || result.statusCode == 302) { grinder.logger.warn("Warning. The response may not be correct. The response code was {}.", result.statusCode); } else { assertThat(result.statusCode, is(200)); assertThat(result.text, containsString("欢迎"))} } @Test public void testXBB(){HTTPResponse result = request.GET("https://testdingtalk3.xbongbong.com/user/autoLogin.do?t=63t42AXnCd6hCEdQl+dOZCXVIiwZVkRhX60J7lPXpv+xZt3tvEB1sT/ld8xQ0FUp7iqSfah+CNgNbYzcwW1d9Q==&nonce=wo0mgi", params) if (result.statusCode == 301 || result.statusCode == 302) { grinder.logger.warn("Warning. The response may not be correct. The response code was {}.", result.statusCode); } else {assertThat(result.statusCode, is(200)); assertThat(result.text, containsString("欢迎"))}}} |
划重点:
1:nGrinder的groovy测试用例需要使用@RunWith()注解进行注释
2:测试方法需要用@Test注解进行注释,使用@Test注解的方法将会被重复执行。
3:nGrinder中每个线程只创建一个对象,每个被@Test注解的方法可以共享成员变量。
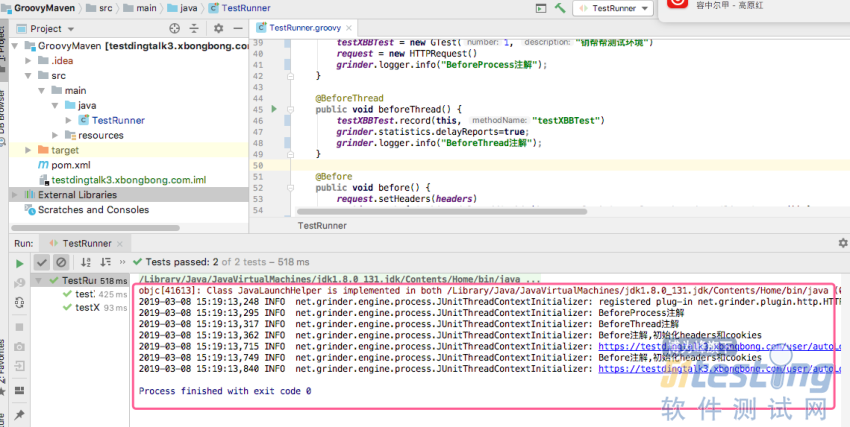
nGrinder中常用的注解如下

1.5.1 浪涌(阶梯)负载模拟
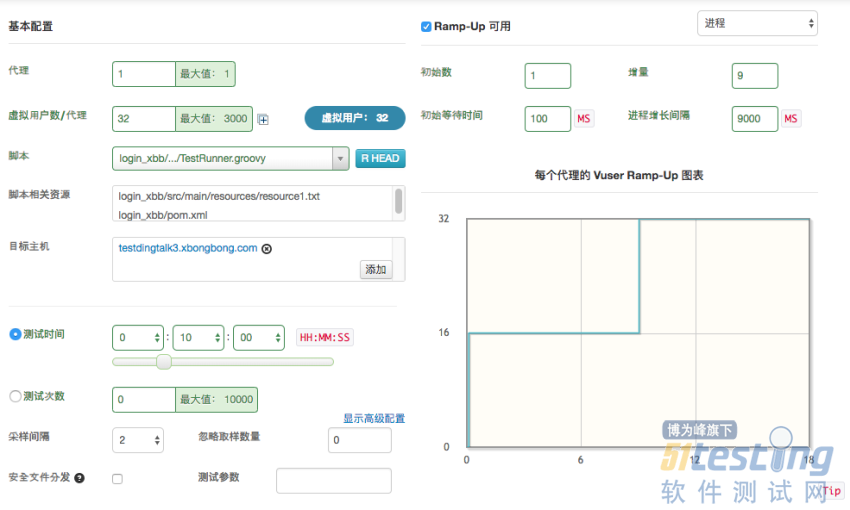
选择脚本创建测试,在测试配置界面选中Ramp-Up可用选项可以模拟简单的浪涌负载。
说实在的,nGrinder对浪涌负载的模拟支持不友好,如果使用Jmeter,浪涌场景的设置就非常丰富并且简单。
1.5.2 分布式执行

上图中我这边只是启动一个代理,nGrinder会自动已注册的代理数。
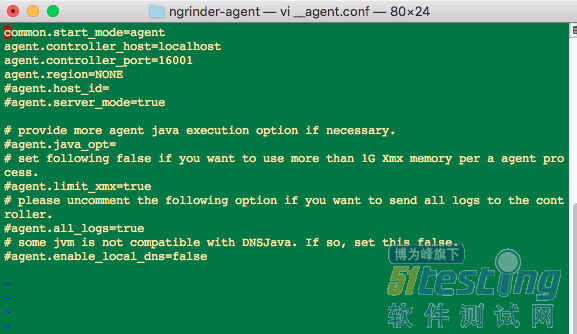
如果我们要使用nGrinder(多台代理机压测)集群,可以设置__agent.conf也即是代理的配置文件指定controller。随后,启动agent即可(*nix系统下执行run_agent.sh,windows系统下执行run_agent.bat)。
二:Locust
2.1 Locust介绍
Locust是一款易于使用的分布式负载测试工具,完全基于事件,即一个locust节点也可以在一个进程中支持数千并发用户,不使用回调,通过gevent使用轻量级过程(即在自己的进程内运行)。
特点
①、不需要编写笨重的UI或者臃肿的XML代码,基于协程而不是回调,脚本编写简单易读;
②、有一个基于we简洁的HTML+JS的UI用户界面,可以实时显示相关的测试结果;
③、支持分布式测试,用户界面基于网络,因此具有跨平台且易于扩展的特点;
④、所有繁琐的I / O和协同程序都被委托给gevent,替代其他工具的局限性;
2.2 Locust环境搭建
Locust的环境配置非常简单,pip3 install -U locust一条命令搞定。
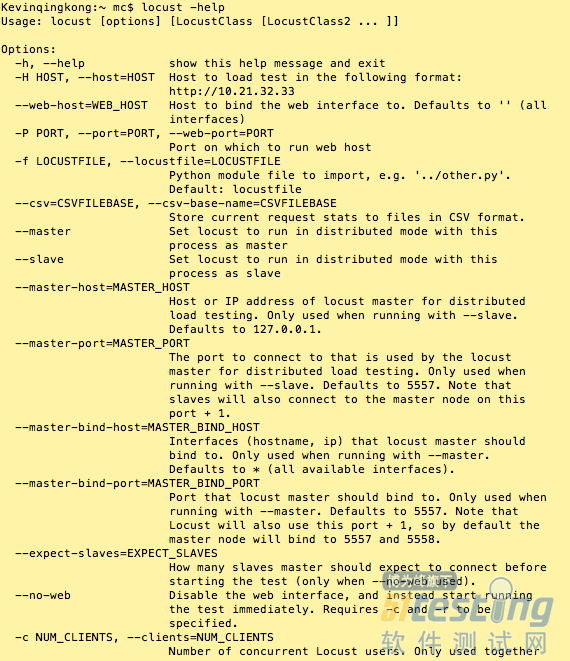
我们可以通过locust -h看下locust支持的参数。
2.3 Locust初体验
我这边先以访问我司客户列表页做例子,摆弄下locust的流程。
1:创建py文件,内容如下
# -*- coding = utf-8 -*- from locust import HttpLocust, TaskSet, task import hashlib import requests # 测试环境Web域名 web_host = 'https://testdingtalk3.xbongbong.com' # 登录Web时请求的URL, 每次操作钉钉重新登录时会变化,切记 web_login_url='/user/autoLogin.do?t=2MxfguwveorRZqV/jW8r5Whg+i6Wcnp1zOWg+v1EXVz3zrSJTdvaI3SVPtMtSxfDIOiacByuNhDykBfyi7Gnog==&nonce=bvqyrp' # 请求头中的referer信息, 随登录时url变化而变动 web_header_referer = 'https://testdingtalkapi3.xbongbong.com//dingtalk/sns/userinfo.html?code=9331275bd3813f099f98fd9293d5fb15&state=STATE' # 测试环境请求header # 注意:Referer部分每次更新环境后会变化 抓包后替换改部分 web_login_headers = {"Host": "testdingtalk3.xbongbong.com", "Connection": "keep-alive", "Upgrade-Insecure-Requests": "1", "User-Agent": "Mozilla/5.0 (Windows NT 6.1; Win64; x64) AppleWebKit/537.36(KHTML, like Gecko) Chrome/59.0.3071.115 Safari/537.36", "Accept": "text/html,application/xhtml+xml,application/xml;q=0.9,image/webp,image/apng,*/*;q=0.8", "Referer": web_header_referer, "Accept-Encoding": "gzip, deflate, br", "Accept-Language": "zh-CN,zh;q=0.8"} # Web后台session初始化 web_session = requests.session() web_session.get(url=web_host + web_login_url, headers=web_login_headers, allow_redirects=False) # 扫码登录时的cookie信息 web_cookie = web_session.cookies # 登录cookie中的xbbAccessToken值,登录后所有请求都会用到这个值 web_access_token = web_cookie['xbbAccessToken'] # 登录cookie中的JSESSIONID, 后续所有请求中均用到 web_session_id = web_cookie['JSESSIONID'] # 生成sign_code def create_sign_code(request_parameters, *args): if len(args) > 0: parameters = str(str(request_parameters) + str(args[0])).encode('utf-8') else: parameters = str(request_parameters).encode('utf-8') return hashlib.sha256(parameters).hexdigest() class Behavior(TaskSet): def on_start(self): Pass def on_stop(self): Pass @task def customer_list_on_web(self): customer_list_body = '{\"corpid\":\"dinga93c84f4d89688bf35c2f4657eb6378f\",\"nowUserId\":\"0933106141722403490\",\"templateId\":175,\"page\":1,\"pageSize\":20,\"belongerType\":\"0\",\"isMain\":1,\"treeType\":\"\",\"pid\":\"\",\"nameLike\":\"\",\"nameLikeType\":\"\",\"isArchived\":0,\"child\":\"customer\",\"categoryId\":\"\"}' sign_code = create_sign_code(customer_list_body, web_access_token) customer_list_request_data = {"params": customer_list_body, "sign": sign_code, "platform": "web", "frontDev": 0,"JSESSIONID": web_session_id} customer_list_url = "/customerApi/listAjax.html" self.client.post(customer_list_url, data=customer_list_request_data, headers=web_login_headers, cookies=web_cookie) class WebSiteUser(HttpLocust): task_set = Behavior min_wait = 5000 max_wait = 9000 |
2:进入脚本所在目录执行如下命令
| locust -f scenario_on_web.py --host=https://testdingtalk3.xbongbong.com |
3:http://localhost:8089/
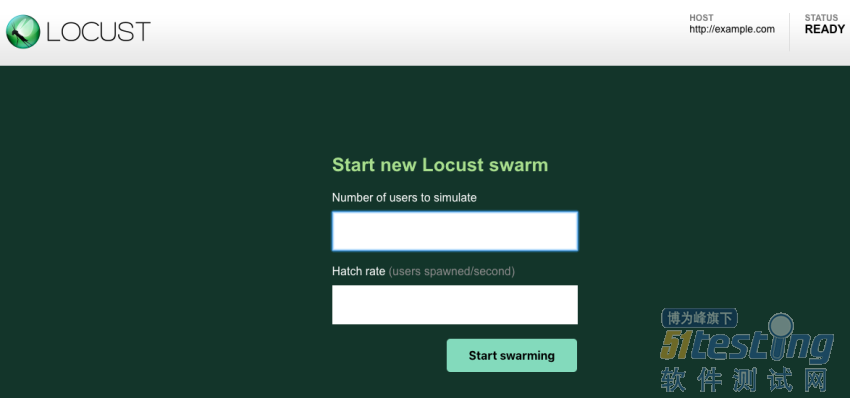
设置模拟的虚拟用户数和每秒启动的虚拟用户数
点击Start swarming开始执行测试
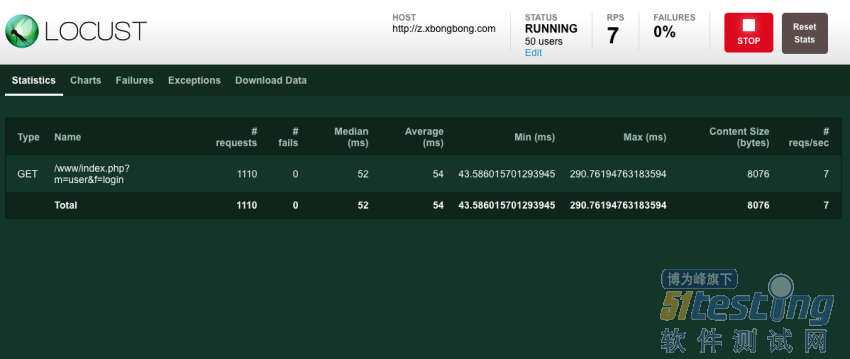
Type:http(s)协议的方法,这里用到的是get方法
Name:请求的url地址(不包括host)。
Requests:当前总请求数。
Fails:当前总失败请求数。
Mediam/average/Min/max:响应时间的中位值/平均值/最小值/最大值。
Content size:请求内容总数,单位为字节。
Reqs/sec:每秒请求数,即QPS。
2.4 Locust实战
2.4.1 浪涌(阶梯)负载模拟
locust中对阶梯式负载的模拟支持不是很友好,如果我们通过locust web设置,只能配置其初始化阶段也即:ramp-up部分。
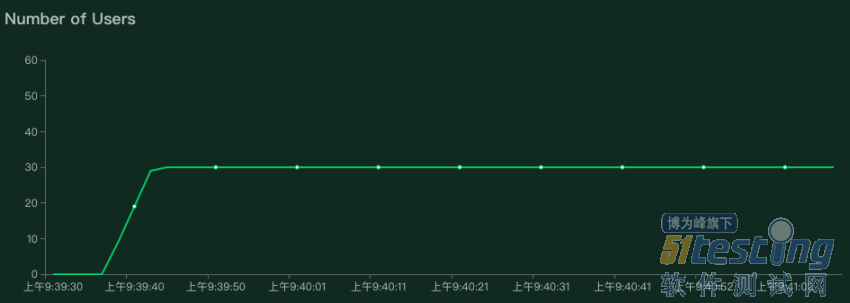
如上图所示,locust可以模拟的测试场景相对来说比较简单。
......
查看更多精彩内容,请点击下载:
版权声明:本文出自《51测试天地》第五十三期。51Testing软件测试网及相关内容提供者拥有51testing.com内容的全部版权,未经明确的书面许可,任何人或单位不得对本网站内容复制、转载或进行镜像,否则将追究法律责任。