坐标分析
分析一下我们图9到图12的截图,首先说图9,我本来觉得它x、y应该是0,就算不是0,也应该是各位数字吧,结果的y是58,这个算到下半截图片区域了,x是157,跑中场去了。图11呢,你的x应该在300左右,y应该100以上吧,结果y是0,到上半段,x是205,在中场偏后,离守门员还远呢。这是怎么肥事?不过我们发现了,图9在元素里是第一个,图11在元素里是最后一个,再结合坐标前面的y值全是58,后面的y值全是0,符合我们上半段下半段颠倒的想法了,然后你再分别查看图9右边/图11左边的元素就会发现,和元素里面div的顺序一样。到这里就差不多了。
总结一下:最终的图片就是把拼图,即图4,按照x=157、y=58、w=10、h=58截取出来,放在上半部分第一个位置,x=145、y=58、w=10、h=58截取出来放在上半部分第二个位置,紧挨着第一个,以此类推,拼成一张整图。
图14
这个就是我拼出来的,恩,很好,很不错嘛小伙子。不过好像哪里不对,缺口嘞。仔细看看网页元素
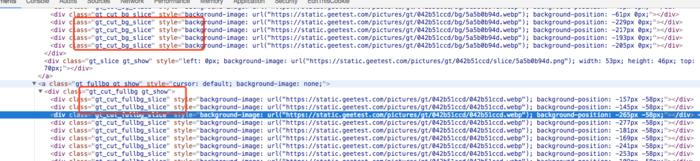
图15
原来一个是fullbg,一个是cutbg,这个名字就很有寓意嘛,那就好了,再把cutbg拼一下看看
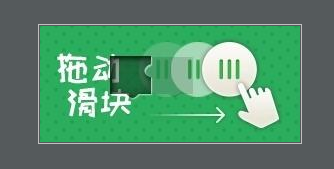
图16
这回就对上了。现在的问题就变成怎么计算缺口位置了
缺口位置
我觉得可能会有计算两张图片不同位置的方式吧,度娘来一发,然后获取了python实战===用python对比两张图片的不同,然后发现了ImageChops.difference这个接口,结果你们知道的,不准确,为啥捏?仔细看拼好的两张图,除了缺口还有其他地方不一样呀。看到图16缺口后面那个阴影没,让我的心里蒙上了一层阴影,再观察其他的图片,基本都有类似的,这可怎么办?这在后面还好说,如果是在前面呢,那不就计算到阴影里去了嘛。如果这个对比有一个容差就好了,我以前用按键精灵的时候好像就有这种嘛,这个好不智能呀。既然它是对比像素,我直接取像素对比一下不就得了,而且我还不给它用==,给它一个范围,如果色差在这个范围内就算一样了,这样不就有容差了吗?这个缺口一般都非常明显,而阴影跟背景又很模糊,应该是可行的。思路就是获取图片的宽高,然后一个像素一个像素的遍历对比。
色差
这个色差怎么确定?一种方式就是调试,这种是比较麻烦的,还有一种方式就是获取多张图片,全图和缺陷图,然后使用取色工具,取对应位置的颜色值,确定一个大概范围。距离确定了,下面就是移动了
selenium模拟移动
selenium的模拟操作网上介绍很多,这里我们只要确认需要哪些接口就行了。
ActionChains方法:
move_to_element(to_element) - 鼠标移动到某个元素
click_and_hold(on_element =None) - 点击鼠标左键,不松开
move_by_offset(xoffset,yoffset) - 鼠标从当前位置移动到某个坐标
release(on_element = None) - 在某个元素位置松开鼠标左键
perform() - 执行操作,记住这个很重要,调用上面的方法后,一定要执行perform才能真正执行
selenium的操作我就不详细描述了,这里用到的都是比较简单的用法。
原理分析就完了,这一次必须要贴代码了,否则可能很多人完成不了,也有利于大家的理解。
# -*- coding: utf-8 -*- import random import time, re from selenium import webdriver from selenium.common.exceptions import TimeoutException from selenium.webdriver.common.by import By from selenium.webdriver.support.wait import WebDriverWait from selenium.webdriver.support import expected_conditions as EC from selenium.webdriver.common.action_chains import ActionChains from PIL import Image import requests from io import BytesIO class HuXiu(object): def __init__(self): chrome_option = webdriver.ChromeOptions() # chrome_option.set_headless() self.driver = webdriver.Chrome(executable_path=r"/usr1/webdrivers/chromedriver", chrome_options=chrome_option) self.driver.set_window_size(1440, 900) def visit_index(self): self.driver.get("https://www.huxiu.com/") WebDriverWait(self.driver, 10, 0.5).until(EC.element_to_be_clickable((By.XPATH, '//*[@class="js-register"]'))) reg_element = self.driver.find_element_by_xpath('//*[@class="js-register"]') reg_element.click() WebDriverWait(self.driver, 10, 0.5).until(EC.element_to_be_clickable((By.XPATH, '//div[@class="gt_slider_knob gt_show"]'))) # 进入模拟拖动流程 self.analog_drag() def analog_drag(self): #鼠标移动到拖动按钮,显示出拖动图片 element = self.driver.find_element_by_xpath('//div[@class="gt_slider_knob gt_show"]') ActionChains(self.driver).move_to_element(element).perform() time.sleep(3) # 刷新一下极验图片 element = self.driver.find_element_by_xpath('//a[@class="gt_refresh_button"]') element.click() time.sleep(1) # 获取图片地址和位置坐标列表 cut_image_url, cut_location = self.get_image_url('//div[@class="gt_cut_bg_slice"]') full_image_url, full_location = self.get_image_url('//div[@class="gt_cut_fullbg_slice"]') # 根据坐标拼接图片 cut_image = self.mosaic_image(cut_image_url, cut_location) full_image = self.mosaic_image(full_image_url, full_location) # 保存图片方便查看 cut_image.save("cut.jpg") full_image.save("full.jpg") # 根据两个图片计算距离 distance = self.get_offset_distance(cut_image, full_image) # 开始移动 self.start_move(distance) # 如果出现error try: WebDriverWait(self.driver, 5, 0.5).until(EC.element_to_be_clickable((By.XPATH, '//div[@class="gt_ajax_tip gt_error"]'))) print("验证失败") return except TimeoutException as e: pass # 判断是否验证成功 try: WebDriverWait(self.driver, 10, 0.5).until(EC.element_to_be_clickable((By.XPATH, '//div[@class="gt_ajax_tip gt_success"]'))) except TimeoutException: print("again times") time.sleep(5) # 失败后递归执行拖动 self.analog_drag() else: # 成功后输入手机号,发送验证码 self.register() # 获取图片和位置列表 def get_image_url(self, xpath): link = re.compile('background-image: url\("(.*?)"\); background-position: (.*?)px (.*?)px;') elements = self.driver.find_elements_by_xpath(xpath) image_url = None location = list() for element in elements: style = element.get_attribute("style") groups = link.search(style) url = groups[1] x_pos = groups[2] y_pos = groups[3] location.append((int(x_pos), int(y_pos))) image_url = url return image_url, location # 拼接图片 def mosaic_image(self, image_url, location): resq = requests.get(image_url) file = BytesIO(resq.content) img = Image.open(file) image_upper_lst = [] image_down_lst = [] for pos in location: if pos[1] == 0: # y值==0的图片属于上半部分,高度58 image_upper_lst.append(img.crop((abs(pos[0]), 0, abs(pos[0]) + 10, 58))) else: # y值==58的图片属于下半部分 image_down_lst.append(img.crop((abs(pos[0]), 58, abs(pos[0]) + 10, img.height))) x_offset = 0 # 创建一张画布,x_offset主要为新画布使用 new_img = Image.new("RGB", (260, img.height)) for img in image_upper_lst: new_img.paste(img, (x_offset, 58)) x_offset += img.width x_offset = 0 for img in image_down_lst: new_img.paste(img, (x_offset, 0)) x_offset += img.width return new_img # 判断颜色是否相近 def is_similar_color(self, x_pixel, y_pixel): for i, pixel in enumerate(x_pixel): if abs(y_pixel[i] - pixel) > 50: return False return True # 计算距离 def get_offset_distance(self, cut_image, full_image): for x in range(cut_image.width): for y in range(cut_image.height): cpx = cut_image.getpixel((x, y)) fpx = full_image.getpixel((x, y)) if not self.is_similar_color(cpx, fpx): img = cut_image.crop((x, y, x + 50, y + 40)) # 保存一下计算出来位置图片,看看是不是缺口部分 img.save("1.jpg") return x # 开始移动 def start_move(self, distance): element = self.driver.find_element_by_xpath('//div[@class="gt_slider_knob gt_show"]') # 这里就是根据移动进行调试,计算出来的位置不是百分百正确的,加上一点偏移 distance -= element.size.get('width') / 2 distance += 15 # 按下鼠标左键 ActionChains(self.driver).click_and_hold(element).perform() time.sleep(0.5) while distance > 0: if distance > 10: # 如果距离大于10,就让他移动快一点 span = random.randint(5, 8) else: # 快到缺口了,就移动慢一点 span = random.randint(2, 3) ActionChains(self.driver).move_by_offset(span, 0).perform() distance -= span time.sleep(random.randint(10,50)/100) ActionChains(self.driver).move_by_offset(distance, 1).perform() ActionChains(self.driver).release(on_element=element).perform() def register(self): element = self.driver.find_element_by_xpath('//input[@id="sms_username"]') element.clear() element.send_keys("手机号") ele_captcha = self.driver.find_element_by_xpath('//span[@class="js-btn-captcha btn-captcha"]') ele_captcha.click() if __name__ == "__main__": h = HuXiu() h.visit_index() |
这个移动move_by_offset,我之前的y值也是随机的[-5,5],我觉得这个模拟会更真实一点,总会上下抖动的嘛,结果就是因为这个考虑的太人性了,识别率非常低,改了好多范围,更大的、更小的,结果最后不偏移,竟然识别率奇高。最后再把执行效果发一下吧~

上文内容不用于商业目的,如涉及知识产权问题,请权利人联系博为峰小编(021-64471599-8017),我们将立即处理。