

在本教程中,您将学习如何使用 Python 创建一个简单的 Discord 机器人。
也许您还不知道什么是 Discord,本质上它是一项针对游戏玩家的一种类 Slack(一个云协作团队工具和服务)的服务。
在 Discord 上,您可以连接多个服务器,您一定也注意到这些服务器有许多机器人。
这些机器人可以做很多事情,从为您播放音乐到简单的聊天。
我被这些机器人深深吸引,因此决定用 Python 写一个属于自己的机器人。
那么让我们立刻开始吧!
设置
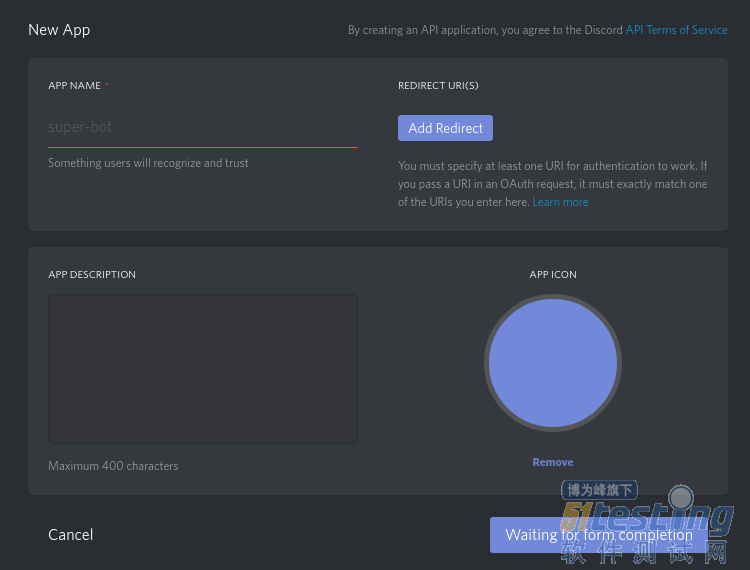
我们首先要创建一个机器人账号。
转到 discordapp.com/developers/… 然后创建一个新的 app。
给您的机器人起一个好听的名字,并给它配上一张个人资料图片。
向下滚动并点击"Create Bot User"。
完成后您将得到一个机器人的私密 token。

您也可以点击以显示机器人的 toke。
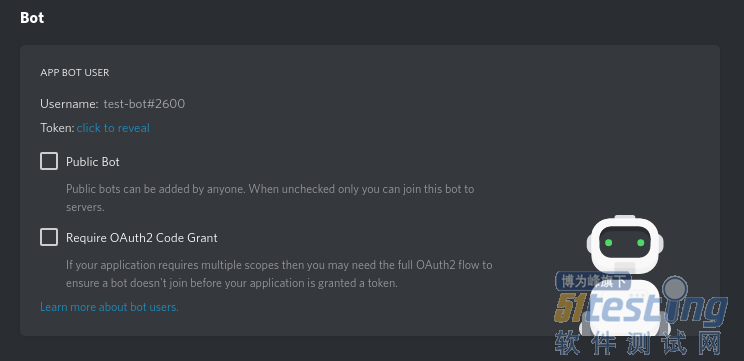
永远不要和任何人分享您的 token,因为他们可能会以此来挟持您的机器人。
在写完这篇文章后,我会更换 token。
代码
现在,开始享受吧。
准备环境
Python 3
pip
Discord.py (重写)
现在我们要安装 discord.py 库的重写版本。
pip 上的 discord.py 没有得到积极维护,因此请安装库的重写版本。
$ python3 -m pip install -U https://github.com/Rapptz/discord.py/archive/rewrite.zip
检查您正在使用的 discord.py 版本,
>>> import discord >>> discord.__version__ '1.0.0a' |
一切已经准备就绪,让我们开始写机器人吧。
import discord from discord.ext import commands |
如果它报 ModuleNotFoundError 或者 ImportError 那么您的 discord.py 安装有问题。
bot = commands.Bot(command_prefix='$', description='A bot that greets the user back.')
命令前缀是消息内容最初调用命令所必须包含的内容。
@bot.event async def on_ready(): print('Logged in as') print(bot.user.name) print(bot.user.id) print('------') |
当客户端准备好从 Discord 中接收数据时,就会调用 on_ready()。
通常是在机器人成功登录后。
现在让我们为机器人添加一些功能。
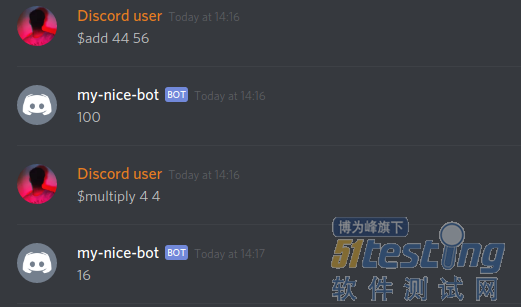
@bot.command() async def add(ctx, a: int, b: int): await ctx.send(a+b) @bot.command() async def multiply(ctx, a: int, b: int): await ctx.send(a*b) @bot.command() async def greet(ctx): await ctx.send(":smiley: :wave: Hello, there!") @bot.cmmands() async def cat(ctx): await ctx.send("https://media.giphy.com/media/JIX9t2j0ZTN9S/giphy.gif") |
在运行它之前,必须将您的机器人添加到您的服务器。
这个 OAuth2 url 可以从您的机器人 settings 页面生成。
转到 https://discordapp.com/developers,点击您的机器人配置文件并生成 oAuth2 url。
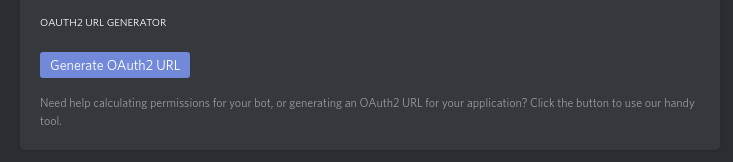
这是您决定给机器人授予什么权限的地方。
对于我们现在的使用情况,我们只需要赋予发送消息的权限即可。
现在,让我们在命令行中运行以下命令来启动机器人。
$ python bot.py
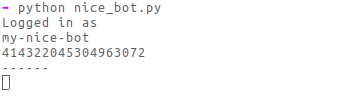
现在我们开始测试机器人。

在创建一个 Discord 机器人时,应该遵循一系列优秀的实践。
我建议您在这里 github.com/meew0/disco… 阅读整个文档。
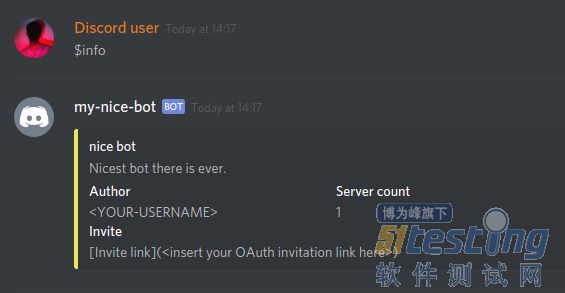
有个信息命令。
它应该提供关于机器人的信息,比如它使用的框架,框架用的是哪个版本以及帮助命令,最重要的一点是,它的开发者是谁。
@bot.command() async def info(ctx): embed = discord.Embed(title="nice bot", description="Nicest bot there is ever.", color=0xeee657) # 在这里提供关于您的信息 embed.add_field(name="Author", value="<YOUR-USERNAME>") # 显示机器人所服务的数量。 embed.add_field(name="Server count", value=f"{len(bot.guilds)}") # 给用户提供一个链接来请求机器人接入他们的服务器 embed.add_field(name="Invite", value="[Invite link](<insert your OAuth invitation link here>)") await ctx.send(embed=embed) |
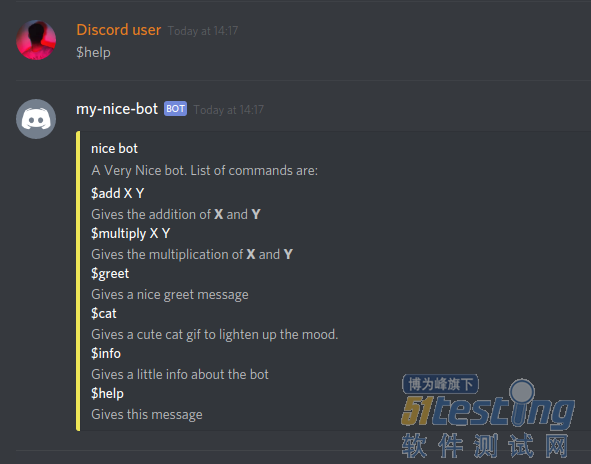
discord.py 会自动生成一个 help 命令。
所以要自定义时,我们首先要删除默认提供的。
bot.remove_command('help')
现在我们可以编写自定义的 help 命令了。请在这里描述您的机器人。
@bot.command() async def help(ctx): embed = discord.Embed(title="nice bot", description="A Very Nice bot. List of commands are:", color=0xeee657) embed.add_field(name="$add X Y", value="Gives the addition of **X** and **Y**", inline=False) embed.add_field(name="$multiply X Y", value="Gives the multiplication of **X** and **Y**", inline=False) embed.add_field(name="$greet", value="Gives a nice greet message", inline=False) embed.add_field(name="$cat", value="Gives a cute cat gif to lighten up the mood.", inline=False) embed.add_field(name="$info", value="Gives a little info about the bot", inline=False) embed.add_field(name="$help", value="Gives this message", inline=False) await ctx.send(embed=embed) |
恭喜!您刚刚用 Python 创建了一个 Discord 机器人。
托管
目前,机器人只会在您运行脚本之前在线运行。
因此,如果您希望您的机器人一直运行,您必须在线托管它,或者您也可以在本地托管它。比如在树莓派(RaspberryPi)。
托管服务范围很广,从免费的(Heroku's free tier)到付费的(Digital Ocean)。
我在 Heroku's free tier 上运行我的机器人,到目前为止还没有遇到任何问题。
源代码
import discord from discord.ext import commands bot = commands.Bot(command_prefix='$') @bot.event async def on_ready(): print('Logged in as') print(bot.user.name) print(bot.user.id) print('------') @bot.command() async def add(ctx, a: int, b: int): await ctx.send(a+b) @bot.command() async def multiply(ctx, a: int, b: int): await ctx.send(a*b) @bot.command() async def greet(ctx): await ctx.send(":smiley: :wave: Hello, there!") @bot.command() async def cat(ctx): await ctx.send("https://media.giphy.com/media/JIX9t2j0ZTN9S/giphy.gif") @bot.command() async def info(ctx): embed = discord.Embed(title="nice bot", description="Nicest bot there is ever.", color=0xeee657) # give info about you here embed.add_field(name="Author", value="<YOUR-USERNAME>") # Shows the number of servers the bot is member of. embed.add_field(name="Server count", value=f"{len(bot.guilds)}") # give users a link to invite thsi bot to their server embed.add_field(name="Invite", value="[Invite link](<insert your OAuth invitation link here>)") await ctx.send(embed=embed) bot.remove_command('help') @bot.command() async def help(ctx): embed = discord.Embed(title="nice bot", description="A Very Nice bot. List of commands are:", color=0xeee657) embed.add_field(name="$add X Y", value="Gives the addition of **X** and **Y**", inline=False) embed.add_field(name="$multiply X Y", value="Gives the multiplication of **X** and **Y**", inline=False) embed.add_field(name="$greet", value="Gives a nice greet message", inline=False) embed.add_field(name="$cat", value="Gives a cute cat gif to lighten up the mood.", inline=False) embed.add_field(name="$info", value="Gives a little info about the bot", inline=False) embed.add_field(name="$help", value="Gives this message", inline=False) await ctx.send(embed=embed) bot.run('NDE0MzIyMDQ1MzA0OTYzMDcy.DWl2qw.nTxSDf9wIcf42te4uSCMuk2VDa0') |
上文内容不用于商业目的,如涉及知识产权问题,请权利人联系博为峰小编(021-64471599-8017),我们将立即处理。


