

这系列文章翻译自google的代码实验室(Codelab:代码实验室)
1.目录如下:
1、在android studio 中创建一个新的android 应用
2、配置你的项目可以支持单元测试
3、创建你的第一个单元测试
4、把你的测试项目跑起来
5、配置你的项目进行真机测试
6、添加一些简单的测试指令到你的应用中
7、创建并运行一个Espresso(这是一个代号,名称而已)测试
8、恭喜你,你学到东西啦!
2.预览(Over view):
在这篇文章里头呢,你可以学到如何在Android studio中创建一个测试项目,编写测试单元跑在你的开发机器上,并且用真机进行界面测试。
那你会学到什么呢?
升级Gradle让它支持单元测试和测试依赖库
编写在Java虚拟机上跑的单元测试
编写Espresso测试,让它跑在真机或者模拟器上
我们需要什么环境呢?
Android studio 版本1.2以上
测试设备的版本要4.0以上
3.在android studio 中创建一个新的android 应用
如果你是第一次打开Android studio,那么就可以点击欢迎界面上的:Start a new Android Studio project

把名字和域名填写上,然后就可以点击next进行下一步操作:
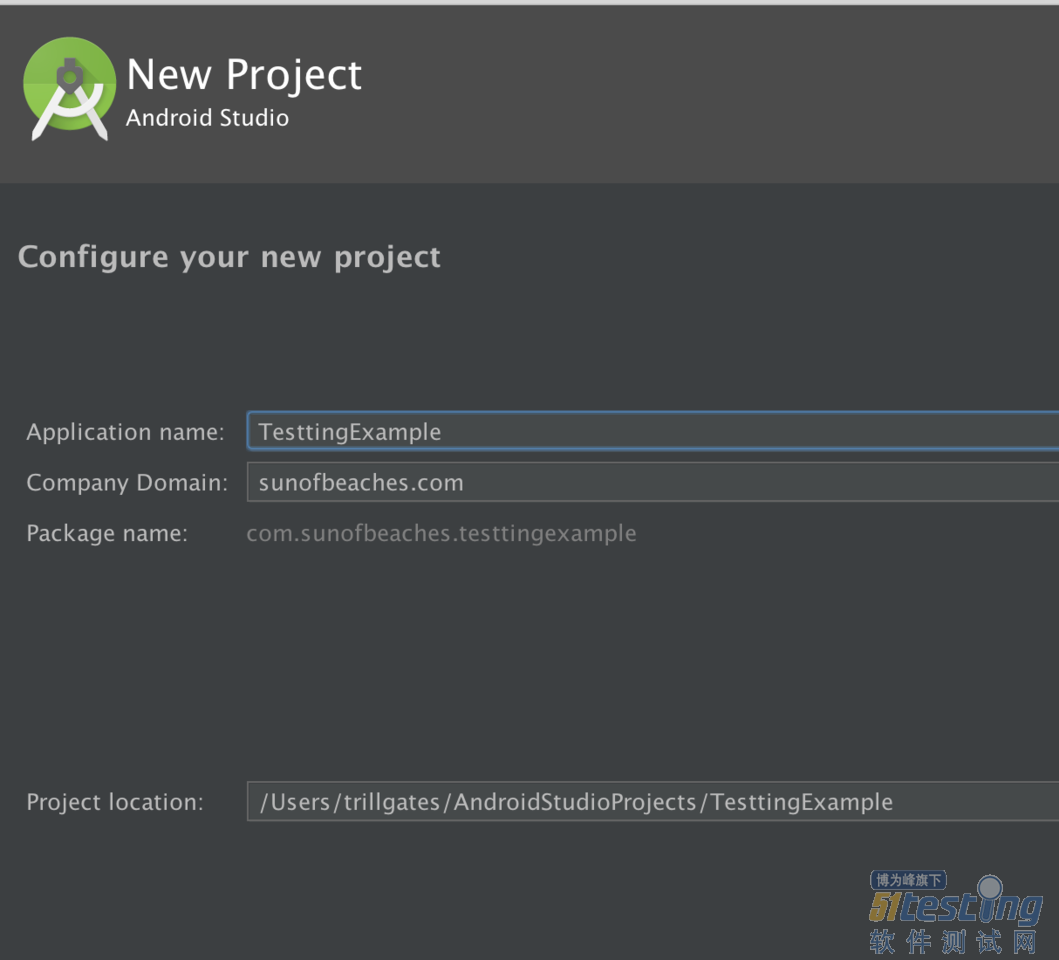
那么接下来呢,一直保持默认的设置即可,直接可以一路next下去就好了。
创建完成之后呢,你可以点击运行的按钮把程序跑起来,就会出现hello world的界面了
到这里的话,说明你创建一个Android studio 项目成功了!来,给自己一点掌声吧!
4.配置你的项目可以支持单元测试
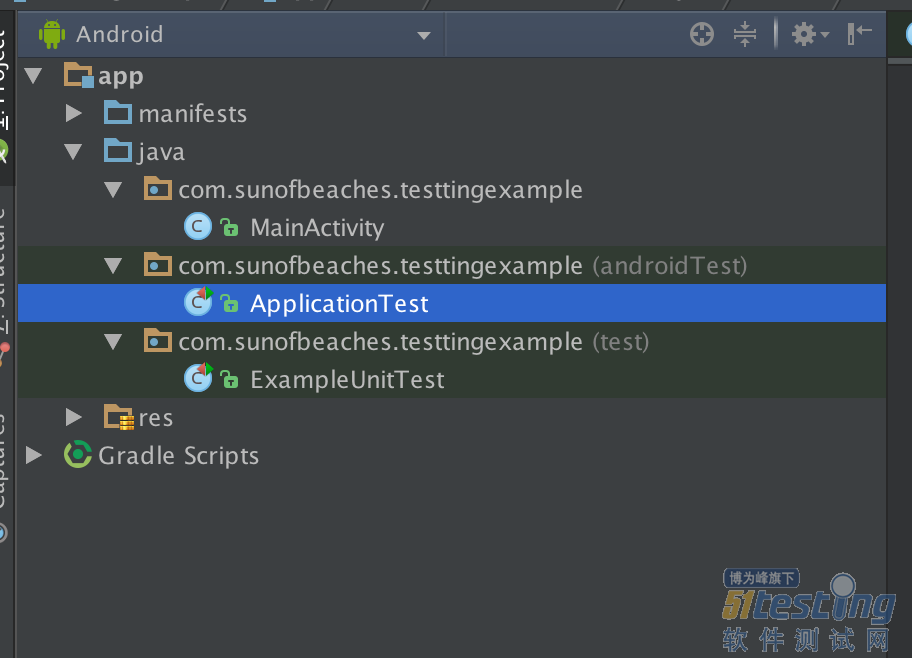
原文的话,没什么好看的。因为在现在的Android studio里头,当你创建项目的时候 ,会自动地给你添加测试依赖的,不需要手动添加。
所以,只要看看Gradle里头有依赖,并且文件夹有三个嘛,一个是普通的代码文件夹,一个JVM里头的测试的,一个是真机或者模拟器的测试文件夹:
5.创建你的第一个单元测试
环境一般都是有已经配置好的,我们直接创建测试单元即可。在测试之前,我们是不是要有东西测试呀,那么我们先要创建一个用于测试的类:
package com.sunofbeaches.testtingexample; /** * Created by trillgates on 16/12/15. */ public class Caculation { public double sum(double numA, double numB) { return numA + numB; } public double multiply(double numA, double numB) { return numA * numB; } } |
这个类呢,很简单,只有两个方法。一个是做加法运算,一个做乘法运算。我们直接右键,如图所示:
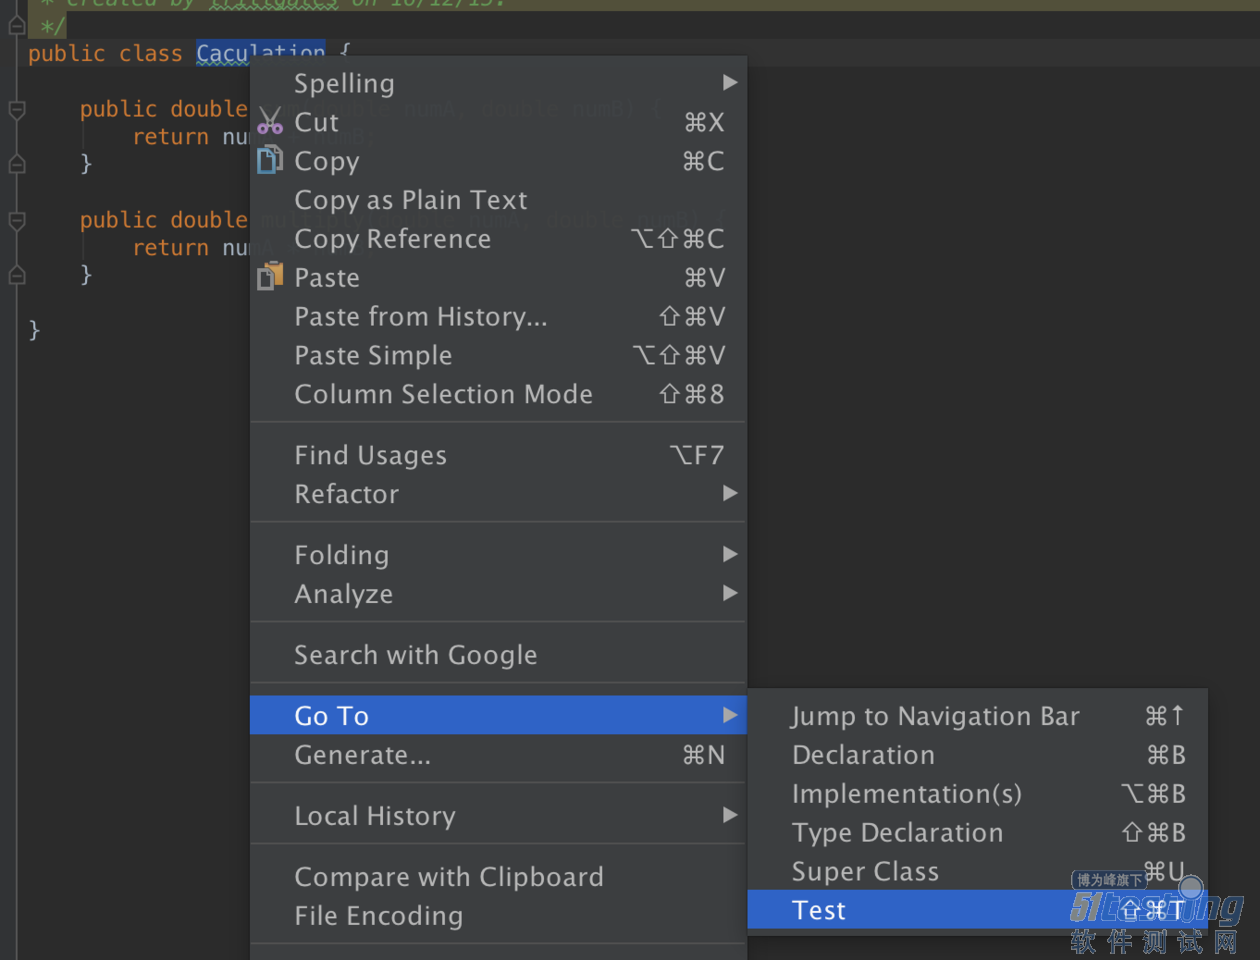
点击创建就可以啦,然后你选择有Unit测试那个文件夹,也就是跑在JVM上测试的那个,就会在那里创建的了。
package com.sunofbeaches.testtingexample; import org.junit.Before; import org.junit.Test; import static junit.framework.Assert.assertEquals; /** * Created by trillgates on 16/12/15. */ public class CaculationTest { private Caculation mCaculation; @Before public void setUp() throws Exception { //Here we should new a instance mCaculation = new Caculation(); } @Test public void testSum() throws Exception { assertEquals(2,mCaculation.sum(1,1),0); } @Test public void testMultiply() throws Exception { assertEquals(10,mCaculation.multiply(2,5),0); } } |
代码很简单,仅仅是几个方法而已。在之前的话,需要创建对象嘛,这个可以理解吧,所以先创建一个对象,后面的就用断言的方式来测试即可。
6.把你的测试项目跑起来
编写好测试代码之后,怎么样才能跑起来呢,这个也很简单哈,小手一抖,对吧,就可以了!
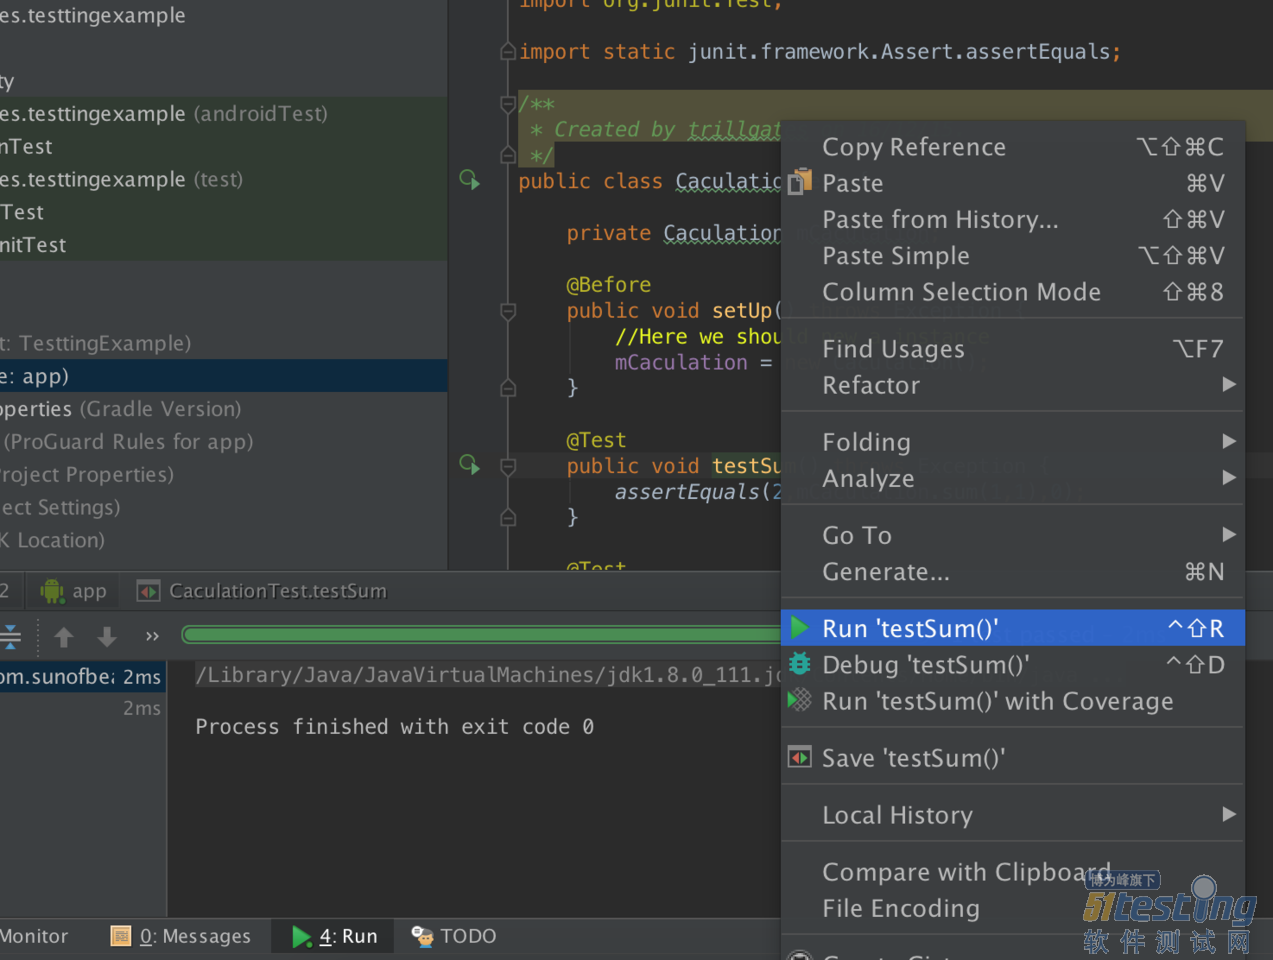
点击注可以跑起来啦,结果如下:如果是绿条哈,那么说明测试通过,红色,则是代码逻辑有总是,输入得到的结果不是你所断言的,所以逻辑有总是了。
7.配置你的项目进行真机测试
原文的配置如下,有些要注意的地方请看后面的说明:
apply plugin: 'com.android.application' android { compileSdkVersion 22 buildToolsVersion "22.0.1" defaultConfig { applicationId "com.example.testing.testingexample" minSdkVersion 15 targetSdkVersion 22 versionCode 1 versionName "1.0" //ADD THIS LINE: testInstrumentationRunner "android.support.test.runner.AndroidJUnitRunner" } buildTypes { release { minifyEnabled false proguardFiles getDefaultProguardFile('proguard-android.txt'), 'proguard-rules.pro' } } //ADD THESE LINES: packagingOptions { exclude 'LICENSE.txt' } } dependencies { compile fileTree(dir: 'libs', include: ['*.jar']) compile 'com.android.support:appcompat-v7:22.0.0' //← MAKE SURE IT’S 22.0.0 testCompile 'junit:junit:4.12' //ADD THESE LINES: androidTestCompile 'com.android.support.test:runner:0.2' androidTestCompile 'com.android.support.test:rules:0.2' androidTestCompile 'com.android.support.test.espresso:espresso-core:2.1' } |
这是我机器上的代码:
apply plugin: 'com.android.application' android { compileSdkVersion 25 buildToolsVersion "25.0.0" defaultConfig { applicationId "com.sunofbeaches.testtingexample" minSdkVersion 15 targetSdkVersion 25 versionCode 1 versionName "1.0" //ADD THIS LINE: testInstrumentationRunner "android.support.test.runner.AndroidJUnitRunner" } buildTypes { release { minifyEnabled false proguardFiles getDefaultProguardFile('proguard-android.txt'), 'proguard-rules.pro' } } //ADD THESE LINES: packagingOptions { exclude 'LICENSE.txt' } } dependencies { compile fileTree(dir: 'libs', include: ['*.jar']) testCompile 'junit:junit:4.12' compile 'com.android.support:appcompat-v7:25.0.0' //ADD THESE LINES: androidTestCompile 'com.android.support.test:runner:0.2' androidTestCompile 'com.android.support.test:rules:0.2' androidTestCompile 'com.android.support.test.espresso:espresso-core:2.1' androidTestCompile 'com.android.support:support-annotations:25.0.0' } |
这里的话,大家要灵活地添加到自己的开发工具中了,因为不同的版本可能不一样。这个要知道哈,注意的地方就是要版本对得上,否则是不能通过编译的。
8.添加一些简单的测试指令到你的应用中
接下来呢,就是添加一些简易的测试指令。先是复制下面的布局到activity_main.xml里
<RelativeLayout xmlns:android="http://schemas.android.com/apk/res/android"
xmlns:tools="http://schemas.android.com/tools"
android:layout_width="match_parent"
android:layout_height="match_parent"
android:paddingBottom="@dimen/activity_vertical_margin"
android:paddingLeft="@dimen/activity_horizontal_margin"
android:paddingRight="@dimen/activity_horizontal_margin"
android:paddingTop="@dimen/activity_vertical_margin"
tools:context=".MainActivity">
<TextView
android:id="@+id/textView"
android:layout_width="wrap_content"
android:layout_height="wrap_content"
android:text="hello world!"/>
<EditText
android:id="@+id/editText"
android:layout_width="match_parent"
android:layout_height="wrap_content"
android:layout_below="@+id/textView"
android:hint="Enter your name here"/>
<Button
android:layout_width="match_parent"
android:layout_height="wrap_content"
android:layout_below="@+id/editText"
android:onClick="sayHello"
android:text="Say hello!"/>
</RelativeLayout>
它看起来就这个样子的哈:

以下是MainActivity的代码:
package com.sunofbeaches.testtingexample; import android.os.Bundle; import android.support.v7.app.AppCompatActivity; import android.view.View; import android.widget.EditText; import android.widget.TextView; public class MainActivity extends AppCompatActivity { @Override protected void onCreate(Bundle savedInstanceState) { super.onCreate(savedInstanceState); setContentView(R.layout.activity_main); } public void sayHello(View v){ TextView textView = (TextView) findViewById(R.id.textView); EditText editText = (EditText) findViewById(R.id.editText); textView.setText("Hello, " + editText.getText().toString() + "!"); } } |
9.创建并运行一个Espresso(这是一个代号,名称而已)测试
到这里的话,我们已经准备好了要测试的内容,于是我们就可以愉快地创建一个测试类了:
package com.sunofbeaches.testtingexample; /** * Created by trillgates on 16/12/15. */ import android.support.test.rule.ActivityTestRule; import android.support.test.runner.AndroidJUnit4; import android.test.suitebuilder.annotation.LargeTest; import org.junit.Rule; import org.junit.Test; import org.junit.runner.RunWith; import static android.support.test.espresso.Espresso.onView; import static android.support.test.espresso.action.ViewActions.click; import static android.support.test.espresso.action.ViewActions.closeSoftKeyboard; import static android.support.test.espresso.action.ViewActions.typeText; import static android.support.test.espresso.assertion.ViewAssertions.matches; import static android.support.test.espresso.matcher.ViewMatchers.withId; import static android.support.test.espresso.matcher.ViewMatchers.withText; @RunWith(AndroidJUnit4.class) @LargeTest public class MainActivityInstrumentationTest { private static final String STRING_TO_BE_TYPED = "Peter"; @Rule public ActivityTestRule<MainActivity> mActivityRule = new ActivityTestRule<>( MainActivity.class); @Test public void sayHello() { onView(withId(R.id.editText)).perform(typeText(STRING_TO_BE_TYPED), closeSoftKeyboard()); //line 1 onView(withText("Say hello!")).perform(click()); //line 2 String expectedText = "Hello, " + STRING_TO_BE_TYPED + "!"; onView(withId(R.id.textView)).check(matches(withText(expectedText))); //line 3 } } |
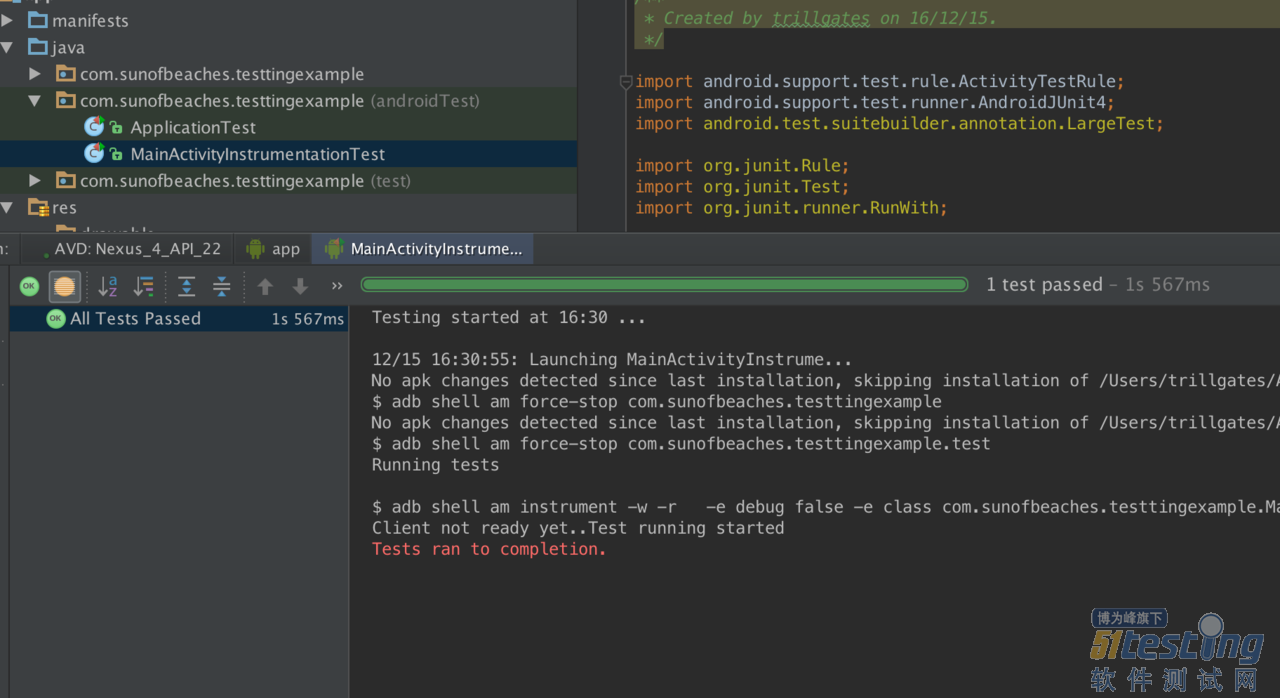
执行一下,你就会发现,这个应用跑起来,然后会自动地输入想着的内容,接着就消失了。绿条表示测试通过哈:

10.恭喜你,你学到东西啦!
上文内容不用于商业目的,如涉及知识产权问题,请权利人联系博为峰小编(021-64471599-8017),我们将立即处理。


