

在本章中,我们将学习如何创建一介测试计划来测试WebService。为了我们的测试目的,我们创建了一个简单的webservice项目并将其部署在Tomcat服务器上。
创建Web服务项目
我们使用Eclipse去创建webservice项目,首先在包com.puyawei.ws下编写服务端接口HelloWorld。HelloWorld.java的内容如下:
package com.puyawei.ws; import javax.jws.WebMethod; import javax.jws.WebService; import javax.jws.soap.SOAPBinding; import javax.jws.soap.SOAPBinding.Style; //服务端接口 @WebService @SOAPBinding(style = Style.RPC) public interface HelloWorld{ @WebMethod String getHelloWorldMessage(String string); } |
这个服务有一个方法getHelloWorldMessage,它有一个String参数。
接下来,在包com.puyawei.ws下创建实现类HelloWorldImpl.java。
package com.puyawei.ws; import javax.jws.WebService; @WebService(endpointInterface="com.puyawei.ws.HelloWorld") public class HelloWorldImpl implements HelloWorld { @Override public String getHelloWorldMessage(String myName){ return("Hello "+myName+" to JAX WS world"); } } |
现在让我们将这个web服务发布到本地服务器上。
公共方法有两个参数:
· 接口链接
· 创建一个HelloWorld实现类对象,以上面的URL作为Web服务公开。
HelloWorldPublisher.java的内容如下:
package com.puyawei.endpoint; import javax.xml.ws.Endpoint; import com.puyawei.ws.HelloWorldImpl; public class HelloWorldPublisher { public static void main(String[] args){ Endpoint.publish("http://localhost:9000/ws/hello", new HelloWorldImpl()); } } |
修改web.xml内容如下:
<?xml version="1.0" encoding="UTF-8"?> <!DOCTYPE web-app PUBLIC "-//Sun Microsystems, Inc.//DTD Web Application 2.3//EN" "http://java.sun.com/j2ee/dtds/web-app_2_3.dtd"> <web-app> <listener> <listener-class> com.sun.xml.ws.transport.http.servlet.WSServletContextListener </listener-class> </listener> <servlet> <servlet-name>hello</servlet-name> <servlet-class> com.sun.xml.ws.transport.http.servlet.WSServlet </servlet-class> <load-on-startup>1</load-on-startup> </servlet> <servlet-mapping> <servlet-name>hello</servlet-name> <url-pattern>/hello</url-pattern> </servlet-mapping> <session-config> <session-timeout>120</session-timeout> </session-config> </web-app> |
要将此应用程序部署为Web服务,我们还需要另一个配置文件sun-jaxws.xml。此文件内容如下:
<?xml version="1.0" encoding="UTF-8"?>
<endpoints xmlns="http://java.sun.com/xml/ns/jax-ws/ri/runtime" version="2.0">
<endpoint name="HelloWorld" implementation="com.puyawei.ws.HelloWorldImpl" url-pattern="/hello"/>
</endpoints>
现在所有文件都准备好了,目录结构如下所示:
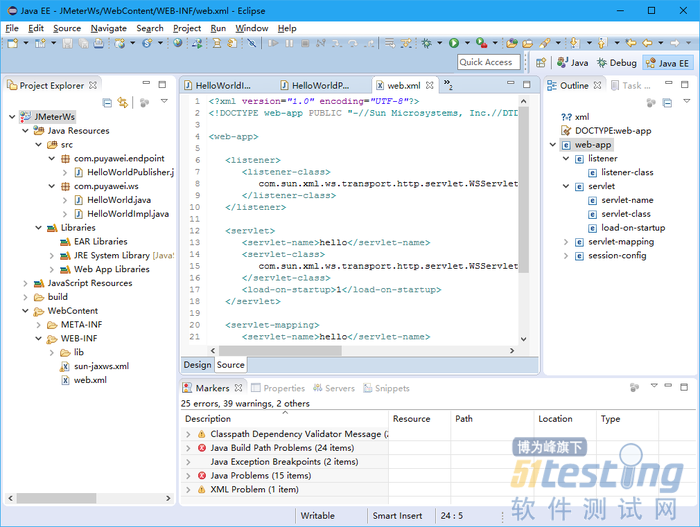
directory structure
· 将程序打包为war.
· 选择 项目>右击>Export>War file
· 保存为JMeterWs,并放到Tomcat的webapps下面
· 现在启动toncat服务
· 服务启动后,你可以访问web服务http://localhost:8080/JMeterWs/hello
创建测试计划
现在我们来创建一个web服务的测试计划
重命名测试计划
· 点击 D:\apache-jmeter-3.0\lib\jmeter.bat 启动JMeter
· 单击测试计划节点。
· 将此测试计划节点重命名为“Webservice测试”。
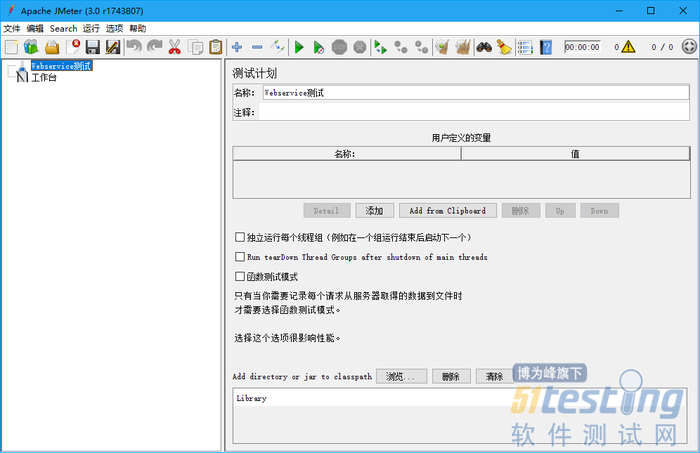
Rename the Test Plan
添加线程组
添加一个线程组,它是所有其他元素(如取样器(Sampler),控制器和监听器)的占位符。
· 右键单击“WebserviceP测试”(我们的测试计划)>添加>Threads(Users)>线程组。线程组将将被添加在测试计划(Webservice测试)节点下。
· 接下来,我们来修改线程组的默认属性以适合我们的测试。 以下属性已更改:
名称 - webservice用户
线程数 - 2
Ramp-Up Period - 保留默认值1秒。
循环次数 - 2
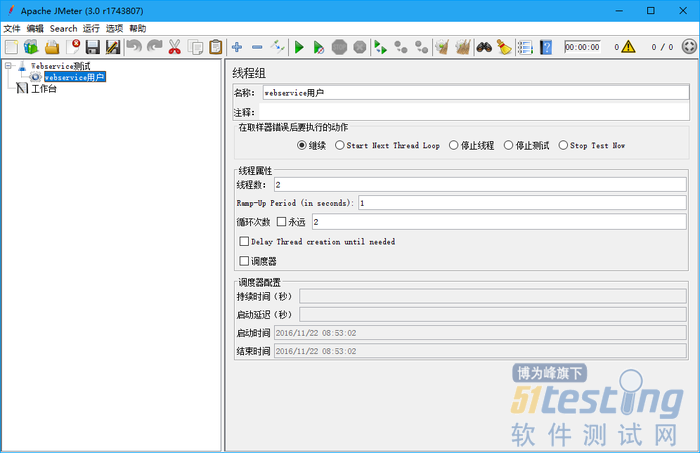
Add Thread Group
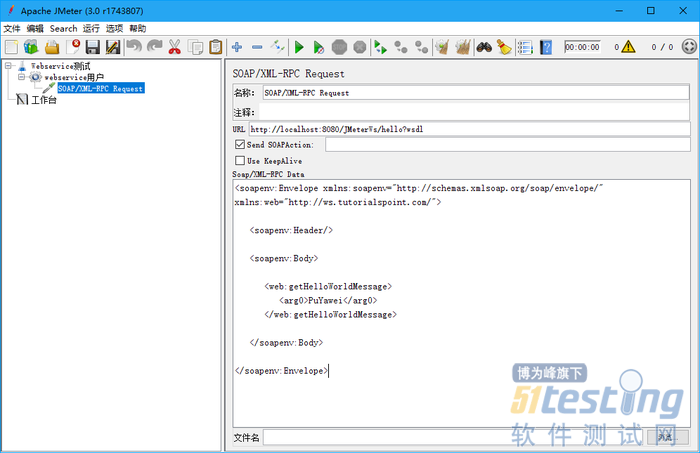
添加取样器 - SOAP/XML-RPC Request
我们已经定义了用户,现在我们来定义要执行的任务。
添加SOAP/XML-RPC Request:
· 右键单击鼠标按钮显示添加菜单。
· 选择 添加>取样器(Sampler)> SOAP/XML-RPC Request。
· 编辑以下属性,如下图所示:
名称 - SOAP/XML-RPC Request
URL - http://localhost:8080/JMeterWs/hello?wsdl
Soap/XML-RPC Data ? 输入以下内容
<soapenv:Envelope xmlns:soapenv="http://schemas.xmlsoap.org/soap/envelope/" xmlns:web="http://ws.puyawei.com/"> <soapenv:Header/> <soapenv:Body> <web:getHelloWorldMessage> <arg0>PuYawei</arg0> </web:getHelloWorldMessage> </soapenv:Body> </soapenv:Envelope> |
Add Sampler


