添加依赖
首先在build.gradle添加部分代码
apply plugin: 'com.android.application' android { compileSdkVersion 25 buildToolsVersion "25.0.2" defaultConfig { applicationId "com.example.administrator.test" minSdkVersion 14 targetSdkVersion 25 versionCode 1 versionName "1.0" //添加Instrumentation测试依赖 testInstrumentationRunner "android.support.test.runner.AndroidJUnitRunner" } buildTypes { release { minifyEnabled false proguardFiles getDefaultProguardFile('proguard-android.txt'), 'proguard-rules.pro' } } //添加Instrumentation测试依赖 packagingOptions { exclude 'LICENSE.txt' } } dependencies { compile fileTree(include: ['*.jar'], dir: 'libs') compile 'com.android.support:appcompat-v7:26.0.0-alpha1' compile 'com.google.android.gms:play-services:4.2.42' testCompile 'junit:junit:4.12' //添加Instrumentation测试依赖 androidTestCompile 'com.android.support.test:runner:0.2' androidTestCompile 'com.android.support.test:rules:0.2' androidTestCompile 'com.android.support.test.espresso:espresso-core:2.1' } |
创建交互页面
创建xml文件
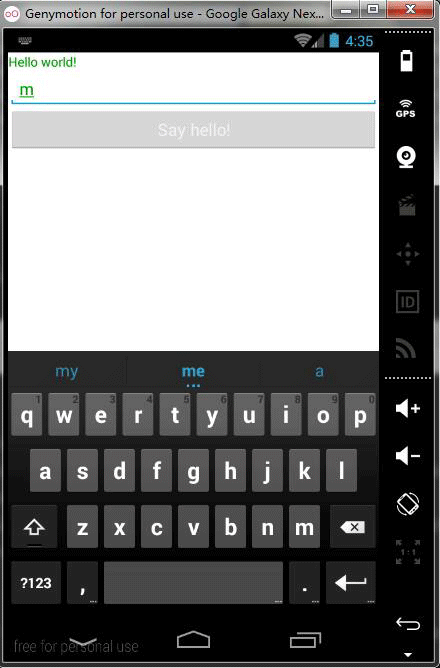
首先我们就简单添加一个TextView、EditText、Button,其中onClick的作用相当于button点击之后调用sayHello方法(sayHello在Activity里面定义),布局代码如下
<?xml version="1.0" encoding="utf-8"?> <RelativeLayout xmlns:android="http://schemas.android.com/apk/res/android" android:layout_width="match_parent" android:layout_height="match_parent"> <TextView android:layout_width="wrap_content" android:layout_height="wrap_content" android:id="@+id/textView" android:textColor="@color/color_green" android:text="@string/hello_world"/> <EditText android:id="@+id/editText" android:layout_width="match_parent" android:layout_height="wrap_content" android:layout_below="@id/textView" android:textColor="@color/color_green" android:hint="Enter your name here"/> <Button android:layout_width="match_parent" android:layout_height="wrap_content" android:text="Say hello!" android:layout_below="@id/editText" android:onClick="sayHello"/> </RelativeLayout> |
创建Activity
代码如下
/** * @author 林思旭 * @since 2017/11/12 */ public class InstrumentActivity extends Activity{ @Override protected void onCreate(@Nullable Bundle savedInstanceState) { super.onCreate(savedInstanceState); setContentView(R.layout.activity_instrumentation); } public void sayHello(View v){ TextView textView = (TextView)findViewById(R.id.textView); EditText editText = (EditText)findViewById(R.id.editText); textView.setText("Hello,"+editText.getText().toString()+"!"); } } |
测试
创建测试类
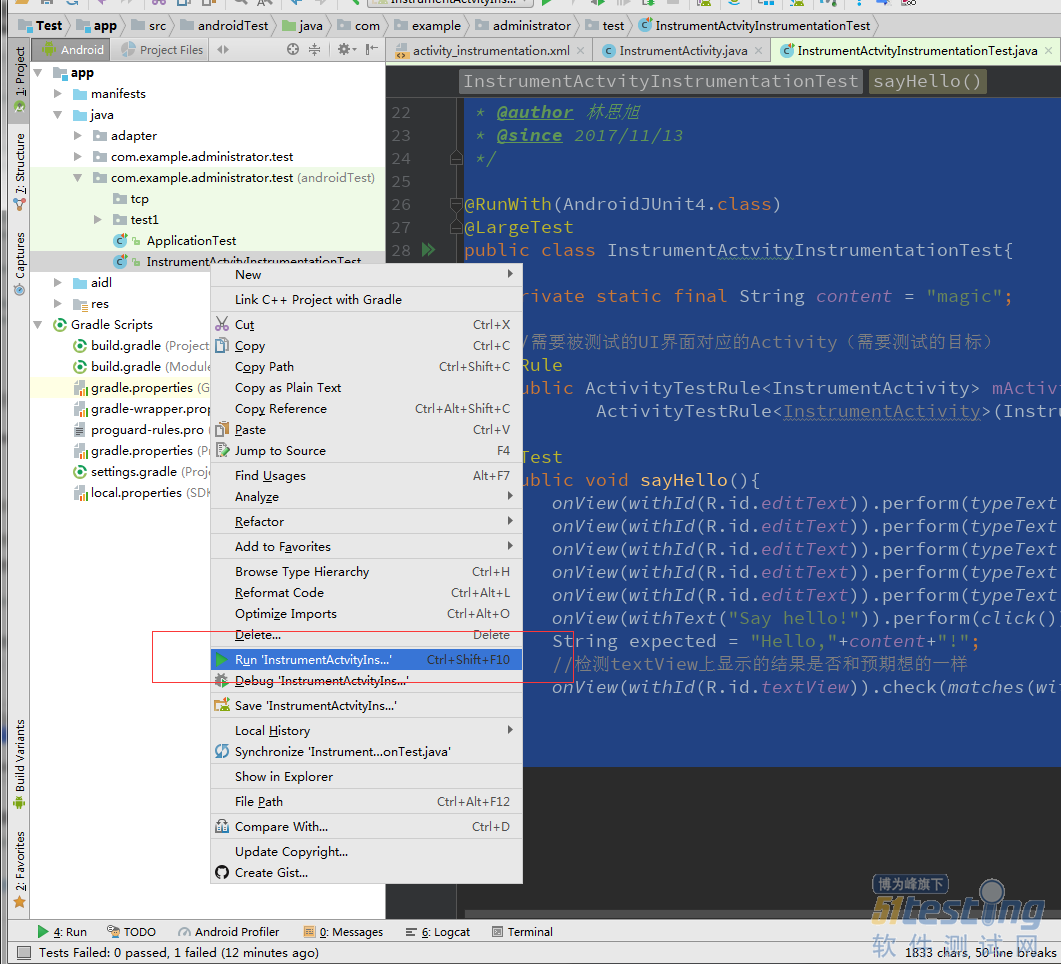
找到以(androidTest)后缀结尾的包名并创建一个新的java类,命名格式×××Test,其中类开头必须添加@RunWith(AndroidJunit4.class)和@LargeTest的注解,而@Rule注解是告知需要测试的是哪个类,@Test注解是测试的具体内容,最好复制我导入的包,这样就不会出现其他错误,具体代码如下
package com.example.administrator.test; import android.support.test.rule.ActivityTestRule; import android.support.test.runner.AndroidJUnit4; import android.test.suitebuilder.annotation.LargeTest; import com.example.administrator.test.activity.InstrumentActivity; import org.junit.Rule; import org.junit.Test; import org.junit.runner.RunWith; import static android.support.test.espresso.Espresso.onView; import static android.support.test.espresso.action.ViewActions.click; import static android.support.test.espresso.action.ViewActions.closeSoftKeyboard; import static android.support.test.espresso.action.ViewActions.typeText; import static android.support.test.espresso.assertion.ViewAssertions.matches; import static android.support.test.espresso.matcher.ViewMatchers.withId; import static android.support.test.espresso.matcher.ViewMatchers.withText; /** * @author 林思旭 * @since 2017/11/13 */ @RunWith(AndroidJUnit4.class) @LargeTest public class InstrumentActvityInstrumentationTest{ private static final String content = "magic"; //需要被测试的UI界面对应的Activity(需要测试的目标) @Rule public ActivityTestRule<InstrumentActivity> mActivityRule = new ActivityTestRule<InstrumentActivity>(InstrumentActivity.class); @Test public void sayHello(){ onView(withId(R.id.editText)).perform(typeText("m")); onView(withId(R.id.editText)).perform(typeText("a")); onView(withId(R.id.editText)).perform(typeText("g")); onView(withId(R.id.editText)).perform(typeText("i")); onView(withId(R.id.editText)).perform(typeText("c"),closeSoftKeyboard()); onView(withText("Say hello!")).perform(click()); String expected = "Hello,"+content+"!"; //检测textView上显示的结果是否和预期想的一样 onView(withId(R.id.textView)).check(matches(withText(expected))); } } |
语法解析
onView是一个可以通过id或者内容绑定一个控件的语法;而perform是执行某种操作的语法,如上代码可以看出我是让EdiTText逐个输入magic单词,最后closeSoftKeyboard是关闭软键盘的意思;perform(click())的意思就是模拟点击操作时间;最后的check语法就是做来作比较,如果和预期值一样测试通过。详细语法大家自己花时间去学习吧!
如何运行测试
打开模拟器,右击创建的×××Test.class类
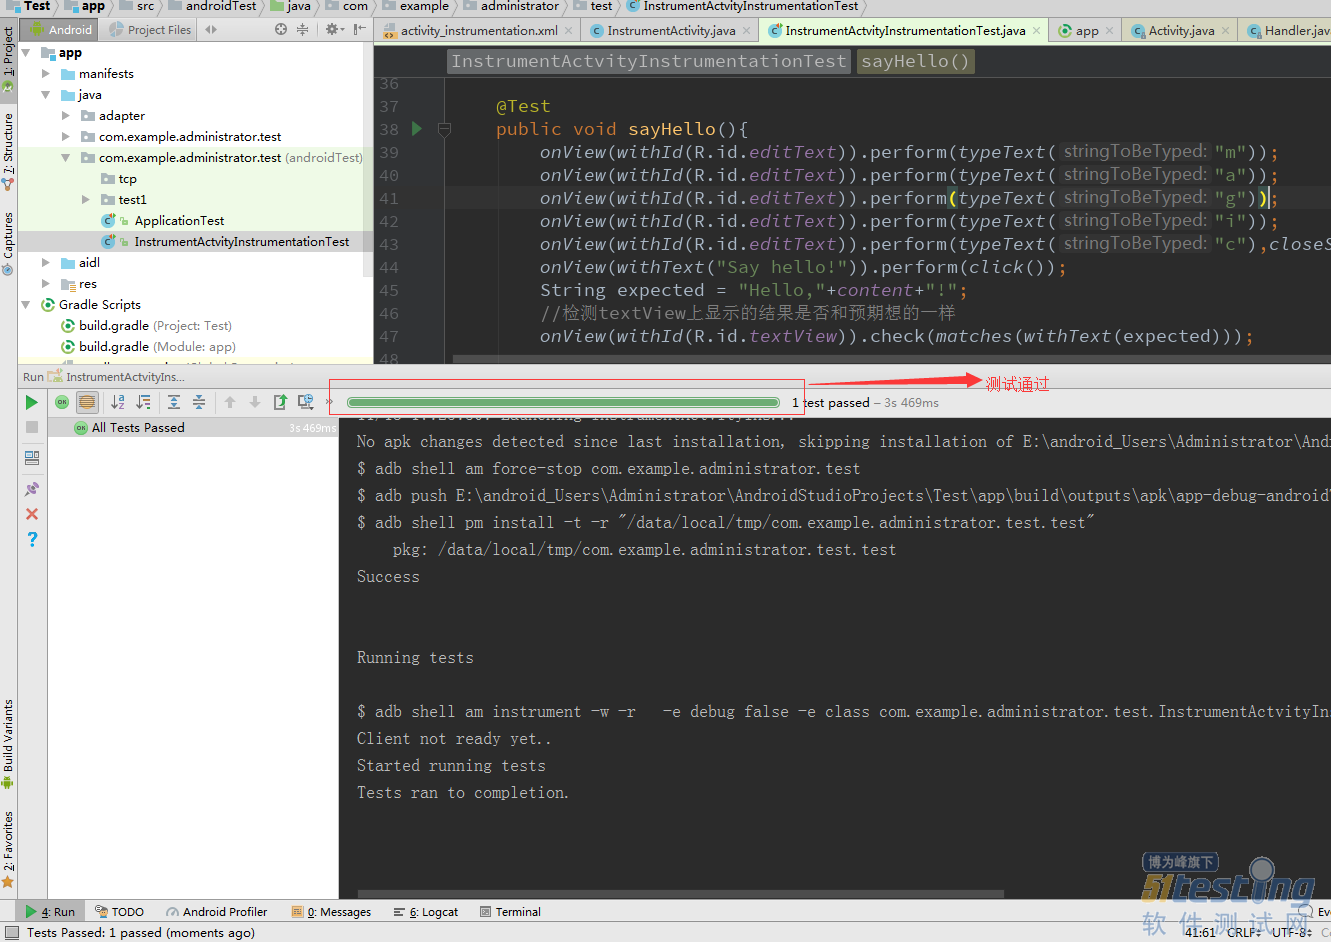
测试结果
测试成功
测试通过是为绿色,没有出错信息
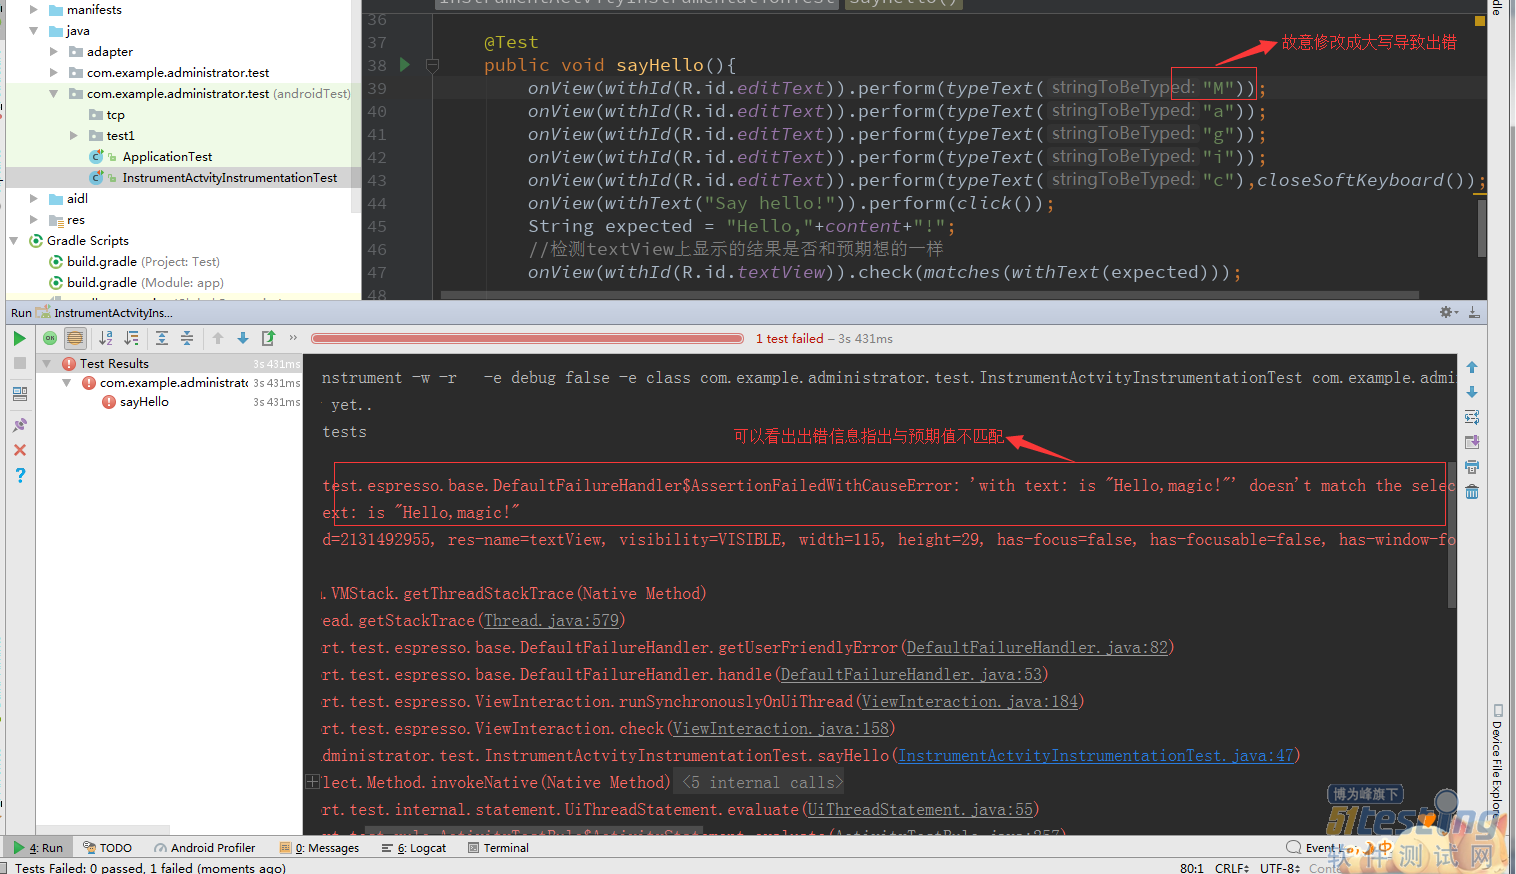
测试失败
测试不通过为红色,显示出错信息
测试过程遇到问题与解决办法
问题
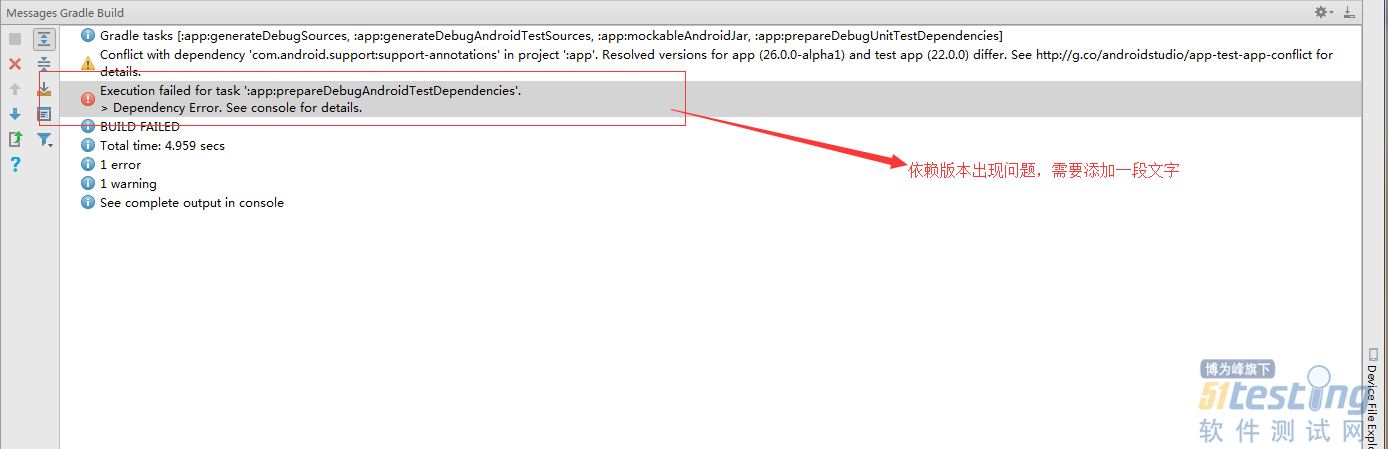
解决方法
在gradle(App)里面添加如下代码,代码块添加在android{}里面
configurations.all {
resolutionStrategy {
force 'com.android.support:support-annotations:24.1.1'
}
}
效果图
全程测试自动化,测试结束后退出页面