

前言
让我一起来看看 Iván Carballo和他的团队是如何使用Espresso, Mockito 和Dagger 2 编写250个UI测试,并且只花了三分钟就运行成功的。
在这篇文章中,我们会探索如何使用Mockito(译者注:Mockito是java编写的一个单元测试框架),Dagger 2 去创建快速可靠的Android UI测试。如果你正在开始编写Android中的UI 测试或者希望改善已有测试性能的开发者,那么这篇文章值得一读。
我第一次在安卓应用中使用UI自动化测试是在几年前使用Robotium(译者注:Robotium是android中的一个自动化测试框架)。我认为测试环境越逼真越好。在最终测试中应当表现得如同超人一般能够迅速的点击任意一个位置而且并不会报错,对吧?我认为mocking测试很糟糕。为什么我们需要在测试的时候改变应用的行为?那不是欺骗吗?几个月后我们有了大概100个测试用例要花费40分钟去运行起来。它们是如此的不稳定,即使应用的功能上并没有任何错误,通常有一大半的几率会运行失败。我们花了大量的时间去编写它们,但是这些测试用例却没有帮我们找到任何问题。
但正如John Dewey所说,失败是具有启发意义的。
失败是有启发意义的。智者总能从失败和成功中学到同样多的东西。
我们确实学到。我们认识到在测试中依赖于真实的API 接口是一个糟糕的做法。因为你失去了对返回的数据结果的控制,你也就不能对你的测试做预先处理。也就是说网络错误和外部API接口错误都会导致你的测试出错。如果你的wifi出错了,你肯定不希望你的测试也会跟着出错。你当然希望这时UI测试能够成功运行。如果你还依赖外部的API接口那么你完全是在做集成测试(integration tests),也就得不到我们期望的结果。
Mock测试正式解决之道
(Mocking is the solution)
Mock 测试也就是通过一个模拟(mock)的对象去替换一个真实的对象以便于测试。它主要应用于编写单元测试,但在UI测试中也会非常有用。你可以参照不同的方法去模拟java对象但使用Mockito 确实是一个简单有效的解决方案。在下面的例子中你可以看到一个模拟的UserApi 类并且stub(译者注:stub,也即“桩”,主要出现在集成测试的过程中,从上往下的集成时,作为下方程序的替代。可以理解为对方法进行预先的处理,达到修改的效果。下文中不做翻译)了其中的一个方法,因此它总会返回一个用户名username的静态数组。
class UsersApi { String[] getUserNames() { } } // Create the mock version of a UsersApi class UsersApi mockApi = Mockito.mock(UsersApi.class); // Stub the getUserNames() method when(mockApi.getUserNames()) .thenReturn(new String[]{"User1", "User2", "User3"}); // The call below will always return an array containing the // three users named above mockApi.getUserNames(); |
一旦你创建了一个mock对象你需要确保应用测试的时候使用的是这个模拟的对象,并且在运行的时候使用的是真实对象。这也是一个难点所在,如果你的代码构建得并不是易于测试(test-friendly)的,替换真实对象的过程会变得异常艰难甚至是说不可能完成。还要注意的是,你想要模拟的代码必须独立到一个单独的类里面。比如说,如果你直接从你的activity中使用HttpURLConnection调用REST API 进行数据访问(我希望你不要这么做), 这个操作过程模拟起来也就会非常困难。
在测试之前考虑一下系统架构,糟糕的系统架构往往会导致测试用例和mock测试难于编写,mock测试也会变得不稳定。
一个易于测试的架构
A test friendly architecture
构建一个易于测试的架构有许多种方式。在这里我将使用 ribot 中使用的架构 (译者注:也就是在开篇提到的Android应用架构)作为范例,你也可以应用这样的架构方式到任何架构中。我们的架构是基于MVP模式,我们决定在UI测试中去模拟(mock)整个Model层,因此我们可以对数据由更多的操作性,也就能够写出更有价值和可靠的测试。
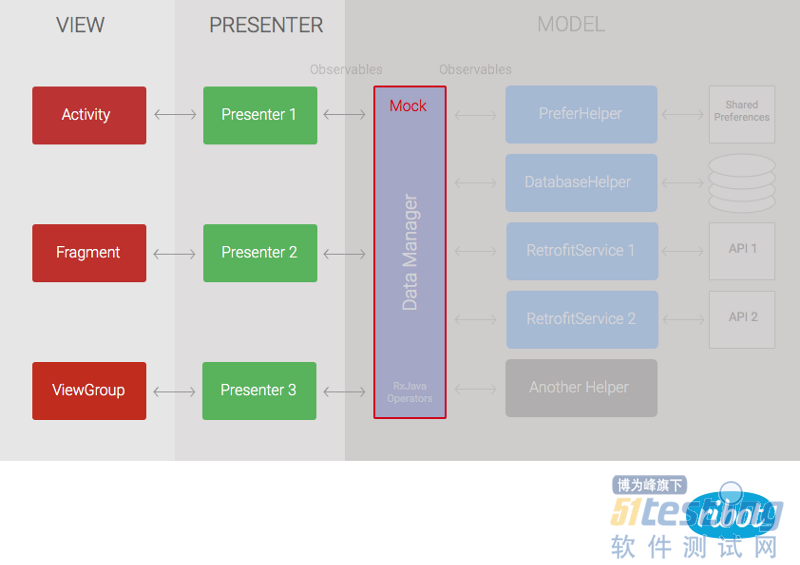
MVP架构
DataManager是Model层中唯一暴露给Presenter层的数据的类,因此为了测试Model层我们只需要替换为一个模拟
的DataManger即可。
使用Dagger注入模拟的DataManager
Using Dagger to inject a mock DataManager
一旦我们明确了需要模拟什么对象,那么接下来就该考虑在测试中如何替换真实的对象。我们通过Dagger2 解决这个问题(一个Android中的依赖注入框架),如果你还没有接触过Dagger ,在继续阅读下去之前我建议你阅读使用Dagger2 进行依赖注入【英】 。我们的应用至少包含一个Dagger 的Module和Component。通常被叫做ApplicationComponent 和ApplicationModule。你可以在下面看到一个简化版的只提供了DataManger实例的类。当然你也可以采用第二种方法,在DataManager的构造函数上使用@inject注解。这里我直接提供一个方法便于理解。(译者注:这里将两个类ApplicationComponent 和ApplicationModule写在一起,便于直观理解)
@Module public class ApplicationModule { @Provides @Singleton public DataManager provideDataManager() { return mDataManager; } } @Singleton @Component(modules = ApplicationModule.class) public interface ApplicationComponent { DataManager dataManager(); } |
应用的ApplicationComponent 在Application类中初始化:
public class MyApplication extends Application { ApplicationComponent mApplicationComponent; public ApplicationComponent getComponent() { if (mApplicationComponent == null) { mApplicationComponent = DaggerApplicationComponent.builder() .applicationModule(new ApplicationModule(this)) .build(); } return mApplicationComponent; } // Needed to replace the component with a test specific one public void setComponent(ApplicationComponent applicationComponent) { mApplicationComponent = applicationComponent; } } |
如果你使用过Dagger2,你可能有同样的配置步骤,现在的做法是创建一个test的时候需要用到的Module和Component
@Module public class TestApplicationModule { // We provide a mock version of the DataManager using Mockito @Provides @Singleton public DataManager provideDataManager() { return Mockito.mock(DataManager.class); } } @Singleton @Component(modules = TestApplicationModule.class) public interface TestComponent extends ApplicationComponent { // Empty because extends ApplicationComponent } |
上面的TestApplicationModule使用Mockito提供了模拟的DataManger对象,TestComponent是ApplicationComponent的继承类,使用了TestApplicationModule作为module,而不是ApplicationModule。这也就意味着如果我们在我们的Application类中初始化TestComponent会使用模拟的DataManager对象。
创建JUnit,并且设定TestComponent
Creating a JUnit rule that sets the TestComponent
为了确保在每次测试前TestComponent被设置到Application类中,我们可以创建JUnit 4 的 TestRule
public class TestComponentRule implements TestRule { private final TestComponent mTestComponent; private final Context mContext; public TestComponentRule(Context context) { mContext = context; MyApplication application = (MyApplication) context.getApplicationContext(); mTestComponent = DaggerTestComponent.builder() .applicationTestModule(new ApplicationTestModule(application)) .build(); } public DataManager getMockDataManager() { return mTestComponent.dataManager(); } @Override public Statement apply(final Statement base, Description description) { return new Statement() { @Override public void evaluate() throws Throwable { MyApplication application = (MyApplication) context.getApplicationContext(); // Set the TestComponent before the test runs application.setComponent(mTestComponent); base.evaluate(); // Clears the component once the tets finishes so it would use the default one. application.setComponent(null); } }; } } |
TestComponentRule将会创建TestComponent的实例对象,这也就会覆写apply方法并返回一个新的 Statement,新的Statement会:
1 设定TestComponent给Application类的component对象。
2调用基类的Statement 的evaluate()方法(这是在test的时候执行)
3 设置Application的component字段为空,也就让其恢复到初始状态。我们能够通过这种方式预防测试用例之间的相互影响
通过上面的代码我们可以通过getMockDataManager()方法获取模拟的DataManager对象。这也就允许我们能够给得到DataManager对象并且stub它的方法。需要注意的是,这只有TestApplicationComponent的provideDataManger方法使用@Singleton注解的时候有效。如果它没有被指定为单例的,那么我们通过getMockDataManager方法得到的实例对象将会不同于应用使用的实例对象。因此,我们也不可能stub它。
编写测试用例
Writing the tests
现在我们有Dagger正确的配置,并且TestComponentRule也可以使用了,我们还有一件事要做,那就是编写测试用例。我们使用 Espresso编写UI测试。它并不是完美的但是它是一个快速可靠的Android测试框架。在编写测试用例之前我们需要一个app去测试。假如我们有一个非常简单的app,从REST API 中加载用户名,并且展示到RecyclerView上面。那么DataManger将会是下面这个样子:
public DataManager { // Loads usernames from a REST API using a Retrofit public Single<List<String>> loadUsernames() { return mUsersService.getUsernames(); } } |
loadUsername()方法使用Retrofit和Rxjava 去加载REST API 的数据。它返回的是Single 对象,并且发送一串字符串。 我们也需要一个Activity展示用户名usernames到RecyclerView上面,我们假设这个Activity叫做UsernamesActivity。如果你遵循MVP模式你也会有相应的presenter但为了直观理解,这里不做presenter操作。
现在我们想要测试这个简单的 Activity有至少三个情况需要测试:
1如果API返回一个有效的用户名列表数据,那么它们会被展示到列表上面。
2 如果API返回空的数据,那么界面会显示“空的列表”
3 如果API 请求失败,那么界面会显示“加载用户名失败”
下面依次展示三个测试:
@Test public void usernamesDisplay() { // Stub the DataManager with a list of three usernames List<String> expectedUsernames = Arrays.asList("Joe", "Jemma", "Matt"); when(component.getMockDataManager().loadUsernames()) .thenReturn(Single.just(expectedUsernames)); // Start the Activity main.launchActivity(null); // Check that the three usernames are displayed for (Sting username:expectedUsernames) { onView(withText(username)) .check(matches(isDisplayed())); } } @Test public void emptyMessageDisplays() { // Stub an empty list when(component.getMockDataManager().loadUsernames()) .thenReturn(Single.just(Collections.emptyList())); // Start the Activity main.launchActivity(null); // Check the empty list message displays onView(withText("Empty list")) .check(matches(isDisplayed())); } @Test public void errorMessageDisplays() { // Stub with a Single that emits and error when(component.getMockDataManager().loadUsernames()) .thenReturn(Single.error(new RuntimeException())); // Start the Activity main.launchActivity(null); // Check the error message displays onView(withText("Error loading usernames")) .check(matches(isDisplayed())); } } |
通过上面的代码,我们使用TestComponentRule 和android 官方测试框架提供的ActivityTestRule。ActivityTestRule会让我们从测试中启动UsernamesActivity 。注意我们使用 RuleChain 来确保 TestComponentRule总是在ActivityTestRule前运行。这也是确保TestComponent在任何Activity运行之前在Application类中设定好。
你可能注意到了三个测试用例遵循同样的构建方式:
1 通过when (xxx).thenReturn(yyy)设置前置条件。这是通过stub loadUsernames()方法实现的。例如,第一个测试的前置条件是有一个有效的用户名列表。
2 通过main.launchActivity(null)运行activity。
3 通过check(matches(isDisplayed()));检查视图的展示,并且展示相应前置条件期望的值。
这是一个非常有效的解决方案,它允许你测试不同的场景,因为你对整个application的初始状态拥有绝对的控制权。如果你不使用mock来编写上面的三个用例,几乎不可能达到这样的效果因为真实的API接口总会返回同样的数据。
如果你想要查看使用这个测试方法的完整实例,你可以在github查看项目ribot Android boilerplate 或者 ribot app.
当然这个解决方案也有一些瑕疵。首先在每个test之前都会stub显得非常繁琐。复杂的界面可能需要在每个测试之前有5-10个stub。将一些stub移到初始化setup()方法中是有用的但经常不同的测试需要不同的stub。第二个问题是UI测试和潜在的实现存在着耦合,也就意味着如果你重构DataManager,那么你也需要修改stub。
虽然这样,我们也在ribot 的几个应用中应用了这个UI测试方法,事实证明这中方法也是有好处的。例如,我们最近的一个Android应用中有250个UI测试能够在三分钟之内运行成功。其中也有380个Model层和Presenter层的单元测试。
好了,我希望这篇文章让你对UI测试的认知以及编写更好的测试代码有一个很好的帮助。


