

摘要:.NET Excel导出方法及其常见问题详解。
一、Excel导出的实现方法
在.net 程序开发中,对于Excel文件的导出我们一共有三种导出方式:
1、利用文件输出流进行读写操作
这种方式的导出方法是比较简单就可以实现的,我们实际上是针对类似于html中table表格的输出
a.针对想要的Excel合并样式写一个table标签代码
1 <table border="1"> 2 <thead> 3 <tr> 4 <th style="background-color:yellow" colspan="7" align="center">物料汇总单</th> 5 </tr> 6 <tr> 7 <th style="background-color:yellow">物料码</th> 8 <th style="background-color:yellow">物料名称</th> 9 <th style="background-color:yellow">型号</th> 10 <th style="background-color:yellow">单位</th> 11 <th style="background-color:yellow">数量</th> 12 <th style="background-color:yellow">备注</th> 13 <th style="background-color:yellow">排序</th> 14 </tr> 15 </thead> 16 <tbody> 17 <tr> 18 <th>{0}</th> 19 <th>{0}</th> 20 <th>{0}</th> 21 <th>{0}</th> 22 <th>{0}</th> 23 <th>{0}</th> 24 <th>{0}</th> 25 </tr> 26 </tbody> 27 </table> |
table的border属性可以控制展现为Excel文件时是否显示网格线,一般如果不设置为border="1"时,导出的文件是不会生成网格线的,实际上table的各种属性和样式最终在生成为Excel文件时,都大致会以相同的格式展现出来,也就是说我们只要设计好table的样式就行,不用考虑其它的问题了。
而对于表头中的颜色设置:
1 <tr> 2 <th style="background-color:yellow">物料码</th> 3 <th style="background-color:yellow">物料名称</th> 4 <th style="background-color:yellow">型号</th> 5 <th style="background-color:yellow">单位</th> 6 <th style="background-color:yellow">数量</th> 7 <th style="background-color:yellow">备注</th> 8 <th style="background-color:yellow">排序</th> 9 </tr> |
有不少人会疑惑:为什么不在<tr>设置background-color不是更方便?
1 <tr style="background-color:yellow"> 2 <th>物料码</th> 3 <th>物料名称</th> 4 <th>型号</th> 5 <th>单位</th> 6 <th>数量</th> 7 <th>备注</th> 8 <th>排序</th> 9 </tr> |
这样做的确省了不少事,但是这样做当转化为Excel文件时效果就不是很相同了。
我们理想中的效果:
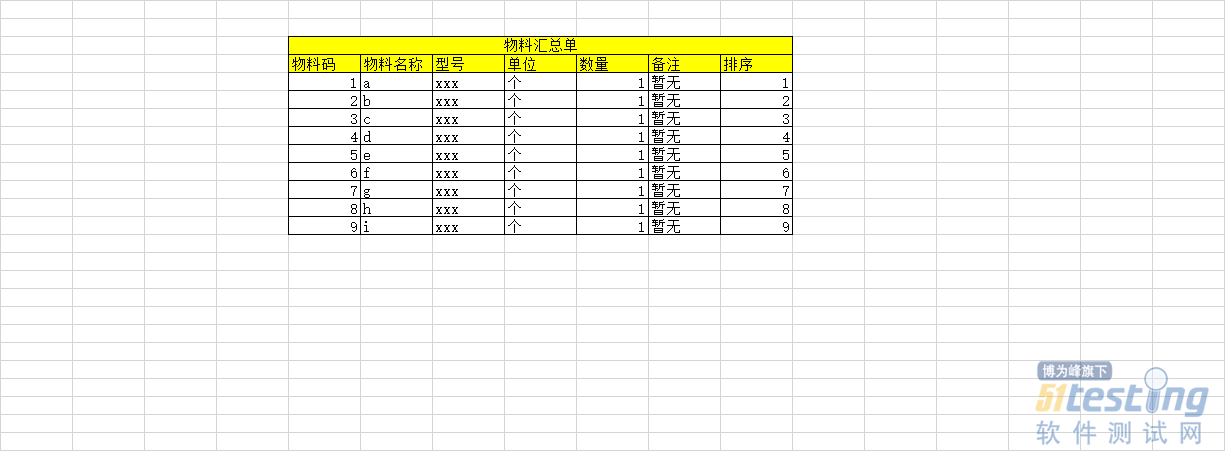
但实际上会展示为:
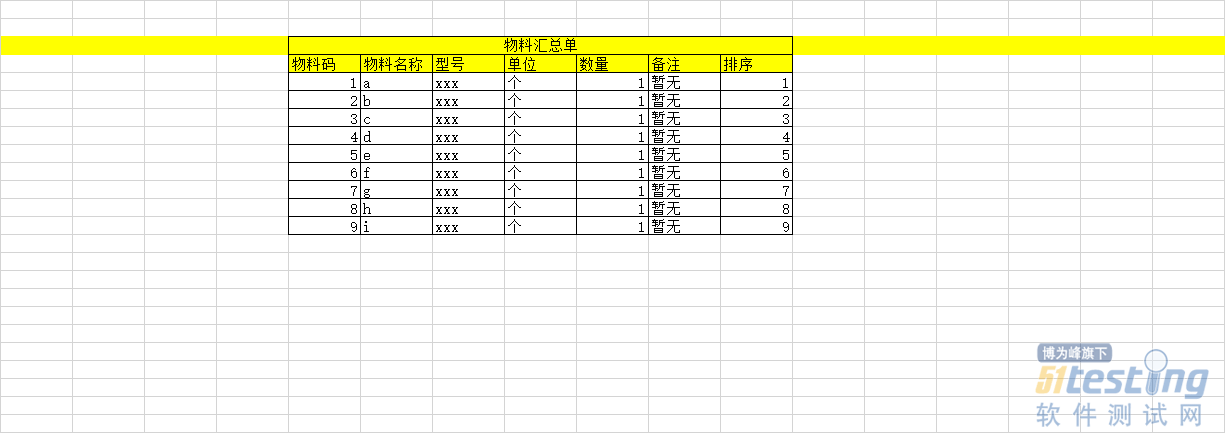
转化为Excel文件时并未在固定的列数设置背景颜色,而是整行都被设置为黄色。针对其他的细节我们可以慢慢的去尝试,去调整。
此时我们先要针对现有的table标签进行数据填充:
1 ber.Append("<table border=\"1\">"); 2 ber.Append("<thead>"); 3 ber.Append("<tr><th style=\"background-color:yellow\" colspan=\"7\" align=\"center\">物料汇总单</th></tr>"); 4 5 ber.Append("<tr>"); 6 7 ber.Append("<th style=\"background-color:yellow\">物料码</th>"); 8 ber.Append("<th style=\"background-color:yellow\">物料名称</th>"); 9 ber.Append("<th style=\"background-color:yellow\">型号</th>"); 10 ber.Append("<th style=\"background-color:yellow\">单位</th>"); 11 ber.Append("<th style=\"background-color:yellow\">数量</th>"); 12 ber.Append("<th style=\"background-color:yellow\">备注</th>"); 13 ber.Append("<th style=\"background-color:yellow\">排序</th>"); 14 15 ber.Append("</tr>"); 16 ber.Append("</thead>"); 17 18 ber.Append("<tbody>"); 19 foreach (ExcelTMaterial item in all_models) 20 { 21 ber.Append("<tr>"); 22 ber.AppendFormat("<th>{0}</th>", item.mt_code); 23 ber.AppendFormat("<th>{0}</th>", item.mt_name); 24 ber.AppendFormat("<th>{0}</th>", item.mt_model); 25 ber.AppendFormat("<th>{0}</th>", item.mt_unit); 26 ber.AppendFormat("<th>{0}</th>", item.count); 27 ber.AppendFormat("<th>{0}</th>", item.mt_remake); 28 ber.AppendFormat("<th>{0}</th>", item.mt_sort); 29 ber.Append("</tr>"); 30 } 31 32 33 ber.Append("</tbody>"); 34 ber.Append("</table>"); |
我们将数据填充完毕以后获得到的将是字符串文本,然后我们则通过以下方法导出Excel文件
1)通用输出流方法
/// <summary> /// 输入HTTP头,然后把指定的流输出到指定的文件名,然后指定文件类型 /// </summary> /// <param name="OutType">输出类型</param> /// <param name="FileName">文件名称</param> /// <param name="ExcelContent">内容</param> public void ExportToExcel(string OutType, string FileName, string dataSource) { lock (this) { System.Web.HttpContext.Current.Response.Charset = "UTF-8"; System.Web.HttpContext.Current.Response.ContentEncoding = System.Text.Encoding.UTF8; System.Web.HttpContext.Current.Response.AppendHeader("Content-Disposition", "attachment;filename=" + HttpUtility.UrlEncode(FileName, System.Text.Encoding.UTF8).ToString()); System.Web.HttpContext.Current.Response.ContentType = OutType; System.IO.StringWriter tw = new System.IO.StringWriter(); System.Web.HttpContext.Current.Response.Output.Write(dataSource); System.Web.HttpContext.Current.Response.Flush(); System.Web.HttpContext.Current.Response.End(); } } |
2)调用方法获取Excel文件下载
1 string data =GetMySourceStr(); 2 ExportToExcel("application/ms-excel", "导出Excel文件.xls", data); |
这里要注意参数:
string OutType:application/ms-excel输出方式;
string FileName:指定文件的名称+.xls,后缀我们最好不要更改,默认.xls即可;
string dataSource:拼接好的数据源字符串;
此时整体下来我们便可以完成简单的Excel表格导出功能了。
2、第三方插件进行Excel导出
网上推荐使用:NPOI导出。以下是百度百科的介绍:
NPOI是指构建在POI 3.x版本之上的一个程序,NPOI可以在没有安装Office的情况下对Word或Excel文档进行读写操作。
POI是一个开源的Java读写Excel、WORD等微软OLE2组件文档的项目。
可以看出NPOI的优势在于独立性,不依赖于Office去完成一系列操作,针对Java和C#都可以使用;其官方网址:NPOI官方网站,由于暂时还未采用第三方插件进行导出,暂不对此进行介绍。而对于B\S端我个人更推荐使用此方法,因为它的一些基本操作以及相关的依赖,NPOI对于格式和生成的速度都是有一定优势的。
3、微软提供的microsoft.office.interop.excel.dll
microsoft.office.interop.excel.dll是针对COM+的包装,它便于在托管代码中使用,依赖本地安装的Office软件。如果本地未安装Office则此方法不适合操作Excel以及其他相关如:

这些都是微软其Office产品提供的插件,唯一的缺点则是依赖性,我们在本地开发需要安装Office,部署在服务器也是需要安装Office,在B\S端的响应速度不是太好。
1)DLL引用
Microsoft.Office.Interop.Excel.dll、Microsoft.Office.core.dll
2)引用方式
Microsoft.Office.Interop.Excel.dll:

通过NuGet包管理器进行安装,要与本地Office版本相对应。
Microsoft.Office.core.dll:
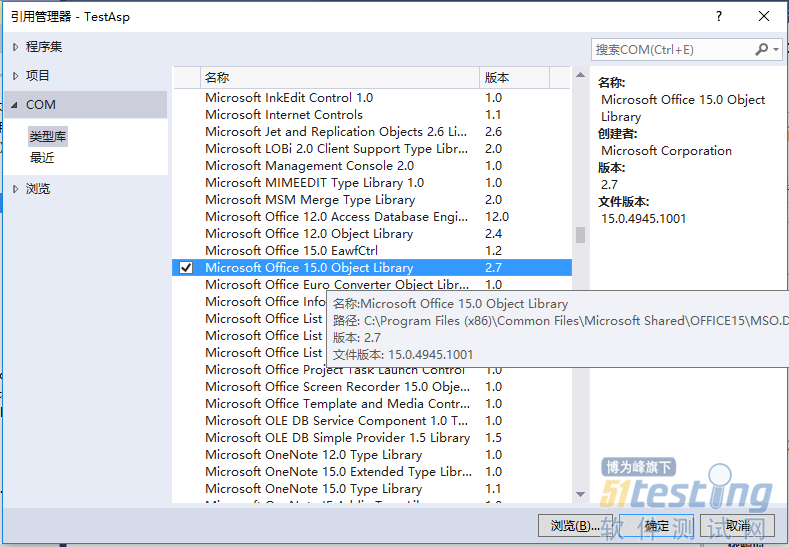
通过项目的右键>添加引用>COM>类型库 --查找-->Microsoft Office 15.0 Object Library(此处针对Office2013,其它版本可以查找相应的Microsoft Office xx.0 Object Library)。
3)使用方法
a.引入命名空间
我们可以直接引入一下命名空间:
using Microsoft.Office.Interop.Excel;
也可以这样引入:
using OfcExcel = Microsoft.Office.Interop.Excel;
这样做主要是针对较长方法的简写。
b.方法的实现

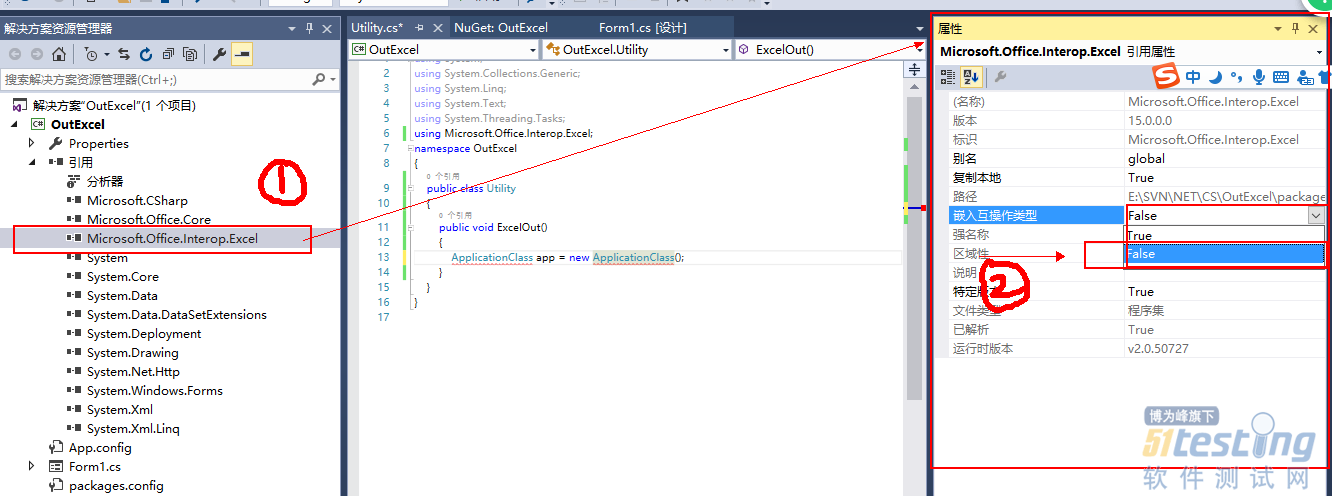
我们首先创建一个ApplicationClass对象,但是发现似乎提示了一个错误,第一次使用的时候发现代码并没用什么问题,后来查阅了一些文档和教程我们只需要做一下操作便可以解决:
在引用中找到Microsoft.Office.Interop.Excel查看属性->嵌入互操作类型由True改为False即可。
再编写以下代码:
1 using System; 2 using System.Collections.Generic; 3 using System.Linq; 4 using System.Text; 5 using System.Threading.Tasks; 6 using Microsoft.Office.Interop.Excel; 7 using System.Drawing; 8 using System.IO; 9 10 namespace OutExcel 11 { 12 public class Utility 13 { 14 public static void ExcelOut() 15 { 16 17 ApplicationClass app = new ApplicationClass(); 18 19 /*针对Excel 对象及工作簿单元格操作*/ 20 Workbook workbook_1 = (Workbook)app.Workbooks.Add(true);//添加workbook 21 Worksheet worksheet_1 = (Worksheet)workbook_1.Worksheets[1];//选择第一个,即默认的工作簿 22 Range sheet_cells = worksheet_1.Cells;//工作簿单元格 23 24 string[] columns = new string[] { "系统", "设备信息", "类别", "代码", "名称", "型号", "单位", "数量", "备注" };//列数 25 int row = 1;//默认行数 26 Range rg = sheet_cells.Range[app.Cells[row, 1], app.Cells[row, columns.Length]];//选择光标-----选择第一行 1 到10列 27 rg.Merge(false);//合并单元格 28 rg.Value2 = "内容";//设置选中单元格内容 29 row++;//下移一行 30 31 32 for (int index = 0; index < columns.Length; index++) 33 { 34 sheet_cells[row, index + 1] = columns[index];//设置列标题内容 35 } 36 37 rg = sheet_cells.Range[app.Cells[1, 1], app.Cells[row, columns.Length]];//选择标题头 38 39 /*针对选中单元格样式设置*/ 40 rg.Borders.LineStyle = XlLineStyle.xlContinuous; 41 rg.HorizontalAlignment = XlHAlign.xlHAlignCenter; 42 rg.VerticalAlignment = XlHAlign.xlHAlignCenter; 43 rg.Interior.Color = Color.Yellow; 44 45 string path_ = AppDomain.CurrentDomain.BaseDirectory.ToString()+ "excel导出.xlsx"; 46 if (File.Exists(path_)) 47 { 48 File.Delete(path_); 49 } 50 try 51 { 52 workbook_1.SaveAs(path_, Type.Missing, Type.Missing, Type.Missing, Type.Missing, Type.Missing , XlSaveAsAccessMode.xlNoChange, 1, false, Type.Missing, Type.Missing, Type.Missing); 53 54 } 55 catch (Exception ex) 56 { 57 path_ = null; 58 } 59 finally 60 { 61 workbook_1.Close(true, path_, Type.Missing); 62 workbook_1 = null; 63 } 64 } 65 } 66 } |
以上代码只是参考示例基础操作,你可以使用过程中对常用方法进行封装。
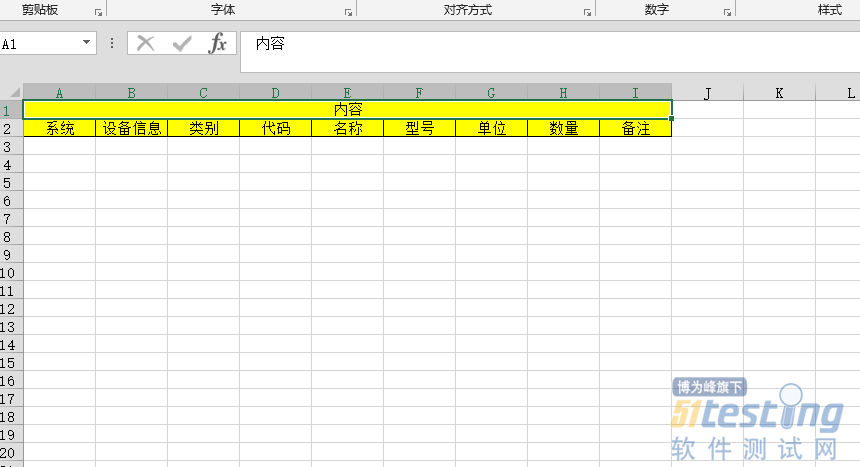
C\S端再调用此方法时会在Debug目录下生成:

B\S生成则在根目录下,我们可以指定自己存放的路径。
生成结果:
此时针对Microsoft.Office.Interop.Excel.dll操作基本完成,而针对它的操作方法可以查阅相关文档即可实现。对于B\S调用出现的问题可以参考下面的方法解决。
二、提示的错误信息
1、导出Excel提示信息错误
检索 COM 类工厂中 CLSID 为 {00024500-0000-0000-C000-000000000046} 的组件失败,原因是出现以下错误: 8000401a 因为配置标识不正确,系统无法开始服务器进程。请检查用户名和密码。 (异常来自 HRESULT:0x8000401A)。
1)问题表现
服务器断开连接,导出功能报错即以上错误。服务器登陆,导出正常。
2)分析
账号的登陆与断开,表现为账户所属权限问题。
3)解决过程
参照着网上的一些教程总结,得出一下方法:
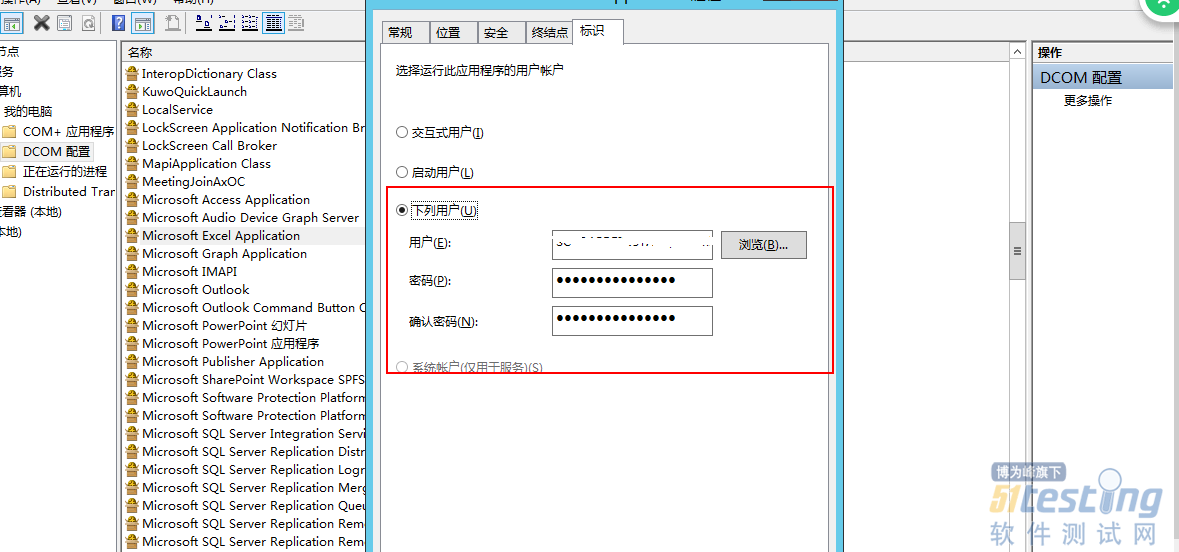
a.设置DCOM
win+r键,输入:dcomcnfg.exe 调出=》组件服务
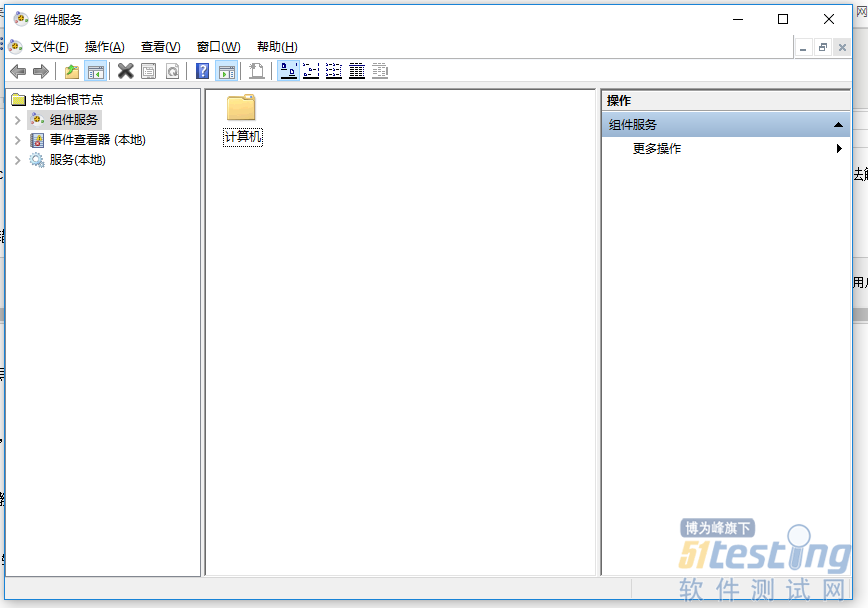
选择 组件服务>计算机>我的电脑>DCOM 配置 --查找-->Microsoft Excel Application
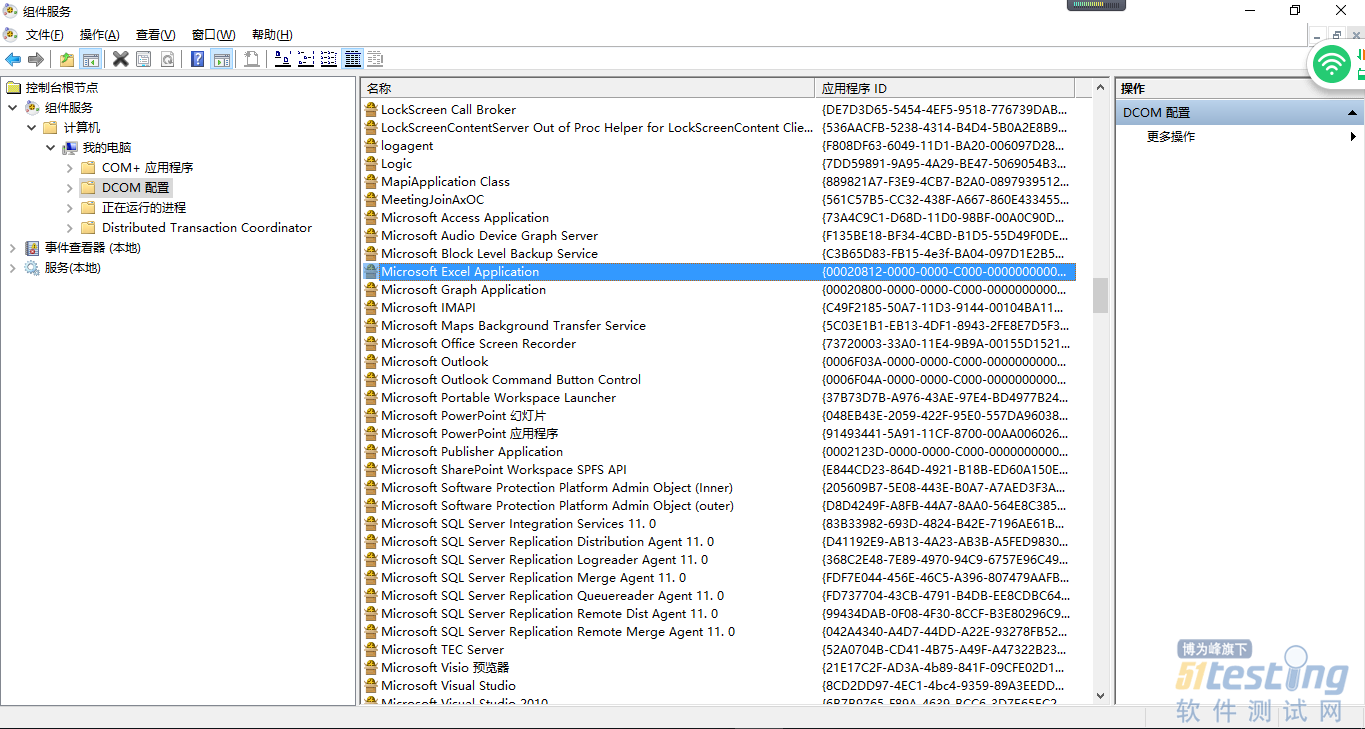
右键>属性>安全,设置如下
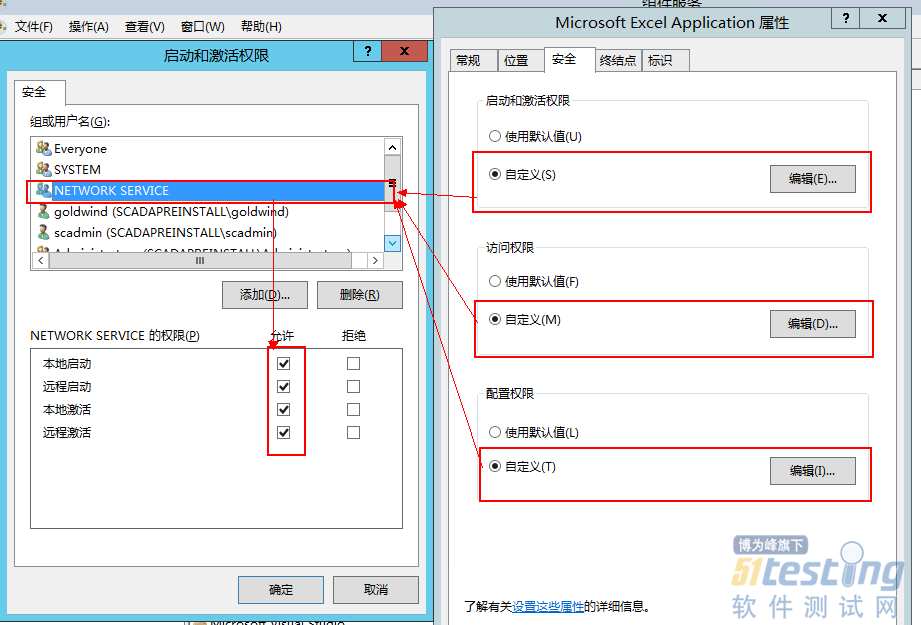
标识设置:
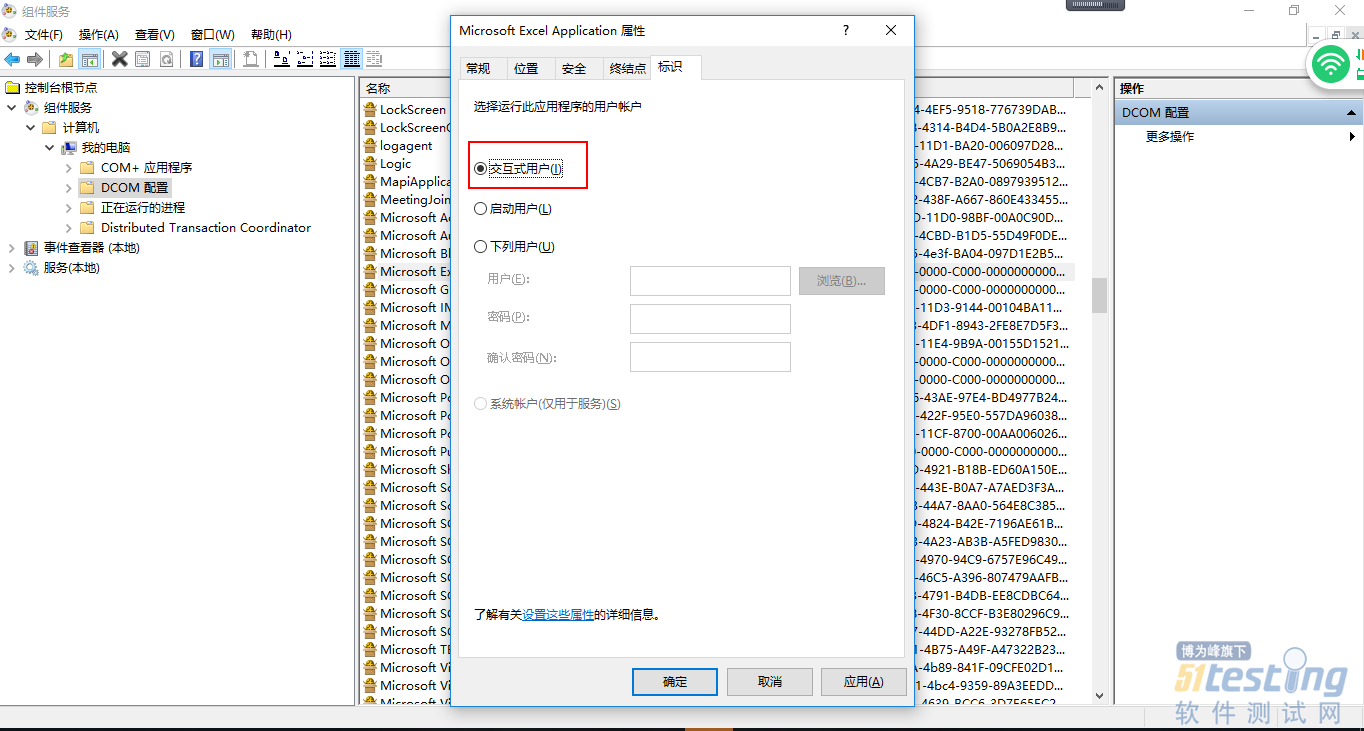
如果此时还是报错,则可以考虑设置 标识 为 下列用户 即指定一个用户:
保存配置在关闭,断开服务器连接,导出Excel不在报8000401A错误。


