

Tsung安装
单机部署
Tsung基于erlang,因此需要安装erlang运行环境otp(依赖ncurses-devel)
安装ncurses-devel: yum install -y ncurses-devel
安装erlang( erlang下载可到 http://www.erlang.org/downloads ),以安装17.5为例:
tar -zxvf otpsrc17.5.tar.gz
cd otpsrc17.5
./configure
make
make install
检查安装是否成功: erl -version
安装tsung( tsung下载可到 http://tsung.erlang-projects.org ),以1.6.0为例:
tar -zxvf tsung-1.6.0.tar.gz
cd tsung-1.6.0
./configure --prefix=/usr/local/tsung
make
make install
将tsung路径(/usr/local/tsung/bin)加入到PATH下
检查安装是否成功:tsung -version
集群部署
每台机器上完成单机部署步骤(保证每台机器上的tsung和erlang版本及安装路径一致)
设置通过计算机名可以使用ssh无密码访问
每台机器的/etc/hosts配置集群的ip和计算机名的对应关系
配置ssh无密码访问:生成密钥 ssh-keygen -t rsa
复制公钥到需要访问该计算机的机器上:ssh-copy-id -i ~/.ssh/id_rsa.pub root@<conmputer_name>
检查机器间可以通过erlang进行通信
ssh是否可以通过机器名相互无密码访问
集群的每台机器上tsung和erlang的地址,版本是否一致
防火墙是否关闭
在终端输入:erl -rsh ssh -sname foo -setcookie mycookie,在提示符下执行以下语句:
slave:start(remotehost,bar,"-setcookie mycookie").
如果返回{ok,bar@remotehost},则集群部署成功
如果返回{error,timeout},则可以检查以下配置是否正确
Tsung使用
tsung.xml文件介绍
Tsung 示例脚本见文档最后。以下介绍常用的标签及其配置。 一般在测试时,需要关注clients,servers,load,options,sessions这几个标签
clients 标签配置tsung集群的信息。 如果是使用单机压测,clients标签可参考下方配置(注意 tsung启动时通过计算机名称启动相应的controller和slave,因此host要配置为计算机名)
<clients> <client host="server85" use_controller_vm="true" /></clients> |
如果是集群压测,clients标签可参考下方配置
<clients> <client host="kafka74" weight="1" maxusers="60000" cpu="6"/> <client host="server85" weight="1" maxusers="60000" cpu="6"/></clients> |
其中weight代表集群中各个tsung所在机器发起的请求的权重;同时需要配置cpu属性,其值和机器的cpu核数相等
maxusers是单进程可打开的socket数量(linux机器,检查 ulimit -n的值;理论上tsung单机可以启动上万个用户。 当单机用户数超过30000时,可考虑在options下添加端口号配置
server 标签配置被压测服务的信息。host为提供服务的机器ip,port为服务的端口号,比如最终压测请求的url为 http://X.Y.Z.XYZ:8090/xxx ,则host配置为X.Y.Z.XYZ,port配置为8090。
weight的含义为当多台机器提供同一服务时,每台机器接受的客户端请求的权重。type可以是tcp, ssl, udp,websocket
<!-- Server side setup --><servers> <server host="X.Y.Z.1" port="8081" weight="2" type="tcp"></server> <server host="X.Y.Z.2" port="8081" weight="1" type="tcp"></server></servers> |
load标签下配置tsung启动虚拟用户的方式
load标签可添加duration和unit属性,含义为在duration设置的时间段内结束tsung的进程,无论压测是否结束;unit可以是second,minute,hour
arrivalphase可以设置多个,通过phase属性区分不同的测试流程阶段(一般在需要测试应用在不同用户下的性能时使用,如突发大流量请求等场景)。
maxnumber为该phase时的启动用户数(并发数),arrivalrate表示单位时间下生成用户的数量,
interarrival表示生成用户的时间间隔。如下phase1和phase2的配置的均表示在1s内启动10个用户
<load duration="20" unit="minute"> <arrivalphase phase="1" duration="1" unit="minute"> <users maxnumber="10" arrivalrate="10" unit="second"/> </arrivalphase> <arrivalphase phase="2" duration="2" unit="minute"> <users maxnumber="200" interarrival="0.1" unit="second"/> </arrivalphase></load> |
options标签配置访问url使用的全局配置,如request间的thinkTime,tcp的buff size,http agent等。
<options> <option type="ts_http" name="user_agent"> <user_agent probability="80">Mozilla/5.0 (X11; U; Linux i686; en-US; rv:1.7.8) Gecko/20050513 Galeon/1.3.21</user_agent> <user_agent probability="20">Mozilla/5.0 (Windows; U; Windows NT 5.2; fr-FR; rv:1.7.8) Gecko/20050511 Firefox/1.0.4</user_agent> </option> <option name="ports_range" min="1025" max="65535"/></options> |
sessions 标签配置具体请求的权重等信息,如下为http请求示例
probability表示请求url的频率,所有session的probability相加和应为100
for中表示每个请求的循环次数,如启动20个用户,for设置为1-50,则请求被发送20*50次
http标签下为http请求的uri(完整url需组合server标签的配置,该标签下可增加http_header,cookie等标签
method为具体的http请求类型,支持GET,POST等,注意如果GET或者POST包含多个参数,参数之间需要通过 ; 连接
如果每个request间需要增加等待时间,可增加thinktime标签
<sessions> <session name="http-example1" probability="57" type="ts_http"> <for from="1" to="5000" var="i"> <request> <http url="test/rest/shop/product/list/v1?api_key=1&app_name=1" method="GET" version="1.1"> <http_header name="Accept-Encoding" value="gzip"/> </http> </request> <thinktime value="0.001"/> </for> </session> <session name="http-example2" probability="43" type="ts_http"> <for from="1" to="5000" var="i"> <request> <http url="/test/rest/shop/goods/detail/v3" method="POST" version="1.1" contents="bla=blu&name=glop"> </http> </request> </for> </session> </sessions> |
启动tsung
准备tsung脚本文件(如上面的tsung.xml格式)
如果tsung脚本文件的名字为tsung.xml,可以直接执行 tsung start启动压力测试
如果tsung脚本文件的名字为其他,则可以通过增加-f参数指定使用的tsung脚本,如下图所示:
查看tsung运行时状态: http://tsungIP:8091

解析tsung log
Tsung执行脚本后,日志默认生成在/root/.tsung/log下,文件夹的名字以启动tsung时的时间戳命名。解析日志文件可参考一下步骤:
生成可视化的报告(先安装perl Template Toolkit(下载地址 http://template-toolkit.org/download/index.html )),参考官网步骤安装
tar -xzxf Template-Toolkit-2.26.tar.gz
cd Template-Toolkit-2.26
perl Makefile.PL
make
sudo make install
安装gnuplot, yum install -y gnuplot
执行perl脚本,生成tsung的report.html文件。
进入log文件夹: cd <logPath>
执行 /usr/bin/perl /usr/local/tsung/lib/tsung/bin/tsung_stats.pl,同目录下生成report.html

执行python -m SimpleHTTPServer,启动一个本地的http服务,通过浏览器访问 http://:8000/report.html,查看tsung的执行结果


解读报告
tps信息可以直接参考“HTTP return code”部分的结果(tsung自1.4之后,会分别打印出最快的10s内的tps和整个压测时间的平均tps)
同时可以关注return Code的值,如下图所示,所有请求的returnCode均为404,那么该压测脚本请求的url应存在问题,需要去检查一下脚本
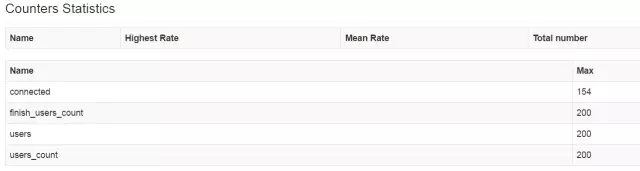
另外可以看一下tsung建立的用户数,比如设置了启动200个用户,那么可以看一下最终启动tsung后,是否真正启动了这么多的用户

Example : tsung.xml
<?xml version="1.0"?><!DOCTYPE tsung SYSTEM "/usr/local/tsung/share/tsung/tsung-1.0.dtd"> <!-- tsung输出的日志级别,从高到低依次为emergency,critical,error,warning,notice(default),info,debug --> <tsung loglevel="notice" version="1.0"> <!-- Tsung Client side setup 集群配置--> <!-- 当单机用户数超过30000时,可考虑在options下添加<option name="ports_range" min="1025" max="65535"/>--> <clients> <client host="kafka74" weight="1" maxusers="60000" cpu="6"/> <client host="server85" weight="1" maxusers="60000" cpu="6"/> </clients> <!-- Server side setup --> <servers> <server host="X.Y.Z.72" port="8081" weight="2" type="tcp"></server> <server host="X.Y.Z.73" port="8081" weight="1" type="tcp"></server> </servers> <!-- to start os monitoring (cpu, network, memory). Use an erlang agent on the remote machine or SNMP. erlang is the default --> <monitoring> <monitor host="X.Y.Z.72" type="snmp"></monitor> </monitoring> <!-- 为load添加duration和unit属性,以在duration设置的时间段内结束tsung的进程,无论压测是否结束;unit可以是second,minute,hour --> <load duration="20" unit="minute"> <!-- several arrival phases can be set: for each phase, you can set the mean inter-arrival time between new clients and the phase duration --> <arrivalphase phase="1" duration="5" unit="minute"> <users maxnumber="200" arrivalrate="200" unit="second"/> </arrivalphase> </load> <options> <option type="ts_http" name="user_agent"> <user_agent probability="80">Mozilla/5.0 (X11; U; Linux i686; en-US; rv:1.7.8) Gecko/20050513 Galeon/1.3.21</user_agent> <user_agent probability="20">Mozilla/5.0 (Windows; U; Windows NT 5.2; fr-FR; rv:1.7.8) Gecko/20050511 Firefox/1.0.4</user_agent> </option> <option name="ports_range" min="1025" max="65535"/> </options> <!-- start a session for a http user. the probability is the frequency of this type os session. The sum of all session's probabilities must be 100 --> <sessions> <session name="http-example1" probability="57" type="ts_http"> <for from="1" to="5000" var="i"> <request> <http url="/test/rest/shop/product/list/v1?api_key=1&app_name=1" method="GET" version="1.1"> <http_header name="Accept-Encoding" value="gzip"/> </http> </request> <thinktime value="0.001"/> </for> </session> <session name="http-example2" probability="28" type="ts_http"> <for from="1" to="5000" var="i"> <request> <http url="/test/rest/shop/goods/detail/v3" method="POST" version="1.1" contents="bla=blu&name=glop"> <!--http_header name="Accept-Encoding" value="gzip"/>--> </http> </request> </for> </session> <session name="http-example3" probability="15" type="ts_http"> <for from="1" to="5000" var="i"> <request> <http url="/test/rest/shop/brand/list/v2?age_group=10" method="GET" version="1.1"> <!--http_header name="Accept-Encoding" value="gzip"/>--> </http> </request> </for> </session> </sessions> </tsung> |


