显而易见,只要是对hdfs上的文件进行操作,必须对FileSystem进行初始化,我们先来分析FileSystem的初始化:
1 public static FileSystem get(URI uri, Configuration conf) throws IOException { 2 return CACHE.get(uri, conf);//部分方法我只截取了部分代码,这里进入get()方法 3 } 1 FileSystem get(URI uri, Configuration conf) throws IOException{ 2 Key key = new Key(uri, conf); 3 return getInternal(uri, conf, key);//调用getInternal() 4 } |
1 private FileSystem getInternal(URI uri, Configuration conf, Key key) throws IOException{ 2 //使用单例模式创建FileSystem,这是由于FS的初始化需要大量的时间,使用单例保证只是第一次加载慢一些,返回FileSystem的子类实现DistributedFileSystem 3 FileSystem fs; 4 synchronized (this) { 5 fs = map.get(key); 6 } 7 if (fs != null) { 8 return fs; 9 } 10 11 fs = createFileSystem(uri, conf); 12 synchronized (this) { // refetch the lock again 13 FileSystem oldfs = map.get(key); 14 if (oldfs != null) { // a file system is created while lock is releasing 15 fs.close(); // close the new file system 16 return oldfs; // return the old file system 17 } 18 19 // now insert the new file system into the map 20 if (map.isEmpty() 21 && !ShutdownHookManager.get().isShutdownInProgress()) { 22 ShutdownHookManager.get().addShutdownHook(clientFinalizer, SHUTDOWN_HOOK_PRIORITY); 23 } 24 fs.key = key; 25 map.put(key, fs); 26 if (conf.getBoolean("fs.automatic.close", true)) { 27 toAutoClose.add(key); 28 } 29 return fs; 30 } 31 } |
1 public void initialize(URI uri, Configuration conf) throws IOException { 2 super.initialize(uri, conf); 3 setConf(conf); 4 5 String host = uri.getHost(); 6 if (host == null) { 7 throw new IOException("Incomplete HDFS URI, no host: "+ uri); 8 } 9 homeDirPrefix = conf.get( 10 DFSConfigKeys.DFS_USER_HOME_DIR_PREFIX_KEY, 11 DFSConfigKeys.DFS_USER_HOME_DIR_PREFIX_DEFAULT); 12 13 this.dfs = new DFSClient(uri, conf, statistics);//实例化DFSClient,并将它作为DistributedFileSystem的引用,下面我们跟进去 14 this.uri = URI.create(uri.getScheme()+"://"+uri.getAuthority()); 15 this.workingDir = getHomeDirectory(); 16 } |
1 public DFSClient(URI nameNodeUri, ClientProtocol rpcNamenode, 2 Configuration conf, FileSystem.Statistics stats) 3 throws IOException { 4 //该构造太长,楼主只截取了重要部分给大家展示,有感兴趣的同学可以亲手进源码瞧瞧 5 NameNodeProxies.ProxyAndInfo<ClientProtocol> proxyInfo = null; 6 //这里声明了NameNode的代理对象,跟我们前面讨论的rpc就息息相关了 7 if (proxyInfo != null) { 8 this.dtService = proxyInfo.getDelegationTokenService(); 9 this.namenode = proxyInfo.getProxy(); 10 } else if (rpcNamenode != null) { 11 Preconditions.checkArgument(nameNodeUri == null); 12 this.namenode = rpcNamenode; 13 dtService = null; 14 } else { 15 Preconditions.checkArgument(nameNodeUri != null, 16 "null URI"); 17 proxyInfo = NameNodeProxies.createProxy(conf, nameNodeUri, 18 ClientProtocol.class, nnFallbackToSimpleAuth); 19 this.dtService = proxyInfo.getDelegationTokenService(); 20 this.namenode = proxyInfo.getProxy();//获取NameNode代理对象引用并自己持有,this.namenode类型为ClientProtocol,它是一个接口,我们看下这个接口 21 } 22 } |
1 public interface ClientProtocol{ 2 public static final long versionID = 69L; 3 //还有很多对NameNode操作的方法申明,包括对文件上传,下载,删除等 4 //楼主特意把versionID贴出来了,这就跟我们写的RPCDemo中的MyBizable接口完全类似,所以说Client一旦拿到该接口实现类的代理对象(NameNodeRpcServer),Client就可以实现与NameNode的RPC通信,我们继续跟进 5 } |
1 public static <T> ProxyAndInfo<T> createProxy(Configuration conf, 2 URI nameNodeUri, Class<T> xface, AtomicBoolean fallbackToSimpleAuth) 3 throws IOException { 4 AbstractNNFailoverProxyProvider<T> failoverProxyProvider = 5 createFailoverProxyProvider(conf, nameNodeUri, xface, true, 6 fallbackToSimpleAuth); 7 if (failoverProxyProvider == null) { 8 // 如果不是HA的创建方式,楼主环境是伪分布式,所以走这里,我们跟进去 9 return createNonHAProxy(conf, NameNode.getAddress(nameNodeUri), xface, 10 UserGroupInformation.getCurrentUser(), true, fallbackToSimpleAuth); 11 } else { 12 // 如果有HA的创建方式 13 Conf config = new Conf(conf); 14 T proxy = (T) RetryProxy.create(xface, failoverProxyProvider, 15 RetryPolicies.failoverOnNetworkException( 16 RetryPolicies.TRY_ONCE_THEN_FAIL, config.maxFailoverAttempts, 17 config.maxRetryAttempts, config.failoverSleepBaseMillis, 18 config.failoverSleepMaxMillis)); 19 return new ProxyAndInfo<T>(proxy, dtService, 20 NameNode.getAddress(nameNodeUri)); 21 } 22 } |
最终返回的为ClientProtocol接口的子类代理对象,而NameNodeRpcServer类实现了ClientProtocol接口,因此返回的为NameNode的代理对象,当客户端拿到了NameNode的代理对象后,即与NameNode建立了RPC通信:
1 private static ClientProtocol createNNProxyWithClientProtocol( 2 InetSocketAddress address, Configuration conf, UserGroupInformation ugi, 3 boolean withRetries, AtomicBoolean fallbackToSimpleAuth) 4 throws IOException { 5 RPC.setProtocolEngine(conf, ClientNamenodeProtocolPB.class, ProtobufRpcEngine.class);//是不是感觉越来越像我们前面说到的RPC 6 7 final RetryPolicy defaultPolicy = 8 RetryUtils.getDefaultRetryPolicy(//加载默认策虐 9 conf, 10 DFSConfigKeys.DFS_CLIENT_RETRY_POLICY_ENABLED_KEY, 11 DFSConfigKeys.DFS_CLIENT_RETRY_POLICY_ENABLED_DEFAULT, 12 DFSConfigKeys.DFS_CLIENT_RETRY_POLICY_SPEC_KEY, 13 DFSConfigKeys.DFS_CLIENT_RETRY_POLICY_SPEC_DEFAULT, 14 SafeModeException.class); 15 16 final long version = RPC.getProtocolVersion(ClientNamenodeProtocolPB.class); 17 //看到versionId了吗?这下明白了rpc的使用中目标接口必须要有这个字段了吧 18 ClientNamenodeProtocolPB proxy = RPC.getProtocolProxy( 19 ClientNamenodeProtocolPB.class, version, address, ugi, conf, 20 NetUtils.getDefaultSocketFactory(conf), 21 org.apache.hadoop.ipc.Client.getTimeout(conf), defaultPolicy, 22 fallbackToSimpleAuth).getProxy(); 23 //看到没?这里使用 RPC.getProtocolProxy()来创建ClientNamenodeProtocolPB对象,调试时可以清楚的看见,该对象引用的是一个代理对象,值为$Proxy12,由JDK的动态代理来实现。 24 //前面我们写RPCDemo程序时,用的是RPC.getProxy(),但是各位大家可以去看RPC源码,RPC.getProtocolProxy()最终还是调用的getProxy() 25 if (withRetries) { 26 Map<String, RetryPolicy> methodNameToPolicyMap 27 = new HashMap<String, RetryPolicy>(); 28 ClientProtocol translatorProxy = 29 new ClientNamenodeProtocolTranslatorPB(proxy); 30 return (ClientProtocol) RetryProxy.create(//这里再次使用代理模式对代理对象进行包装,也可以理解为装饰者模式 31 ClientProtocol.class, 32 new DefaultFailoverProxyProvider<ClientProtocol>( 33 ClientProtocol.class, translatorProxy), 34 methodNameToPolicyMap, 35 defaultPolicy); 36 } else { 37 return new ClientNamenodeProtocolTranslatorPB(proxy); 38 } 39 } |
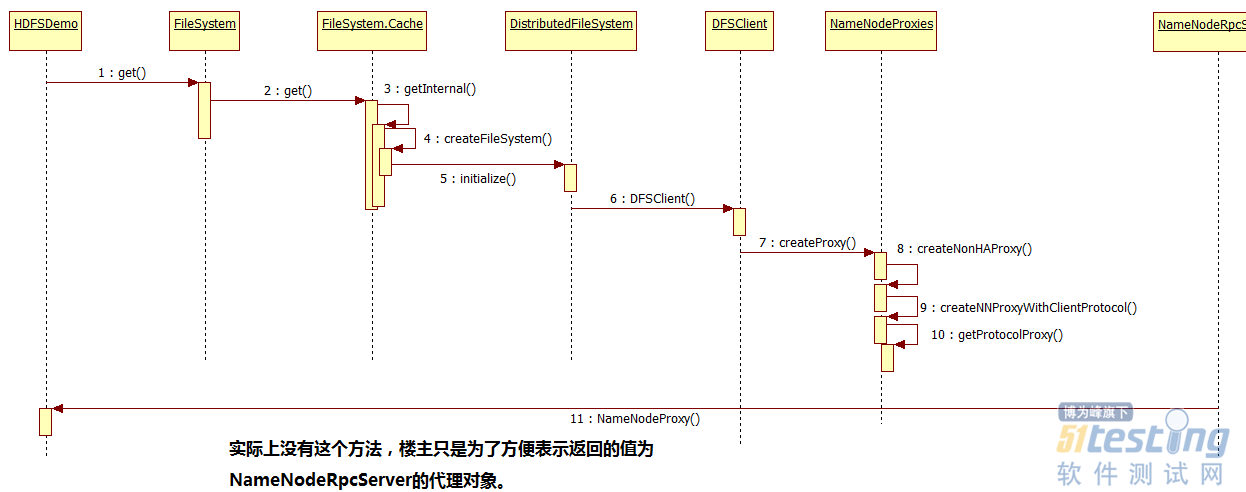
整个FileSystem的初始化用时序图表示为:
到此,FileSystem的初始化就基本完成。由于文章篇幅过大的问题,所以楼主把HDFS原理及源码分析拆分成了两部分,上半部分主要是HDFS原理与FileSystem的初始化介绍,那在下半部分将会具体介绍HDFS文件上传、下载的源码解析。
另外,文章用到的一些示例代码,将会在下半部分发布后,楼主一起上传到GitHub。