引入
在 build.gradle 文件中
dependencies {
testCompile 'junit:junit:4.12'
}
这其中会引入两个jar:junit-4.12.jar 和 hamcrest-core-1.3.jar
介绍
junit 中两个重要的类 Assume 和 Assert, 以及其他一些重要的注解:BeforeClass,AfterClass,After,Before 及 Test,Ignore。
其中,BeforeClass 和 AfterClass 在每个类加载的开始和结束时运行,需要设置 static 方法;而 Before和After 则是在每个测试方法的开始之前和结束之后运行。
在 hamcrest-core 的 jar 包中,在 org.hamcrest.core 包中提供了一系列操作运算封装,使测试代码更加地易读。如is,not,allOf,anyOf等。
代码示例
@Test public void testAssertArrayEquals() { byte[] expected = "trial".getBytes(); byte[] actual = "trial".getBytes(); assertArrayEquals("failure - byte arrays not same", expected, actual); } @Test public void testAssertEquals() { assertEquals("failure - strings are not equal", "text", "text"); } @Test public void testAssertFalse() { assertFalse("failure - should be false", false); } @Test public void testAssertNotNull() { assertNotNull("should not be null", new Object()); } @Test public void testAssertNotSame() { assertNotSame("should not be same Object", new Object(), new Object()); } @Test public void testAssertNull() { assertNull("should be null", null); } @Test public void testAssertSame() { Integer aNumber = Integer.valueOf(768); assertSame("should be same", aNumber, aNumber); } @Test public void testAssertTrue() { assertTrue("failure - should be true", true); } |
以上代码来自官方介绍的 Demo , 列举的是常用而又基础的操作,但遇到复杂的集合判断操作,就力不从心了,不过 Junit 提供了另一更为强大的 assertThat 方法,首先来看看它的使用:
// JUnit Matchers assertThat @Test public void testAssertThatBothContainsString() { assertThat("albumen", both(containsString("a")).and(containsString("b"))); } @Test public void testAssertThatHasItems() { assertThat(Arrays.asList("one", "two", "three"), hasItems("one", "three")); } @Test public void testAssertThatEveryItemContainsString() { assertThat(Arrays.asList(new String[] { "fun", "ban", "net" }), everyItem(containsString("n"))); } // Core Hamcrest Matchers with assertThat @Test public void testAssertThatHamcrestCoreMatchers() { assertThat("good", allOf(equalTo("good"), startsWith("good"))); assertThat("good", not(allOf(equalTo("bad"), equalTo("good")))); assertThat("good", anyOf(equalTo("bad"), equalTo("good"))); assertThat(7, not(CombinableMatcher.<Integer>either(equalTo(3)).or(equalTo(4)))); assertThat(new Object(), not(sameInstance(new Object()))); } |
这里的 assertThat 用了两种方法:一个是 JunitMatchers ,另一个就是 hamcrest matchers 的 assertThat,不过后者提供的功能相当强大,前者的方法已经标为废弃了。
另外,官方也提及了其它第三方提供的 Matchers 实现:
Excel spreadsheet matchers
JSON matchers
XML/XPath matchers
所以再次我们只看后者,可以看出来的是其方法的最后一个参数非常灵活,紧接着我们看看其怎么实现的?
assertThat 方法实现
public static <T> void assertThat(T actual, Matcher<? super T> matcher) {
assertThat("", actual, matcher);
}
public static <T> void assertThat(String reason, T actual,
Matcher<? super T> matcher) {
MatcherAssert.assertThat(reason, actual, matcher);
}
再定位到 MatcherAssert 类的方法 assertThat:
public static <T> void assertThat(String reason, T actual, Matcher<? super T> matcher) {
if (!matcher.matches(actual)) {
Description description = new StringDescription();
description.appendText(reason)
.appendText("\nExpected: ")
.appendDescriptionOf(matcher)
.appendText("\n but: ");
matcher.describeMismatch(actual, description);
throw new AssertionError(description.toString());
}
}
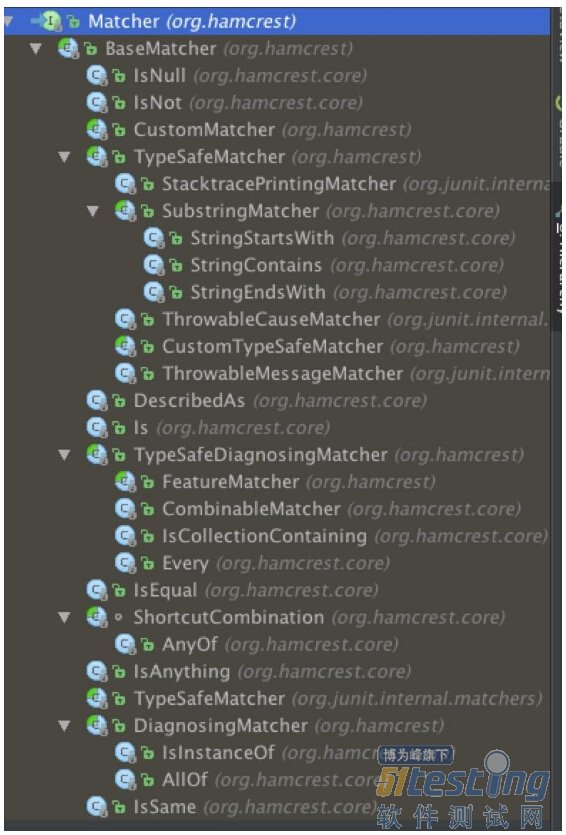
可以看出真正地判断方法是通过 Matcher 类的 matches 方法,若是不满足的话,则返回 AssertionError。所以真正的核心就是 Matcher,而关于它的实现都在 hamcrest-core-1.3 包中,看看其实现的类结构图:
看一下其的实现,就可发现上文提到的 is , anyof 等等静态方法都是返回一个相应的 Matcher,这样通过一个简单的抽象,在这里就提供了极大的灵活性。若是感觉它提供的这些不满足的话,也可自己进行来进行重写,按自己的需求来定制实现。
Rule 介绍
同样地,当我们越来越多需要进行单元测试时,就需要使用 Rule 来帮忙了。其主要目的是针对一个测试类中的每个单元测试方法进行统一添加一些行为。代码则使用 @Rule 注解的形式来添加至类的属性上。
在 Junit 框架中,其相对应的接口是 TestRule,而主要的实现有:
ErrorCollector: 将大量的错误收集起来
ExpectedException: 对抛出的错误做断言
ExternalResource: 可对测试方法的开始和结束添加回调
TemporaryFolder: 用来创建文件,并在测试结束时自动删除
TestName: 用来获取测试所执行的方法名称
TestWatcher: 可在测试方法的执行期间添加逻辑
Timeout: 超过固定的时间让测试结束
Verifier: 当状态不正确时,可让测试结束
它们的更多使用方法,可参照官网的 Rules 介绍。
实现原理分析
Junit4 中的测试代码可被执行,是因为其真正的入口是名为 JUnitCore。它作为 Junit 的 Facade (门面)模式,来对外进行交互。另外,其有一个静态的 main 方法:
public static void main(String... args) {
Result result = new JUnitCore().runMain(new RealSystem(), args);
System.exit(result.wasSuccessful() ? 0 : 1);
}
所以,当我们执行单元测试的时候,其实也就是运行了一个新的进程应用程序,其入口就在这里。我们执行分析的时候,也从这里开始:
其会调到一个 run(Runner runner) 的方法,而 Runner 是一个抽象类,其实现针对不同的平台又有好多个。这里主要提及两个,一个是 Junit4ClassRunner,它是 4.4 版本及之前的采用的,之后被废弃掉了,而采用了继承实现抽象类 ParentRunner 的 BlockJUnit4ClassRunner 类,它在 4.5 之后被采用。这里主要查看后者,先看 ParentRunner 对其接口 Runner 中方法 run 的实现:
@Override public void run(final RunNotifier notifier) { EachTestNotifier testNotifier = new EachTestNotifier(notifier, getDescription()); try { Statement statement = classBlock(notifier); statement.evaluate(); } catch (AssumptionViolatedException e) { testNotifier.addFailedAssumption(e); } catch (StoppedByUserException e) { throw e; } catch (Throwable e) { testNotifier.addFailure(e); } } |
其中,主要通过 classBlock 方法生成的 Statement 的 evaluate来进行调用,先看它是怎么生成的:
protected Statement classBlock(final RunNotifier notifier) {
Statement statement = childrenInvoker(notifier);
if (!areAllChildrenIgnored()) {
statement = withBeforeClasses(statement);
statement = withAfterClasses(statement);
statement = withClassRules(statement);
}
return statement;
}
这里主要的方法 childrenInvoker 会调用一个抽象的方法 protected abstract void runChild(T child, RunNotifier notifier);,它则是由子类来实现。另外看到的是,当测试类中的测试方法都没有被忽略的时候,则会使用 with对应的三个方法来添加其获取注解 BeforeClass,AfterClass,ClassRule对应的信息,并添加至其调用的 statement中。
接下来查看 BlockJUnit4ClassRunner 的 runChild的实现:
@Override
protected void runChild(final FrameworkMethod method, RunNotifier notifier) {
Description description = describeChild(method);
if (isIgnored(method)) {
notifier.fireTestIgnored(description);
} else {
runLeaf(methodBlock(method), description, notifier);
}
}
其中,若是添加了 @ignore的注解,则不会得到调用。看看 methodBlock方法都干了什么:
protected Statement methodBlock(FrameworkMethod method) { Object test; try { test = new ReflectiveCallable() { @Override protected Object runReflectiveCall() throws Throwable { return createTest(); } }.run(); } catch (Throwable e) { return new Fail(e); } Statement statement = methodInvoker(method, test); statement = possiblyExpectingExceptions(method, test, statement); statement = withPotentialTimeout(method, test, statement); statement = withBefores(method, test, statement); statement = withAfters(method, test, statement); statement = withRules(method, test, statement); return statement; } |
在这个 statement 的获取中,通过使用组合的方式,会这个 statement 添加 Before,After 及其它 Rule 的链式调用,最后生成一个 statement 来返回。
总结
可以看出 Junit 是一个简单而又强大的库,不然不会经久不衰。其简单的实现但又强大的功能已经基本满足我们绝大多数的需求。但在这里还有一个疑问就是不知道 Junit 是如何继承到 Android Studio 的 IDE 中,并是如何直接调用我们的测试方法或者测试类的?


