

7.2.6 测试用例实现代码及其讲解
接下来,补充完整针对前面"设计一个用例来证明"1+2=3"是正确的"问题的实现代码,源代码如下。
package yuy.test.lessons; import com.android.uiautomator.core.UiDevice; import com.android.uiautomator.core.UiObject; import com.android.uiautomator.core.UiObjectNotFoundException; import com.android.uiautomator.core.UiSelector; import com.android.uiautomator.testrunner.UiAutomatorTestCase; import android.os.RemoteException; public class TestCase1 extends UiAutomatorTestCase { public void testCalc() throws UiObjectNotFoundException, RemoteException { UiDevice device = getUiDevice(); device.pressHome(); device.wakeUp(); device.swipe(100, 100, 100, 500, 5); UiObject tv= new UiObject(new UiSelector().className("android.view.View").instance(2)); assertTrue("The view does not that contains the calculator application icon.", tv.exists()); System.out.println("The view has been found."); UiObject calcico= tv.getChild(new UiSelector().className("android.widget.TextView").instance(3)); assertTrue("The icon does not exist.", calcico.exists()); System.out.println("The icon has been found."); calcico.click(); sleep(1000); UiObject btn1 = new UiObject(new UiSelector().index(12)); assertTrue("The '1' button is not found.", btn1.exists()); btn1.click(); UiObject btnplus = new UiObject(new UiSelector().index(11)); assertTrue("The '+' button is not found.", btnplus.exists()); btnplus.click(); UiObject btn2 = new UiObject(new UiSelector().index(13)); assertTrue("The '2' button is not found.", btn2.exists()); btn2.click(); UiObject btnequal = new UiObject(new UiSelector().index(19)); assertTrue("The '=' button is not found.", btnequal.exists()); btnequal.click(); UiObject edtresult = new UiObject(new UiSelector().className("android.widget.EditText")); System.out.println("Output Result:\r\n"+edtresult.getText()); assertTrue("The results should be 3 !",edtresult.getText().contains("3")); } } |
下面,我们先针对用例设计的主体实现部分代码进行一下讲解。
UiDevice device = getUiDevice();
device.pressHome();
device.wakeUp();
device.swipe(100, 100, 100, 500, 5);
这部分代码用于唤醒作者使用的三星手机,代码"UiDevice device = getUiDevice();"用于获得手机设备,代码"device.pressHome();"用于按手机上的"Home"键,代码"device.wakeUp();"用于唤醒手机屏幕,因为如果几分钟(这和设置有关)不对手机进行操作,手机系统会进行锁屏、关闭屏幕操作,以节省用电量等。唤醒屏幕以后,还需要进行滑屏操作才能解锁,所以此处有一个滑屏操作,即"device.swipe(100, 100, 100, 500, 5);"。滑屏后我们可以通过"UI Automator Viewer"获得最新的手机界面信息,如图7-46所示。
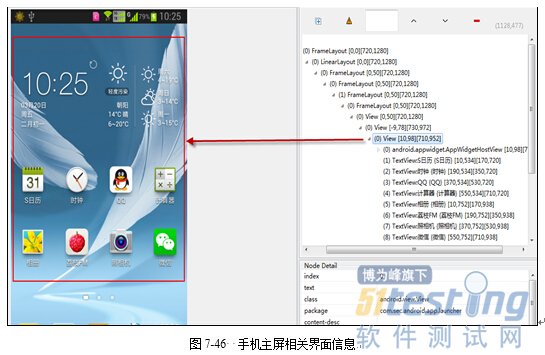
从图7-46中,我们可以看到"计算器"应用图标在容器"View[10,98][710,957"部分中,按照界面对应的结构,发现这个View是第3个View,第2个实例(因为索引号从0开始,所以第3个应该索引号为2),所以以下代码就是用于获得图7-46中"View[10,98][710,957"这个对象。
UiObject tv= new UiObject(new
UiSelector().className("android.view.View").instance(2));
为了确定是否成功获得了这个对象,所以我们加入了一个断言语句
assertTrue("The view does not that contains the calculator application icon.",
tv.exists());
这条语句的意思是,判断是否存在"tv"对象,如果没有发现这个对象,就输出"he view does not that contains the calculator application icon.",而存在的话,就不输出任何信息,断言的使用涉及到了Junit的相关内容,如果大家不太了解请参看"Junit使用基础介绍"部分内容。接下来,以一句文本内容输出"The view has been found.",表示查找到了"View"对象。
System.out.println("The view has been found.");
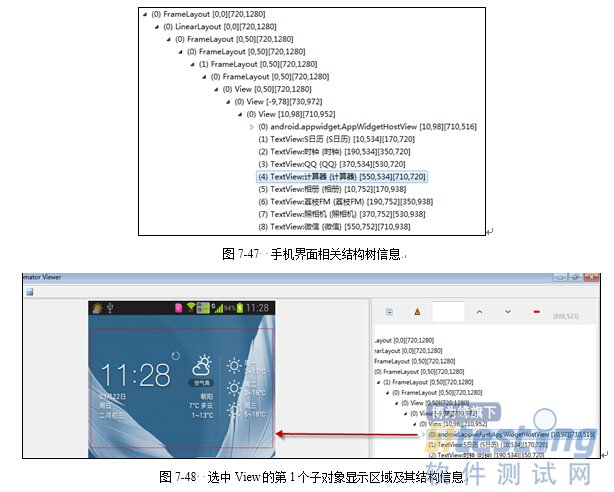
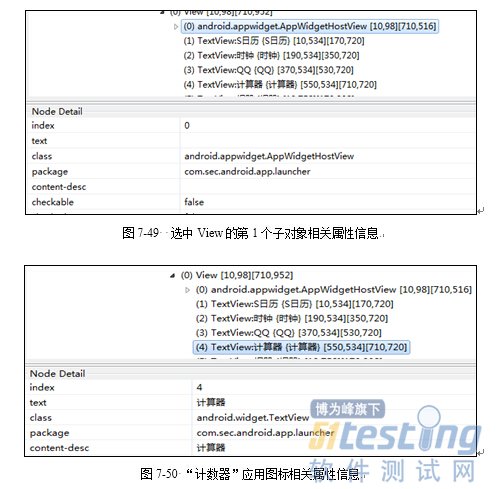
因为"计算器"图标位于这个"View"中,即"计算器"图标是"View"的子对象,从图7-47看到它是一个"TextView",且索引号为"4",我们来看一下这个选中的"View"前5个子对象分别是什么?第1个子对象为一个包含天气和时钟的区域,它是一个"android.appwidget.AppWidgetHostView"类,如图7-48和图7-49所示;第2个子对象为"日历"应用图标,它是一个"android.widget.TextView"类;第3个子对象为"时钟"应用图标,它是一个"android.widget.TextView"类;第4个子对象为"QQ"应用图标,它是一个"android.widget.TextView"类;第5个子对象为"计算器"应用图标,它是一个"android.widget.TextView"类,如图7-50所示。大家可以看到从第2个子对象开始其类都为"android.widget.TextView",这么算下来"计算器"应用图标应该为第4"android.widget.TextView"类对象,所以其实例的索引号应为3,因为索引号从0开始计数。下面的语句。
UiObject calcico= tv.getChild(new
UiSelector().className("android.widget.TextView").instance(3));
assertTrue("The icon does not exist.", calcico.exists());
System.out.println("The icon has been found.");
calcico.click();
第1条语句是获得"计算器"应用图标对象,前面讲过因为是第4个"android.widget. TextView"类,所以instance内的索引号为3。
UiObject calcico= tv.getChild(new
UiSelector().className("android.widget.TextView").instance(3));
第2条语句是一个断言,判断"计算器"应用图标对象是否存在,若不存在则输出"The icon does not exist."。
assertTrue("The icon does not exist.", calcico.exists());
第3条语句是打印一串文本信息"The icon has been found."。
System.out.println("The icon has been found.");
第4条语句是单击"计算器"应用图标。
calcico.click();
sleep(1000);
这条语句的意思是等待1000毫秒,即1秒,主要目的是要等待计算器应用程序启动起来。


