

第二步我们已经创建好测试工程,然后现在开始我们第三步。
注意:下面所提到的部分文件,在其他项目中,基本类似,但是有些可能名字以及所在位置等都不太一样,大家可以跟其开发沟通确认,应该会比较快有个了解。
第三步 测试工程环境搭建
一、拷贝webx.xml
拷贝marketing-web\src\main\webapp\WEB-INF\webx.xml到测试工程marketing-web-test\src\main\webapp\WEB-INF目录下,然后修改相应的配置:
a)开发配置文件中很多${XXX}这样形式的变量,是需要替换的,所以加载auto-config.properties后,就可以直接替换使用;

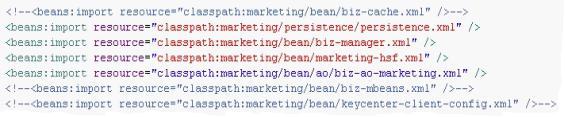
b)测试数据导入与验证的时候需要用到的数据源配置文件,像我们自定义的一些beans配置文件,都可以通过<beans:import />标签导入使用;
c)有些配置文件,测试的时候是可以忽略的,像下面被注释掉的biz-cache.xml,biz-mbeans.xml,keycenter-client-config.xml这些文件,还有红色部分配置文件是需要拷贝并修改的;
我们可以将开发代码marketing-config\src\main\resources\META-INF\autoconf里的auto-config.xml文件里的property配置,转换成key-value对,保存到测试工程marketing-web-test\src\test\resources里面的auto-config.properties文件。
三、新建datasource.xml
测试数据导入与验证的时候都需要用到的数据源配置文件,内容参考:
<?xml version=”1.0″ encoding=”UTF-8″?><beans xmlns=”http://www.springframework.org/schema/beans”xmlns:xsi=”http://www.w3.org/2001/XMLSchema-instance”xsi:schemaLocation=”http://www.springframework.org/schema/beanshttp://www.springframework.org/schema/beans/spring-beans-2.0.xsd”> <bean id=”bm“ class=”org.apache.commons.dbcp.BasicDataSource” destroy-method=”close”> <property name=”driverClassName” value=”com.mysql.jdbc.Driver” /> <property name=”url” value=”jdbc:mysql://127.0.0.1:3306/baoming?characterEncoding=UTF-8″ /> <property name=”username” value=”" /> <property name=”password” value=”" /> </bean> <bean id=”baomingTemplate” class=”org.springframework.jdbc.core.simple.SimpleJdbcTemplate”> <constructor-arg ref=”bm” /> </bean> </beans> |


